目录
YOLO-V3实时检测实现(opencv+python实现)——改进——>更加的易懂
YOLO-V3实时检测实现(opencv+python实现)
提示:下面在连接IP Camera的时候,需要电脑和手机的网都在同一个网段(同一个热点或者WIFI)。
1.第一款IP Camera(一)
(1).IP Camera下载

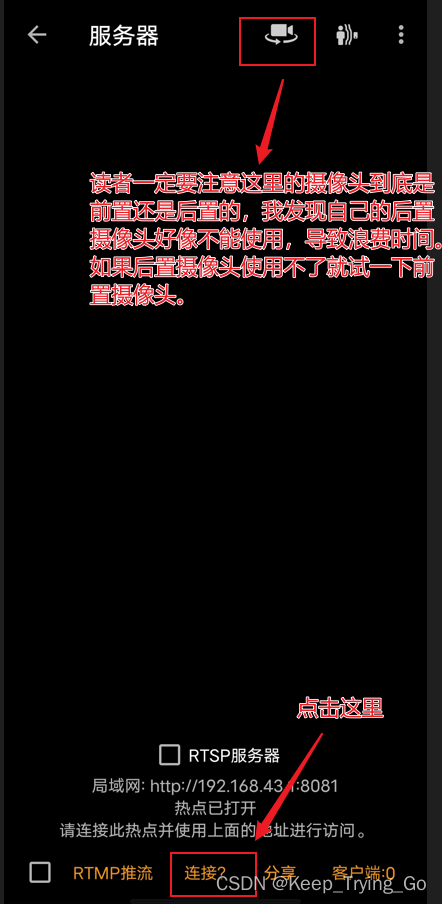
(2).IP Camera使用


(3).测试程序
提示:如果读者在以下程序中测试可以打开摄像头,则可以进行后序的步骤啦。
"""
@Author : Keep_Trying_Go
@Major  : Computer Science and Technology
@Hobby  : Computer Vision
@Time   : 2023/5/21 10:27
"""

import cv2  # 导入库
import threading

def run_video():
    cv2.namedWindow("camera", 1)  # 定义启动窗口名称
    video = "http://admin:[email protected]:8081/video"
    # video = "http://192.168.43.1:8080/video"
    # 此处根据IP摄像头生成的局域网地址
    capture = cv2.VideoCapture(video)
    while True:
        success, img = capture.read()  # 读取视频
        img = cv2.flip(img, 1)
        cv2.imshow("camera", img)
        key = cv2.waitKey(10)
        if key == 27:  # esc键退出
            break

    capture.release()
    cv2.destroyWindow("camera")

if __name__ == '__main__':
    thread = threading.Thread(target=run_video)
    thread.start()
(4).YOLOV3进行物体检测
提示:关于YOLOV3的权重文件和cfg配置文件下载:https://pjreddie.com/darknet/yolo/
"""
@Author : Keep_Trying_Go
@Major  : Computer Science and Technology
@Hobby  : Computer Vision
@Time   : 2023/5/19 16:33
"""

import os
import time
import cv2
import cvzone
import numpy as np

#读取YOLOV3-tiny-weight和.cfg文件
net = cv2.dnn.readNet(model='yolov3-tiny.weights',config='yolov3-tiny.cfg')
#设置置信度阈值和非极大值抑制的阈值
Confidence_thresh=0.2
Nms_thresh=0.35
#读取coco.names文件中的类别
with open('coco.names','r') as fp:
    classes=fp.read().splitlines()

def yolov_detect(frame):
    """
    :param frame:
    :return:
    """
    #获取网络模型
    model = cv2.dnn_DetectionModel(net)
    #设置网络的输入
    model.setInputParams(scale = 1 / 255, size=(416,416))
    #进行预测
    class_id,score,boxes = model.detect(
        frame,confThreshold=Confidence_thresh,nmsThreshold=Nms_thresh
    )
    return class_id,score,boxes

#进行实时检测
def detect_time():
    video = "http://admin:[email protected]:8081/video"
    cap = cv2.VideoCapture(video)

    while cap.isOpened():
        ret,frame = cap.read()
        if ret is False:
            break
        frame = cv2.flip(src = frame,flipCode=2)
        #输出预测的结果
        start_time = time.time()
        class_ids,scores,boxes = yolov_detect(frame)
        #绘制矩形框
        for (class_id,box) in enumerate(boxes):
            (x,y,w,h) = box
            class_name = classes[class_id]
            confidence = scores[class_id]
            confidence = str(round(confidence,2))
            cv2.rectangle(img = frame,pt1=(x,y),pt2=(x + w, y + h),
                          color = (0,255,0),thickness = 2
                          )
            text = class_name + ' '+ confidence
            cvzone.putTextRect(
                img=frame, text=text, pos=(x, y - 10), font=
                cv2.FONT_HERSHEY_SIMPLEX,scale=1.0,colorR=(255,0,255),
                thickness=2
            )
            # cv2.putText(img = frame,text = text,org=(x,y - 10), fontFace=
            #             cv2.FONT_HERSHEY_SIMPLEX,fontScale=1.0,color=(0,255,0),
            #             thickness=2)
        # 计算结束时间
        end_time = time.time()
        FPS = round(1 / (end_time - start_time), 0)
        cv2.putText(img=frame, text='FPS: ' + str(FPS), org=(10, 50),
                    fontFace=cv2.FONT_HERSHEY_SIMPLEX,
                    fontScale=1.0, color=(0, 255, 0), thickness=2)
        cv2.imshow('detect',frame)
        key = cv2.waitKey(1)
        if key == 27:
            break
    cap.release()
    cv2.destroyAllWindows()

#单张图片的检测
def signal_detect(image_path='images/face1.jpg'):
    frame=cv2.imread(image_path)
    frame = cv2.resize(src=frame, dsize=(416, 416))
    # 进行预测
    class_ids, scores, boxes = yolov_detect(frame)
    # 绘制矩形框
    for (class_id, box) in enumerate(boxes):
        (x, y, w, h) = box
        class_name = classes[class_ids[class_id]]
        confidence = scores[class_ids[class_id]]
        confidence = str(round(confidence, 2))
        cv2.rectangle(img=frame, pt1=(x, y), pt2=(x + w, y + h),
                      color=(0, 255, 0), thickness=2)
        text = class_name + ' ' + confidence
        cvzone.putTextRect(
            img=frame, text=text, pos=(x, y - 10), font=
            cv2.FONT_HERSHEY_SIMPLEX, scale=1.0, colorR=(255, 0, 255),
            thickness=2
        )
        # cv2.putText(img=frame, text=text,
        #             org=(x, y - 10), fontFace=cv2.FONT_HERSHEY_SIMPLEX,
        #             fontScale=1.0, color=(0, 255, 0), thickness=2)

    cv2.imshow('detect', frame)
    cv2.waitKey(0)
    cv2.destroyAllWindows()

if __name__ == '__main__':
    detect_time()
2.第二款IP Camera(二)
(1)下载地址
提示:下载专业版,不然好像运行不了(我这个上面是这样的)http://m.itmop.com/downinfo/431802.html(安卓手机上安装)
(2)使用方式

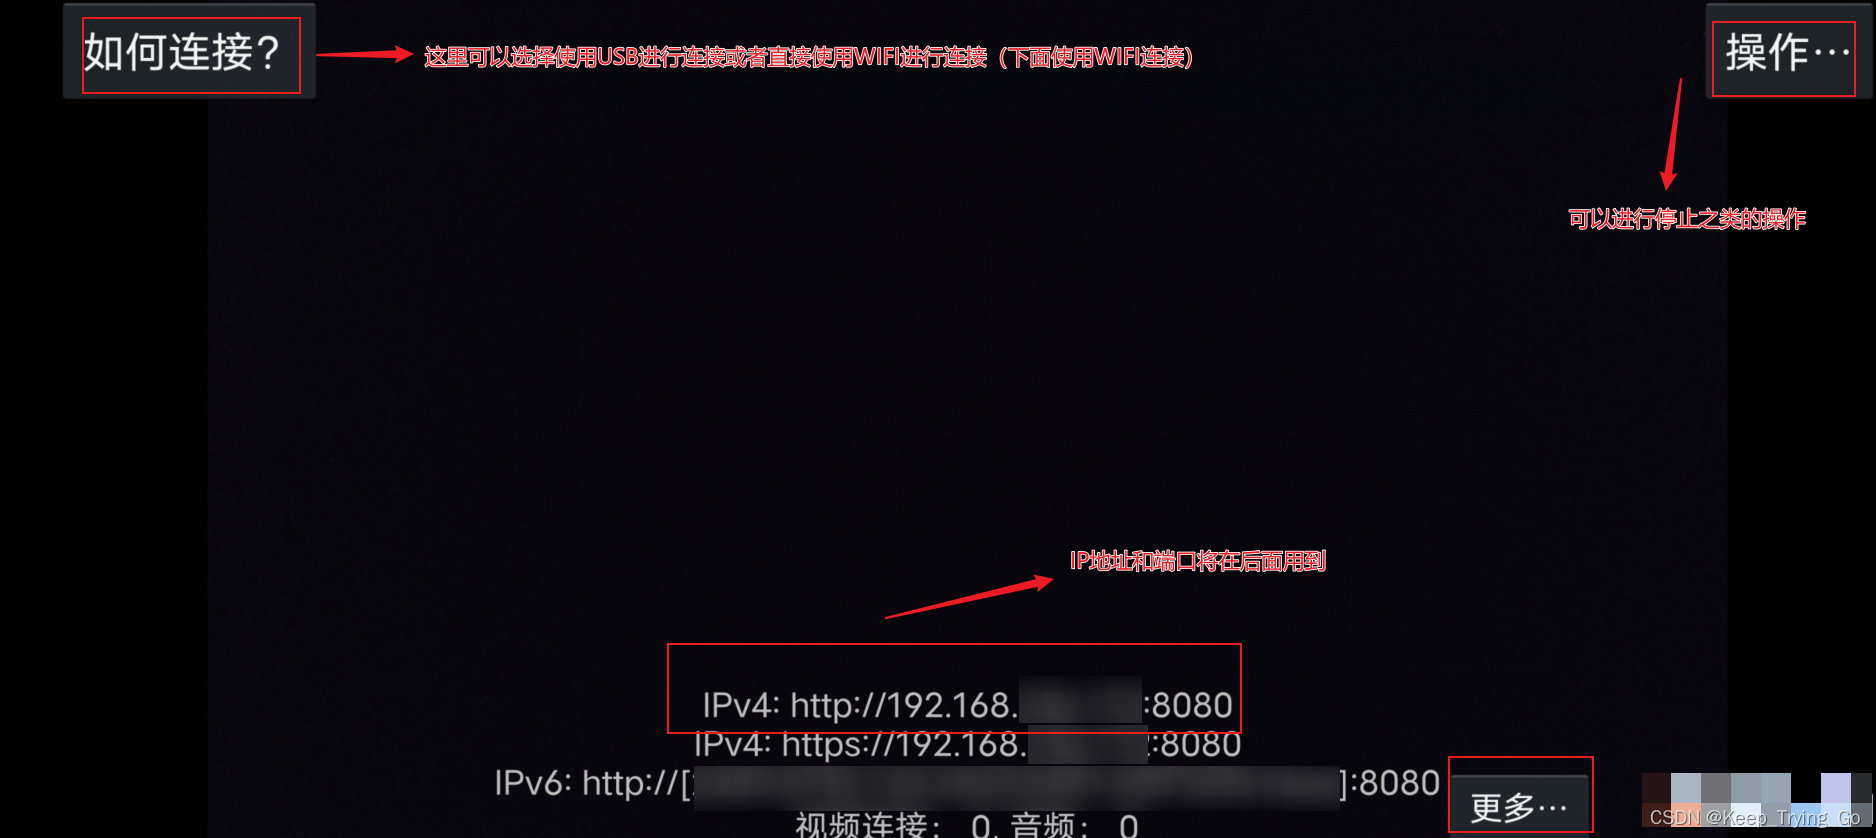
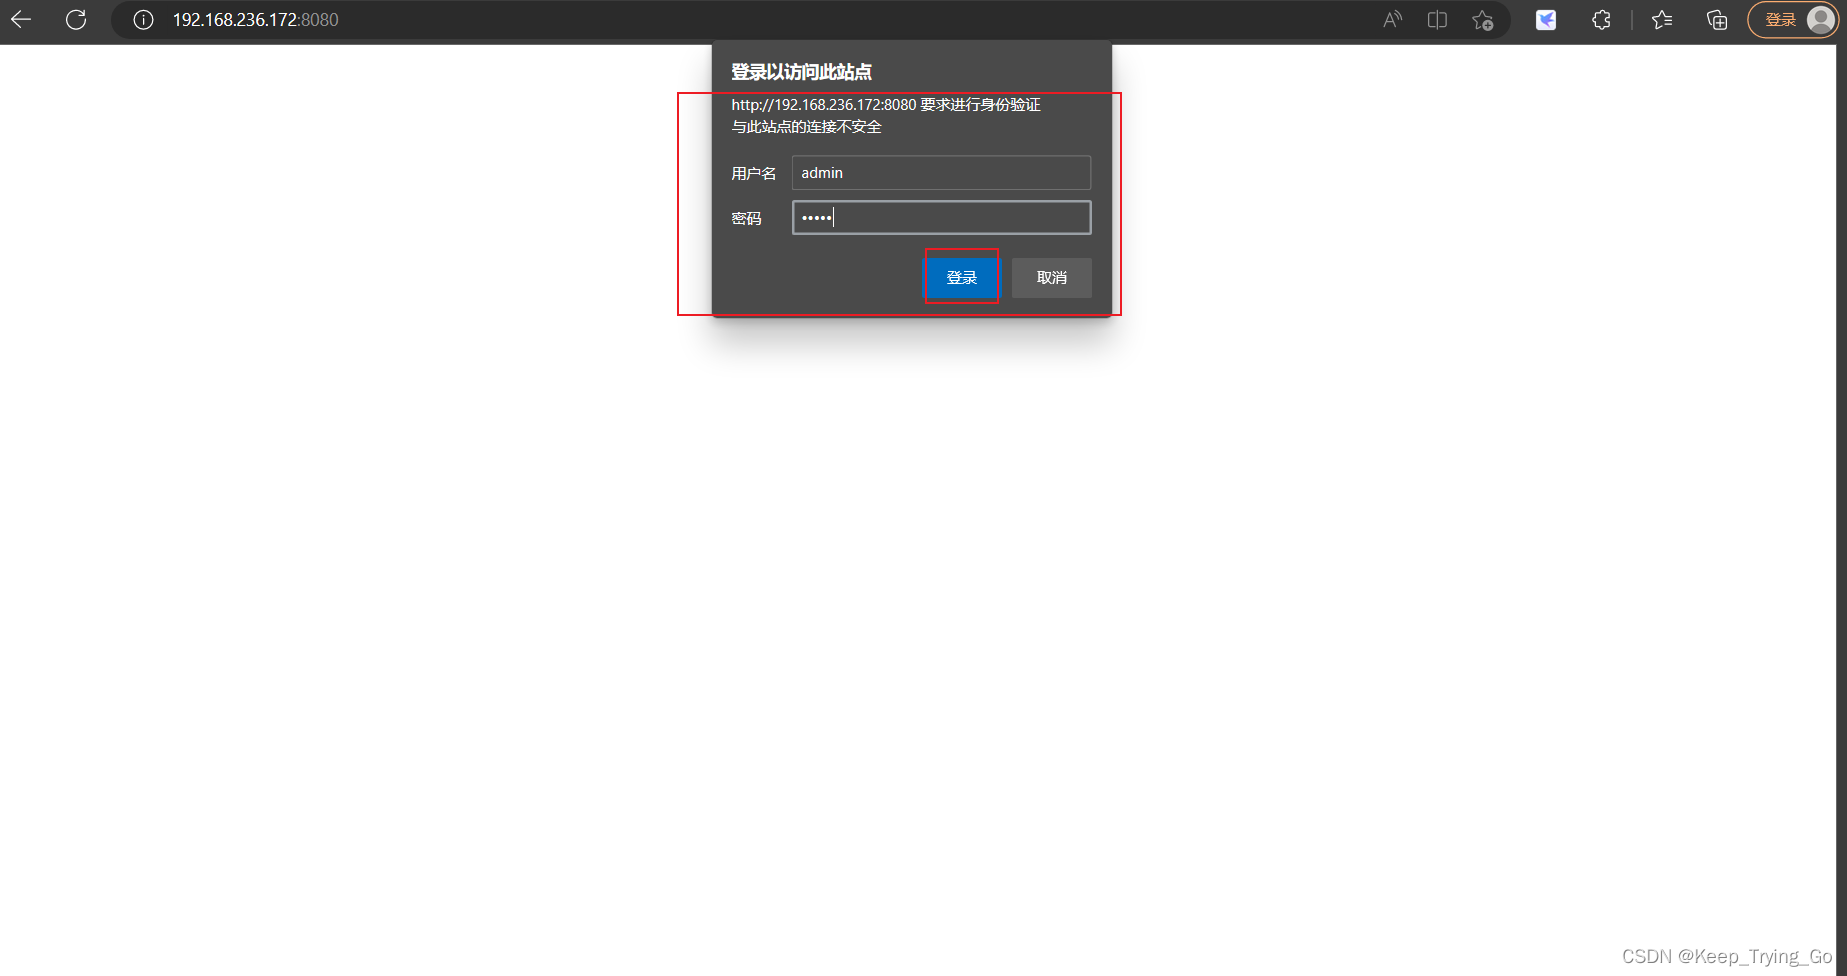
提示:可以使用上面的ip地址和端口即可在浏览器中进行访问:http://192.168.*.*:8080/
访问的界面可以看到如下:


提示:关于里面更多的操作,读者可以自己去摸索。
(3)程序进行测试

"""
@Author : Keep_Trying_Go
@Major  : Computer Science and Technology
@Hobby  : Computer Vision
@Time   : 2023/5/19 16:33
"""

import os
import time
import cv2
import cvzone
import numpy as np

#读取YOLOV3-tiny-weight和.cfg文件
net = cv2.dnn.readNet(model='yolov3-tiny.weights',config='yolov3-tiny.cfg')
#设置置信度阈值和非极大值抑制的阈值
Confidence_thresh=0.2
Nms_thresh=0.35
#读取coco.names文件中的类别
with open('coco.names','r') as fp:
    classes=fp.read().splitlines()

def yolov_detect(frame):
    """
    :param frame:
    :return:
    """
    #获取网络模型
    model = cv2.dnn_DetectionModel(net)
    #设置网络的输入
    model.setInputParams(scale = 1 / 255, size=(416,416))
    #进行预测
    class_id,score,boxes = model.detect(
        frame,confThreshold=Confidence_thresh,nmsThreshold=Nms_thresh
    )
    return class_id,score,boxes

#进行实时检测
def detect_time():
    # video = "http://admin:[email protected]:8081/video"
    video = "http://admin:[email protected]:8080/video"
    cap = cv2.VideoCapture(video)

    while cap.isOpened():
        ret,frame = cap.read()
        if ret is False:
            break
        frame = cv2.flip(src = frame,flipCode=2)
        #输出预测的结果
        start_time = time.time()
        class_ids,scores,boxes = yolov_detect(frame)
        #绘制矩形框
        for (class_id,box) in enumerate(boxes):
            (x,y,w,h) = box
            class_name = classes[class_id]
            confidence = scores[class_id]
            confidence = str(round(confidence,2))
            cv2.rectangle(img = frame,pt1=(x,y),pt2=(x + w, y + h),
                          color = (0,255,0),thickness = 2
                          )
            text = class_name + ' '+ confidence
            cvzone.putTextRect(
                img=frame, text=text, pos=(x, y - 10), font=
                cv2.FONT_HERSHEY_SIMPLEX,scale=1.0,colorR=(255,0,255),
                thickness=2
            )
            # cv2.putText(img = frame,text = text,org=(x,y - 10), fontFace=
            #             cv2.FONT_HERSHEY_SIMPLEX,fontScale=1.0,color=(0,255,0),
            #             thickness=2)
        # 计算结束时间
        end_time = time.time()
        FPS = round(1 / (end_time - start_time), 0)
        cv2.putText(img=frame, text='FPS: ' + str(FPS), org=(10, 50),
                    fontFace=cv2.FONT_HERSHEY_SIMPLEX,
                    fontScale=1.0, color=(0, 255, 0), thickness=2)
        frame = cv2.resize(src = frame,dsize=(820,520))
        cv2.imshow('detect',frame)
        key = cv2.waitKey(1)
        if key == 27:
            break
    cap.release()
    cv2.destroyAllWindows()

#单张图片的检测
def signal_detect(image_path='images/face1.jpg'):
    frame=cv2.imread(image_path)
    frame = cv2.resize(src=frame, dsize=(416, 416))
    # 进行预测
    class_ids, scores, boxes = yolov_detect(frame)
    # 绘制矩形框
    for (class_id, box) in enumerate(boxes):
        (x, y, w, h) = box
        class_name = classes[class_ids[class_id]]
        confidence = scores[class_ids[class_id]]
        confidence = str(round(confidence, 2))
        cv2.rectangle(img=frame, pt1=(x, y), pt2=(x + w, y + h),
                      color=(0, 255, 0), thickness=2)
        text = class_name + ' ' + confidence
        cvzone.putTextRect(
            img=frame, text=text, pos=(x, y - 10), font=
            cv2.FONT_HERSHEY_SIMPLEX, scale=1.0, colorR=(255, 0, 255),
            thickness=2
        )
        # cv2.putText(img=frame, text=text,
        #             org=(x, y - 10), fontFace=cv2.FONT_HERSHEY_SIMPLEX,
        #             fontScale=1.0, color=(0, 255, 0), thickness=2)

    cv2.imshow('detect', frame)
    cv2.waitKey(0)
    cv2.destroyAllWindows()

if __name__ == '__main__':
    detect_time()