一,在子线程中更新UI
1,新建项目,修改布局代码
<RelativeLayout xmlns:android="http://schemas.android.com/apk/res/android"
    android:layout_width="match_parent"
    android:layout_height="match_parent">
   <Button
       android:id="@+id/change_text"
       android:layout_width="match_parent"
       android:layout_height="wrap_content"
       android:text="改变文本"/>
    <TextView
        android:id="@+id/text"
        android:layout_width="wrap_content"
        android:layout_height="wrap_content"
        android:layout_centerInParent="true"
        android:text="hello world"
        android:textSize="20sp"/>
</RelativeLayout>
2,修改活动中的代码
public class MainActivity extends AppCompatActivity  implements View.OnClickListener{


    private TextView text;
    @Override
    protected void onCreate(Bundle savedInstanceState) {


        super.onCreate(savedInstanceState);
        setContentView(R.layout.activity_main);
        text=(TextView) findViewById(R.id.text);
        Button changeText=(Button) findViewById(R.id.change_text);
        changeText.setOnClickListener(this);
    }

    @Override
    public void onClick(View view) {


        switch(view.getId()){


            case R.id.change_text:
                //创建一个子进程
                new Thread(new Runnable() {


                    @Override
                    public void run() {


                        //run中执行的就是子进程中的代码
                        text.setText("hellosdfsdfs");
                    }
                }).start();
                break;
            default:
                break;
        }
    }
}
这样在子线程中直接修改ui,是不被允许的。
那有的时候,我们又必须在子线程中执行操作,然后再一依据结果来更新ui呢?
3,安卓异步消息处理
public class MainActivity extends AppCompatActivity  implements View.OnClickListener{


    public static final int UPDATE_TEXT=1;
    private TextView text;
    private  Handler handler=new Handler(){


        @Override
        public void handleMessage(@NonNull Message msg) {


            //接收到message并处理
            switch(msg.what){


                case UPDATE_TEXT:
                    //这里可以进行ui的操作
                    text.setText("NICE TO MEET YOU");
                    break;
                default:
                    break;
            }
        }
    };

    @Override
    protected void onCreate(Bundle savedInstanceState) {


        super.onCreate(savedInstanceState);
        setContentView(R.layout.activity_main);
        text=(TextView) findViewById(R.id.text);
        Button changeText=(Button) findViewById(R.id.change_text);
        changeText.setOnClickListener(this);
    }

    @Override
    public void onClick(View view) {


        switch(view.getId()){


            case R.id.change_text:
                //创建一个子进程
                new Thread(new Runnable() {


                    @Override
                    public void run() {


                        Message message=new Message();
                        message.what=UPDATE_TEXT;
                        //将message对象发送出去
                        handler.sendMessage(message);
                    }
                }).start();
                break;
            default:
                break;
        }
    }
}
使用message就可以更新成功了。这就是安卓异步消息处理的基本方法。
二,解析异步消息处理机制
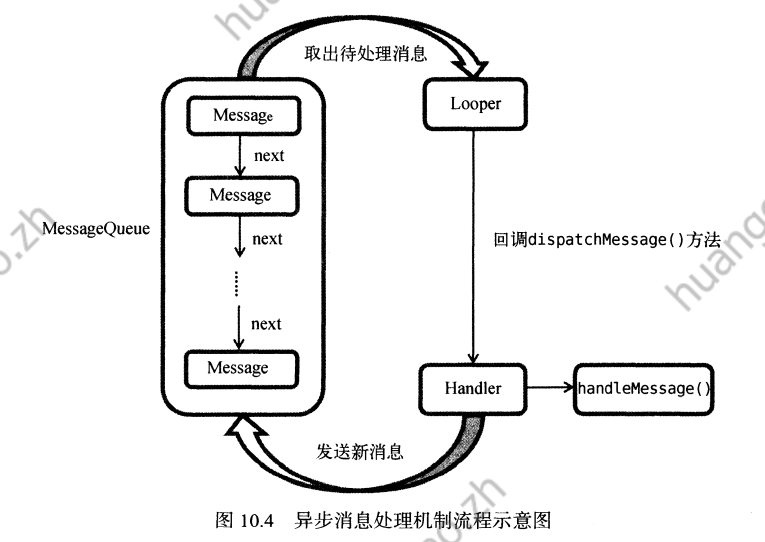
Android 中的异步消息处理主要由4个部分组成:Message Handler、MessageQueue 和 Looper。其中 Message 和 Handler 在上一小节中我们已经接触过了,而 MessageQueue 和 Looper 对于你来说还是全新的概念,下面我就对这 4个部分进行一下简要的介绍。
1,Message
Message是在线程之间传递的消息,它可以在内部携带少量的信息,用于在不同线程之间交换数据。上一小节中我们使用到了 Message的what 字段,除此之外还可以使用arg1和arg2字段来携带一些整型数据,使用 obi 字段携带一个 object 对象。
2. Handler
Handler 顾名思义也就是处理者的意思,它主要是用于发送和处理消息的。发送消息一般是使用 Handler 的 sendMessage()方法,而发出的消息经过一系列地辗转处理后,最终会传递到Handler的 handleMessage()方法中。
3.MessageQueue
MessageQueue 是消息队列的意思,它主要用于存放所有通过 Handler 发送的消息。这部分消息会一直存在于消息队列中,等待被处理。每个线程中只会有一个MessageQueue 对象。
4. Looper
Looper 是每个线程中的 MessageQueue 的管家,调用 Looper 的 Loop()方法后,就会进入到一个无限循环当中,然后每当发现MessageQueue 中存在一条消息,就会将它取出,并传递到Handler的 handleMessage()方法中。每个线程中也只会有一个 Looper 对象。
首先需要在主线程当中创建一个 Handler 对象,并重写handleMessage()方法。然后当子线程中需要进行UI操作时,就创建一个Message 对象,并通过 Handler将这条消息发送出去。之后这条消息会被添加到 MessageQueue 的队列中等待被处理而 Looper 则会一直尝试从 MessageQueue 中取出待处理消息,最后分发回 Handler 的handleMessage()方法中。由于 Handler 是在主线程中创建的,所以此时 handleMessage()方法中的代码也会在主线程中运行,于是我们在这里就可以安心地进行 UI操作了。
三,使用AsynTask
首先来看一下AsyncTask 的基本用法,由于AsyncTask 是一个抽象类,所以如果我们想使用它,就必须要创建一个子类去继承它。在继承时我们可以为 AsyncTask类指定3个泛型参数,这3个参数的用途如下。
Params:在执行AsyncTask时需要传入的参数,可用于在后台任务中使用。
progress。后台任务执行时,如果需要在界面上示当前的的进度。则使用这里指定的泛型1作为进度单位。
Resut:当任务执行完毕后,如果需要对结果进行返回,则使用这里指定的泛型作为哦返回值类型。
因此,一个最简单的自定义的AsynTask可以写成如下样子:
class DownLoadTask extends AsynTask<void,Integer,Boolean>{


	...
}
目前我们自定义的DownLoadTask还是一个空任务,并不能进行任何的实际操作,我们还需要重写AsynTask中的几个方法才能完成对任务的定制。常用过的有以下4个:

1.onPreExecute()
这个方法会在后台任务开始执行之前调用,用于进行一些界面上的初始化操作,比如显示一个进度条对话框等。
2.doInBackground(Params...)
这个方法中的所有代码都会在子线程中运行,我们应该在这里去处理所有的耗时任务。任务旦完成就可以通过return 语来将任务的执行结果返回,如果AsyncTask 的第三个泛型参数指定的是 Void,就可以不返回任务执行结果。注意,在这个方法中是不可以进行 UI操作的,如果需要更新 UI 元素,比如说反馈当前任务的执行进度,可以调用 publishProgress(Progress...)方法来完成。
3.onProgressUpdate(Progress...)
当在后台任务中调用了 publishProgress(Progress...)方法后,onProgressUpdate(Progress...)方法就会很快被调用,该方法中携带的参数就是在后台任务中传递过来的。在这个方法中可以对 UI进行操作,利用参数中的数值就可以对界面元素进行相应的更新。
4.onPostExecute(Result)
当后台任务执行完毕并通过 return 语句进行返回时,这个方法就很快会被调用。返回的数据会作为参数传递到此方法中,可以利用返回的数据来进行一些 UI操作,比如说提醒任务执行的结果,以及关闭掉进度条对话框等。
简单来说,使用AsyncTask 的诀窍就是,在 doInBackground()方法中执行具体的耗时任务在onProgressUpdate()方法中进行UI操作,在onPostExecute()方法中执行一些任务的收尾工作。
如果想要启动这个任务,只需编写以下代码即可:
new DownloadTask().execute();
四,服务的基本用法
1,定义一个服务
新建一个ServiceTest项目,然后右击com.example.servicetest-new-Service-Service,点击确定,创建服务:
public class MyService extends Service {


    public MyService() {


    }

    @Override
    public IBinder onBind(Intent intent) {


        //唯一的抽象方法,必须在子类中进行实现
        // TODO: Return the communication channel to the service.
        throw new UnsupportedOperationException("Not yet implemented");
    }

    @Override
    public void onCreate() {


        //服务创建时调用
        super.onCreate();
    }

    @Override
    public int onStartCommand(Intent intent, int flags, int startId) {


        //服务启动的时候调用
        return super.onStartCommand(intent, flags, startId);
    }

    @Override
    public void onDestroy() {


        //服务销毁的时候调用
        super.onDestroy();
    }
}
然后,AS会在menifest中自动帮我们注册:
    <application
        android:allowBackup="true"
        android:icon="@mipmap/ic_launcher"
        android:label="@string/app_name"
        android:roundIcon="@mipmap/ic_launcher_round"
        android:supportsRtl="true"
        android:theme="@style/Theme.AndroidThreadTest">
        <service
            android:name=".MyService"
            android:enabled="true"
            android:exported="true"></service>
    </application>
这样一个服务就创建好了。
2,启动和停止服务
启动和停止服务主要时利用Intent来实现。
修改布局:
<LinearLayout xmlns:android="http://schemas.android.com/apk/res/android"
    android:orientation="vertical"
    android:layout_width="match_parent"
    android:layout_height="match_parent">
   <Button
       android:id="@+id/start_serivce"
       android:layout_width="match_parent"
       android:layout_height="wrap_content"
       android:text="启动服务"/>
    <Button
        android:id="@+id/stop_service"
        android:layout_width="match_parent"
        android:layout_height="wrap_content"
        android:text="停止服务"/>
</LinearLayout>
修改对应的活动代码,利用Intent来启停服务:
public class MainActivity extends AppCompatActivity  implements View.OnClickListener{


    @Override
    protected void onCreate(Bundle savedInstanceState) {


        super.onCreate(savedInstanceState);
        setContentView(R.layout.activity_main);
        Button startService=(Button) findViewById(R.id.start_serivce);
        Button stopService=(Button) findViewById(R.id.stop_service);
        startService.setOnClickListener(this);
        stopService.setOnClickListener(this);
    }

    @Override
    public void onClick(View view) {


       switch(view.getId()){


           case R.id.start_serivce:
               Intent startIntent=new Intent(this,MyService.class);
               startService(startIntent);
               break;
           case R.id.stop_service:
                Intent stopIntent=new Intent(this,MyService.class);
                stopService(stopIntent);
               break;
           default:
               break;
       }
    }
}
然后修改服务代码:
public class MyService extends Service {


    public MyService() {


    }

    @Override
    public IBinder onBind(Intent intent) {


        //唯一的抽象方法,必须在子类中进行实现
        // TODO: Return the communication channel to the service.
        throw new UnsupportedOperationException("Not yet implemented");
    }

    @Override
    public void onCreate() {


        //服务第一次创建时调用
        super.onCreate();
        Log.d("TAG", "onCreate: ");
    }

    @Override
    public int onStartCommand(Intent intent, int flags, int startId) {


        //服务每次启动的时候调用
        Log.d("TAG", "onStartCommand: ");
        return super.onStartCommand(intent, flags, startId);
    }

    @Override
    public void onDestroy() {


        //服务销毁的时候调用
        super.onDestroy();
        Log.d("TAG", "onDestroy: ");
    }
}
3,活动和服务进行通讯
上文中,我们虽然在活动中对服务进行了启停处理,但是我们并没有真正地在活动中和服务进行交互。
比如说,目前我们希望在MyService里提供一个下载功能,然后在活动中可以决定何时开始下载,以及随时查看下载进度。实现这个地思路是创建一个专门的Binder对象来对下载功能进行管理,修改MyService中的代码,如下:
public class MyService extends Service {


    private DownloadBinder mBinder=new DownloadBinder();
    class DownloadBinder extends Binder {


        public void startDownload(){


            Log.d("TAG", "startDownload: ");
        }
        public int getProgress(){


            Log.d("TAG", "getProgress: ");
            return 0;
        }
    }
    public MyService() {


    }

    @Override
    public IBinder onBind(Intent intent) {


        //唯一的抽象方法,必须在子类中进行实现
        return mBinder;
    }
 }
这样服务中的代码就写完了,接下来修改布局:
    <Button
        android:id="@+id/bind_service"
        android:layout_width="match_parent"
        android:layout_height="wrap_content"
        android:text="绑定服务"/>
    <Button
        android:id="@+id/unbind_service"
        android:layout_width="match_parent"
        android:layout_height="wrap_content"
        android:text="取消绑定服务"/>
接下来要在活动中绑定服务,当一个活动和服务绑定之后,就可以调用该服务里面的Binder提供的方法了。修改MainActiviyty中的代码:
public class MainActivity extends AppCompatActivity  implements View.OnClickListener{


    private MyService.DownloadBinder downloadBinder;
    private ServiceConnection connection =new ServiceConnection() {


        @Override
        public void onServiceConnected(ComponentName name, IBinder service) {


            downloadBinder=(MyService.DownloadBinder) service;
            downloadBinder.startDownload();
            downloadBinder.getProgress();
        }

        @Override
        public void onServiceDisconnected(ComponentName componentName) {

    }
    };
    @Override
    protected void onCreate(Bundle savedInstanceState) {


        super.onCreate(savedInstanceState);
        setContentView(R.layout.activity_main);
        Button startService=(Button) findViewById(R.id.start_serivce);
        Button stopService=(Button) findViewById(R.id.stop_service);
        startService.setOnClickListener(this);
        stopService.setOnClickListener(this);
        //新增通信服务
        Button bindService=(Button) findViewById(R.id.bind_service);
        Button unbindService=(Button) findViewById(R.id.unbind_service);
        bindService.setOnClickListener(this);
        unbindService.setOnClickListener(this);
    }

    @Override
    public void onClick(View view) {


       switch(view.getId()){


           case R.id.start_serivce:
               Intent startIntent=new Intent(this,MyService.class);
               startService(startIntent);
               break;
           case R.id.stop_service:
                Intent stopIntent=new Intent(this,MyService.class);
                stopService(stopIntent);
               break;
           case R.id.bind_service:
               Intent bindIntent=new Intent(this,MyService.class);
               bindService(bindIntent,connection,BIND_AUTO_CREATE);//绑定服务
               break;
           case R.id.unbind_service:
               unbindService(connection);//解绑服务
               break;
           default:
               break;
       }
    }
}