一、安装
1、环境配置
首先需要创建一个虚拟环境,然后安装 PyTorch 和 SAM。创建虚拟环境:
conda create -n torchLabel python=3.9 -y #名字随便取,我的是torchLabel
conda activate torchLabel
conda install git #windows环境
sudo apt-get install git #Linux环境git clone https://github.com/open-mmlab/playground #克隆 OpenMMLab PlayGround2、安装 PyTorch
#windows + cuda11.7
pip3 install torch torchvision torchaudio --index-url https://download.pytorch.org/whl/cu117

#Linux + cuda11.7
pip3 install torch torchvision torchaudio

#windows或Linux  + cuda11.8
pip3 install torch torchvision torchaudio --index-url https://download.pytorch.org/whl/cu118

#windows + CPU
pip3 install torch torchvision torchaudio

#Linux + CPU
pip3 install torch torchvision torchaudio --index-url https://download.pytorch.org/whl/cpu
3、安装 SAM 并下载预训练模型
windows系统没有wget需要在GNU Wget 1.21.4 for Windows下载wget.exe文件放到C:\Windows\System32下面
cd path/to/playground/label_anything
pip install opencv-python pycocotools matplotlib onnxruntime onnx -i https://pypi.tuna.tsinghua.edu.cn/simple
pip install git+https://github.com/facebookresearch/segment-anything.git
wget https://dl.fbaipublicfiles.com/segment_anything/sam_vit_b_01ec64.pth

# 如果想要分割的效果好请使用 sam_vit_h_4b8939.pth 权重
# wget https://dl.fbaipublicfiles.com/segment_anything/sam_vit_l_0b3195.pth
# wget https://dl.fbaipublicfiles.com/segment_anything/sam_vit_h_4b8939.pth
注意:编译pycocotools是可能出错,可以先安装visual studio下载 Visual Studio Tools - 免费安装 Windows、Mac、Linux,然后编译,编译完了就可以卸载
4、安装 Label-Studio 和 label-studio-ml-backend
# sudo apt install libpq-dev python3-dev # Linux如果使用 Label Studio 1.7.2 版本需要安装 `libpq-dev` 和 `python3-dev` 依赖。
# pip3 install opencv-python -i https://pypi.tuna.tsinghua.edu.cn/simple

pip install label-studio==1.7.3 -i https://pypi.tuna.tsinghua.edu.cn/simple
pip install label-studio-ml==1.0.9 -i https://pypi.tuna.tsinghua.edu.cn/simple
二、启动服务
1、启动 SAM 后端推理服务
cd path/to/playground/label_anything

label-studio-ml start sam --port 8003 --with sam_config=vit_b sam_checkpoint_file=./sam_vit_b_01ec64.pth out_mask=True out_bbox=True device=cuda:0
# device=cuda:0 为使用 GPU 推理,如果使用 cpu 推理,将 cuda:0 替换为 cpu
# out_poly=True 返回外接多边形的标注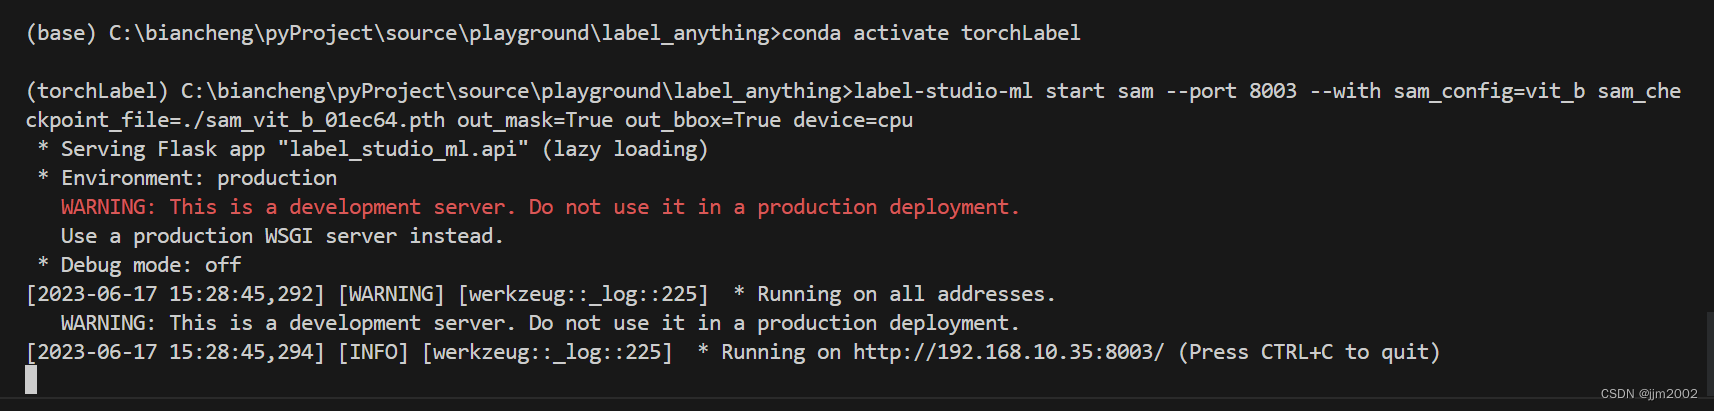
此时,SAM 后端推理服务已经启动,后续在 Label-Studio Web 系统中配置 http://localhost:8003 后端推理服务即可。以上的终端窗口需要保持打开状态
2、启动 Label-Studio 网页服务
⚠(如不使用vit-h的SAM后端请跳过此步)使用的推理后端是SAM的 vit-h, 由于模型加载时间长,导致连接后端超时,需要设置以下环境变量。
具体可根据下载的SAM的权值名称判断,比如sam_vit_h_4b8939.pth 为 vit-h,sam_vit_b_01ec64.pth为 vit-b。
再开一个终端
# Linux需要使用以下指令
export ML_TIMEOUT_SETUP=40
# Windows要使用以下指令
set ML_TIMEOUT_SETUP=40
3、启动 Label-Studio 网页服务
label-studio start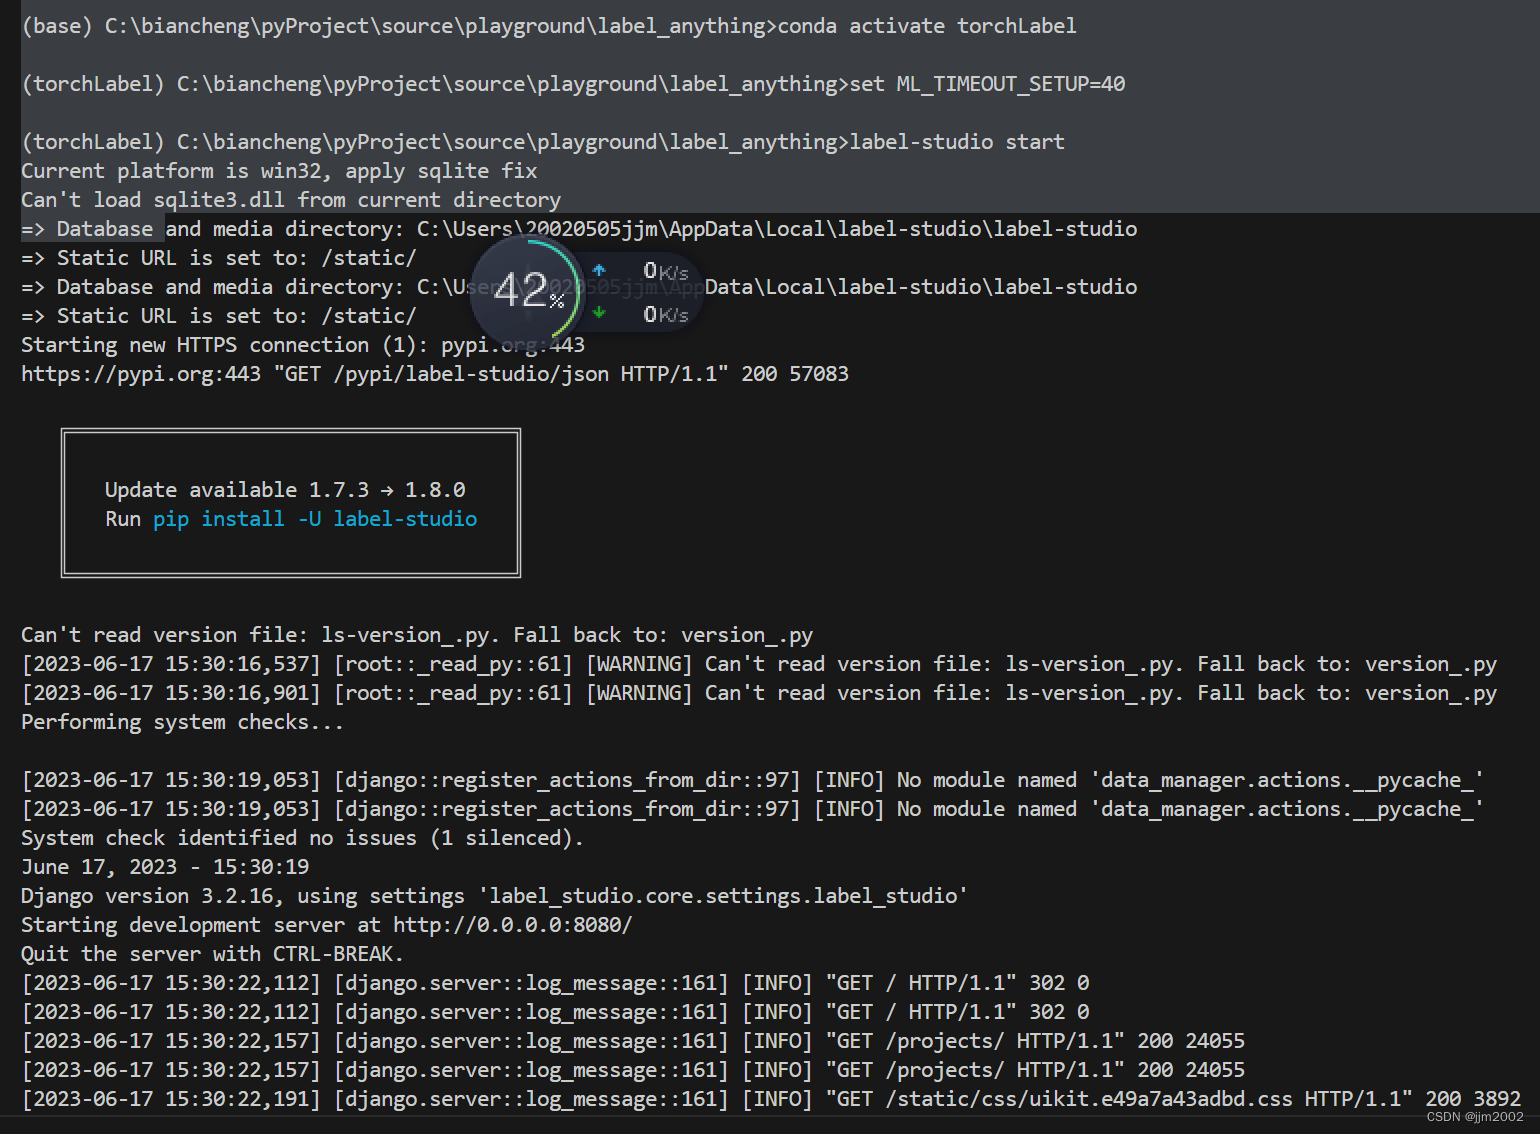

我们注册一个用户,然后创建一个 OpenMMLabPlayGround 项目。

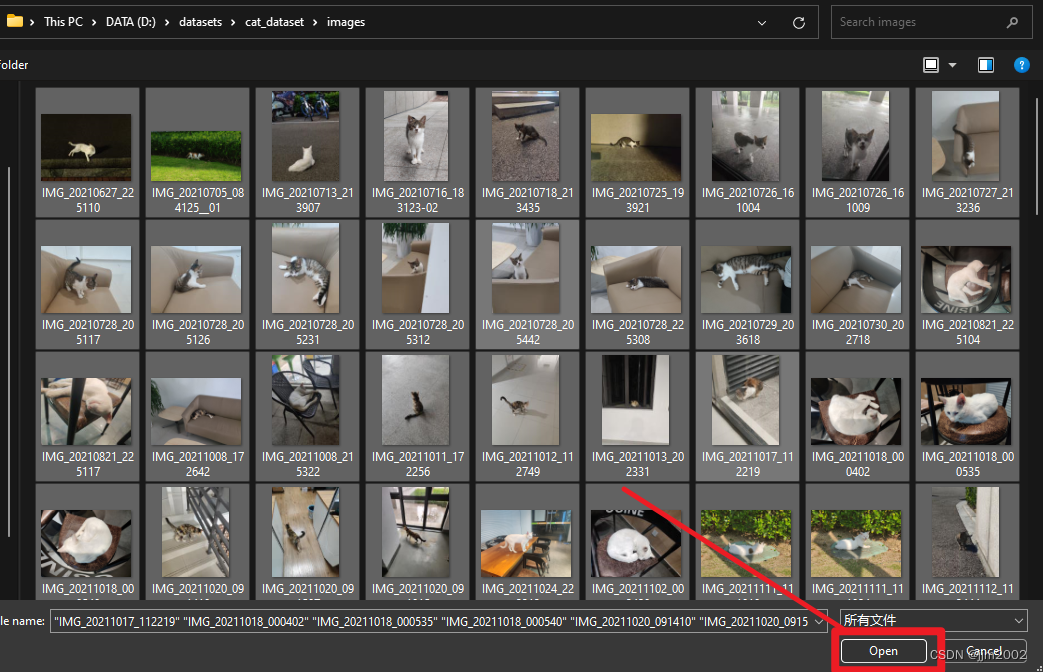
我们通过下面的方式下载好示例的喵喵图片,点击 Data Import 导入需要标注的猫图片,点击 Save 创建 Project。
cd path/to/playground/label_anything
mkdir data && cd data

wget https://download.openmmlab.com/mmyolo/data/cat_dataset.zip && unzip cat_dataset.zip 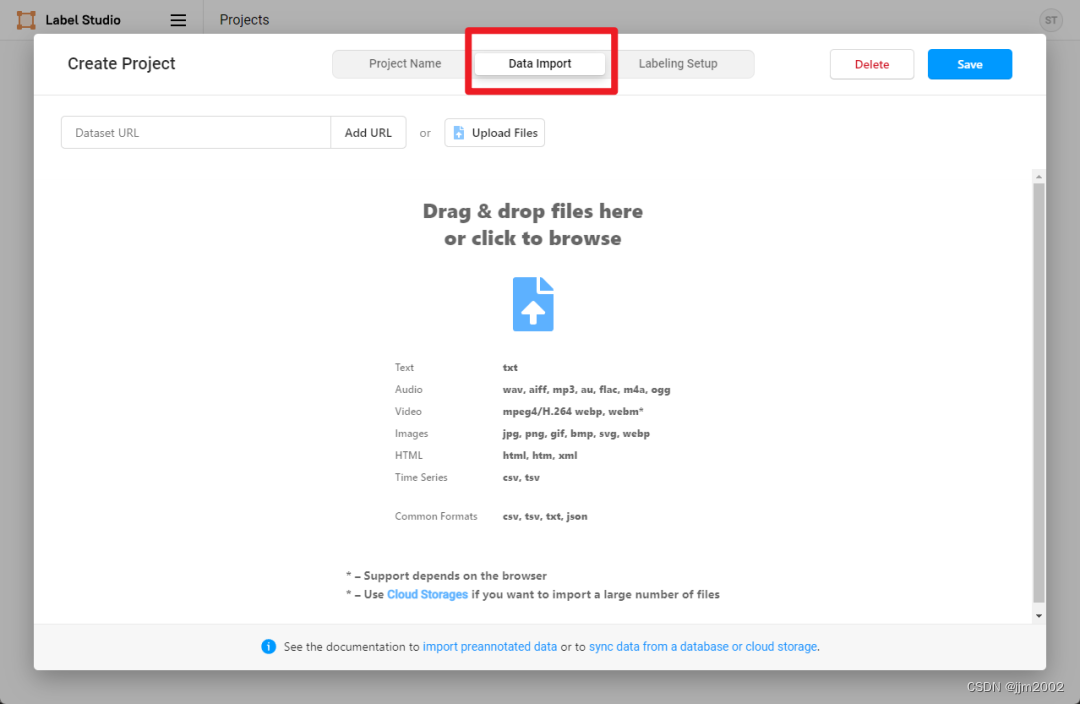
在 Settings/Labeling Interface 中配置 Label-Studio 关键点和 Mask 标注。
<View>
  <Image name="image" value="$image" zoom="true"/>
  <KeyPointLabels name="KeyPointLabels" toName="image">
    <Label value="cat" smart="true" background="#e51515" showInline="true"/>
    <Label value="person" smart="true" background="#412cdd" showInline="true"/>
  </KeyPointLabels>
  <RectangleLabels name="RectangleLabels" toName="image">
   <Label value="cat" background="#FF0000"/>
   <Label value="person" background="#0d14d3"/>
  </RectangleLabels>
  <PolygonLabels name="PolygonLabels" toName="image">
   <Label value="cat" background="#FF0000"/>
   <Label value="person" background="#0d14d3"/>
  </PolygonLabels>
  <BrushLabels name="BrushLabels" toName="image">
   <Label value="cat" background="#FF0000"/>
   <Label value="person" background="#0d14d3"/>
  </BrushLabels>
</View>
在上述 XML 中我们对标注进行了配置,其中 KeyPointLabels 为关键点标注,BrushLabels 为 Mask 标注,PolygonLabels 为外接多边形标注,RectangleLabels 为矩形标注。
本实例使用 cat 和 person 两个类别,如果社区用户想增加更多的类别需要分别在 KeyPointLabels、BrushLabels、PolygonLabels、RectangleLabels 中添加对应的类别。
然后将上述 XML 复制添加到 Label-Studio,然后点击 Save。

然后在设置中点击 Add Model 添加 OpenMMLabPlayGround 后端推理服务,设置好 SAM 后端推理服务的 URL,并打开 Use for interactive preannotations 并点击 Validate and Save。
⚠如果你在这一步无法顺利执行,可能由于模型加载时间长,导致连接后端超时,请重新执行第二步中已经跳过的部分,重启SAM后端推理服务。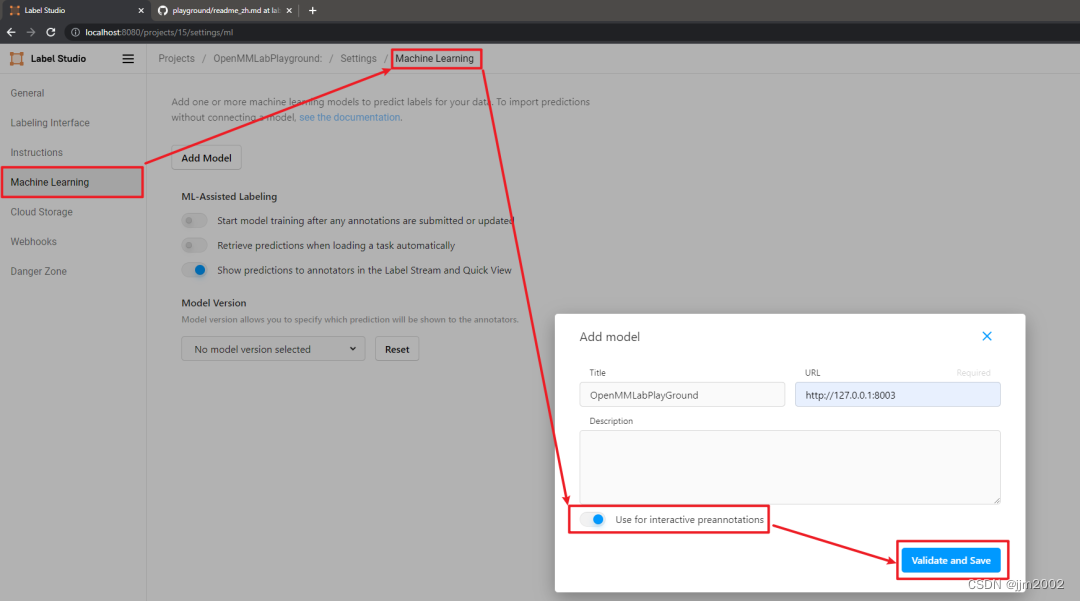
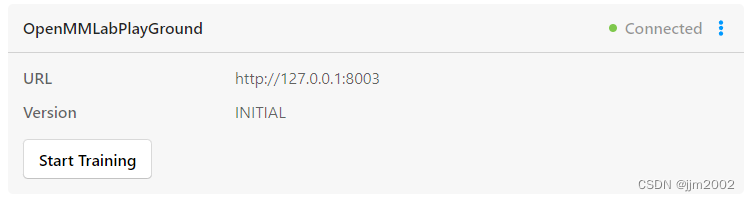
看到如下 Connected 就说明后端推理服务添加成功。
三、半自动化标注

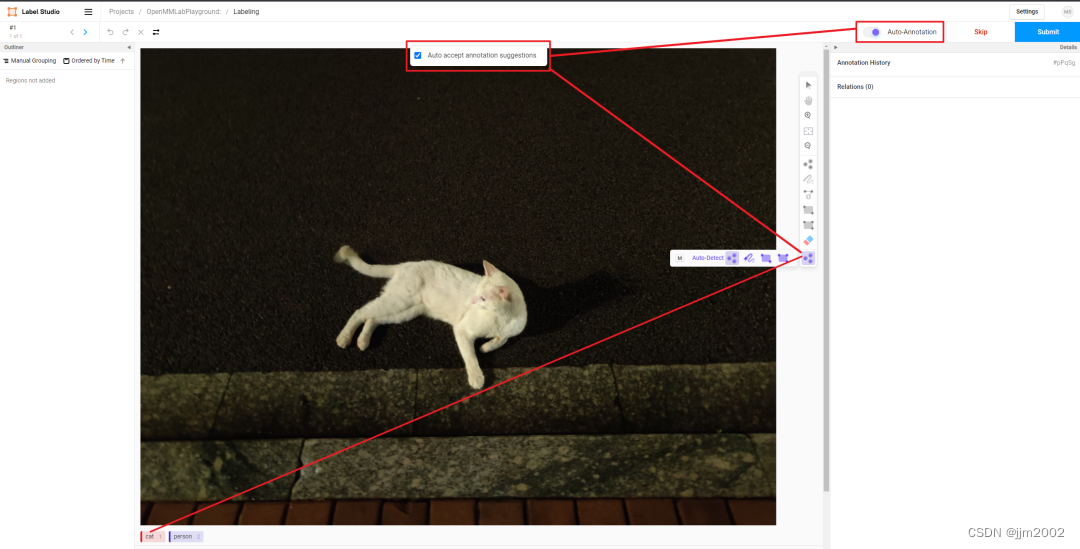
需要打开 Auto-Annotation 的开关,并建议勾选 Auto accept annotation suggestions,并点击右侧 Smart 工具,切换到 Point 后,选择下方需要标注的物体标签,这里选择 cat。如果是 BBox 作为提示词请将 Smart 工具切换到 Rectangle。
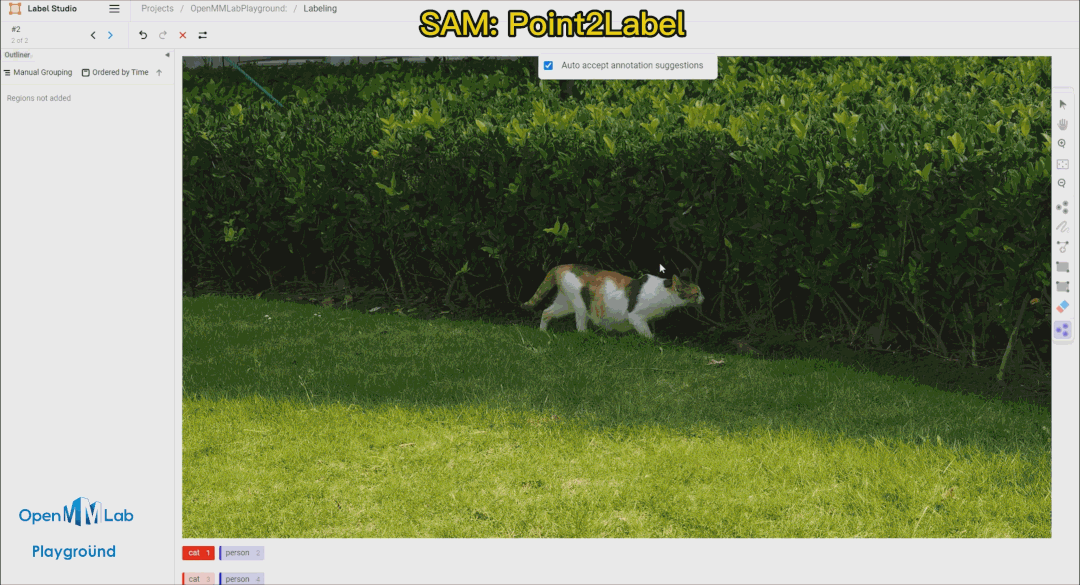
Point2Label:由下面的 gif 的动图可以看出,只需要在物体上点一个点,SAM 算法就能将整个物体分割和检测出来。
Bbox2Label: 由下面的 gif 的动图可以看出,只需要标注一个边界框,SAM 算法就能将整个物体分割和检测出来。

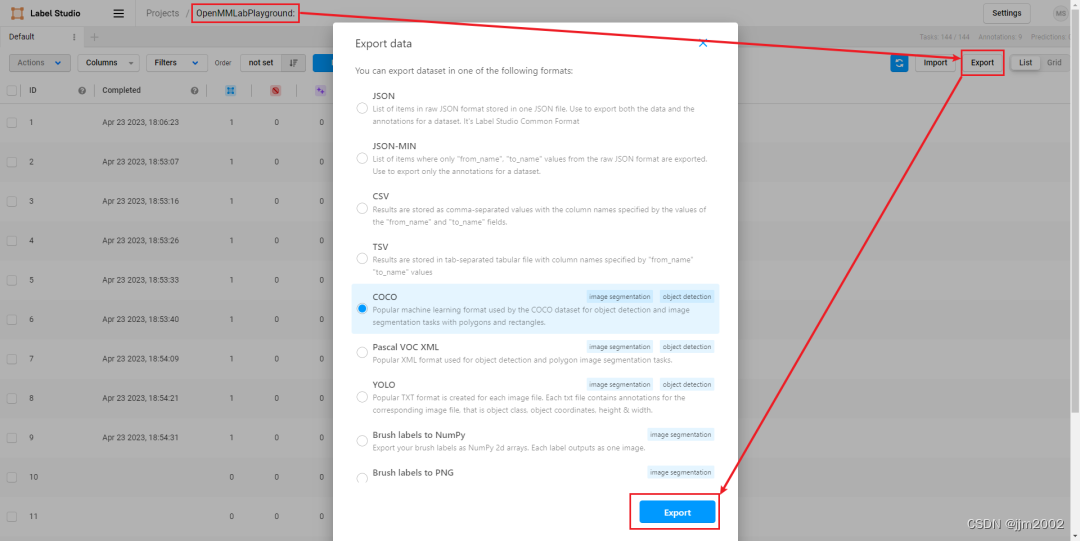
我们 submit 完毕所有图片后,点击 exprot 导出 COCO 格式的数据集,就能把标注好的数据集的压缩包导出来了。注意:此处导出的只有边界框的标注,如果想要导出实例分割的标注,需要在启动 SAM 后端服务时设置 out_poly=True。
用 vscode 打开解压后的文件夹,可以看到标注好的数据集,包含了图片和 json 格式的标注文件。

到此半自动化标注就完成了, 通过 Label-Studio 的半自动化标注功能,可以让用户在标注过程中,通过点击一下鼠标,就可以完成目标的分割和检测,大大提高了标注效率。