文章目录
- guacamole 纯web rdp预研:相关JAVA基础
-
- 1. pom.xml
- 2 scm标签
- 3 application/octet-stream
- 4. tomcat webapps下war包
- 5 maven-assembly-plugin maven assembly插件介绍
- 6. Mavenz中的source插件的使用和注意事项。
- 7. Maven私库安装与配置
- 8. 配置Nexus
- 9. servlet的运行过程
- 10 servlet规范定义web应用程序目录层次
- 11 java 数组定义
- 12 Servlet与普通Java类的区别
- 13 web.xml 部署描述文件
- 14 Listener:监控Servlet的每个动作
- 15. Guice
- 16 ServletModule类
- GuiceServletContextListener类
- 17 理解java的依赖注入
- 18 java.util.Collection
- 20 java.util.Map
- 21 java.util.ArrayList
guacamole 纯web rdp预研:相关JAVA基础
⭐️来自很多年前的笔记,只是一个归档,不做更新!⭐️
1. pom.xml
POM是项目对象模型(Project Object Model)的简称,它是Maven项目中的文件,使用XML表示。
该文件用户管理:源代码、配置文件、开发者信息、项目依赖关系等。在Maven世界中,project可以什么都没有,甚至没有代码,但是必须又pom.xml文件。
Maven之pom.xml配置文件,主要描述了mven的依赖关系。
org.apache.guacamole 公司或组织的唯一标识,并且配置时生成的路径也会由此生成,例如此,会将项目打包成jar包放到本地路径/org/apache/guacamole
guacamole-example 本项目的唯一ID
0.9.14 本项目目前所处的版本号。
<dependencies> 定义本项目的依赖关系

    <!-- Servlet API -->
      每个dependency都对应一个jar包
   <dependency>
        <groupId>org.apache.guacamole</groupId>
        <artifactId>guacamole-common</artifactId>
        <version>0.9.13-incubating</version>
        <scope>compile</scope>
    </dependency>
Scope 用于限制相应依赖范围、传播范围。值有test:在测试范围有效,它在执行test命令的时候才执行。Compile 默认,这种类型表示所有情况都是有用的。
<packaging>pom</packaging>
当前maven羡慕package命令打包类型(如 .war .jar)
<modules>    <module>guacamole</module>
maven支持多模块结构。这样的maven项目也被成为聚合项目,通常由一个父模块和若干个子模块构成。
其中父模块必须以pom打包类型,同时以给出所有的子模块。其中的每个module都是另外一个Maven项目。
2 scm标签
<scm>
    <url>https://github.com/apache/incubator-guacamole-client</url>
    <connection>scm:git:https://git.wip-us.apache.org/repos/asf/incubator-guacamole-client.git</connection>

</scm>
Maven为我们集成了软件配置管理的SCM(Software Configureation Management)
3 application/octet-stream
Tunnel.js
        var message_xmlhttprequest = new XMLHttpRequest();
        message_xmlhttprequest.open("POST", TUNNEL_WRITE + tunnel.uuid);
        message_xmlhttprequest.withCredentials = withCredentials;
        message_xmlhttprequest.setRequestHeader("Content-type", "application/octet-stream");
XMLHttpRequest是AJAX的基础。XMLHttpRequest对象所有浏览器都支持
4. tomcat webapps下war包
当tomcat启动时会去加载webapps目录下的应用程序,可以以文件夹、war包、jar包形式发布应用。
Java web项目打包(war包)并部署。
在eclipse中右键单击项目,然后export导出选择war file生成项目的WAR文件。
War文件就相当于一个web应用程序;而jar文件就是把类和一些相关的资源封装到一个包中。
Jar:通常是开发时要引用通用(JAVA)类,打成包便于存放管理。
War:做好一个(web)应用后,通常是网站,打成包部署到容器中。
Ear: 企业级应用,实际上Ear包含WAR包和几个企业级项目的配置文件而已。一般服务器选择WebSphere等,都会使用EAR包。通常是EJB打成ear包。
注意:将web项目以war方式导出后,直接放在tomcat容器的webapps下,启动服务,即可运行项目,该war包会自动解压出一个同名的文件夹。
5 maven-assembly-plugin maven assembly插件介绍
你是否想要创建一个包含脚本、配置文件以及所有运行时所依赖的元素(jar) Assembly插件帮你构建一个完整的发布包。
插件支持创建二进制归档文件,也支持源码归档文件。插件会生成”assemblies”,assemblies定义在一个assembly描述符文件里。目前assembly插件支持如下格式的归档文件:
Zip、tar.gz、tar.bz2、jar、dir、war
使用assembly的简单步骤:
1) 从预定义描述符中选择一个或者自己编写一个assembly描述符号。
2) 工程的pom.xml里配置Assembly插件。
3) 在工程根目录下运行”mvn assembly:assembly”命令
什么是assembly?
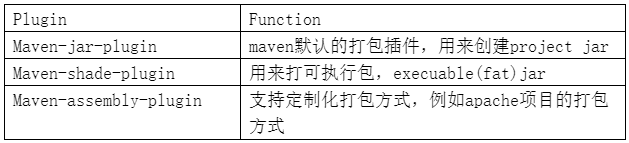
当你使用Maven对项目打包时,你需要了解以下3个打包plugin,它们分别是:
在pom.xml 使用descriptors,指定打包文件,在该配置文件内指定打包操作。
<descriptors> <descriptor>project-assembly.xml</descriptor></descriptors>
描述符文件元素
- Id标识符,添加到生成文件名称的后缀符。如果指定id的话,目标文件则是 a r t i f a c t I d − {artifactId}- artifactId−{id}.tar.gz
- formats指定打包的格式
- fileSets管理一组文件的存放位置
6. Mavenz中的source插件的使用和注意事项。
使用source插件,可以使我们在package打包过程中也打包项目源码,使用source插件,需要我们在pom.xml中配置。
如下在guacamole-common的pom.xml中
     <!-- Attach source jar -->
        <plugin>
            <groupId>org.apache.maven.plugins</groupId>
            <artifactId>maven-source-plugin</artifactId>
            <version>2.4</version>
            <executions>
                <execution>
                    <id>attach-sources</id>
                    <goals>
                        <goal>jar</goal>
                    </goals>
                </execution>
            </executions>
        </plugin>
另个一个常用插件是 maven-javadoc-plugin,可以用来打包文档包。
7. Maven私库安装与配置
项目开发时,一般采用Maven来进行项目构建,管理,jar包下载,项目组开发人员开发时,只要在项目的pom.xml文件中,添加如下pom.xml信息从公共的库中下载相关的Jar包以及依赖Jar包,但有时候公共的库不是那么稳定而且下载速度往往很慢,一个团队一起开发项目时,如果每个组员都去下载一遍所有依赖的Jar包,其实是一件很麻烦的事情,所以这时候就有必要搭建一个Maven的私库了,这样如果再添加其他的构件时,会先在Maven私库下载好,以后才会下载到本地。以后,如果发现私服已经存在某一jar包,则会直接从私服下载,如果没有再去网络上下载,能大大的提高效率,因此很有必要搭建maven私服。
maven默认去远程中央仓库下载JAR包的,访问国外网络相当慢,如果团队每个人都去下载一遍无疑是网络的浪费,当然也可以添加国内的镜像,但如果想添加远程不存在的像第三方公司的JAR包就比较麻烦。
所以,使用私库,第一,开源包只要有一个人下载过其他人就不需要再下载了,直接从私库下载即可。第二,可以用来管理第三方公司的或者远程仓库不存在的JAR包,或者公司不开源的JAR包。
1) https://www.sonatype.com/nexus-repository-oss
Maven的私库我们使用的是Nexus。
首先去sonatype官网下载nexus包,要下载开源免费版的OSS版,即Open Source Software。
下载最新的3.X的版本,这里以windows为例进行下载。
下载后点击bin目录中的启动文件即可,默认的端口是8081,访问路径是/,也可以去配置文件中修改,这里以默认。
启动后,打开localhost:8081,nexus默认的用户名是admin/admin123
默认安装有以下这几个仓库,在控制台也可以修改远程仓库的地址,第三方仓库等。
Maven配置
修改maven主目录conf/setting.xml配置文件。
添加nexus认证的用户名和密码配置信息。
<servers>
<server>
<id>nexus-releases</id>
<privateKey>admin</privateKey>
<passphrase>admin123</passphrase>
</server>
<id>nexus-snapshots</id>
</servers>
添加mirror镜像
<mirrors>
<mirror>
<id>Nexus</id>
<mirrorOf>*</mirrorOf>
<name>Nexus</name>
<url>http://127.0.0.1:8081/repository/maven-public/</url>
</mirror>
</mirrors>
添加私库
<profiles>
<profile>
<repositories>
<repository>
<releases>
<enabled>true</enabled>
</releases>
<snapshots>
</snapshots>
</repository>
</repositories>
<pluginRepositories>
<pluginRepository>
</pluginRepository>
</pluginRepositories>
</profile>
</profiles>
激活私库
<activeProfiles>
<activeProfile>Nexus</activeProfile>
</activeProfiles>
2) 如何使用
pepositories说明
maven-central:maven中央库,默认从https://repo1.maven.org/maven2/拉取jar
maven-releases:私库发行版jar
maven-snapshots:私库快照(调试版本)jar
maven-public:仓库分组,把上面三个仓库组合在一起对外提供服务,在本地maven基础配置settings.xml中使用。
本地maven库配置settings.xml
<settings>

  <pluginGroups>
    <pluginGroup>org.sonatype.plugins</pluginGroup>
  </pluginGroups>

 <servers>
    <server>
      <id>nexus</id>
      <username>admin</username>
      <password>admin123</password>
    </server>
  </servers>

<mirrors>
    <mirror>
      <id>nexus</id>
      <mirrorOf>*</mirrorOf>
      <url>http://localhost:8081/repository/maven-public/</url>
    </mirror>
    <mirror>
      <id>repo2</id>
      <mirrorOf>central</mirrorOf>
      <name>Human Readable Name for this Mirror.</name>
      <url>http://repo2.maven.org/maven2/</url>
    </mirror>

  </mirrors>

<profiles>
<profile>
      <id>nexus</id>
      <repositories>
        <repository>
          <id>central</id>
          <url>http://central</url>
          <releases><enabled>true</enabled></releases>
          <snapshots><enabled>true</enabled></snapshots>
        </repository>
      </repositories>
     <pluginRepositories>
        <pluginRepository>
          <id>central</id>
          <url>http://central</url>
          <releases><enabled>true</enabled></releases>
          <snapshots><enabled>true</enabled></snapshots>
        </pluginRepository>
      </pluginRepositories>
    </profile>

  </profiles>
  <activeProfiles>
    <activeProfile>nexus</activeProfile>
  </activeProfiles>
</settings>
工程配置pox.xml
<distributionManagement>
  <repository>
      <id>nexus</id>
      <name>Releases</name>
      <url>http://localhost:8081/repository/maven-releases</url>
    </repository>
    <snapshotRepository>
      <id>nexus</id>
      <name>Snapshot</name>
      <url>http://localhost:8081/repository/maven-snapshots</url>
    </snapshotRepository>
  </distributionManagement>

<build>
    <defaultGoal>compile</defaultGoal>
    <finalName>page</finalName>
    <plugins>
        <plugin>
            <groupId>org.apache.maven.plugins</groupId>
            <artifactId>maven-surefire-plugin</artifactId>
            <configuration>
                <skip>true</skip>
            </configuration>
        </plugin>
        <plugin>
                <groupId>org.apache.maven.plugins</groupId>
                <artifactId>maven-compiler-plugin</artifactId>
                <version>3.3</version>
                <configuration>
                    <source>1.8</source>
                    <target>1.8</target>
                </configuration>
            </plugin>
    </plugins>
  </build>
在Repositories页面里显示着,默认已经创建了5个仓库(2个为group),直接可以拿来用,无需再自行创建仓库。
一般用到的仓库种类是hosted、proxy。Hosted代表宿主仓库,用来发布一些第三方不允许的组件,比如oracle驱动、比如商业软件jar包。Proxy代表代理远程的仓库,最典型的就是Maven官方中央仓库、JBoss仓库等等。如果构建的Maven项目本地仓库没有依赖包,那么就会去这个代理站点去下载,那么如果代理站点也没有此依赖包,就回去远程中央仓库下载依赖,这些中央仓库就是proxy。代理站点下载成功后再下载至本机。笔者认为,其实Maven这个自带的默认仓库一般情况下已经够大多数项目使用了。特殊情况时在配置新的仓库,指定url即可。
hosted 类型的仓库,内部项目的发布仓库
releases 内部的模块中release模块的发布仓库
snapshots 发布内部的SNAPSHOT模块的仓库
3rd party 第三方依赖的仓库,这个数据通常是由内部人员自行下载之后发布上去
proxy 类型的仓库,从远程中央仓库中寻找数据的仓库
group 类型的仓库,组仓库用来方便我们开发人员进行设置的仓库
8. 配置Nexus
● 开启远程索引
新搭建的neuxs环境只是一个空的仓库,需要手动和远程中心库进行同步,nexus默认是关闭远程索引下载,最重要的一件事情就是开启远程索引下载,点击左边Administration菜单下面的Repositories,找到右边仓库列表中的三个仓库Apache Snapshots,Codehaus Snapshots和Maven Central,然后再没有仓库的configuration下把Download Remote Indexes修改为true,操作完后记得点击下面的save按钮
然后在Apache Snapshots,Codehaus Snapshots和Maven Central这三个仓库上分别右键,选择Repari Index,这样Nexus就会去下载远程的索引文件。
默认是从中央仓库中下载jar包,但有时候中央仓库下载很慢,经常下载不下来,所有有时候需要修改远程仓库的地址,可以改成jboss仓库https://repository.jboss.org/nexus/content/groups/public/,还可以改成http://maven.aliyun.com/nexus/content/groups/public/,后面这个库速度很快,不错。
nexus私库的一些使用介绍
在左边菜单栏里面有个Artifact Search, 在输入框里面输入你想要搜索的构件名字,比如:spring, 那么查询结果如下:
右下角就是这个Jar包的POM坐标信息,我们要想使用这个私服仓库,先在项目pom中配置相关私服信息:
这样这个Maven项目构建的时候会从私服下载相关依赖。当然这个配置仅仅是在此项目中生效,对于其他项目还是不起作用。如果相对Maven的其他项目也生效的话。需要修改全局的settings.xml文件。
修改settings.xml为:
<?xml version="1.0" encoding="UTF-8"?>

<settings xmlns="http://maven.apache.org/SETTINGS/1.0.0"
          xmlns:xsi="http://www.w3.org/2001/XMLSchema-instance"
          xsi:schemaLocation="http://maven.apache.org/SETTINGS/1.0.0 http://maven.apache.org/xsd/settings-1.0.0.xsd">
  <!--设置本地仓库-->
<localRepository>${user.home}/.m2/repository</localRepository>
  <!-- localRepository
   | The path to the local repository maven will use to store artifacts.
   |
   | Default: ${user.home}/.m2/repository
  <localRepository>/path/to/local/repo</localRepository>
  -->

  <!-- interactiveMode
   | This will determine whether maven prompts you when it needs input. If set to false,
   | maven will use a sensible default value, perhaps based on some other setting, for
   | the parameter in question.
   |
   | Default: true
  <interactiveMode>true</interactiveMode>
  -->

  <!-- offline
   | Determines whether maven should attempt to connect to the network when executing a build.
   | This will have an effect on artifact downloads, artifact deployment, and others.
   |
   | Default: false
  <offline>false</offline>
  -->

  <!-- pluginGroups
   | This is a list of additional group identifiers that will be searched when resolving plugins by their prefix, i.e.
   | when invoking a command line like "mvn prefix:goal". Maven will automatically add the group identifiers
   | "org.apache.maven.plugins" and "org.codehaus.mojo" if these are not already contained in the list.
   |-->
  <pluginGroups>
    <!-- pluginGroup
     | Specifies a further group identifier to use for plugin lookup.
    <pluginGroup>com.your.plugins</pluginGroup>
    -->
  </pluginGroups>

  <!-- proxies
   | This is a list of proxies which can be used on this machine to connect to the network.
   | Unless otherwise specified (by system property or command-line switch), the first proxy
   | specification in this list marked as active will be used.
   |-->
  <proxies>
    <!-- proxy
     | Specification for one proxy, to be used in connecting to the network.
     |
    <proxy>
      <id>optional</id>
      <active>true</active>
      <protocol>http</protocol>
      <username>proxyuser</username>
      <password>proxypass</password>
      <host>proxy.host.net</host>
      <port>80</port>
      <nonProxyHosts>local.net|some.host.com</nonProxyHosts>
    </proxy>
    -->
  </proxies>


  <!--设置私库认证信息-->
  <servers>
    <server>
        <id>nexus</id>
        <username>admin</username>
        <password>admin123</password>
    </server>
    <server>
        <id>nexus-snapshot</id>
        <username>admin</username>
        <password>admin123</password>
    </server>
  </servers>

  <!--设置私库mirror 表示maven所有的请求都由nexus来处理-->
  <mirrors>
     <!-- <mirror>
            <id>ibiblio.org</id>
            <name>ibiblio Mirror of http://repo1.maven.org/maven2/</name>
            <url>http://mirrors.ibiblio.org/pub/mirrors/maven2</url>
            <mirrorOf>central</mirrorOf>
        </mirror> -->
   <mirror>
        <id>nexus</id>
        <mirrorOf>*</mirrorOf>
        <!-- <mirrorOf>central</mirrorOf>  -->
        <name>Nexus Mirror.</name>
        <url>http://192.168.199.201:8081/nexus/content/groups/public</url>
    </mirror>
  </mirrors>

  <!--设置maven私库信息-->
  <profiles>
    <profile>
        <id>nexus</id>
        <repositories>
          <repository>
            <id>nexus</id>
            <name>Nexus</name>
            <url>http://192.168.199.201:8081/nexus/content/groups/public/</url>
            <releases><enabled>true</enabled></releases>
            <snapshots><enabled>true</enabled></snapshots>
          </repository>
        </repositories>
        <pluginRepositories>
          <pluginRepository>
            <id>nexus</id>
            <name>Nexus</name>
            <url>http://192.168.199.201:8081/nexus/content/groups/public/</url>
            <releases><enabled>true</enabled></releases>
            <snapshots><enabled>true</enabled></snapshots>
          </pluginRepository>
        </pluginRepositories>
    </profile>

    <!--覆盖maven中央仓库设置开启releases和snapshots版本的下载-->
    <profile>
      <id>central</id>
      <repositories>
           <repository>
              <id>central</id>
              <url>http://central</url>
              <releases><enabled>true</enabled></releases>
              <snapshots><enabled>true</enabled></snapshots>
          </repository>
      </repositories>
      <pluginRepositories>
          <pluginRepository>
              <id>central</id>
              <url>http://central</url>
              <releases><enabled>true</enabled></releases>
              <snapshots><enabled>true</enabled></snapshots>
          </pluginRepository>
      </pluginRepositories>
    </profile>
  </profiles>

  <!--激活私库信息的配置-->
  <activeProfiles>
      <activeProfile>nexus</activeProfile>
      <activeProfile>central</activeProfile>
  </activeProfiles>
</settings>
之后所有本机的Maven项目就在私服下载组件,这是推荐的做法。
本地仓库是远程仓库的一个缓冲和子集,当你构建Maven项目的时候,首先会从本地仓库查找资源,如果没有,那么Maven会从远程仓库下载到你本地仓库。
9. servlet的运行过程
Servlet是由web服务器调用,web服务器收到客户端的Servlet访问请求后:
1) web服务器首先检查是否已经装载并创建了该Servlet的实例对象。如果是,直接执行第4步,否则执行第2步。
2) 装载并创建该Servlet的一个实例对象。
3) 调用Servlet实例对象的init()方法。
4) 床一个用于封装HTTP请求消息的HttpServletRequest对象和一个代表HTTP响应消息的HttpServletResponse对象,然后调用Servlet的service()方法并将请求和响应对象作为参数传递进去。
5) Web应用程序被停止或重新启动之前,Servlet引擎将卸载Servlet,并在卸载之前调用Servlet的destroy()。
Servlet接口SUN公司定义了两个默认实现类,分别为GenericServlet、HttpServlet。
HttpServlet指能够处理HTTP请求的servlet,它在原有Servlet接口上添加了一些与HTTP协议处理方法,TabithaServlet接口的功能更为强大。因此开发人员编写Servlet时,通常会继承这个类,而避免直接去实现Servlet接口。
HttpServlet在实现Servlet接口时,覆写了service方法,该方法会自动判断用户请求方式,如GET请求,则调用HttpServlet的doGet方法,如为POST方法,则调用doPost方法。因此开发人员在编写Servlet时,通常只需要覆写doGet和doPost方法,而不要覆写service方法。
10 servlet规范定义web应用程序目录层次
1) WEB-INF目录下的classess和lib目录都可以存放java类文件,在Servlet容器运行时,Web应用程序的类加载器将首先加载classess目录下的,其次才是lib目录下的类。如果两个目录下存在同名的类,起作用的将是classes目录下的类。
2) WEB-INF是一个特殊目录(所有字母都要大写)。这个目录并不属于web应用程序可以访问的上下文路径的一部分,对于客户端来说,这个目录是不可见的。但在该目录下的内容对于Servlet代码是可见的。
11 java 数组定义
Collection<Resource> javaScriptResources = new ArrayList<Resource>();
12 Servlet与普通Java类的区别
Servlet是一个供其它Java程序(Servlet引擎)调用的java类,它不能单独运行,它的运行完全由Servlet引擎来控制和调度。
针对客户端多次Servlet请求,通常情况下,服务器只会创建一个Servlet实例对象,也就是说Servlet实例对象一旦创建,它就会驻留在内存中,为后续的其它请求服务,指导容器退出,servlet实例对象才会销毁。
在Servlet的整个生命周期内,Servlet的init方法只能被调用一次。而对Servlet的每次请求访问都导致Servlet引擎都会创建一个新的HttpServletRequest和HttpServletResponse对象,然后将这两个对象传递给它调用的Servlet的service()方法,service再根据请求方式分别调用doXXX方法。
13 web.xml 部署描述文件
凡是web.xml中找不到匹配的元素的URL,它们的访问请求都会交给默认的Servlet处理,也就是说,缺
省Servlet用于处理所有其它Servlet不处理的访问请求。
<filter>    <filter-name>guiceFilter</filter-name>    <filter-class>com.google.inject.servlet.GuiceFilter</filter-class></filter>
过滤器用于拦截请求,并对ServletRequest对象进行处理,它可以用来验证权限、加密、解密、Session检查、数据转换、防盗链等。
14 Listener:监控Servlet的每个动作
Java web使用监听通过以下两个方法:
1) 通过注解@Weblistener来标识一个自定义的监听器;
2) 通过在web.xml中来配置使用用监听器
在java web中,主要是对servletContext、HttpSession和ServletRequest三个对象提供支持。
<listener> <listener-class>org.apache.guacamole.GuacamoleServletContextListener</listener-class></listener>
ServletContext监听器
有两个类监听器监听ServletContext对象;
ServletContextListener:该监听器用来监听ServletContext的初始化和销毁事件;
ServletContextAttributeListener:该监听器监听ServletContext中属性的删除、添加、和替换事件。
启动过程中,首先创建了ServletContext,这激发了contextInitialized监听器方法。
15. Guice
Guice是谷歌推出的一个轻量级依赖注入框架,帮助我们解决java项目中的依赖注入问题。如果使用过sptring的话,会了解到依赖注入是个非常方便的功能。不过假如只想在项目中使用依赖注入,那么引入guice未免大材小用。这时候我们应该参考guice。
1) 基本使用
引入依赖
如果使用maven的话,添加以下依赖项。
    <dependency>
        <groupId>com.google.inject</groupId>
        <artifactId>guice</artifactId>
        <version>3.0</version>
    </dependency>
    <dependency>
        <groupId>com.google.inject.extensions</groupId>
        <artifactId>guice-assistedinject</artifactId>
        <version>3.0</version>
    </dependency>

    <!-- Guice Servlet -->
    <dependency>
        <groupId>com.google.inject.extensions</groupId>
        <artifactId>guice-servlet</artifactId>
        <version>3.0</version>
    </dependency>
2) 简单的依赖注入
首先,配置依赖关系。我们继承AbstractModule (import com.google.inject.AbstractModule;
),并重写configure方法即可。
在confgure方法中,我们可以调用AbstractModule类提供的一些方法配置依赖关系。最常用的方法就是bind(接口或父类).to(实现类或子类)的方式来设置依赖关系。
Guice的IoC
两种模式,一种是基于Module的,Module的实现类将会在config()方法中进行配置,指定某一个基类/接口都应对应哪一个具体实现;这个,在通过@Inject来注解属性/构造函数的时候,就可以自动根据配置进行实例化。
我们可以将guice的架构分成两个不同的阶段:启动和运行。你在启动时创建一个注入器Injector,在运行时用它来注入对象。
启动
你通过实现Module来配置Guice。你传给Guice一个模块对象,Guice则将一个绑定器对象传入你的模块,然后,你的模块使用绑定器来绑定配置。
Guice servlet简化了传统servlet的开发。
Guice并不会改变servlet的生命周期。
重要:guice
16 ServletModule类
是一个用内部编码方式的web.xml部署描述符的替代品。Filter和Servlet使用普通的java方法来调用配置。如下:一个典型的在创建guice注册器时,注册一个servlet的例子。
Guice.getInjector(..., new ServletModule(){

@Override
protected void configureServlets(){
serve('*.html').with(MyServlet.class);
}

})
这样就注册了一个叫MyServlet的Servlet(一个HttpServlet的子类)对所有的.html结尾的请求进行服务。
GuiceServletContextListener类
如何使用(重要):
-
Pom.xml配置guice相关依赖
-
在web.xml中配置GuiceFilter过滤器
guiceFilter com.google.inject.servlet.GuiceFilter guiceFilter /*
在所有的依赖包配置好后(1),我们需要做的第一件事就是配置GuiceFilter。这个过滤器重新路由所有的客户端请求。如下: -
安装ServletModule
Guice.createInjector(new ServletModule())
这个模块是用来设置请求和会话范围(scopes),同时提供了一个配置你的过滤器和servlet的方法。
一个不错的建议是在一个ServletContentListener中进行,当然你也可以在其它你需要该注入器injector的地方。
Guice Servlet提供了一个GuiceServletContextListener,我们继承该类实现自己的ServletContextListener 如下:
    @Override
    protected Injector getInjector() {


        return Guice.createInjector(Stage.PRODUCTION,
            new EnvironmentModule(environment),
            new LogModule(environment),
            new ExtensionModule(environment),
            new RESTServiceModule(sessionMap),
            new TunnelModule()
        );
}
然后在web.xml中配置该listener。然后当Servlet容器启动Web应用时,该监听器便会执行,我们的ServletModule被安装。
如下:
总结:我们可以将ServletModule看做是一个代码形式的web.xml文件。每个servlet都是单例。如果你不能直接注解该类,那么你需要使用bind(…).in(Singleton.class). Guice servlet不支持SingleThreadModel。
- 可用的注入
安装了ServletModule之后,我可方便的注入一些servlet体系中的类。
17 理解java的依赖注入
依赖注入是一种软件设计模式。
依赖注入的思想,一个类对另一个类有依赖时,不再该类内部对依赖的类实例化,而是之前配置一个beans.xml告诉容器所依赖的类,容器自动注入一个所依赖的类的实例。
18 java.util.Collection
是集合结构的根接口,定义了所有集合类型都应提供的基础方法。代表一个对象的分组,包含的每个对象称为集合的元素。每个集合可以指定是否容许吃哦那功夫元素,是否有序。
其父接口Iterable
其子接口List,Set,Queue等。
Collection表示一组对象,这些对象称为collection的元素。
Collection javaScriptResources = new ArrayList();
java.util.Collections;提供了一些操作集合的方法。
16. java.util.List; 属于java基础数据包,属于java.util,JDAK或这JRE中的rt.jar包。
列表,是一种特殊的集合结构,即List是一种有序的集合。
20 java.util.Map
Map主要用于保存Key-Value对。在一个Map对象中,不容许存在相同的key,并且每个key最多可以映射到一个值(value).
21 java.util.ArrayList
是java开发非常常用的类。
列表类,用来存放其它java对象,内部是通过数组实现的。只要是java对象就可以往arraylist里面放。
Collection javaScriptResources = new ArrayList();
add方法