1.切换到项目根目录,使用composer require 5ini99/think-addons:dev-master命令安装thinkphp插件
如果是root用户或是管理员执行的话会有提示
等一下,会有这个提示
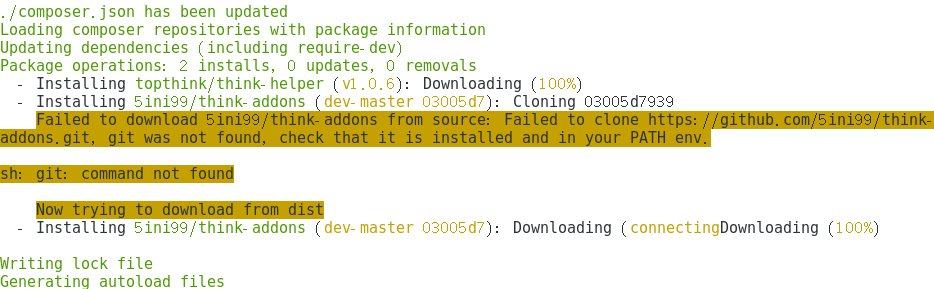
这就表示下好了,然后访问tp5,会在根目录生成addons文件夹(如果tp5目录没有权限的话需要改变权限)
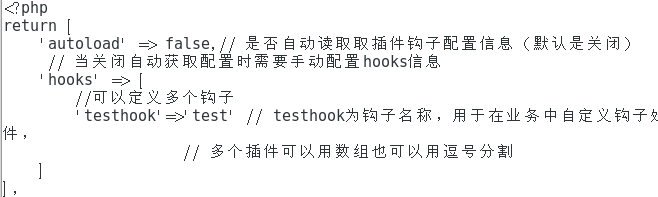
编辑application/extra/addons.php
在addons文件新建test文件夹,在test下新建Test.php


<?php
namespace addons\test;    // 注意命名空间规范

use think\Addons;

/**
 * 插件测试
 * @author byron sampson
 */
class Test extends Addons    // 需继承think\addons\Addons类
{
    // 该插件的基础信息 也可以单独配置在info.ini中
    public $info = [
        'name' => 'test',    // 插件标识
        'title' => '插件测试',    // 插件名称
        'description' => 'tp5插件测试',    // 插件简介
        'status' => 0,    // 状态
        'author' => 'byron sampson',
        'version' => '0.1'
    ];

    /**
     * 插件安装方法
     * @return bool
     */
    public function install()
    {
       // return true;
    }

    /**
     * 插件卸载方法
     * @return bool
     */
    public function uninstall()
    {
       // return true;
    }

    /**
     * 实现的testhook钩子方法
     * @return mixed
     */
    public function testhook($param)
    {
        // 调用钩子时候的参数信息
        // print_r($param);
        // 当前插件的配置信息,配置信息存在当前目录的config.php文件中,见下方
        // print_r($this->getConfig());
        // 可以返回模板,模板文件默认读取的为插件目录中的文件。模板名不能为空!
        //return $this->fetch('info');
     echo "这里是钩子调用的方法";
    }

}
在test下新建config.php ,info.ini 可以不写内容
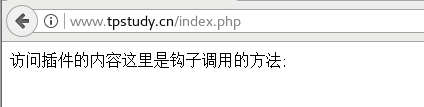
从项目的模板中访问插件,{:hook('testhook')};
扫描二维码关注公众号,回复:
1539055 查看本文章