文章目录
测试环境
- Ubuntu 20.04
- Intel® Xeon® Gold 5318Y
一、检查服务器是否支持SGX
测试方法参考官方文档
方法1:cpuid查看是否支持SGX
cpuid --one-cpu | grep -i sgx
      SGX: Software Guard Extensions supported = true
      SGX_LC: SGX launch config supported      = true
      SGX-KEYS: SGX attestation services       = true
   Software Guard Extensions (SGX) capability (0x12/0):
      SGX1 supported                           = false
      SGX2 supported                           = false
      SGX ENCLV E*VIRTCHILD, ESETCONTEXT       = false
      SGX ENCLS ETRACKC, ERDINFO, ELDBC, ELDUC = false
      SGX ENCLU EVERIFYREPORT2                 = false
      SGX ENCLU EDECCSSA                       = false
   SGX attributes: ECREATE SECS.ATTRIBUTES (0x12/1):
   SGX Enclave Page Cache (EPC) enumeration (0x12/0x2):
- 如果输出为空,则表示不支持,可以使用simulation mode,但该模式不能用于发布版环境。
- 如果输出中包含
SGX_LC: SGX launch config supported = true,则支持DCAP(数据中心标记基元,即远程认证服务)功能。FLC 即 Flexible Launch Control。 - 上述输出中
SGX1 supported = false表示SGX还未开启,或者未开启成功。
方法2:test-sgx.c测试是否支持SGX
- 安装
gcc
sudo dnf -y install clang
- 转到 SGX 硬件 Github 并下载文件 test-sgx.c 或克隆存储库
- 根据以下说明编译并运行
test-sgx.c:
$ gcc test-sgx.c -o test-sgx
$ ./test-sgx
eax: 606a6 ebx: 4400800 ecx: 7ffefbf7 edx: bfebfbff
stepping 6
model 10
family 6
processor type 0
extended model 6
extended family 0
smx: 1

Extended feature bits (EAX=07H, ECX=0H)
eax: 2 ebx: f3bfb7ef ecx: 40417f5e edx: bc040412
sgx available: 1
sgx launch control: 1

CPUID Leaf 12H, Sub-Leaf 0 of Intel SGX Capabilities (EAX=12H,ECX=0)
eax: 0 ebx: 0 ecx: 0 edx: 0
sgx 1 supported: 0
sgx 2 supported: 0
MaxEnclaveSize_Not64: 0
MaxEnclaveSize_64: 0

CPUID Leaf 12H, Sub-Leaf 1 of Intel SGX Capabilities (EAX=12H,ECX=1)
eax: 0 ebx: 0 ecx: 0 edx: 0

CPUID Leaf 12H, Sub-Leaf 2 of Intel SGX Capabilities (EAX=12H,ECX=2)
eax: 0 ebx: 0 ecx: 0 edx: 0
size of EPC section in Processor Reserved Memory, 0 M

CPUID Leaf 12H, Sub-Leaf 3 of Intel SGX Capabilities (EAX=12H,ECX=3)
eax: 0 ebx: 0 ecx: 0 edx: 0
size of EPC section in Processor Reserved Memory, 0 M

CPUID Leaf 12H, Sub-Leaf 4 of Intel SGX Capabilities (EAX=12H,ECX=4)
eax: 0 ebx: 0 ecx: 0 edx: 0
size of EPC section in Processor Reserved Memory, 0 M

CPUID Leaf 12H, Sub-Leaf 5 of Intel SGX Capabilities (EAX=12H,ECX=5)
eax: 0 ebx: 0 ecx: 0 edx: 0
size of EPC section in Processor Reserved Memory, 0 M

CPUID Leaf 12H, Sub-Leaf 6 of Intel SGX Capabilities (EAX=12H,ECX=6)
eax: 0 ebx: 0 ecx: 0 edx: 0
size of EPC section in Processor Reserved Memory, 0 M

CPUID Leaf 12H, Sub-Leaf 7 of Intel SGX Capabilities (EAX=12H,ECX=7)
eax: 0 ebx: 0 ecx: 0 edx: 0
size of EPC section in Processor Reserved Memory, 0 M

CPUID Leaf 12H, Sub-Leaf 8 of Intel SGX Capabilities (EAX=12H,ECX=8)
eax: 0 ebx: 0 ecx: 0 edx: 0
size of EPC section in Processor Reserved Memory, 0 M

CPUID Leaf 12H, Sub-Leaf 9 of Intel SGX Capabilities (EAX=12H,ECX=9)
eax: 0 ebx: 0 ecx: 0 edx: 0
size of EPC section in Processor Reserved Memory, 0 M
- 查找 输出:
sgx launch control: 1
验证是否支持SPS
由于实验中使用的型号是TH-D2113 Gold 5318Y ,实现SGX需要支持SPS(Server Platform Services,英特尔® SPS)才行。
Intel® Software Guard Extensions (Intel® SGX) Yes with Intel® SPS
不知道如何验证,应该是需要装相关的SPS驱动。
二、启动 SGX 服务
参考文档
- 安装文档参考《Intel® SGX Software Installation Guide For Linux* OS》
- 更多的参考文档见这儿
启动 SGX
首先检查BIOS是以UEFI模式启动的,不能以legacy模式启动,因为:
- 在 Legacy 模式下启动的系统无法执行软件启用,因为该过程取决于 EFI 变量。
- 可以通过在 UEFI 模式下启动 Linux Live CD,然后执行软件启用来启用 Legacy 模式系统。 英特尔 SGX 启用发生在平台级别,而不是操作系统级别。
- EFI 文件系统,如果您的 Linux 系统以 UEFI 模式启动,则默认情况下应安装该文件系统。
方法1:BIOS 启动SGX
不同的BIOS操作不同,示例如下:
BIOS下enable SGX【System Configuration】 → BIOS/Platform Configuration (RBSU) → System Options → Processor Options → Intel Software Guard Extensions (SGX)】→ 启动。
如果在BIOS中没有设置SGX的地方,且芯片是支持SGX的,可以升级BIOS版本或者找服务器售后了解情况。
方法2:软启动 SGX
如果SGX在BIOS中提示“软件控制”,则可以使用下面的软起动方法启动SGX。具体说明可以参考这儿
软启动代码参考:github.com/intel/sgx-software-enable
由于本服务器不支持软件启动,所以无法展示启动情况。
- 安装gcc环境
sudo apt install -y clang
- 编译,启动
$ make
$ sudo ./sgx_enable
Intel SGX is explicitly disabled, and your BIOS does not
support the "software enable" option. Check your BIOS for an
explicit option to enable Intel SGX.
检查SGX是否开启成功
git clone https://github.com/ethernity-cloud/mvp-pox-node.git
cd mvp-pox-node
cd mvp-pox-node
./utils/linux/test-sgx
如果输出下面类似的结果表示已经开启成功:
...
Extended feature bits (EAX=07H, ECX=0H)
eax: 2 ebx: f3bfb7ef ecx: 40417f5e edx: bc040412
sgx available: 1
sgx launch control: 1

CPUID Leaf 12H, Sub-Leaf 0 of Intel SGX Capabilities (EAX=12H,ECX=0)
eax: 403 ebx: 1 ecx: 0 edx: 381f
sgx 1 supported: 1
sgx 2 supported: 1
MaxEnclaveSize_Not64: 1f
MaxEnclaveSize_64: 38
MaxEnclaveSize_64 (MB): 0
...
如果sgx 1 supported不为1,至少MaxEnclaveSize_64是大于0的。
三、安装 SGX 驱动
下面的方法是在FLC + Intel® AES New Instructions 平台上进行安装的步骤。如果是老版本的机器,请参考老版本的安装步骤。
SGX驱动介绍
参考:
-
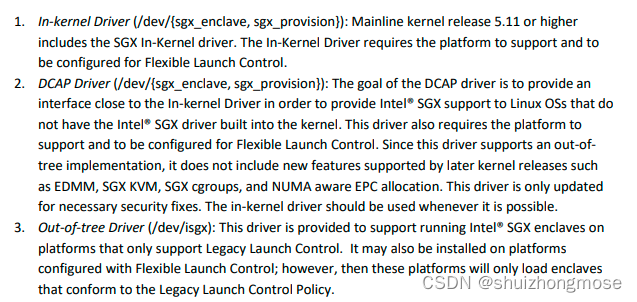
linux-sgx-driver, 旧版本,不支持 DCAP。如果CPU不支持灵活的启动控制和英特尔® AES新指令,只支持SGX1,则使用该驱动进行安装。
-
SGXDataCenterAttestationPrimitives, out-of-tree(OOT) 模式驱动,同时支持 非 DCAP 软件基础设施(使用旧的 EPID 远程证明技术)和新的 DCAP(使用新的 ECDSA 和更“正常”的 PKI 基础设施)。 该驱动需要选择<5.11的Linux kernel。
-
从 kernel 5.11 开始,SGX 支持被上游到 Linux 主线(SGX驱动集成到了Linux内核中,In-kernel Driver) 目前仅支持 DCAP 认证。 该驱动程序可通过
/dev/sgx_enclave和/dev/sgx_provision访问。需要注意的是安装5.11以上kernel需要SGX 支持FLC。
使用SGXDataCenterAttestationPrimitives编译安装SGX驱动
如果使用 kernel 版本≥5.11,则跳过驱动安装,直接进行SDK和PSW安装。
操作系统及CPU要求
- 操作系统要求
Ubuntu* 16.04 LTS Desktop 64bits - minimal kernel 4.15
Ubuntu* 16.04 LTS Server 64bits - minimal kernel 4.15
Ubuntu* 18.04 LTS Desktop 64bits
Ubuntu* 18.04 LTS Server 64bits
Ubuntu* 20.04 LTS Server 64bits
Red Hat Enterprise Linux Server 8 (RHEL 8) 64bits
CentOS 8 64bits
- FLC功能对CPU版本要求
第八代Intel® Core™处理器或更新版本,具有灵活启动控制和Intel® AES新指令支持。
cpuid -1 | grep -i sgx

// 如果输出中包含下面信息表示CPU支持FLC
SGX_LC: SGX launch config supported = true
....
SGX1 Supported = true // SGX1必须为true表示SGX开启成功
SGX2 Supported = true
或者使用测试程序:SGX Hardware Github
git clone https://github.com/ayeks/SGX-hardware.git
gcc test-sgx.c -o test-sgx
./test-sgx

// 如果输出如下信息表示CPU支持FLC
sgx launch control: 1
更多的FLC测试信息见官方文档《Which Platforms Support Intel® Software Guard Extensions (Intel® SGX) SGX2?》
- 硬件已经启动SGX,见前述。
驱动编译安装步骤
- 环境检查
// 头文件检查:执行下面文件,如果有输出表示已经安装
dpkg-query -s linux-headers-$(uname -r)

// 如果没有安装头文件,则使用下面命令进行安装
sudo apt-get install linux-headers-$(uname -r)
git clone https://github.com/intel/SGXDataCenterAttestationPrimitives.git
cd SGXDataCenterAttestationPrimitives/driver/linux/
- 安装DKMS
DKMS动态内核模块支持 (Dynamic Kernel Module Support,DKMS)是用来生成Linux的内核模块的一个框架,其源代码一般不在Linux内核源代码树。
sudo apt-get install -y dkms
- 查看SGX版本
cat dkms.conf
// 输出以下信息
PACKAGE_NAME="sgx"
PACKAGE_VERSION="1.41"
BUILT_MODULE_NAME[0]="intel_sgx"
DEST_MODULE_LOCATION[0]="/kernel/drivers/intel/sgx"
AUTOINSTALL="yes"
MAKE[0]="'make'  KDIR=/lib/modules/${kernelver}/build"
其中PACKAGE_VERSION为第5-6步中的<version>值,比如1.41。
- 安装驱动到DKMS中
export version=<your version>
sudo mkdir /usr/src/sgx-$version/
make clean
sudo cp ./* /usr/src/sgx-$version/ -r
sudo dkms add -m sgx -v $version
sudo dkms build -m sgx -v $version
sudo dkms install -m sgx -v $version
sudo /sbin/modprobe intel_sgx
如果此步骤出现如下问题:
- install 错误:modprobe: ERROR: could not insert ‘intel_sgx’: Bad address
// 查看安装情况
$ dkms status
sgx, 1.41, 5.4.0-150-generic, x86_64: installed
问题原因是SGX虽然在BIOS开启了,但是并未启动成功
SGX1 Supported = false
SGX1 Supported = false
[外链图片转存失败,源站可能有防盗链机制,建议将图片保存下来直接上传(img-qYOtPW8m-1687240284270)(https://note.youdao.com/yws/res/80448/WEBRESOURCEe35d46a560328736926178b221e3499e)]
解决方法:使用BIOS中SGX选项【SGX Factory Reset】选项将SGX空间清空(不同BIOS操作不相同),然后即可正常打开SGX。
- 添加
udev规则和sgx_prv组以正确设置/dev/sgx/enclave和/dev/sgx/provision节点的权限,更多背景信息见启动带有配置位设置的 enclave一文。
sudo cp  10-sgx.rules /etc/udev/rules.d
sudo groupadd sgx_prv
sudo udevadm trigger
- 卸载SGX 驱动的方法
sudo /sbin/modprobe -r intel_sgx
sudo dkms remove -m sgx -v $version --all
sudo rm -rf /usr/src/sgx-$version
sudo dracut --force   # only needed on RHEL/CentOS 8
四、构建Intel® SGX SDK 和 SGX PSW包
构建前准备
- 支持的操作系统
Ubuntu* 18.04 LTS Desktop 64bits
Ubuntu* 18.04 LTS Server 64bits
Ubuntu* 20.04 LTS Desktop 64bits
Ubuntu* 20.04 LTS Server 64bits
Ubuntu* 22.04 LTS Server 64bits
Red Hat Enterprise Linux Server release 8.6 64bits
CentOS Stream 8 64bits
CentOS 8.3 64bits
SUSE Linux Enterprise Server 15.4 64bits
Anolis OS 8.6 64bits
Debian 10 64bits
其他操作系统安装步骤参考:安装sgx驱动以及相关服务
- 安装环境
构建Intel® SGX SDK要求gcc版本为7.3及以上,glibc版本为2.27及以上
// 驱动环境
sudo apt-get install build-essential ocaml ocamlbuild automake autoconf libtool wget python-is-python3 libssl-dev git cmake perl -y

// PSW 环境
sudo apt-get install libssl-dev libcurl4-openssl-dev protobuf-compiler libprotobuf-dev debhelper cmake reprepro unzip pkgconf libboost-dev libboost-system-dev libboost-thread-dev lsb-release libsystemd0 -y
- 下载源码并进行预编译
git clone https://github.com/intel/linux-sgx.git
cd linux-sgx
sudo sed -i '$a\export SGX_LINUX_PATH=<your linux_sgx path>' /etc/profile
source /etc/profile
make preparation
提示:
make preparation将执行脚本download_prebuilt.sh来下载预构建的二进制文件。 可能需要为脚本使用的wget工具设置https代理(比如export https_proxy=http://test-proxy:test-port)或者将https://github.com替换为https://gitclone.com/github.com。- 该步骤由于网络原因可能时间比较长,耐心等待。
- 如果提示某个
sh文件没有权限,执行find ./ -type f | grep \\.sh$ | xargs chmod +x将所有sh文件增加操作权限。
- 将当前操作系统分布对应的缓解工具从
external/toolset/{current_distr}复制到/usr/local/bin,并确保它们有执行权限:
// 由于我的操作系统是ubuntu20.04,所以current_distr值为ubuntu20.04
sudo cp external/toolset/{current_distr}/* /usr/local/bin
which ar as ld objcopy objdump ranlib
编译和安装SGX SDK
具体的编译方法见Build the Intel® SGX SDK and Intel® SGX SDK Installer
- 编译SDK
find ./ -type f | grep \\.sh$ | xargs chmod +x
find ./ -type f | grep configure$ | xargs chmod +x

// do not use `make sdk`,如果执行`make sdk`后面的安装会失败
make sdk_install_pkg

// 提示如下信息表是编译成功
...
scripts/
scripts/install.sh
scripts/installConfig
Generated sdk installer: ./linux/installer/bin/sgx_linux_x64_sdk_2.19.100.3.bin
- 安装SDK
sudo apt-get install build-essential python-is-python3
cd linux/installer/bin
./sgx_linux_x64_sdk_${version}.bin
安装成功之后提示【Please set the environment variables with below command:】,执行提示的命令,且每次编译的时候都需要执行下面的source命令
source SGX_LINUX_PATH/linux/installer/bin/sgxsdk/environment
如果不想每次都执行source命令,则可以将environment文件中内容复制到/etc/profile文件中。
$ cat /etc/profile
...
export SGX_SDK=/home/private/codes/tee/linux-sgx/linux/installer/bin/sgxsdk
export PATH=$PATH:$SGX_SDK/bin:$SGX_SDK/bin/x64
export PKG_CONFIG_PATH=$PKG_CONFIG_PATH:$SGX_SDK/pkgconfig
if [ -z "$LD_LIBRARY_PATH" ]; then
        export LD_LIBRARY_PATH=$SGX_SDK/sdk_libs
else
        export LD_LIBRARY_PATH=$LD_LIBRARY_PATH:$SGX_SDK/sdk_libs
fi
- 测试SDK
暂未安装 PSW,所以只能先测试Simulation 模式,参考:Requires libsgx_urts.so to run in SGX hardware mode
cd SGX_LINUX_PATH/SampleCode/LocalAttestation
make SGX_MODE=SIM
cd bin
./app

// 输出结果表示安装成功
succeed to load enclaves.
succeed to establish secure channel.
Succeed to exchange secure message...
Succeed to close Session...
注意:在 Ubuntu 22.04 或任何带有 systemd v248 或更高版本的发行版上,/dev/sgx_enclave 只能由组“sgx”中的用户访问。
sudo groupadd sgx
sudo usermod -a -G sgx <user name>
// 查看是否添加成功
groups <user name>
编译和安装PSW
- 编译PSW
编译详情参考:Build the Intel® SGX PSW and Intel® SGX PSW Installer
cd $SGX_LINUX_PATH
make psw_install_pkg

// 出现如下信息代表安装成功
scripts/
scripts/install.sh
scripts/installConfig
Generated psw installer: ./linux/installer/bin/sgx_linux_x64_psw_2.19.100.3.bin
- 安装PSW
sudo apt-get install libssl-dev libcurl4-openssl-dev libprotobuf-dev
sudo ./linux/installer/bin/sgx_linux_x64_psw_2.19.100.3.bin
- 测试 LocalAttestation
cd $SGX_LINUX_PATH
source linux/installer/bin/sgxsdk/environment
cd SampleCode/LocalAttestation/

// 安装PSW之后就可以直接使用硬件环境进行编译了
$ make
....
CC   <=  EnclaveInitiator_u.c
CC   <=  EnclaveResponder_u.c
CXX   <=  App.cpp
CC   <=  UntrustedEnclaveMessageExchange.cpp
GEN  =>  app
make[1]: Leaving directory '/home/private/codes/tee/linux-sgx/SampleCode/LocalAttestation/App'
The project has been built in hardware debug mode.

$ cd bin/
$ ./app
succeed to load enclaves.
succeed to establish secure channel.
Succeed to exchange secure message...
Succeed to close Session...