Time-To-Live and Expiration — RabbitMQ
一、死信队列
Dead Letter Exchanges — RabbitMQ
死信队列:
DLX 全称(Dead-Letter-Exchange),称之为死信交换器,当消息变成一个死信之后,如果这个消息所在的队列存在x-dead-letter-exchange参数,那么它会被发送到x-dead-letter-exchange对应值的交换器上,这个交换器就称之为死信交换器,与这个死信交换器绑定的队列就是死信队列
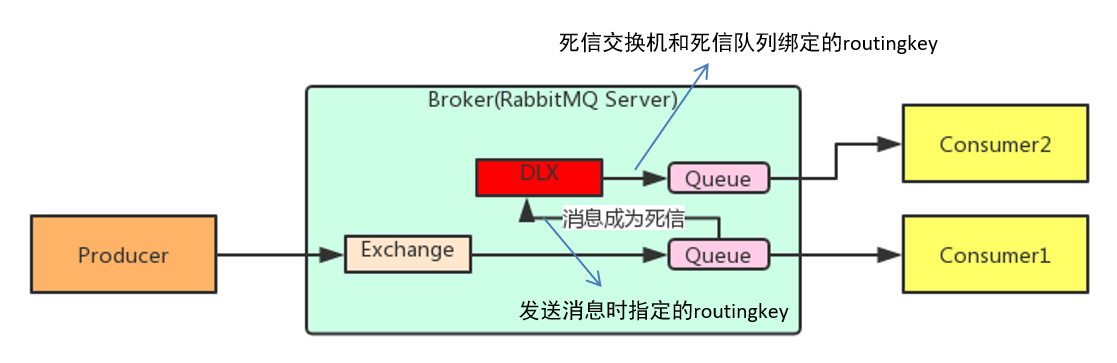
死信消息:
- 消息被拒绝(Basic.Reject或Basic.Nack)并且设置 requeue 参数的值为 false
- 消息过期(消息TTL过期。TTL:Time To Live的简称,即过期时间)
- 队列达到最大的长度
过期消息:
在 rabbitmq 中存在2种方法可设置消息的过期时间:
- 第一种通过对队列进行设置,这种设置后,该队列中所有的消息都存在相同的过期时间
- 第二种通过对消息本身进行设置,那么每条消息的过期时间都不一样
如果同时使用这2种方法,那么以过期时间小的那个数值为准。当消息达到过期时间还没有被消费,那么那个消息就成为了一个 死信 消息
队列设置:在队列申明的时候使用** x-message-ttl **参数,单位为 毫秒;
- 队列中这个属性的设置要在第一次声明队列的时候设置才有效,如果队列一开始已存在且没有这个属性,则要删掉队列再重新声明才可以。
- 队列的 TTL 只能被设置为某个固定的值,一旦设置后则不能更改,否则会抛出异常
单个消息设置:是设置消息属性的 expiration 参数的值,单位为 毫秒。
说明:
对于第一种设置队列属性的方法,一旦消息过期,就会从队列中抹去;而在第二种方法中,即使消息过期,也不会马上从队列中抹去,因为每条消息是否过期是在即将投递到消费者之前判定的
1. 生产者:
声明队列的时候用属性指定其死信队列交换机名称。
测试:
package rabbitmq;

import java.io.IOException;
import java.util.HashMap;
import java.util.Map;
import java.util.concurrent.TimeoutException;

import com.rabbitmq.client.BuiltinExchangeType;
import com.rabbitmq.client.Channel;
import com.rabbitmq.client.Connection;
import com.rabbitmq.client.ConnectionFactory;

public class Producer {

    public static ConnectionFactory getConnectionFactory() {
        // 创建连接工程,下面给出的是默认的case
        ConnectionFactory factory = new ConnectionFactory();
        factory.setHost("192.168.99.100");
        factory.setPort(5672);
        factory.setUsername("guest");
        factory.setPassword("guest");
        factory.setVirtualHost("/");
        return factory;
    }

    public static void main(String[] args) throws IOException, TimeoutException  {
        ConnectionFactory connectionFactory = getConnectionFactory();
        Connection newConnection = null;
        Channel createChannel = null;
        try {
            newConnection = connectionFactory.newConnection();
            createChannel = newConnection.createChannel();

            // 声明一个正常的direct类型的交换机
            createChannel.exchangeDeclare("order.exchange", BuiltinExchangeType.DIRECT);
            // 声明死信交换机为===order.dead.exchange
            String dlxName = "order.dead.exchange";
            createChannel.exchangeDeclare(dlxName, BuiltinExchangeType.DIRECT);
            // 声明队列并指定死信交换机为上面死信交换机
            Map<String, Object> arg = new HashMap<String, Object>();
            arg.put("x-dead-letter-exchange", dlxName);
            createChannel.queueDeclare("myQueue", true, false, false, arg);

            String message = "测试消息";
            createChannel.basicPublish("order.exchange", "routing_key_myQueue", null, message.getBytes());
            System.out.println("消息发送成功");
        } catch (Exception e) {
            e.printStackTrace();
        } finally {
            if (createChannel != null) {
                createChannel.close();
            }
            if (newConnection != null) {
                newConnection.close();
            }
        }

    }
}
结果:
(1)生成两个Exchange
(2)队列myQueue的死信队列有属性
2. 消费者:
一个消费者监听正常队列,一个消费者监听死信队列。(只是绑定的交换机不同)
消费者一:监听正常队列
package rabbitmq;

import java.io.IOException;
import java.util.Date;
import java.util.concurrent.TimeUnit;
import java.util.concurrent.TimeoutException;

import com.rabbitmq.client.Channel;
import com.rabbitmq.client.Connection;
import com.rabbitmq.client.ConnectionFactory;
import com.rabbitmq.client.DefaultConsumer;
import com.rabbitmq.client.Envelope;
import com.rabbitmq.client.AMQP.BasicProperties;

public class Consumer {

    public static ConnectionFactory getConnectionFactory() {
        // 创建连接工程,下面给出的是默认的case
        ConnectionFactory factory = new ConnectionFactory();
        factory.setHost("192.168.99.100");
        factory.setPort(5672);
        factory.setUsername("guest");
        factory.setPassword("guest");
        factory.setVirtualHost("/");
        return factory;
    }

    public static void main(String[] args) throws IOException, TimeoutException {
        ConnectionFactory connectionFactory = getConnectionFactory();
        Connection newConnection = null;
        Channel createChannel = null;
        try {
            newConnection = connectionFactory.newConnection();
            createChannel = newConnection.createChannel();

            // 队列绑定交换机-channel.queueBind(队列名, 交换机名, 路由key[广播消息设置为空串])
            createChannel.queueBind("myQueue", "order.exchange", "routing_key_myQueue");

            createChannel.basicConsume("myQueue", false, "", new DefaultConsumer(createChannel) {
                @Override
                public void handleDelivery(String consumerTag, Envelope envelope, BasicProperties properties,
                        byte[] body) throws IOException {

                    System.out.println("consumerTag: " + consumerTag);
                    System.out.println("envelope: " + envelope);
                    System.out.println("properties: " + properties);
                    String string = new String(body, "UTF-8");
                    System.out.println("接收到消息: -》 " + string);

                    long deliveryTag = envelope.getDeliveryTag();
                    Channel channel = this.getChannel();
                    System.out.println("拒绝消息, 使之进入死信队列");
                    System.out.println("时间: " + new Date());
                    try {
                        TimeUnit.SECONDS.sleep(3);
                    } catch (InterruptedException e) {
                    }

                    // basicReject第二个参数为false进入死信队列或丢弃
                    channel.basicReject(deliveryTag, false);
                }
            });

        } catch (Exception e) {
            e.printStackTrace();
        } finally {
        }

    }
}
消费者二:监听死信队列
package rabbitmq;

import java.io.IOException;
import java.util.Date;
import java.util.concurrent.TimeoutException;

import com.rabbitmq.client.Channel;
import com.rabbitmq.client.Connection;
import com.rabbitmq.client.ConnectionFactory;
import com.rabbitmq.client.DefaultConsumer;
import com.rabbitmq.client.Envelope;
import com.rabbitmq.client.AMQP.BasicProperties;

public class Consumer2 {

    public static ConnectionFactory getConnectionFactory() {
        // 创建连接工程,下面给出的是默认的case
        ConnectionFactory factory = new ConnectionFactory();
        factory.setHost("192.168.99.100");
        factory.setPort(5672);
        factory.setUsername("guest");
        factory.setPassword("guest");
        factory.setVirtualHost("/");
        return factory;
    }

    public static void main(String[] args) throws IOException, TimeoutException {
        ConnectionFactory connectionFactory = getConnectionFactory();
        Connection newConnection = null;
        Channel createChannel = null;
        try {
            newConnection = connectionFactory.newConnection();
            createChannel = newConnection.createChannel();

            // 队列绑定交换机-channel.queueBind(队列名, 交换机名, 路由key[广播消息设置为空串])
            createChannel.queueBind("myQueue", "order.dead.exchange", "routing_key_myQueue");

            createChannel.basicConsume("myQueue", false, "", new DefaultConsumer(createChannel) {
                @Override
                public void handleDelivery(String consumerTag, Envelope envelope, BasicProperties properties,
                        byte[] body) throws IOException {

                    System.out.println("时间: " + new Date());

                    System.out.println("consumerTag: " + consumerTag);
                    System.out.println("envelope: " + envelope);
                    System.out.println("properties: " + properties);
                    String string = new String(body, "UTF-8");
                    System.out.println("接收到消息: -》 " + string);

                    long deliveryTag = envelope.getDeliveryTag();
                    Channel channel = this.getChannel();
                    channel.basicAck(deliveryTag, true);
                    System.out.println("死信队列中处理完消息息");
                }
            });

        } catch (Exception e) {
            e.printStackTrace();
        } finally {
        }

    }
}
结果: 消费者一先正常监听到,basicReject为false拒绝后进入死信队列;消费者二监听的死信队列收到消息。
消费者一打出的日志如下:
consumerTag: amq.ctag-0noHs24F0FsGe-dfwwqWNw
envelope: Envelope(deliveryTag=1, redeliver=false, exchange=order.exchange, routingKey=routing_key_myQueue)
properties: #contentHeader<basic>(content-type=null, content-encoding=null, headers=null, delivery-mode=null, priority=null, correlation-id=null, reply-to=null, expiration=null, message-id=null, timestamp=null, type=null, user-id=null, app-id=null, cluster-id=null)
接收到消息: -》 测试消息
拒绝消息, 使之进入死信队列
时间: Sat Nov 07 12:18:44 CST 2020
消费者二打出的日志如下:
时间: Sat Nov 07 12:18:47 CST 2020
consumerTag: amq.ctag-ajYMpMFkXHDiYWkD3XFJ7Q
envelope: Envelope(deliveryTag=1, redeliver=false, exchange=order.dead.exchange, routingKey=routing_key_myQueue)
properties: #contentHeader<basic>(content-type=null, content-encoding=null, headers={x-death=[{reason=rejected, count=1, exchange=order.exchange, time=Sat Nov 07 01:52:19 CST 2020, routing-keys=[routing_key_myQueue], queue=myQueue}]}, delivery-mode=null, priority=null, correlation-id=null, reply-to=null, expiration=null, message-id=null, timestamp=null, type=null, user-id=null, app-id=null, cluster-id=null)
接收到消息: -》 测试消息
死信队列中处理完消息息
注意:
进入死信队列之后,headers 加了一些死信相关的信息,包括原队列以及进入死信的原因。
补充:在队列进入死信队列之前也可以修改其routingKey,而且只有在指定x-dead-letter-exchange的前提下才能修改下面属性,否则会报错
(1)修改生产者声明队列的方式,如下:
// 声明一个正常的direct类型的交换机
            createChannel.exchangeDeclare("order.exchange", BuiltinExchangeType.DIRECT);
            // 声明死信交换机为===order.dead.exchange
            String dlxName = "order.dead.exchange";
            createChannel.exchangeDeclare(dlxName, BuiltinExchangeType.DIRECT);
            // 声明队列并指定死信交换机为上面死信交换机
            Map<String, Object> arg = new HashMap<String, Object>();
            arg.put("x-dead-letter-exchange", dlxName);
            // 修改进入死信队列的routingkey,如果不修改会使用默认的routingKey
            arg.put("x-dead-letter-routing-key", "routing_key_myQueue_dead");
            createChannel.queueDeclare("myQueue", true, false, false, arg);
(2)修改监听死信队列的消费者二:
// 队列绑定交换机-channel.queueBind(队列名, 交换机名, 路由key[广播消息设置为空串])
            createChannel.queueBind("myQueue", "order.dead.exchange", "routing_key_myQueue_dead");
结果,收到消费者二收到的信息如下:
时间: Sat Nov 07 12:27:08 CST 2020
consumerTag: amq.ctag-THqpEdYH_-iNeCIccgpuaw
envelope: Envelope(deliveryTag=1, redeliver=false, exchange=order.dead.exchange, routingKey=routing_key_myQueue_dead)
properties: #contentHeader<basic>(content-type=null, content-encoding=null, headers={x-death=[{reason=rejected, count=1, exchange=order.exchange, time=Sat Nov 07 02:00:41 CST 2020, routing-keys=[routing_key_myQueue], queue=myQueue}]}, delivery-mode=null, priority=null, correlation-id=null, reply-to=null, expiration=null, message-id=null, timestamp=null, type=null, user-id=null, app-id=null, cluster-id=null)
接收到消息: -》 测试消息
死信队列中处理完消息
二、延时队列
延迟队列,即消息进入队列后不会立即被消费,只有到达指定时间后,才会被消费
RabbitMQ本身没提供延时队列,我们可以利用消息的生存时间和死信队列实现延时
典型的应用场景就是订单30分钟内未支付就关闭订单,还有一种场景,账单24小时未确认,就发送提醒消息

2.1.1、yml配置
spring:
    rabbitmq:
        host: 192.168.99.12
        port: 5672
        username: guest
        password: guest
        # 发送确认
        publisher-confirms: true
        # 路由失败回调
        publisher-returns: true
        template:
            # 必须设置成true 消息路由失败通知监听者,false 将消息丢弃
            mandatory: true
        #消费端
        listener:
            simple:
                # 每次从RabbitMQ获取的消息数量
                prefetch: 1
                default-requeue-rejected: false
                # 每个队列启动的消费者数量
                concurrency: 1
                # 每个队列最大的消费者数量
                max-concurrency: 1
                # 签收模式为手动签收-那么需要在代码中手动ACK
                acknowledge-mode: manual
#邮件队列
email:
    queue:
        name: demo.email

#邮件交换器名称
exchange:
    name: demoTopicExchange

#死信队列
dead:
    letter:
        queue:
            name: demo.dead.letter
        exchange:
            name: demoDeadLetterTopicExchange

#延时队列
delay:
    queue:
        name: demo.delay
    exchange:
        name: demoDelayTopicExchange
2.1.2、延时队列配置
/**
 * rabbitmq 配置
 *
 * @author DUCHONG
 * @since 2020-08-23 14:05
 **/
@Configuration
@Slf4j
public class RabbitmqConfig {


    @Value("${email.queue.name}")
    private String emailQueue;
    @Value("${exchange.name}")
    private String topicExchange;
    @Value("${dead.letter.queue.name}")
    private String deadLetterQueue;
    @Value("${dead.letter.exchange.name}")
    private String deadLetterExchange;
    @Value("${delay.queue.name}")
    private String delayQueue;
    @Value("${delay.exchange.name}")
    private String delayExchange;

    @Bean
    public Queue emailQueue() {

        Map<String, Object> arguments = new HashMap<>(2);
        // 绑定死信交换机
        arguments.put("x-dead-letter-exchange", deadLetterExchange);
        // 绑定死信的路由key
        arguments.put("x-dead-letter-routing-key", deadLetterQueue+".#");

        return new Queue(emailQueue,true,false,false,arguments);
    }


    @Bean
    TopicExchange emailExchange() {
        return new TopicExchange(topicExchange);
    }


    @Bean
    Binding bindingEmailQueue() {
        return BindingBuilder.bind(emailQueue()).to(emailExchange()).with(emailQueue+".#");
    }


    //私信队列和交换器
    @Bean
    public Queue deadLetterQueue() {
        return new Queue(deadLetterQueue);
    }

    @Bean
    TopicExchange deadLetterExchange() {
        return new TopicExchange(deadLetterExchange);
    }

    @Bean
    Binding bindingDeadLetterQueue() {
        return BindingBuilder.bind(deadLetterQueue()).to(deadLetterExchange()).with(deadLetterQueue+".#");
    }
    //延时队列
    @Bean
    public Queue delayQueue() {
        return new Queue(delayQueue);
    }

    @Bean
    CustomExchange delayExchange() {
        Map<String, Object> args = new HashMap<>();
        args.put("x-delayed-type", "topic");
        //参数二为类型:必须是x-delayed-message
        return new CustomExchange(delayExchange, "x-delayed-message", true, false, args);

    }

    @Bean
    Binding bindingDelayQueue() {
        return BindingBuilder.bind(delayQueue()).to(delayExchange()).with(delayQueue+".#").noargs();
    }
}
2.2、消息发送方
30分钟时间太久了,这里延时2分钟来看效果
@Configuration
@EnableScheduling
@Slf4j
public class ScheduleController {

    @Autowired
    RabbitTemplate rabbitTemplate;

    @Value("${exchange.name}")
    private String topicExchange;

    @Value("${delay.exchange.name}")
    private String delayTopicExchange;

    @Scheduled(cron = "0 0/1 * * * ?")
    public void sendEmailMessage() {

        String msg = RandomStringUtils.randomAlphanumeric(8);
        JSONObject email=new JSONObject();
        email.put("content",msg);
        email.put("to","[email protected]");
        CorrelationData correlationData=new CorrelationData(UUID.randomUUID().toString());
        rabbitTemplate.convertAndSend(topicExchange,"demo.email.x",email.toJSONString(),correlationData);
        log.info("---发送 email 消息---{}---messageId---{}",email,correlationData.getId());
    }


    @Scheduled(cron = "0 0/1 * * * ?")
    public void sendDelayOrderMessage() throws Exception{

        //订单号 id实际是保存订单后返回的,这里用uuid代替
        String orderId = UUID.randomUUID().toString();
        // 模拟订单信息
        JSONObject order=new JSONObject();
        order.put("orderId",orderId);
        order.put("goodsName","vip充值");
        order.put("orderAmount","99.00");
        CorrelationData correlationData=new CorrelationData(orderId);
        MessageProperties messageProperties = new MessageProperties();
        messageProperties.setMessageId(orderId);
        //30分钟时间太长,这里延时120s消费
        messageProperties.setHeader("x-delay", 120000);
        Message message = new Message(order.toJSONString().getBytes(CharEncoding.UTF_8), messageProperties);

        rabbitTemplate.convertAndSend(delayTopicExchange,"demo.delay.x",message,correlationData);

        log.info("---发送 order 消息---{}---orderId---{}",order,correlationData.getId());
        //睡一会,为了看延迟效果
        TimeUnit.MINUTES.sleep(10);
    }
}
2.3、消息消费方
@Component
@Slf4j
public class MessageHandler {


    /**
     * 邮件发送
     * @param message
     * @param channel
     * @param headers
     * @throws IOException
     */
    @RabbitListener(queues ="demo.email")
    @RabbitHandler
    public void handleEmailMessage(Message message, Channel channel, @Headers Map<String,Object> headers) throws IOException {

        try {

            String msg=new String(message.getBody(), CharEncoding.UTF_8);
            JSONObject jsonObject = JSON.parseObject(msg);
            jsonObject.put("messageId",headers.get("spring_returned_message_correlation"));
            log.info("---接受到消息---{}",jsonObject);
			//主动异常
			int m=1/0;
            //手动签收
            channel.basicAck(message.getMessageProperties().getDeliveryTag(),false);
        }
        catch (Exception e) {
            log.info("handleEmailMessage捕获到异常,拒绝重新入队---消息ID---{}", headers.get("spring_returned_message_correlation"));
            //异常,ture 重新入队,或者false,进入死信队列
            channel.basicNack(message.getMessageProperties().getDeliveryTag(),false,false);

        }
    }

    /**
     * 死信消费者,自动签收开启状态下,超过重试次数,或者手动签收,reject或者Nack
     * @param message
     */
    @RabbitListener(queues = "demo.dead.letter")
    public void handleDeadLetterMessage(Message message, Channel channel,@Headers Map<String,Object> headers) throws IOException {

        //可以考虑数据库记录,每次进来查数量,达到一定的数量,进行预警,人工介入处理
        log.info("接收到死信消息:---{}---消息ID---{}", new String(message.getBody()),headers.get("spring_returned_message_correlation"));
		//回复ack
        channel.basicAck(message.getMessageProperties().getDeliveryTag(),false);
    }

    /**
     * 延时队列消费
     * @param message
     * @param channel
     * @param headers
     * @throws IOException
     */
    @RabbitListener(queues ="demo.delay")
    @RabbitHandler
    public void handleOrderDelayMessage(Message message, Channel channel, @Headers Map<String,Object> headers) throws IOException {

        try {

            String msg=new String(message.getBody(), CharEncoding.UTF_8);
            JSONObject jsonObject = JSON.parseObject(msg);
            log.info("---接受到订单消息---orderId---{}",message.getMessageProperties().getMessageId());
            log.info("---订单信息---order---{}",jsonObject);
            //业务逻辑,根据订单id获取订单信息,如果还未支付,设置关闭状态,如果已支付,不做任何处理
            //手动签收
            channel.basicAck(message.getMessageProperties().getDeliveryTag(),false);
        }
        catch (Exception e) {
            log.info("handleOrderDelayMessage捕获到异常,重新入队---orderId---{}", headers.get("spring_returned_message_correlation"));
            //异常,ture 重新入队,或者false,进入死信队列
            channel.basicNack(message.getMessageProperties().getDeliveryTag(),false,true);

        }
    }

}
2.4、结果
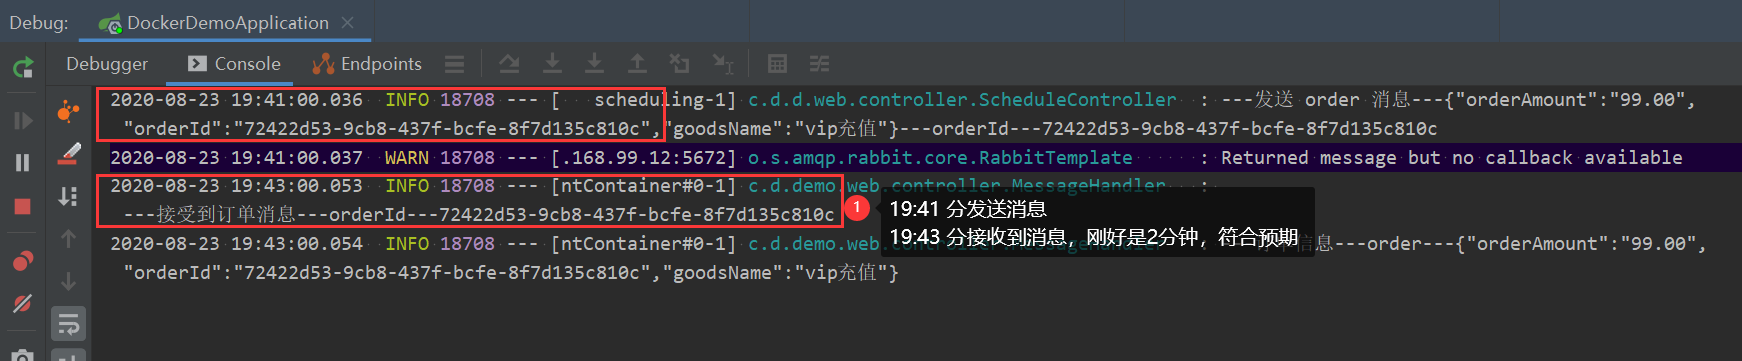
运行结果显示,同一个订单号的消息,发送过后2分钟,消费者才接受到,符合预期
https://www.cnblogs.com/geekdc/p/13550620.html