配置与管理WEB服务器
[实例1]
某公司新购一台服务器,服务器上已安装Linux操作系统,现要求将服务器配置成Apache服务器,IP地址为:192.168.1.100,给公司员工提供基本Web服务。具体要求如下:
a.设置主目录的路径为/home/www/web.
b.添加index.html文件作为默认文档。
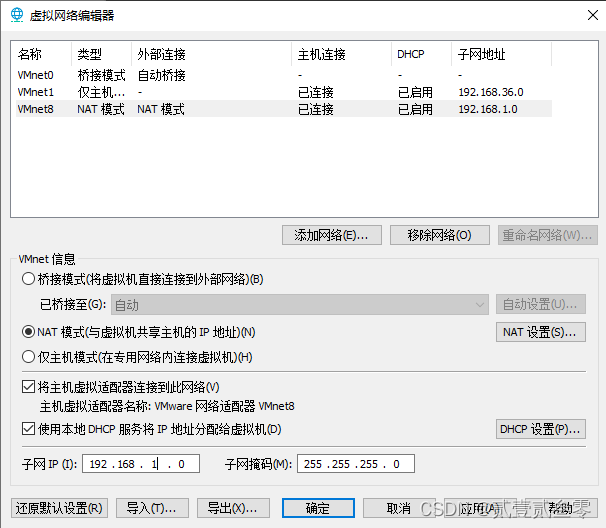
1、配置网络环境,设置服务器模式为NAT模式,在VMware中设置虚拟网络编辑器中NAT模式子网IP为192.168.1.0
[root@hnsw 桌面]# ifconfig
eno16777736: flags=4163<UP,BROADCAST,RUNNING,MULTICAST>  mtu 1500
        inet 192.168.1.128  netmask 255.255.255.0  broadcast 192.168.1.255
        inet6 fe80::20c:29ff:fe08:ae0d  prefixlen 64  scopeid 0x20<link>
        ether 00:0c:29:08:ae:0d  txqueuelen 1000  (Ethernet)
        RX packets 36  bytes 4271 (4.1 KiB)
        RX errors 0  dropped 0  overruns 0  frame 0
        TX packets 52  bytes 6833 (6.6 KiB)
        TX errors 0  dropped 0 overruns 0  carrier 0  collisions 0

lo: flags=73<UP,LOOPBACK,RUNNING>  mtu 65536
        inet 127.0.0.1  netmask 255.0.0.0
        inet6 ::1  prefixlen 128  scopeid 0x10<host>
        loop  txqueuelen 0  (Local Loopback)
        RX packets 6  bytes 560 (560.0 B)
        RX errors 0  dropped 0  overruns 0  frame 0
        TX packets 6  bytes 560 (560.0 B)
        TX errors 0  dropped 0 overruns 0  carrier 0  collisions 0

[root@hnsw 桌面]# nmtui
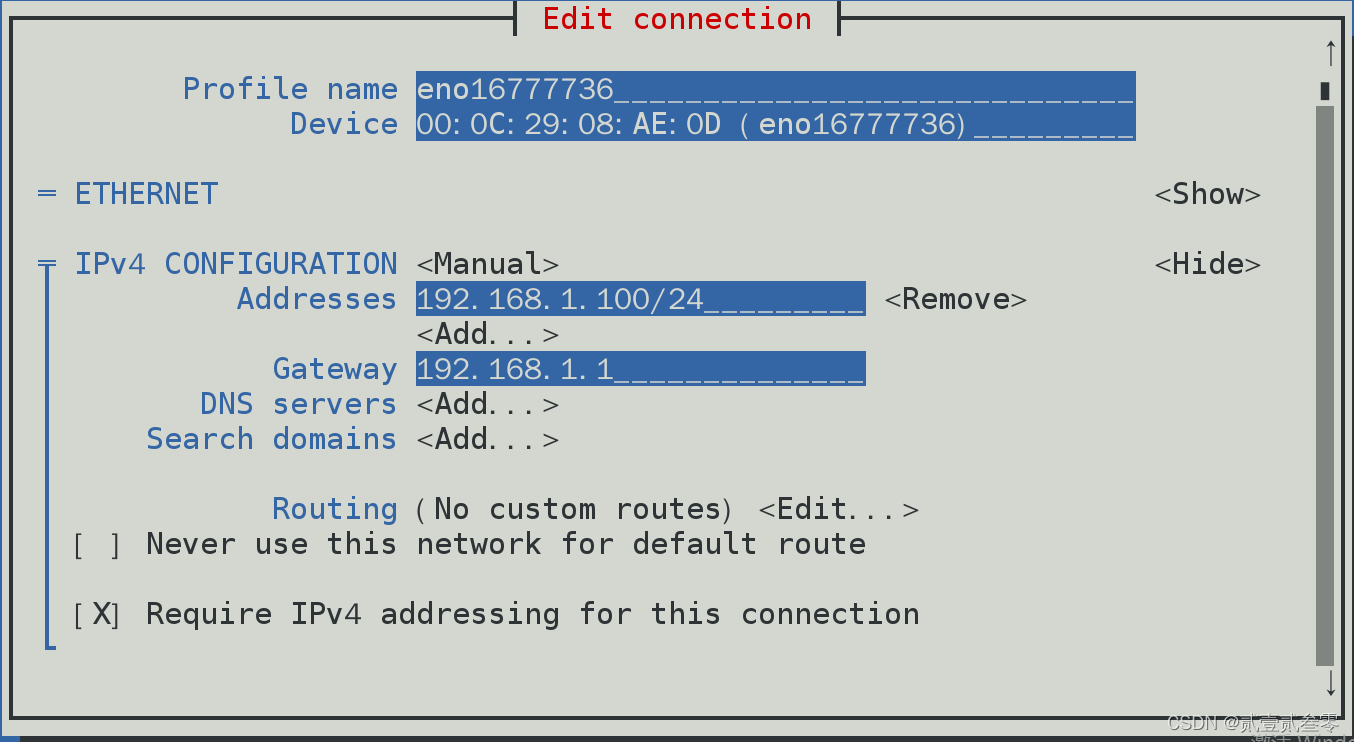
[root@hnsw 桌面]# systemctl restart network
[root@hnsw 桌面]# ifconfig
eno16777736: flags=4163<UP,BROADCAST,RUNNING,MULTICAST>  mtu 1500
        inet 192.168.1.100  netmask 255.255.255.0  broadcast 192.168.1.255
        inet6 fe80::20c:29ff:fe08:ae0d  prefixlen 64  scopeid 0x20<link>
        ether 00:0c:29:08:ae:0d  txqueuelen 1000  (Ethernet)
        RX packets 72  bytes 7355 (7.1 KiB)
        RX errors 0  dropped 0  overruns 0  frame 0
        TX packets 95  bytes 11147 (10.8 KiB)
        TX errors 0  dropped 0 overruns 0  carrier 0  collisions 0

lo: flags=73<UP,LOOPBACK,RUNNING>  mtu 65536
        inet 127.0.0.1  netmask 255.0.0.0
        inet6 ::1  prefixlen 128  scopeid 0x10<host>
        loop  txqueuelen 0  (Local Loopback)
        RX packets 10  bytes 980 (980.0 B)
        RX errors 0  dropped 0  overruns 0  frame 0
        TX packets 10  bytes 980 (980.0 B)
        TX errors 0  dropped 0 overruns 0  carrier 0  collisions 0
2、挂载镜像,配置YUM源,下载安装HTTPD软件包
[root@localhost Desktop]# mkdir /mnt/cdrom
[root@localhost Desktop]# mount /dev/sr0 /mnt/cdrom/
mount: /dev/sr0 is write-protected, mounting read-only
[root@localhost Desktop]# vim /etc/yum.repos.d/a.repo
[a]
name=a
baseurl=file:///mnt/cdrom
enabled=1
gpgcheck=0
[root@hnsw mnt]# yum install -y httpd
[root@hnsw mnt]# systemctl status httpd
httpd.service - The Apache HTTP Server
   Loaded: loaded (/usr/lib/systemd/system/httpd.service; disabled)
   Active: inactive (dead)

[root@hnsw mnt]# systemctl start httpd
[root@hnsw mnt]# systemctl status httpd
httpd.service - The Apache HTTP Server
   Loaded: loaded (/usr/lib/systemd/system/httpd.service; disabled)
   Active: active (running) since 一 2022-11-21 16:54:16 CST; 3s ago
 Main PID: 5059 (httpd)
   Status: "Processing requests..."
   CGroup: /system.slice/httpd.service
           ├─5059 /usr/sbin/httpd -DFOREGROUND
           ├─5061 /usr/sbin/httpd -DFOREGROUND
           ├─5062 /usr/sbin/httpd -DFOREGROUND
           ├─5063 /usr/sbin/httpd -DFOREGROUND
           ├─5064 /usr/sbin/httpd -DFOREGROUND
           └─5065 /usr/sbin/httpd -DFOREGROUND
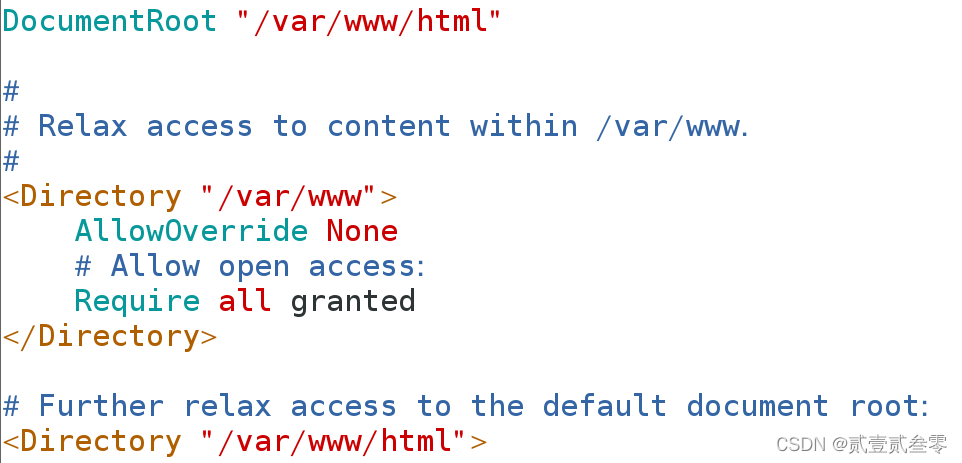
在默认情况下,网站数据保存在/var/www/html目录中,如果想把保存网站数据的目录修改为/var/ www/web目录,需要修改配置文件,以下是修改前后对比。
[root@hnsw mnt]# vim /etc/httpd/conf/httpd.conf
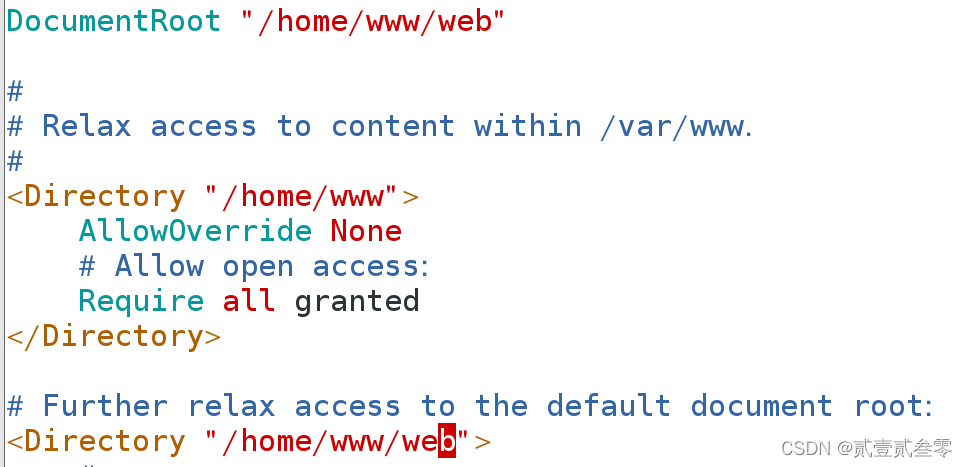
[root@hnsw mnt]# mkdir /home/www/web -p
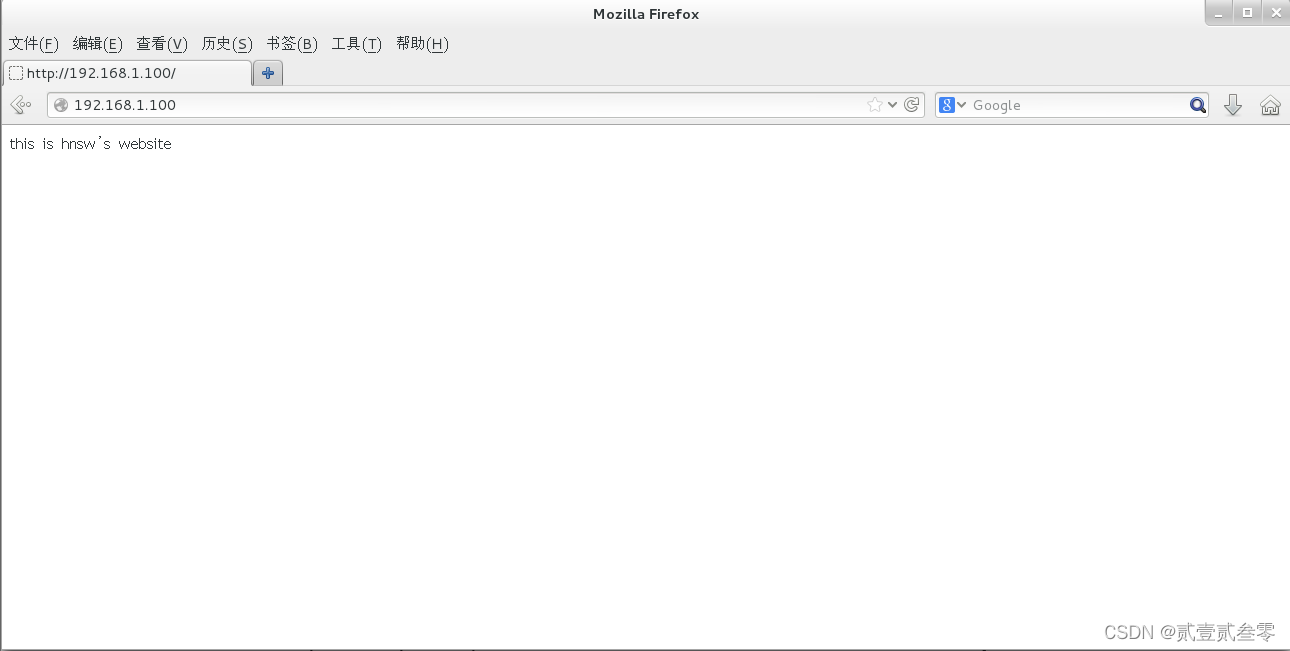
[root@hnsw mnt]# echo "this is hnsw's website" > /home/www/web/index.html
[root@hnsw mnt]# systemctl restart httpd
打开浏览器输入192.168.1.100验证,发现失败,这是由于httpd服务程序的功能是允许用户访问网站内容,SELinux会默认放行用户对网站的请求操作。但是,我们将网站数据的默认保存目录修改为/home/www/web,/home目录是用来存放普通用户的家目录数据,而httpd提供的网站服务获取普通用户家目录中的数据违反了SELinux的监管原则。
在ls命令中,-Z参数用于查看文件的安全上下文值,-d参数代表对象是个文件夹,我们来查看原始网站数据的保存目录与当前网站数据的保存目录是否拥有不同的SELinux安全上下文值。
[root@hnsw 桌面]# ls -Zd /var/www/html/
drwxr-xr-x. root root system_u:object_r:httpd_sys_content_t:s0 /var/www/html/
[root@hnsw 桌面]# ls -Zd /home/www/web/
drwxr-xr-x. root root unconfined_u:object_r:home_root_t:s0 /home/www/web/
[root@hnsw 桌面]# semanage fcontext -a -t httpd_sys_content_t /home/www/web
[root@hnsw 桌面]# semanage fcontext -a -t httpd_sys_content_t /home/www/web/*
在文件上设置的SELinux安全上下文是由用户段、角色段以及类型段等多个信息项共同组成的。其中,用户段system_u代表系统进程的身份,角色段object_r代表文件目录的角色,类型段httpd_sys_content_t代表网站服务的系统文件。
针对当前这种情况,我们只需要使用semanage命令,将当前网站目录/home/www/web/的SELinux安全上下文修改为跟原始网站目录的一样就行了。
semanage命令用于管理SELinux的策略,英文全称为“SELinux manage”,语法格式为“semanage [参数] [文件]”。
SELinux服务极大地提升了Linux系统的安全性,将用户权限牢牢地锁在笼子里。semanage命令不仅能够像传统的chcon命令那样设置文件、目录的策略,还能够管理网络端口、消息接口。使用semanage命令时,经常用到的几个参数及其作用如表所示。
semanage命令中常用参数以及作用

| 参数 | 作用 |
|---|---|
| -l | 查询 |
| -a | 添加 |
| -m | 修改 |
| -d | 删除 |
向新的网站数据目录中新添加一条SELinux安全上下文,让这个目录以及里面的所有文件能够被httpd服务程序访问到。
[root@hnsw 桌面]# semanage fcontext -a -t httpd_sys_content_t /home/www/web
[root@hnsw 桌面]# semanage fcontext -a -t httpd_sys_content_t /home/www/web/*
注意,在执行上述设置之后,还无法立即访问网站,还需要使用restorecon命令将设置好的SELinux安全上下文立即生效。在使用restorecon命令时,可以加上-Rv参数对指定的目录进行递归操作,以及显示SELinux安全上下文的修改过程。最后,再次刷新页面,就可以正常看到网页内容了。
[root@hnsw 桌面]# restorecon -Rv /home/www/web/
restorecon reset /home/www/web context unconfined_u:object_r:home_root_t:s0->unconfined_u:object_r:httpd_sys_content_t:s0
restorecon reset /home/www/web/index.html context unconfined_u:object_r:home_root_t:s0->unconfined_u:object_r:httpd_sys_content_t:s0
[实例2]
假如你是某学校的网络管理员,学校的域名为www.hnsw.com,学校计划为每位教师开通个人主页服务,为教师与学生之间建立沟通的平台。该学校网络拓扑图如图9-9所示。

图9-9 Web服务器搭建与配置网络拓扑
学校计划为每位教师开通个人主页服务,要求实现如下功能。
(1)网页文件上传完成后,立即自动发布,URL为http://www.hnsw.com/~用户名,并在网站中添加密码功能,只有通过身份验证的用户才能看到里面的内容。
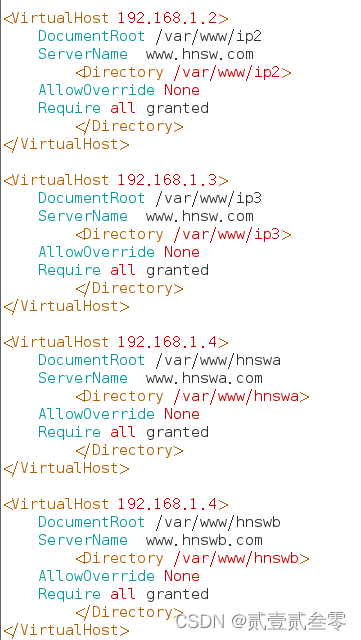
(2)使用192.168.1.2和192.168.1.3两个IP地址,创建基于IP地址的虚拟主机。其中IP地址为192.168.1.2的虚拟主机对应的主目录为/var/www/ip2,IP地址为192.168.1.3的虚拟主机对应的主目录为/var/www/ip3。
(3)创建基于www.hnswa.com和www.hnswb.com两个域名的虚拟主机,域名为www.hnswa.com的虚拟主机对应的主目录为/var/www/hnswa,域名为www.hnswb.com的虚拟主机对应的主目录为/var/www/hnswb
(4)配置Web服务器仅允许192.168.1.0/24网段的客户机访问该虚拟目录。
第一步,个人用户主页功能实现
httpd服务程序提供的个人用户主页功能可以让系统内所有的用户在自己的家目录中管理个人的网站,在httpd服务程序中,默认没有开启个人用户主页功能。我们开启个人用户主页功能;同时去掉UserDir public_html参数前面的井号(#)(UserDir参数表示网站数据在用户家目录中的保存目录名称,即public_html目录)。
[root@localhost 桌面]# vim /etc/httpd/conf.d/userdir.conf
<IfModule mod_userdir.c>
    #
    # UserDir is disabled by default since it can confirm the presence
    # of a username on the system (depending on home directory
    # permissions).
    #
   #UserDir disabled

    #
    # To enable requests to /~user/ to serve the user's public_html
    # directory, remove the "UserDir disabled" line above, and uncomment
    # the following line instead:
    #
    UserDir public_html
</IfModule>
[root@localhost 桌面]# su - student
[student@localhost ~]$ mkdir public_html
[student@localhost ~]$ echo "this is student's website" > /home/student/public_html/index.html
[student@localhost ~]$ chmod -R 755 /home/student/
[student@localhost ~]$ exit
登出
[root@localhost 桌面]# systemctl restart httpd.service
重新启动httpd服务程序,在浏览器的地址栏中输入网址,其格式为“网址/~用户名”
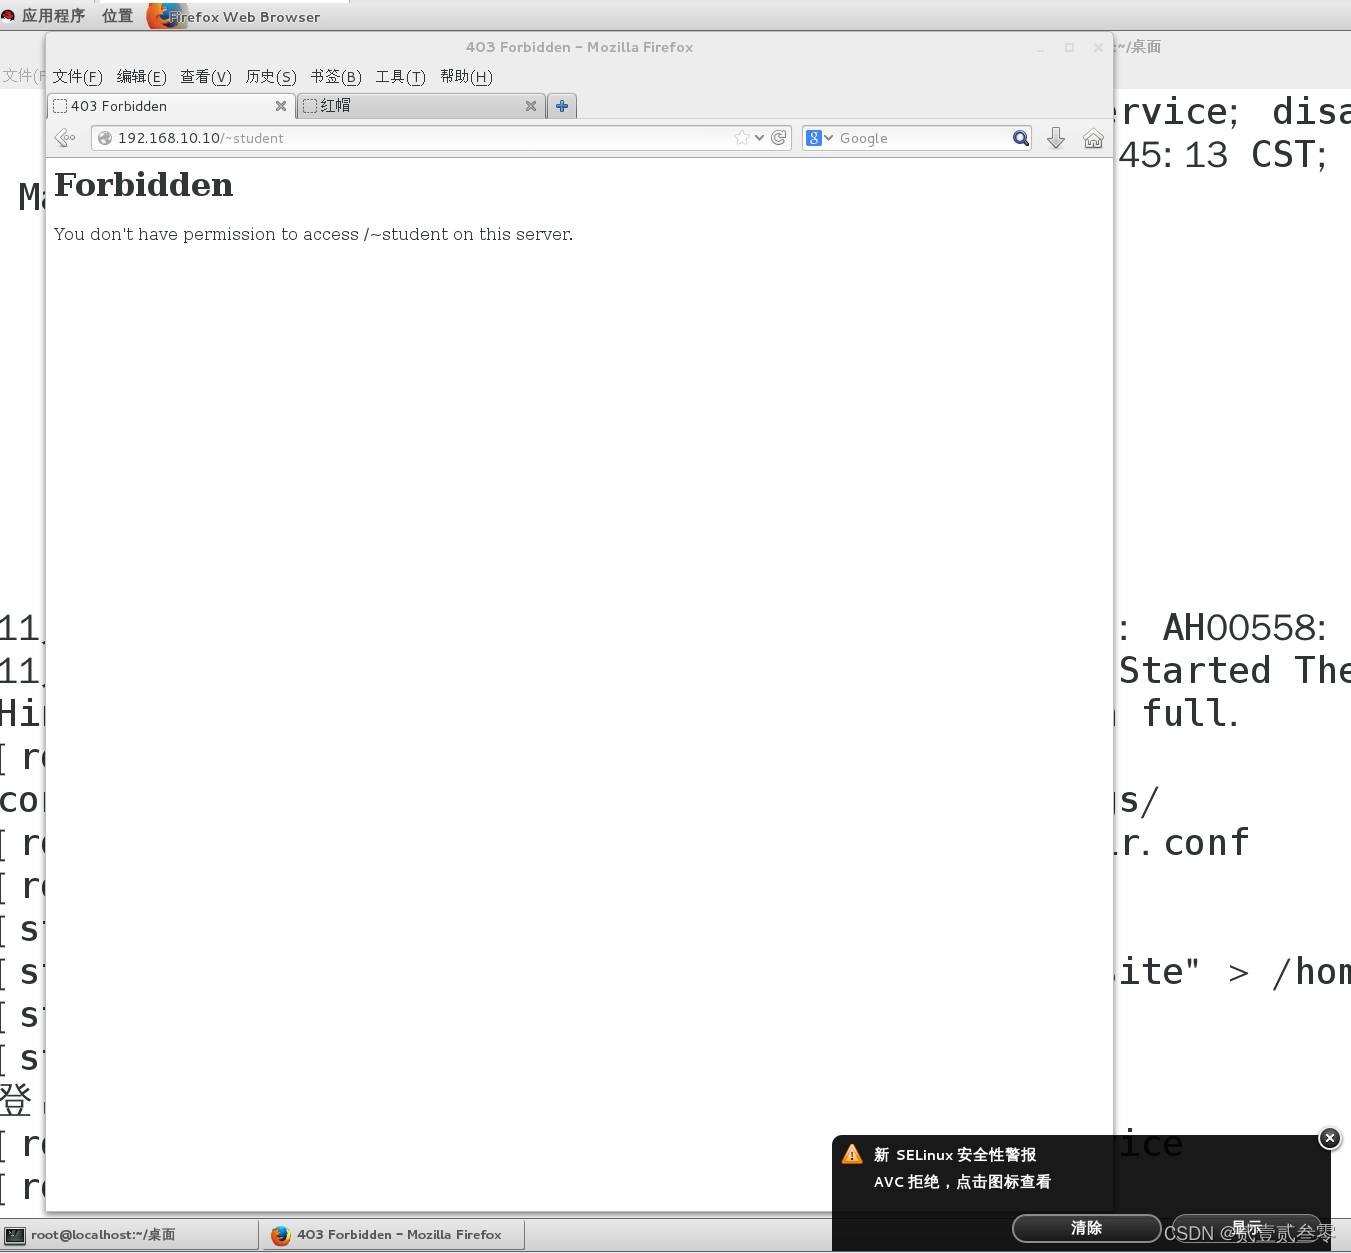
系统显示报错页面,检查SELinux域。
[root@localhost 桌面]# getsebool -a |grep http
httpd_anon_write --> off
httpd_builtin_scripting --> on
httpd_can_check_spam --> off
httpd_can_connect_ftp --> off
httpd_can_connect_ldap --> off
httpd_can_connect_mythtv --> off
httpd_can_connect_zabbix --> off
httpd_can_network_connect --> off
httpd_can_network_connect_cobbler --> off
httpd_can_network_connect_db --> off
httpd_can_network_memcache --> off
httpd_can_network_relay --> off
httpd_can_sendmail --> off
httpd_dbus_avahi --> off
httpd_dbus_sssd --> off
httpd_dontaudit_search_dirs --> off
httpd_enable_cgi --> on
httpd_enable_ftp_server --> off
httpd_enable_homedirs --> off
httpd_execmem --> off
httpd_graceful_shutdown --> on
httpd_manage_ipa --> off
httpd_mod_auth_ntlm_winbind --> off
httpd_mod_auth_pam --> off
httpd_read_user_content --> off
httpd_run_stickshift --> off
httpd_serve_cobbler_files --> off
httpd_setrlimit --> off
httpd_ssi_exec --> off
httpd_sys_script_anon_write --> off
httpd_tmp_exec --> off
httpd_tty_comm --> off
httpd_unified --> off
httpd_use_cifs --> off
httpd_use_fusefs --> off
httpd_use_gpg --> off
httpd_use_nfs --> off
httpd_use_openstack --> off
httpd_use_sasl --> off
httpd_verify_dns --> off
named_tcp_bind_http_port --> off
prosody_bind_http_port --> off
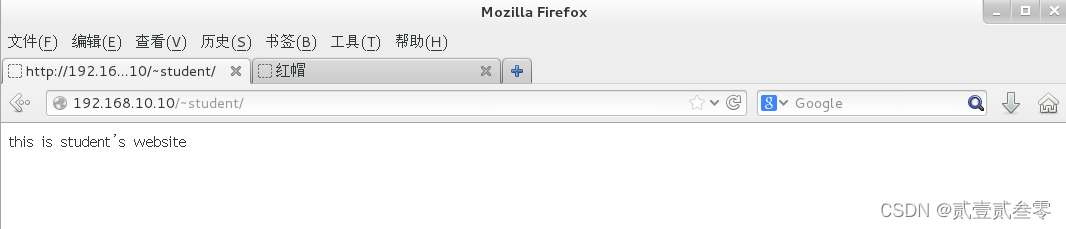
[root@localhost 桌面]# setsebool -P httpd_enable_homedirs=on
[root@localhost 桌面]# getsebool -a |grep httpd_enable_homedirs
httpd_enable_homedirs --> on
刷新网页
第二步 密码功能实现
1、使用htpasswd命令生成密码数据库及密码数据库的存放文件。-c参数表示第一次生成;最后指定验证要用到的用户名称(该用户不必是系统中已有的本地账户)。
[root@localhost 桌面]# htpasswd -c /etc/httpd/passwd student
New password:
Re-type new password:
Adding password for user student
[root@localhost 桌面]#vim /etc/httpd/conf.d/userdir.conf
<Directory "/home/*/public_html">
    AllowOverride all
    authuserfile "/etc/httpd/passwd"         //刚刚生成出的密码验证文件保存路径
    authname "welcome to my website"   //当用户访问网站时的提示信息
    authtype basic                                   //验证方式为口令模式
    Require user student                        //访问网站时需要验证的用户名称
</Directory>
[root@localhost 桌面]# systemctl restart httpd.service
第三步 创建基于IP地址的虚拟主机
[root@localhost 桌面]# nmtui
[root@localhost 桌面]# systemctl restart network
[root@localhost 桌面]# ifconfig
eno16777736: flags=4163<UP,BROADCAST,RUNNING,MULTICAST> mtu 1500
inet 192.168.1.2 netmask 255.255.255.0 broadcast 192.168.1.255
inet6 fe80::20c:29ff:fe63:fcd2 prefixlen 64 scopeid 0x20<link>
ether 00:0c:29:63:fc:d2 txqueuelen 1000 (Ethernet)
RX packets 357 bytes 32068 (31.3 KiB)
RX errors 0 dropped 0 overruns 0 frame 0
TX packets 239 bytes 24209 (23.6 KiB)
TX errors 0 dropped 0 overruns 0 carrier 0 collisions 0
lo: flags=73<UP,LOOPBACK,RUNNING> mtu 65536
inet 127.0.0.1 netmask 255.0.0.0
inet6 ::1 prefixlen 128 scopeid 0x10<host>
loop txqueuelen 0 (Local Loopback)
RX packets 401 bytes 34420 (33.6 KiB)
RX errors 0 dropped 0 overruns 0 frame 0
TX packets 401 bytes 34420 (33.6 KiB)
TX errors 0 dropped 0 overruns 0 carrier 0 collisions 0
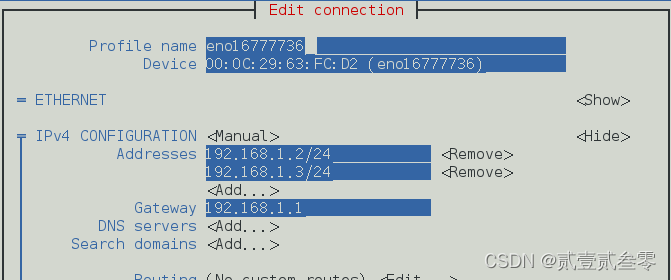
[root@localhost 桌面]# nmcli device show
GENERAL.设备: eno16777736
GENERAL.类型: ethernet
GENERAL.硬盘: 00:0C:29:63:FC:D2
GENERAL.MTU: 1500
GENERAL.状态: 100 (连接的)
GENERAL.CONNECTION: eno16777736
GENERAL.CON-PATH: /org/freedesktop/NetworkManager/ActiveConnection/2
WIRED-PROPERTIES.容器: 开
IP4.地址[1]: ip = 192.168.1.2/24, gw = 192.168.1.1
IP4.地址[2]: ip = 192.168.1.3/24, gw = 192.168.1.1
IP6.地址[1]: ip = fe80::20c:29ff:fe63:fcd2/64, gw = ::
GENERAL.设备: lo
GENERAL.类型: loopback
GENERAL.硬盘: 00:00:00:00:00:00
GENERAL.MTU: 65536
GENERAL.状态: 10 (未管理)
GENERAL.CONNECTION: --
GENERAL.CON-PATH: --
IP4.地址[1]: ip = 127.0.0.1/8, gw = 0.0.0.0
IP6.地址[1]: ip = ::1/128, gw = ::
[root@localhost 桌面]# mkdir /var/www/ip2
[root@localhost 桌面]# mkdir /var/www/ip3
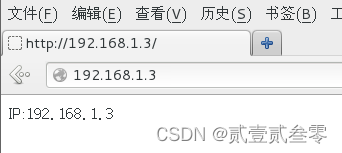
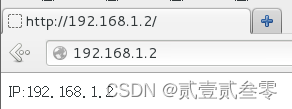
[root@localhost 桌面]# echo "IP:192.168.1.2" > /var/www/ip2/index.html
[root@localhost 桌面]# echo "IP:192.168.1.3" > /var/www/ip3/index.html
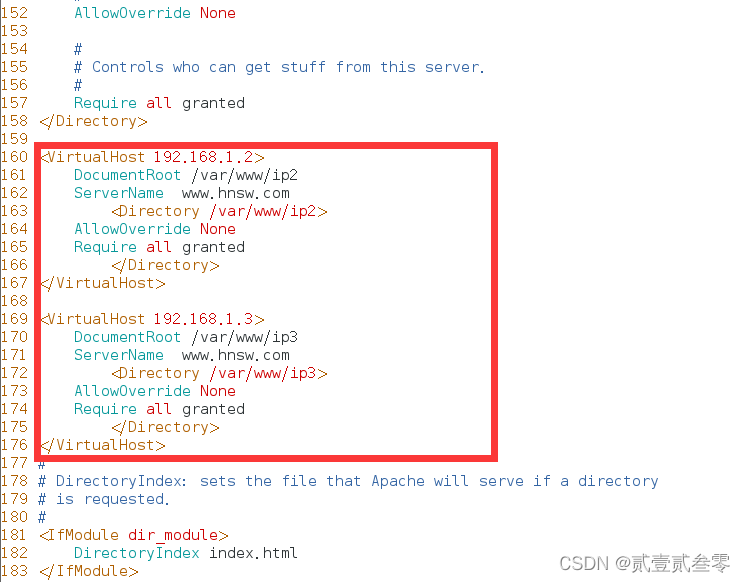
[root@localhost 桌面]# vim /usr/share/doc/httpd-2.4.6/httpd-vhosts.conf
进入模板文件/usr/share/doc/httpd-2.4.6/httpd-vhosts.conf复制部分内容至配置文件/etc/httpd/conf/httpd.conf中,修改参数为下图红框内容。
重启服务,测试。查看测试结果。
第四步 创建基于主机域名的虚拟主机
[root@localhost 桌面]# nmtui
[root@localhost 桌面]# systemctl restart network
[root@localhost 桌面]# nmcli device show
GENERAL.设备: eno16777736
GENERAL.类型: ethernet
GENERAL.硬盘: 00:0C:29:63:FC:D2
GENERAL.MTU: 1500
GENERAL.状态: 100 (连接的)
GENERAL.CONNECTION: eno16777736
GENERAL.CON-PATH: /org/freedesktop/NetworkManager/ActiveConnection/3
WIRED-PROPERTIES.容器: 开
IP4.地址[1]: ip = 192.168.1.2/24, gw = 192.168.1.1
IP4.地址[2]: ip = 192.168.1.3/24, gw = 192.168.1.1
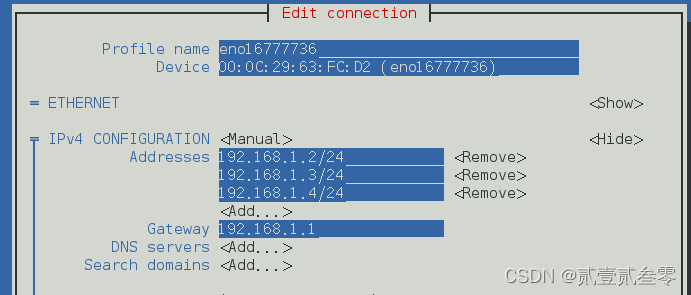
IP4.地址[3]: ip = 192.168.1.4/24, gw = 192.168.1.1
IP6.地址[1]: ip = fe80::20c:29ff:fe63:fcd2/64, gw = ::
GENERAL.设备: lo
GENERAL.类型: loopback
GENERAL.硬盘: 00:00:00:00:00:00
GENERAL.MTU: 65536
GENERAL.状态: 10 (未管理)
GENERAL.CONNECTION: --
GENERAL.CON-PATH: --
IP4.地址[1]: ip = 127.0.0.1/8, gw = 0.0.0.0
IP6.地址[1]: ip = ::1/128, gw = ::
[root@localhost 桌面]# vim /etc/httpd/conf/httpd.conf
编辑/etc/hosts文件设置主机域名解析到指定IP地址,
[root@localhost 桌面]# vim /etc/hosts
127.0.0.1 localhost localhost.localdomain localhost4 localhost4.localdomain4
::1 localhost localhost.localdomain localhost6 localhost6.localdomain6
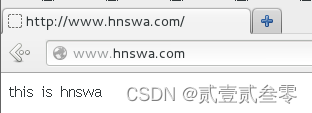
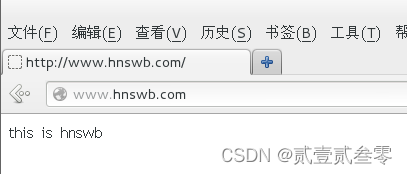
192.168.1.4 www.hnswa.com www.hnswb.com
[root@localhost 桌面]# mkdir /var/www/hnswa
[root@localhost 桌面]# mkdir /var/www/hnswb
[root@localhost 桌面]# echo "this is hnswa" > /var/www/hnswa/index.html
[root@localhost 桌面]# echo "this is hnswb" > /var/www/hnswb/index.htm
[root@localhost 桌面]# systemctl restart httpd.service
测试
第五步 配置访问控制
通过配置项order,Deny from,Allow from,可根据客户机的主机名或IP地址来限制是否客户端访问。使用Order配置项设置“allow,deny”或“deny,allow”,可决定主机应用“允许”,“拒绝”策略的先后顺序。
allow,deny:先允许后拒绝,默认拒绝所有未明确允许的客户机地址。 deny,allow:先拒绝后允许,默认允许所有未明确拒绝的客户机地址。
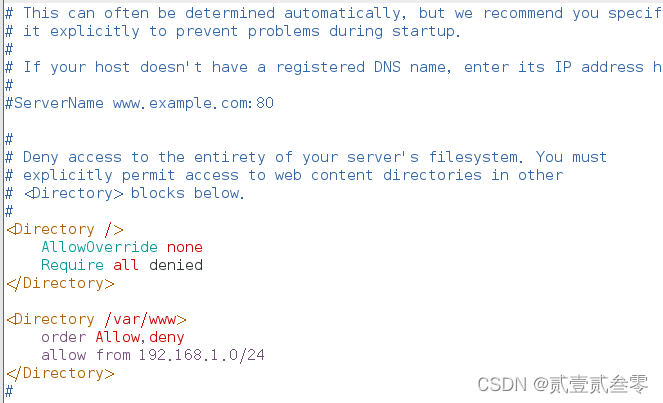
[root@localhost 桌面]# vim /etc/httpd/conf/httpd.conf
[root@localhost 桌面]# systemctl restart httpd.service
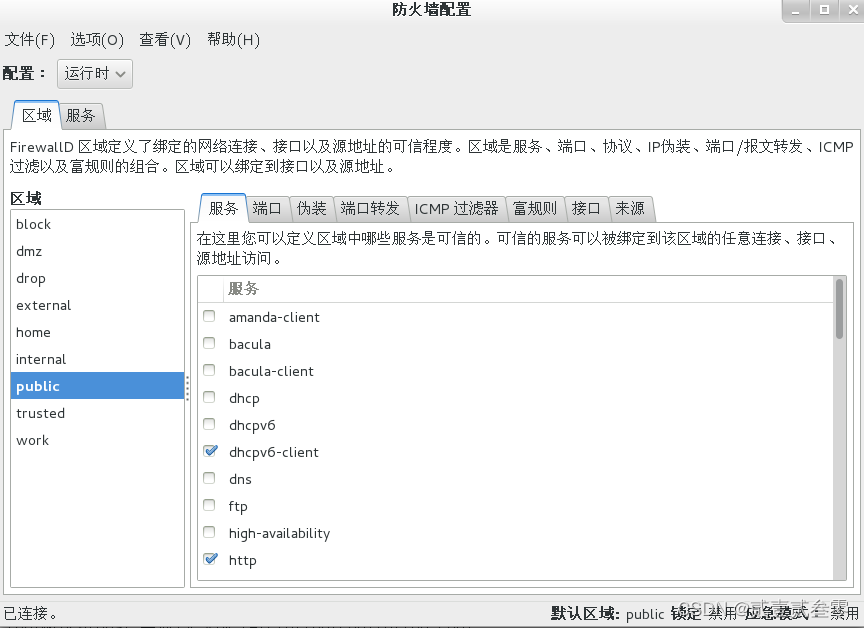
[root@localhost 桌面]# firewall-config