TableLayout
TableLayout使用表格的方式划分子组件。
支持的XML属性
TableLayout的共有XML属性继承自:Component
TableLayout的自有XML属性见下表:
| 属性名称 |
中文描述 |
取值 |
取值说明 |
使用案例 |
|---|---|---|---|---|
| alignment_type |
对齐方式 |
align_edges |
表示TableLayout内的组件按边界对齐。 |
ohos:alignment_type="align_edges" |
| align_contents |
表示TableLayout内的组件按边距对齐。 |
ohos:alignment_type="align_contents" |
||
| column_count |
列数 |
integer类型 |
可以直接设置整型数值,也可以引用integer资源。 |
ohos:column_count="3" ohos:column_count="$integer:count" |
| row_count |
行数 |
integer类型 |
可以直接设置整型数值,也可以引用integer资源。 |
ohos:row_count="2" ohos:row_count="$integer:count" |
| orientation |
排列方向 |
horizontal |
表示水平方向布局。 |
ohos:orientation="horizontal" |
| vertical |
表示垂直方向布局。 |
ohos:orientation="vertical" |
TableLayout的创建
- 在XML中创建TableLayout,示例代码如下:
<?xml version="1.0" encoding="utf-8"?>
<TableLayout
    xmlns:ohos="http://schemas.huawei.com/res/ohos"
    ohos:height="match_parent"
    ohos:width="match_parent"
    ohos:background_element="#87CEEB"
    ohos:padding="8vp">
</TableLayout>- 添加子组件
a.在graphic文件夹下创建Text的背景table_text_bg_element.xml,示例代码如下
<?xml version="1.0" encoding="utf-8"?>
<shape xmlns:ohos="http://schemas.huawei.com/res/ohos"
       ohos:shape="rectangle">
    <corners
        ohos:radius="5vp"/>
    <stroke
        ohos:width="1vp"
        ohos:color="gray"/>
    <solid
        ohos:color="#00BFFF"/>
</shape>
b.在TableLayout布局中添加子组件。
<?xml version="1.0" encoding="utf-8"?>
<TableLayout
xmlns:ohos="http://schemas.huawei.com/res/ohos"
ohos:height="match_parent"
ohos:width="match_parent"
ohos:background_element="#87CEEB"
ohos:padding="8vp">
<Text
ohos:height="60vp"
ohos:width="60vp"
ohos:background_element="$graphic:table_text_bg_element"
ohos:margin="8vp"
ohos:text="1"
ohos:text_alignment="center"
ohos:text_size="20fp"/>
<Text
ohos:height="60vp"
ohos:width="60vp"
ohos:background_element="$graphic:table_text_bg_element"
ohos:margin="8vp"
ohos:text="2"
ohos:text_alignment="center"
ohos:text_size="20fp"/>
<Text
ohos:height="60vp"
ohos:width="60vp"
ohos:background_element="$graphic:table_text_bg_element"
ohos:margin="8vp"
ohos:text="3"
ohos:text_alignment="center"
ohos:text_size="20fp"/>
<Text
ohos:height="60vp"
ohos:width="60vp"
ohos:background_element="$graphic:table_text_bg_element"
ohos:margin="8vp"
ohos:text="4"
ohos:text_alignment="center"
ohos:text_size="20fp"/>
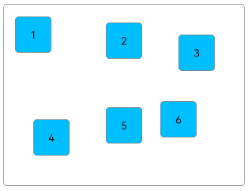
</TableLayout>TableLayout默认一列多行
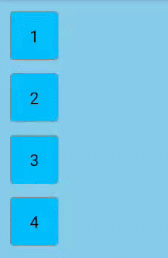
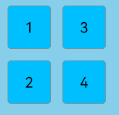
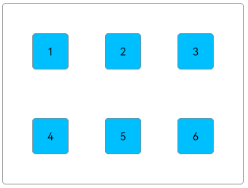
设置行列数
<TableLayout
    ...
    ohos:row_count="2"
    ohos:column_count="2">
设置TableLayout的行为2,列为2效果

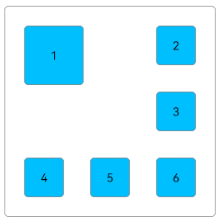
设置布局排列方向
在XML中设置布局排列方向,以“vertical”为例:
<TableLayout
    ...
    ohos:orientation="vertical">
    ...
</TableLayout>
设置布局排列方向为“vertical”的效果
设置对齐方式
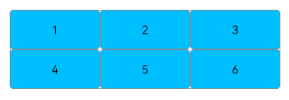
TableLayout提供两种对齐方式,边距对齐“align_contents”、边界对齐“align_edges”,默认为边距对齐“align_contents”。
- 边距对齐方式
代码如下:
<?xml version="1.0" encoding="utf-8"?>
<TableLayout
    xmlns:ohos="http://schemas.huawei.com/res/ohos"
    ohos:height="match_content"
    ohos:width="match_content"
    ohos:alignment_type="align_contents"
    ohos:background_element="$graphic:layout_borderline"
    ohos:column_count="3"
    ohos:padding="8vp">

    <Text
        ohos:height="48vp"
        ohos:width="48vp"
        ohos:background_element="$graphic:table_text_bg_element"
        ohos:margin="8vp"
        ohos:padding="8vp"
        ohos:text="1"
        ohos:text_alignment="center"
        ohos:text_size="14fp"/>

    <Text
        ohos:height="48vp"
        ohos:width="48vp"
        ohos:background_element="$graphic:table_text_bg_element"
        ohos:margin="16vp"
        ohos:padding="8vp"
        ohos:text="2"
        ohos:text_alignment="center"
        ohos:text_size="14fp"/>

    <Text
        ohos:height="48vp"
        ohos:width="48vp"
        ohos:background_element="$graphic:table_text_bg_element"
        ohos:margin="32vp"
        ohos:padding="8vp"
        ohos:text="3"
        ohos:text_alignment="center"
        ohos:text_size="14fp"/>

    <Text
        ohos:height="48vp"
        ohos:width="48vp"
        ohos:background_element="$graphic:table_text_bg_element"
        ohos:margin="32vp"
        ohos:padding="8vp"
        ohos:text="4"
        ohos:text_alignment="center"
        ohos:text_size="14fp"/>

    <Text
        ohos:height="48vp"
        ohos:width="48vp"
        ohos:background_element="$graphic:table_text_bg_element"
        ohos:margin="16vp"
        ohos:padding="8vp"
        ohos:text="5"
        ohos:text_alignment="center"
        ohos:text_size="14fp"/>

    <Text
        ohos:height="48vp"
        ohos:width="48vp"
        ohos:background_element="$graphic:table_text_bg_element"
        ohos:margin="8vp"
        ohos:padding="8vp"
        ohos:text="6"
        ohos:text_alignment="center"
        ohos:text_size="14fp"/>
</TableLayout>
边距对齐效果
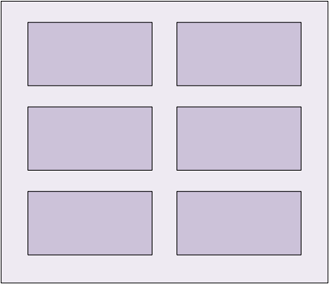
- 边界对齐方式
将TableLayout的对齐方式修改为边界对齐。
<TableLayout
    ...
    ohos:alignment_type="align_edges">

    ...

</TableLayout>
边界对齐效果
引用graphic文件夹下的背景资源文件为layout_borderline.xml,示例代码如下:
<?xml version="1.0" encoding="utf-8"?>
<shape xmlns:ohos="http://schemas.huawei.com/res/ohos"
ohos:shape="rectangle">
<corners
ohos:radius="5vp"/>
<stroke
ohos:width="1vp"
ohos:color="gray"/>
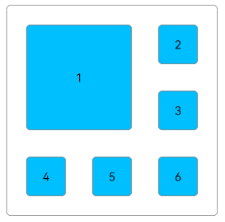
</shape>设置子组件的行列属性
实现合并单元格的效果
TableLayout合并单元格的效果可以通过设置子组件的行列属性来实现。
设置子组件的行列属性均为2的效果展示
在XML中创建TableLayout,并添加子组件,代码如下:
<?xml version="1.0" encoding="utf-8"?>
<TableLayout
    xmlns:ohos="http://schemas.huawei.com/res/ohos"
    ohos:height="match_content"
    ohos:width="match_content"
    ohos:alignment_type="align_edges"
    ohos:background_element="$graphic:layout_borderline"
    ohos:column_count="3"
    ohos:padding="8vp"
    ohos:row_count="3">

    <Text
        ohos:id="$+id:text_one"
        ohos:height="48vp"
        ohos:width="48vp"
        ohos:background_element="$graphic:table_text_bg_element"
        ohos:margin="16vp"
        ohos:padding="8vp"
        ohos:text="1"
        ohos:text_alignment="center"
        ohos:text_size="14fp"/>

    <Text
        ohos:height="48vp"
        ohos:width="48vp"
        ohos:background_element="$graphic:table_text_bg_element"
        ohos:margin="16vp"
        ohos:padding="8vp"
        ohos:text="2"
        ohos:text_alignment="center"
        ohos:text_size="14fp"/>

    <Text
        ohos:height="48vp"
        ohos:width="48vp"
        ohos:background_element="$graphic:table_text_bg_element"
        ohos:margin="16vp"
        ohos:padding="8vp"
        ohos:text="3"
        ohos:text_alignment="center"
        ohos:text_size="14fp"/>

    <Text
        ohos:height="48vp"
        ohos:width="48vp"
        ohos:background_element="$graphic:table_text_bg_element"
        ohos:margin="16vp"
        ohos:padding="8vp"
        ohos:text="4"
        ohos:text_alignment="center"
        ohos:text_size="14fp"/>

    <Text
        ohos:height="48vp"
        ohos:width="48vp"
        ohos:background_element="$graphic:table_text_bg_element"
        ohos:margin="16vp"
        ohos:padding="8vp"
        ohos:text="5"
        ohos:text_alignment="center"
        ohos:text_size="14fp"/>

    <Text
        ohos:height="48vp"
        ohos:width="48vp"
        ohos:background_element="$graphic:table_text_bg_element"
        ohos:margin="16vp"
        ohos:padding="8vp"
        ohos:text="6"
        ohos:text_alignment="center"
        ohos:text_size="14fp"/>
</TableLayout>
在Java代码中设置子组件的行列属性,代码如下:
    @Override
    protected void onStart(Intent intent) {
        ...
        Component component = findComponentById(ResourceTable.Id_text_one);
        TableLayout.LayoutConfig tlc = new TableLayout.LayoutConfig(vp2px(72), vp2px(72));
        tlc.columnSpec = TableLayout.specification(TableLayout.DEFAULT, 2);
        tlc.rowSpec = TableLayout.specification(TableLayout.DEFAULT, 2);
        component.setLayoutConfig(tlc);
    }

    private int vp2px(float vp) {
        return AttrHelper.vp2px(vp, getContext());
    }
- 说明
在设置子组件的行列属性时,TableLayout剩余的行数和列数必须大于等于该子组件所设置的行数和列数。
目前仅支持Java代码设置TableLayout子组件的行列属性。
在创建子组件的行列属性时,还可设置子组件的对齐方式,修改上述Java代码如下:
    @Override
    protected void onStart(Intent intent) {
        ...
        tlc.columnSpec = TableLayout.specification(TableLayout.DEFAULT, 2, TableLayout.Alignment.ALIGNMENT_FILL);
        tlc.rowSpec = TableLayout.specification(TableLayout.DEFAULT, 2, TableLayout.Alignment.ALIGNMENT_FILL);
        ...
    }
子组件的对齐方式设置为ALIGNMENT_FILL的效果
设置子组件的权重
代码如下:
 @Override
    protected void onStart(Intent intent) {
        ...
        TableLayout.LayoutConfig tlc = new TableLayout.LayoutConfig(0, vp2px(48));
        tlc.columnSpec = TableLayout.specification(TableLayout.DEFAULT, 1, 1.0f);
        tlc.rowSpec = TableLayout.specification(TableLayout.DEFAULT, 1);

        findComponentById(ResourceTable.Id_text_one).setLayoutConfig(tlc);
        findComponentById(ResourceTable.Id_text_two).setLayoutConfig(tlc);
        findComponentById(ResourceTable.Id_text_three).setLayoutConfig(tlc);
        findComponentById(ResourceTable.Id_text_four).setLayoutConfig(tlc);
        findComponentById(ResourceTable.Id_text_five).setLayoutConfig(tlc);
        findComponentById(ResourceTable.Id_text_six).setLayoutConfig(tlc);
    }
上述代码将子组件的宽度权重设置为1.0,每行子组件会均分TableLayout的宽度,所以需要设置TableLayout为固定宽度或match_parent。
<TableLayout
    ohos:width="match_parent"
    ...>

    <Text
        ohos:id="$+id:text_one"
        .../>

    <Text
        ohos:id="$+id:text_two"
        .../>

    <Text
        ohos:id="$+id:text_three"
        .../>

    <Text
        ohos:id="$+id:text_four"
        .../>

    <Text
        ohos:id="$+id:text_five"
        .../>

    <Text
        ohos:id="$+id:text_six"
        .../>
</TableLayout>
将子组件的宽度权重设置为1.0的效果展示