文章目录
- 画一个三角形
- 去除inline-block元素间的间距
- 单行文本溢出时显示省略号
- 多行文本溢出显示省略号
- 实现三栏布局
- 变量提升题
- 实现边框0.5px
- 深拷贝
- 快速排序
- 冒泡排序
- 选择排序
- 插入排序
- 归并排序
- 手写发布订阅/事件总线
- 去重
- 数组扁平化
- 创建10个a标签,点击弹出对应序号
- 实现一个new
- 实现connect高阶组件
- 防抖函数
- 节流函数
- 求嵌套数组的深度
- 实现一个promise
- 实现Promise.all
- 实现Promise.race
- 实现Promise.any
- 实现call()
- 实现bind()
- 实现apply()
- Vue实现分页器
- Vue实现轮播图
- React实现轮播图
- 用React写一个tab
- React实现虚拟列表
- 实现Redux
画一个三角形
- 采用的是相邻边框连接处的均分原理,将元素的宽高设置为0
  .box1 {


        width: 0;
        height: 0;
        border: 10px solid;
        border-color: red transparent transparent transparent;
      }
去除inline-block元素间的间距
- 我们在使用CSS把非inline-block的元素改为inline-block的时候,元素之间就会产生默认间距
- 通过font-size:0,就可以将大部分浏览器下inline-block元素之间的间距去除
单行文本溢出时显示省略号
- overflow:hidden;white-space:nowrap;text-overflow:ellipsis;
多行文本溢出显示省略号
- display:-webkit-box; -webkit-box-orient:vertical; -webkit-line-clamp:3; overflow:hidden;
实现三栏布局
- 三栏布局是两边固定,中间自适应
通过position和margin
<!DOCTYPE html>
<html lang="en">
  <head>
    <meta charset="UTF-8" />
    <meta http-equiv="X-UA-Compatible" content="IE=edge" />
    <meta name="viewport" content="width=device-width, initial-scale=1.0" />
    <title>Document</title>
    <style>
      .container {


        position: relative;
      }
      .left,
      .right {


        position: absolute;
        height: 100%;
        top: 0;
        background-color: #ff69b4;
      }
      .left {


        left: 0;
        width: 100px;
      }
      .right {


        right: 0;
        width: 200px;
      }
      .main {


        height: 100%;
        margin: 0 200px 0 100px;
        background-color: #659;
      }
    </style>
  </head>
  <body>
    <div class="container">
      <div class="left">left</div>
      <div class="right">right</div>
      <div class="main">main</div>
    </div>
  </body>
</html>
通过float和margin
<!DOCTYPE html>
<html lang="en">
  <head>
    <meta charset="UTF-8" />
    <meta http-equiv="X-UA-Compatible" content="IE=edge" />
    <meta name="viewport" content="width=device-width, initial-scale=1.0" />
    <title>Document</title>
    <style>
      .container {


        width: 100%;
        height: 100%;
      }
      .left {


        float: left;
        height: 100%;
        width: 100px;
        background-color: pink;
      }

      .right {


        float: right;
        height: 100%;
        width: 200px;
        background-color: pink;
      }

      .main {


        height: 100%;
        margin: 0 200px 0 100px;
        background-color: green;
      }
    </style>
  </head>
  <body>
    <div class="container">
      <div class="left">left</div>
      <div class="right">right</div>
      <div class="main">main</div>
    </div>
  </body>
</html>
通过flex实现
<!DOCTYPE html>
<html lang="en">
  <head>
    <meta charset="UTF-8" />
    <meta http-equiv="X-UA-Compatible" content="IE=edge" />
    <meta name="viewport" content="width=device-width, initial-scale=1.0" />
    <title>Document</title>
    <style>
      .container {


        display: flex;
      }
      .left {


        width: 200px;
        background-color: red;
      }
      .main {


        flex: 1;
        background-color: pink;
      }
      .right {


        width: 200px;
        background-color: red;
      }
    </style>
  </head>
  <body>
    <div class="container">
      <div class="left">left</div>
      <div class="main">main</div>
      <div class="right">right</div>
    </div>
  </body>
</html>
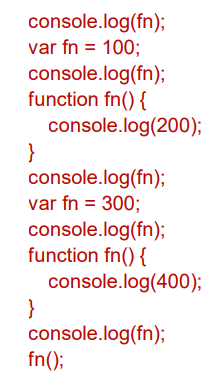
变量提升题
- 变量提升,声明式函数比var的优先级更高,后创建的函数覆盖前面的函数
- 当JavaScript代码执行时,会进行两个阶段的处理:编译阶段和执行阶段。在编译阶段,JavaScript会将函数声明和变量声明(但是还没有赋值)提升到作用域的顶部。这意味着无论函数声明和变量声明在代码中的位置如何,它们都会在执行阶段之前被处理。
- 函数声明的优先级高于变量声明
- 输出fn(){console.log(400)},100,100,300,400
实现边框0.5px
原理:
方法1:高度1px,背景渐变,一半有颜色,一半没颜色
linear-gradient(0deg, #f00 50%, transparent 50%);
方法2:通过transform:scaleY(.5)进行缩放垂直尺寸
深拷贝
 <!DOCTYPE html>
<html lang="en">
  <head>
    <meta charset="UTF-8" />
    <meta http-equiv="X-UA-Compatible" content="IE=edge" />
    <meta name="viewport" content="width=device-width, initial-scale=1.0" />
    <title>Document</title>
  </head>
  <body>
    <script>
      //判断是不是对象
      function isObject(value) {


        const valueType = typeof value; // null,object,function,array
        return (
          value !== null && (valueType === "object" || valueType === "function")
        );
      }
      function deepCopy(originValue, map = new WeakMap()) {


        //通过map解决循环引用,
        //1.如果是原始类型,直接返回
        if (!isObject(originValue)) {


          return originValue;
        }
        //2.如果是对象类型,才需要创建对象
        if (map.get(originValue)) {


          return map.get(originValue);
        }
        const newObj = Array.isArray(originValue) ? [] : {

      };
        map.set(originValue, newObj);
        for (const key in originValue) {


          newObj[key] = deepCopy(originValue[key], map);
        }

        return newObj;
      }
      const info = {


        name: "why",
        age: 18,
        friend: {


          name: "kobe",
          address: {


            name: "洛杉矶",
            detail: "lmp",
          },
        },
      };
      info.self = info;
      const newObj = deepCopy(info);
      console.log(newObj);
    </script>
  </body>
</html>
快速排序
/**
 * LeetCode 912: 排序数组
 * @param {number[]} nums 数组
 * @return {number[]} 排序后的数组
 */
const sortArray = function(nums) {


  // 使用内置的快速排序算法进行排序
  const quickSort = (nums, start, end) => {


    if (start >= end) {


      return;
    }
    // 选择基准元素
    const pivot = nums[start];
    let left = start + 1;
    let right = end;

    while (left <= right) {


      // 找到左侧大于等于基准元素的值
      while (left <= right && nums[left] < pivot) {


        left++;
      }
      // 找到右侧小于等于基准元素的值
      while (left <= right && nums[right] > pivot) {


        right--;
      }
      // 交换左侧和右侧的值
      if (left <= right) {


        [nums[left], nums[right]] = [nums[right], nums[left]];
        left++;
        right--;
      }
    }
    // 将基准元素放到正确的位置
    [nums[start], nums[right]] = [nums[right], nums[start]];
    // 递归排序左右两部分
    quickSort(nums, start, right - 1);
    quickSort(nums, right + 1, end);
  };

  // 调用快速排序函数进行排序
  quickSort(nums, 0, nums.length - 1);

  return nums;
};

// 测试用例
const nums = [5, 2, 3, 1];
console.log(sortArray(nums)); // 输出 [1, 2, 3, 5]
冒泡排序
function randomArray(n) {


        let result = [];
        for (let i = 0; i < n; i++) {


          result.push((Math.random() * n) | 0);
        }
        return result;
      }

      function isSorted(ary) {


        for (var i = 1; i < ary.length; i++) {


          if (ary[i] < ary[i - 1]) {


            return false;
          }
        }
        return true;
      }

      function bubbleSort(ary) {


        for (var stop = ary.length - 1; stop >= 1; stop--) {


          var isChanged = false;
          for (let i = 0; i < stop; i++) {


            if (ary[i] > ary[i + 1]) {


              isChanged = true;
              let temp = ary[i + 1];
              ary[i + 1] = ary[i];
              ary[i] = temp;
            }
          }
          if (!isChanged) {


            break;
          }
        }
        return ary;
      }
选择排序
插入排序
归并排序
手写发布订阅/事件总线
<!DOCTYPE html>
<html lang="en">
  <head>
    <meta charset="UTF-8" />
    <meta http-equiv="X-UA-Compatible" content="IE=edge" />
    <meta name="viewport" content="width=device-width, initial-scale=1.0" />
    <title>Document</title>
  </head>
  <body>
    <button class="nav-btn">nav button</button>
    <script>
      class HYEventBus {


        constructor() {


          this.eventMap = {

      };
        }
        on(eventName, eventFn) {


          let eventFns = this.eventMap[eventName];
          if (!eventFns) {


            eventFns = [];
            this.eventMap[eventName] = eventFns;
          }
          eventFns.push(eventFn);
        }
        emit(eventName, ...args) {


          let eventFns = this.eventMap[eventName];
          if (!eventFns) return;
          eventFns.forEach((fn) => {


            fn(...args);
          });
        }

        off(eventName, eventFn) {


          let eventFns = this.eventMap[eventName];
          if (!eventFns) return;
          for (let i = 0; i < eventFns.length; i++) {


            const fn = eventFns[i];
            if (fn === eventFn) {


              eventFns.splice(i, 1);
              break;
            }
          }
          //如果eventFns已经清空了
          if (eventFns.length === 0) {


            delete this.eventMap[eventName];
          }
        }
      }
      const eventBus = new HYEventBus();

      eventBus.on("navclick", (name, age, height) => {


        console.log("navclick listener 01", name, age, height);
      });
      const click = () => {


        console.log("navclick listener 02");
      };
      eventBus.on("navclick", click);
      setTimeout(() => {


        eventBus.off("navclick", click);
      }, 5000);
      eventBus.on("asideclick", () => {


        console.log("asideclick listener");
      });

      const navBtnEl = document.querySelector(".nav-btn");
      navBtnEl.onclick = () => {


        console.log("自己监听到");
        eventBus.emit("navclick", "why", 18, 1.88);
      };
    </script>
  </body>
</html>
去重
用set
[…new Set(arr)]
数组扁平化
function flatten(arr) {


        let result = [];
        for (let i = 0; i < arr.length; i++) {


          if (Array.isArray(arr[i])) {


            result = result.concat(flatten(arr[i]));
          } else {


            result = result.concat(arr[i]);
          }
        }
        return result;
      }
const a = [1, [2, [3, 4]]];
console.log(flatten(a));
创建10个a标签,点击弹出对应序号
 let a;
      for (let i = 0; i < 10; i++) {


        a = document.createElement("a");
        a.innerHTML = i + "<br>";
        a.addEventListener("click", (e) => {


          console.log(e);
          e.preventDefault();
          alert(i);
        });
        document.body.appendChild(a);
      }
实现一个new
 function myNew(fn, ...args) {


        const obj = Object.create(fn.prototype);
        const result = fn.apply(obj, args);
        return result instanceof Object ? result : obj;
      }

      // 示例使用
      function Person(name) {


        this.name = name;
      }

      Person.prototype.sayHello = function () {


        console.log(`Hello, my name is ${

      this.name}.`);
      };

      const person = myNew(Person, "John");
      person.sayHello(); // 输出:Hello, my name is John.
实现connect高阶组件
import {

     PureComponent } from "react";
import store from "../store";
export default function connect(mapStateToProps, mapDispatchToProps) {


  //高阶组件
  return function (WrapperComponent) {


    class NewComponent extends PureComponent {


      constructor(props) {


        super(props);
        this.state = mapStateToProps(store.getState());
      }
      componentWillMount() {


        this.unsubscribe = store.subscribe(() => {


          // this.forceUpdate();
          this.setState(mapStateToProps(store.getState()));
        });
      }
      componentWillUnmount() {


        this.unsubscribe();
      }
      render() {


        const stateObj = mapStateToProps(store.getState());
        const dispatchObj = mapDispatchToProps(store.dispatch);
        return (
          <WrapperComponent {

    ...this.props} {

    ...stateObj} {

    ...dispatchObj} />
        );
      }
    }
    return NewComponent;
  };
}
防抖函数
节流函数
求嵌套数组的深度
实现一个promise
实现Promise.all
实现Promise.race
实现Promise.any
实现call()
实现bind()
实现apply()
Vue实现分页器
Vue实现轮播图
React实现轮播图
用React写一个tab
import {

    useState, Children} from 'react'
function Tabs(props) {


  var [curr, setCurr] = useState(0)
  //通过Children.toArray可以扁平化数组
  var tabs = Children.toArray(props.children)
  return (
    <div style={

    {

    border:'1px solid'}}>
      <header>
        {


          tabs.map((tab,index) => {


            return <button key={

    index} onClick={

    () =>  setCurr(index) } style={

    {

    color:index==curr?'red':'black'}}>{

    tab.props.label}</button>
          })
        }
      </header>
      <main>
        {

    tabs[curr]}
      </main>
    </div>
  )
}
function Tab(props) {


  return (
    <div>
      {

    props.children}
    </div>
  )
}
function App() {


  return (
      <div>
        <Tabs>
          <Tab label="foo">
            aaaa
          </Tab>
          <Tab label="bar">
            bbbb
          </Tab>
          <Tab label="baz">
            cccc
          </Tab>
        </Tabs>
      </div>
  );
}

export default App;
React实现虚拟列表
import {

    useState,useRef} from 'react'
function List(props) {


  var {

     height, itemCount, itemSize, width, children } = props

  var containerStyle = {


    height: height,
    width: width,
    overflow: 'auto',
    border: '1px solid'
  }

  var innerSize = {


    height: itemSize * itemCount,
    position: 'relative'
  }

  var wrapper = useRef()

  var [range, setRange] = useState({


    start: 0,
    end: Math.ceil(height / itemSize)
  })

  function onScroll(e) {


    var scrollTop = wrapper.current.scrollTop
    var startIndex = Math.floor(scrollTop / itemSize)
    var endIndex = startIndex + Math.ceil(height / itemSize)
    setRange({


      start: startIndex,
      end: endIndex
    })
  }

  var visible = []
  for (var i = range.start; i <= range.end; i++) {


   var element = children({


     index: i,
     style: {


       position: 'absolute',
       height: itemSize,
       width: '100%',
       top: i * itemSize
     }
   })
   visible.push(element)
  }

  return (
    <div ref={

    wrapper} style={

    containerStyle} onScroll={

    onScroll}>
      <div style={

    innerSize}>
        {

    visible}
      </div>
  </div>
  )
}
function App() {


  return (
      <div>
      <List
        height={

    150}
        itemCount={

    100}
        itemSize={

    35}
        width={

    300}
      >
        {


          ({

      index, style }) =>
            <div style={

    style}>Row {

    index}</div>
        }
      </List>
      </div>
  );
}

export default App;
实现Redux
import {

     createContext, useContext, useEffect, useState } from "react";
export function createStore(reducer) {


  var state; // 存储应用程序状态的变量
  var action; // 最近一次分发的操作

  state = reducer(state, action); // 使用初始状态和初始操作来初始化状态

  var subscribes = []; // 存储订阅函数的数组

  return {


    getState() {


      return state; // 返回当前的状态
    },

    dispatch(action) {


      state = reducer(state, action); // 使用传入的操作和当前状态来更新状态
      for (var sub of subscribes) {


        sub(); // 通知所有订阅者,状态已更新
      }
      return action; // 返回分发的操作
    },

    subscribe(f) {


      subscribes.push(f); // 将订阅函数添加到订阅数组中
      return () => {


        var idx = subscribes.indexOf(f);
        if (idx >= 0) {


          subscribes.splice(idx, 1); // 取消订阅函数
        }
      };
    },
  };
}

export function connnect() {

    }

var ReduxContext = createContext();
//创建一个名字,可以在开发工具中的组件树展示出来
ReduxContext.displayName = "ReduxContext";
export function Provider(props) {


  //<Provider store = {store}><App/></Provider>
  var {

     store, children } = props;
  var [Change, setChange] = useState(0);
  useEffect(() => {


    var unsub = store.subscribe(() => {


      setChange((Change) => Change + 1);
    });
    return unsub;
  }, []);

  return (
    <ReduxContext.Provider value={

    {

     store: store }}>
      {

    children}
    </ReduxContext.Provider>
  );
}

export function useSelector(selector) {


  var store = useContext(ReduxContext).store;
  var state = store.getState();
  return selector(state);
}

export function useDispatch() {


  var store = useContext(ReduxContext).store;
  return store.dispatch;
}