comment
comment 是我开发一个帮助开发人员查看项目API的工具。
comment 的主要作用是将类注释扫描到文档中。通过在类中添加类注解@Comment,在项目编译的时候,生成.java 和.html 文档。.java 和.html 文档会把一个包下的每个类具有的方法汇聚到一起,帮助开发人员一览项目 API。
导入工具
Java Module
在你要使用该工具的 Module 的 build.gradle 文件中添加依赖:
dependencies {
    annotationProcessor 'com.wangjiang:comment-doc:0.0.3'
    implementation 'com.wangjiang:comment-doc:0.0.3'
}
Kotlin Module
在你要使用该工具的 Module 的 build.gradle 文件中添加依赖:
apply plugin: 'kotlin-kapt'

dependencies {
    kapt 'com.wangjiang:comment-doc:0.0.3'
    implementation 'com.wangjiang:comment-doc:0.0.3'
}
配置可选参数
还可以在 build.gradle 文件中添加编译配置信息:
android {
    defaultConfig {
        javaCompileOptions {
            annotationProcessorOptions {
                includeCompileClasspath true
                arguments = [ debuggable : 'true',check_comment : 'true']
            }
        }
    }
}
arguments 参数表示意思:
- debuggable:表示是否在控制台打印出相关日志信息,值为"true"打印,"false"不打印。
- check_comment:表示是否会检查添加了注解
@Comment的类有类或方法注释,值为"true"检查,在检查中发现类或方法没有注释就会编译失败,"false"不检查。
如果没有添加编译配置信息debuggable 或 check_comment,debuggable的默认值是"false",check_comment的默认值是"true"。
使用简单介绍
1.在你需要生成注释文档的类中添加注解@Comment,如在工具类DisplayUtil中添加:
package com.example.comment.util;
/**
 * 页面相关
 *
 * @author wangjiang [email protected]
 * @version V1.0
 */
@Comment
public final class DisplayUtil {

    private DisplayUtil() {
        throw new UnsupportedOperationException("不能创建此对象");
    }

    /**
     * 获得StatusBar的高度
     *
     * @param context 上下文对象
     * @return 状态栏的高度
     */
    public static int getStatusBarHeight(Context context) {
        Resources resources = context.getResources();
        int resourceId = resources.getIdentifier("status_bar_height", "dimen",
                "android");
        int statusBarHeight = resources.getDimensionPixelSize(resourceId);
        return statusBarHeight;
    }
    //省略部分代码
}
-
构建项目,运行
./gradlew build或./gradlew assembleDebug或./gradlew assembleRelease命令。 -
构建完成后,查看主 Module 下的目录
/build/generated/source/apt/debug/,再找到你添加注解@Comment的类的包下,如上面类包名为com.example.comment.util,则你会在该包下看到文件:JavaCommentDoc.java 和 JavaCommentDoc.html。
4.查看生成的文件 JavaCommentDoc.java :
package com.example.comment.util;
class JavaCommentDoc{
/**
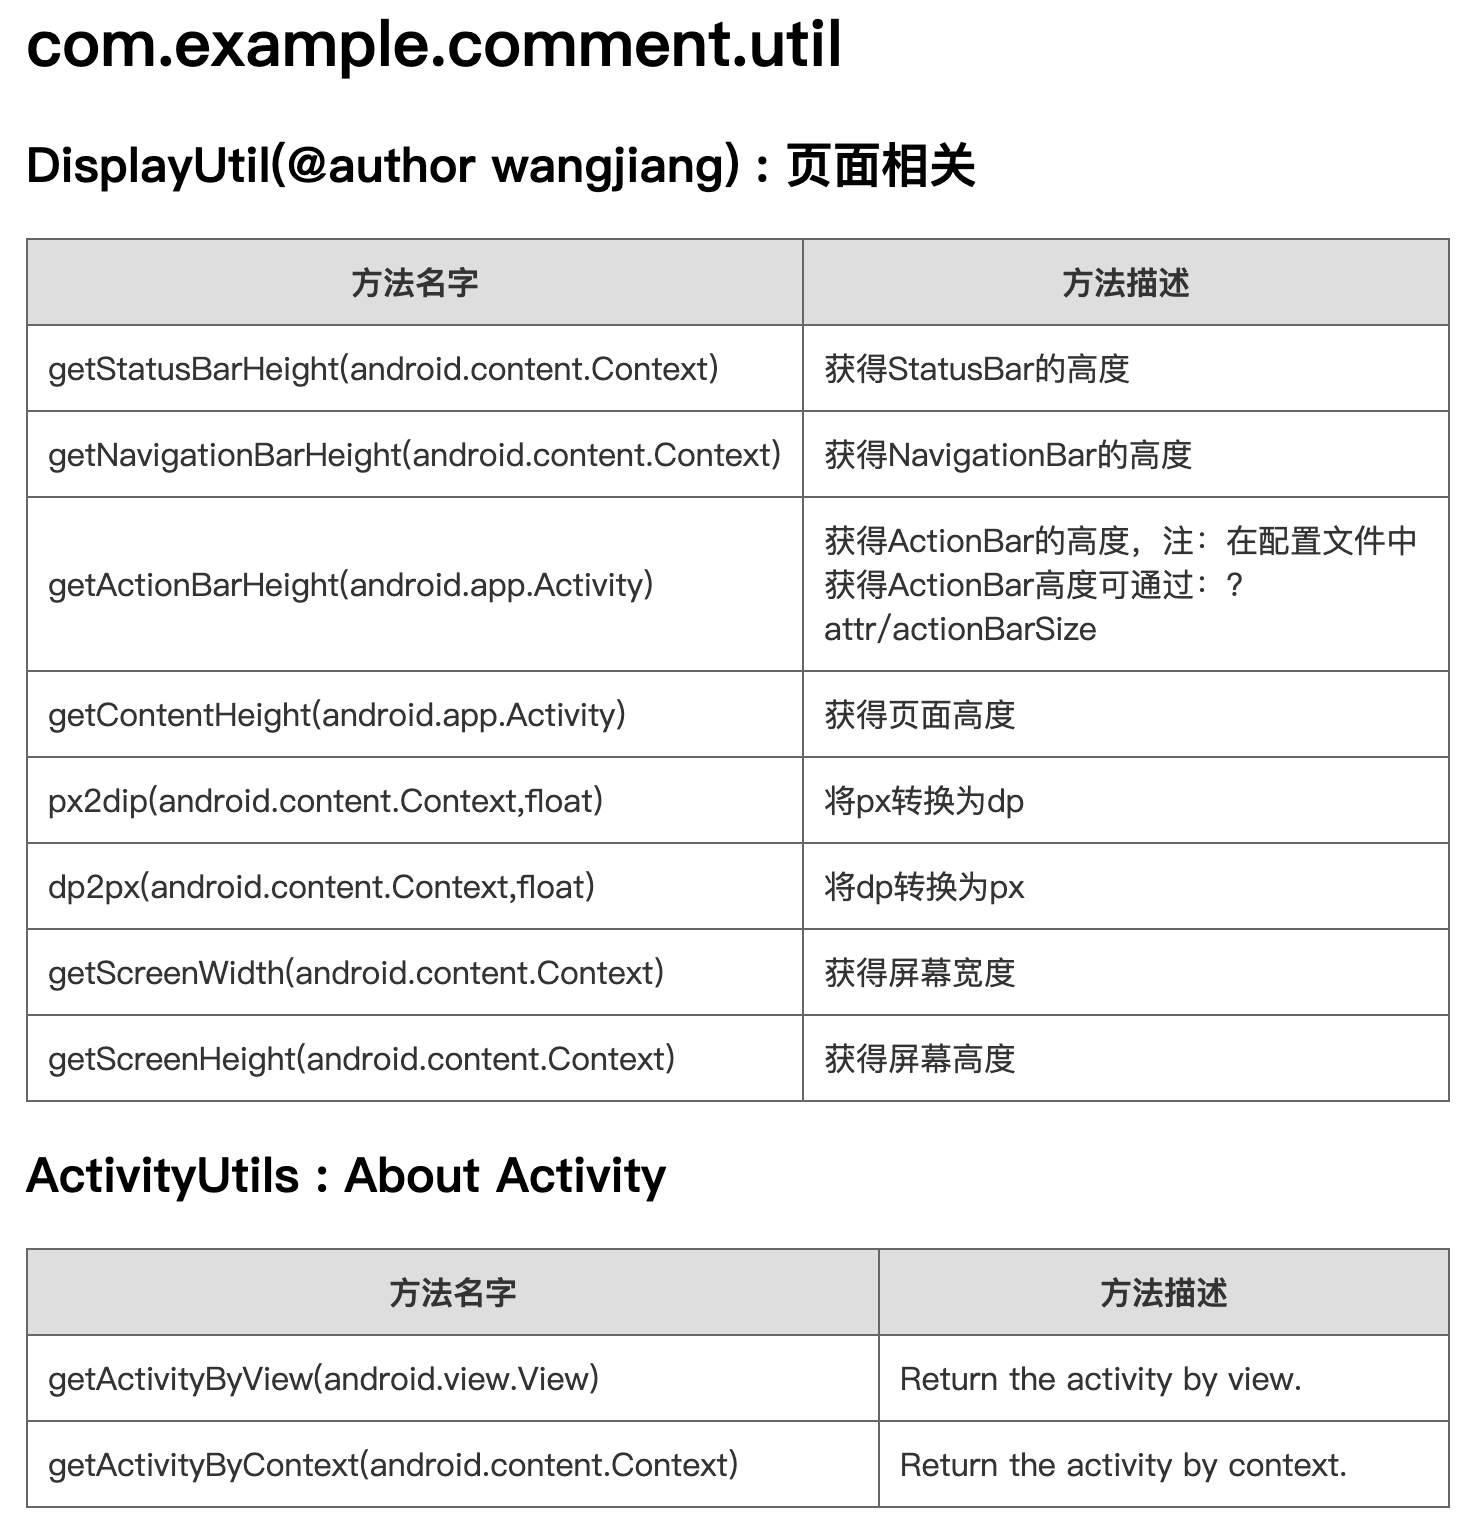
* {@link com.example.comment.util.DisplayUtil, 页面相关}
* {@link com.example.comment.util.DisplayUtil#getStatusBarHeight(android.content.Context), 获得StatusBar的高度}
* {@link com.example.comment.util.DisplayUtil#getNavigationBarHeight(android.content.Context), 获得NavigationBar的高度}
* {@link com.example.comment.util.DisplayUtil#getActionBarHeight(android.app.Activity), 获得ActionBar的高度,注:在配置文件中获得ActionBar高度可通过:?attr/actionBarSize}
* {@link com.example.comment.util.DisplayUtil#getContentHeight(android.app.Activity), 获得页面高度}
* {@link com.example.comment.util.DisplayUtil#px2dip(android.content.Context,float), 将px转换为dp}
* {@link com.example.comment.util.DisplayUtil#dp2px(android.content.Context,float), 将dp转换为px}
* {@link com.example.comment.util.DisplayUtil#getScreenWidth(android.content.Context), 获得屏幕宽度}
* {@link com.example.comment.util.DisplayUtil#getScreenHeight(android.content.Context), 获得屏幕高度}
*
*/
}
JavaCommentDoc.java 文件会把一个包下的每个类具有的方法汇聚到一起,可以通过AndroidStudio 的快捷键也可直接进入到原类。如果有多个包,则有多个JavaCommentDoc.java 文件。
查看生成的文件 JavaCommentDoc.html,需要在浏览器中打开:
JavaCommentDoc.html 和 JavaCommentDoc.java 表达的意思一样。