考试要求:
在 mars.domain250.example.com 上执行以下任务。
○ 复查 ○ 完成 配置网络设置
○ 复查 ○ 完成 配置您的系统以使用默认存储库
○ 复查 ○ 完成 调试 SELinux
○ 复查 ○ 完成 创建用户帐户
○ 复查 ○ 完成 配置 cron 作业
○ 复查 ○ 完成 创建协作目录
○ 复查 ○ 完成 配置 NTP
○ 复查 ○ 完成 配置 autofs
○ 复查 ○ 完成 配置 /var/tmp/fstab 权限
○ 复查 ○ 完成 配置用户帐户
○ 复查 ○ 完成 查找文件
○ 复查 ○ 完成 查找字符串
○ 复查 ○ 完成 创建存档
在 venus.domain250.example.com 上执行以下任务。
○ 复查 ○ 完成 设置 root 密码
○ 复查 ○ 完成 配置您的系统以使用默认存储库
○ 复查 ○ 完成 调整逻辑卷大小
○ 复查 ○ 完成 添加交换分区
○ 复查 ○ 完成 创建逻辑卷
○ 复查 ○ 完成 创建 VDO 卷
○ 复查 ○ 完成 配置系统调优
○ 复查 ○ 完成 配置容器
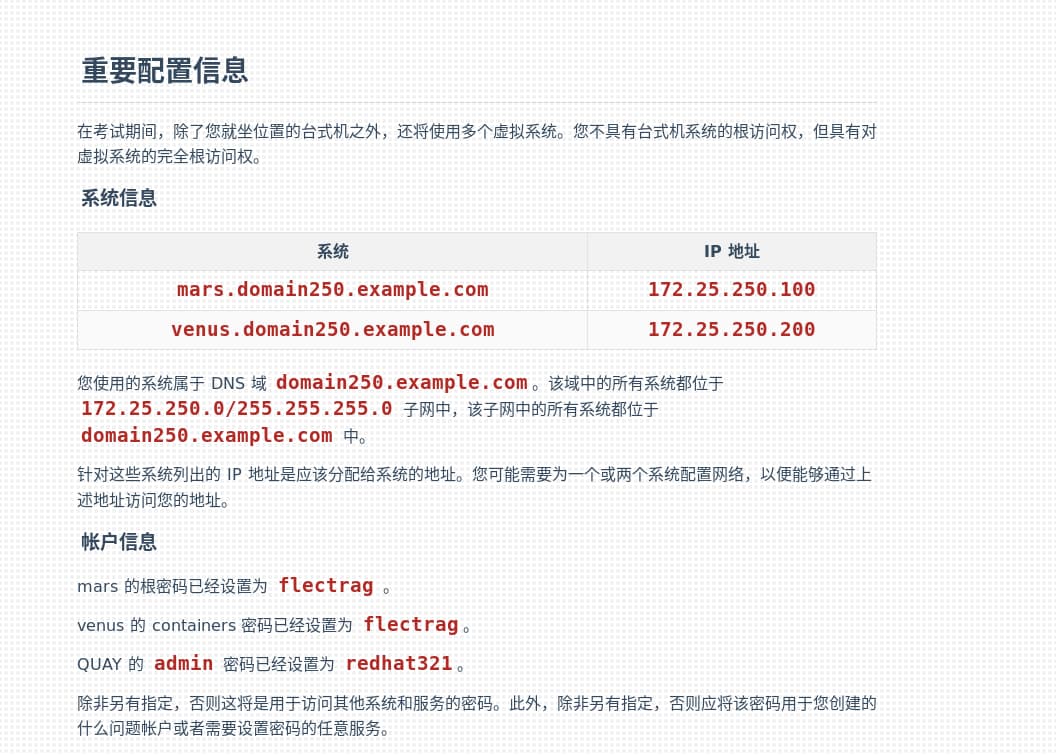
第一台机器
第一题:
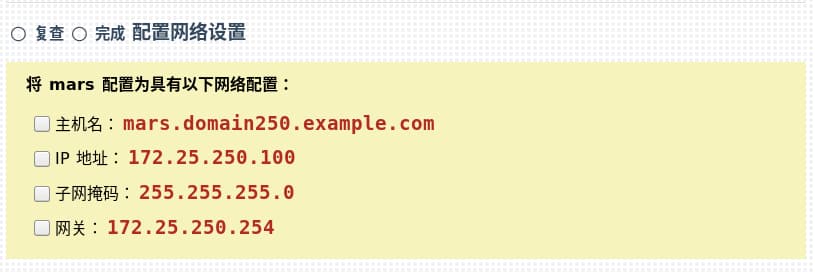
第一步:查看网卡信息
[root@mars ~]# nmcli connection show
NAME                UUID                                  TYPE      DEVICE
Wired connection 1  46da4a6a-06c3-6fae-eea1-ac0ca900f213  ethernet  eth0
第二步:根据要求配置网络配置
[root@mars ~]# nmcli connection modify Wired\ connection\ 1 ipv4.method manual ipv4.addresses 172.25.250.100/24 ipv4.gateway 172.25.250.254 ipv4.dns 172.25.250.254 autoconnect yes
第三步:设置主机名
[root@mars ~]# hostnamectl set-hostname mars.domain250.example.com
第二题:

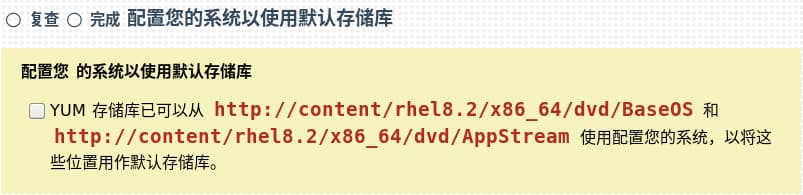
第一步:安装yum-utils命令
[root@mars ~]# rpm -ivh http://content/rhel8.2/x86_64/dvd/BaseOS/Packages/yum-utils-4.0.12-3.el8.noarch.rpm
第二步:配置仓库
[root@mars ~]#yum-config-manager --add-repo http://content/rhel8.2/x86_64/dvd/BaseOS
[root@mars ~]#yum-config-manager --add-repo http://content/rhel8.2/x86_64/dvd/AppStream
第三步:查找Redhat提供的公钥public key进行签名检查
[root@mars ~]#find / -name *KEY*
[root@mars ~]#rpm --import /etc/pki/rpm-gpg/RPM-GPG-KEY-redhat-release
第三题:
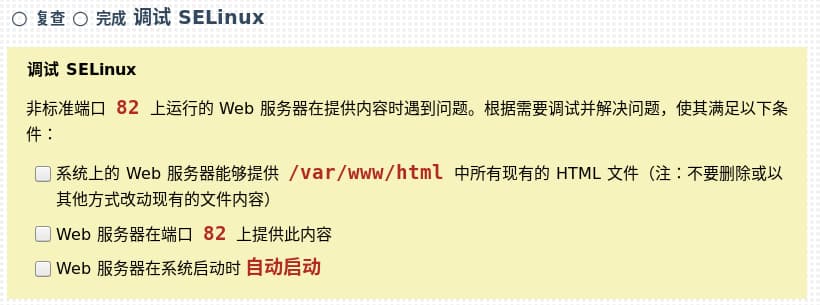
第一步:重启httpd服务
[root@mars ~]#systemctl restart httpd
第二步:更改selinux策略
[root@mars ~]#grep -n 82 /var/log/messages
[root@mars ~]#semanage port -a -t http_port_t -p tcp 82
第三步:在防火墙放行82端口
[root@mars ~]#firewall-cmd --add-port=82/tcp --permanent
[root@mars ~]#firewall-cmd --reload
第四步:恢复文件的安全上下文
[root@mars ~]#ll -Z /var/www/html/
[root@mars ~]#semanage fcontext -m -t httpd_sys_content_t /var/www/html/file1
[root@mars ~]#restorecon -R -v /var/www/html/file1
第五步:开启httpd服务
[root@mars ~]#systemctl enable --now httpd
第四题:

第一步:创建名为sysmgrs组
[root@mars ~]# groupadd sysmgrs
第二步:用户 natasha ,作为次要组从属于 sysmgrs
[root@mars ~]# useradd -G sysmgrs natasha
第三步:用户 harry ,作为次要组还从属于 sysmgrs
[root@mars ~]# useradd -G sysmgrs harry
第四步:用户 sarah ,无权访问系统上的交互式 shell 且不是 sysmgrs 的成员
[root@mars ~]# useradd -s /sbin/nologin sarah
第五步:natasha 、 harry 和 sarah 的密码应当都是 flectrag
[root@mars ~]# for i in natasha harry sarah
> do
> echo flectrag | passwd --stdin $i
> done
第五题:
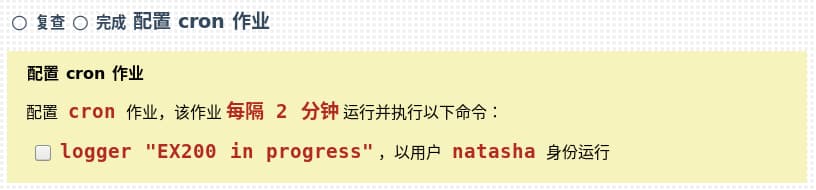
表示格式:分时日月周
[root@mars ~]# crontab -u natasha -e
*/2 * * * * logger "EX200 in progress"
还可能换种方式考察:
每天14:23 分natasha执行 echo “Hi rhcsa”
[root@mars ~]#crontab -u natasha -e
23 14 * * * echo "Hi rhcsa"
第六题:

第一步:创建目录
[root@mars ~]# mkdir /home/managers
第二步:更改目录的属组
[root@mars ~]# chgrp sysmgrs /home/managers/
第三步:查看/home/managers所拥有的权限
[root@mars ~]# ll -d /home/managers/
drwxr-xr-x. 2 root sysmgrs 6 Oct 26 12:12 /home/managers/
第四步:设定目录的权限,目录的访问权限即为x权限rwx=7,自动变成sysmgrs 组用特殊权限2
[root@mars ~]# chmod 2770 /home/managers
第七题:
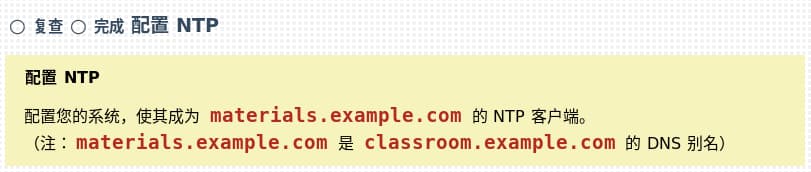
第一步:查找chrony配置文件
[root@mars ~]# rpm -qc chrony
/etc/chrony.conf
/etc/chrony.keys
/etc/logrotate.d/chrony
/etc/sysconfig/chronyd
第二步:修改配置文件
[root@mars ~]# vim /etc/chrony.conf
 Use public servers from the pool.ntp.org project.
# Please consider joining the pool (http://www.pool.ntp.org/join.html).
#server 0.rhel.pool.ntp.org iburst
#server 1.rhel.pool.ntp.org iburst
#server 2.rhel.pool.ntp.org iburst
#server 3.rhel.pool.ntp.org iburst
#server _gateway iburst  #这行注释掉
server materials.example.com iburst
第三步:重启chronyd服并设置开机自启动
[root@mars ~]# systemctl restart chronyd.service
[root@mars ~]# systemctl enable chronyd.service
第四步:查看是否配置成功
[root@mars ~]# chronyc sources
210 Number of sources = 1
MS Name/IP address         Stratum Poll Reach LastRx Last sample
===============================================================================
^* classroom.example.com         8   6    17     4   +328us[-3211us] +/-   11ms
第八题:

第一步:安装autofs
[root@mars ~]# yum -y install autofs
第二步:查找autofs文件
[root@mars ~]# rpm -qc autofs
/etc/auto.master
/etc/auto.misc
/etc/auto.net
/etc/auto.smb
/etc/autofs.conf
/etc/autofs_ldap_auth.conf
/etc/sysconfig/autofs
/usr/lib/systemd/system/autofs.service
第二步:编写配置文件
[root@mars ~]# vim /etc/auto.master
增加上层接口目录
#
/misc   /etc/auto.misc
/rhome /etc/auto.rhome
第三步:编写子配置文件
[root@mars ~]# cp /etc/auto.misc /etc/auto.rhome
[root@mars ~]# vim /etc/auto.rhome
#cd             -fstype=iso9660,ro,nosuid,nodev :/dev/cdrom		#注释掉此行
remoteuser1     -fstype=nfs,vers=4,rw   materials.example.com:/rhome/remoteuser
第四步:设置开机自启动
[root@mars ~]# systemctl restart autofs.service
[root@mars ~]# systemctl enable autofs.service
第五步:测试是否成功,远程登录
[root@mars ~]# ssh remoteuser1@mars
remoteuser1@mars's password:
Activate the web console with: systemctl enable --now cockpit.socket

This system is not registered to Red Hat Insights. See https://cloud.redhat.com/
To register this system, run: insights-client --register

Last login: Wed Oct 26 12:53:54 2022 from 172.25.250.100
[remoteuser1@mars ~]$ pwd
/rhome/remoteuser1
第九题:

第一步:将文件复制过去
[root@mars ~]# cp /etc/fstab /var/tmp/fstab
第二步:查看一下文件权限
[root@mars ~]# ll -d /var/tmp/fstab
-rw-r--r--. 1 root root 534 Oct 26 13:01 /var/tmp/fstab
第三步:配置natasha
[root@mars ~]# setfacl -m u:natasha:rw /var/tmp/fstab
第四步:配置harry
[root@mars ~]# setfacl -m u:harry:- /var/tmp/fstab
第五步:检查是否配置成功
[root@mars ~]# getfacl /var/tmp/fstab
getfacl: Removing leading '/' from absolute path names
# file: var/tmp/fstab
# owner: root
# group: root
user::rw-
user:natasha:rw-
user:harry:---
group::r--
mask::rw-
other::r--
第十题:

第一步:创建manalo用户并指定其组ID
[root@mars ~]# useradd -u 3533 manalo
第二步:设置密码
[root@mars ~]# echo flectrag | passwd --stdin manalo
Changing password for user manalo.
passwd: all authentication tokens updated successfully.
第十一题:

第一步:查看用户和目录是否存在
[root@mars ~]# id jacques
uid=1003(jacques) gid=1003(jacques) groups=1003(jacques)
[root@mars ~]# ll -d /root/findfiles
ls: cannot access '/root/findfiles': No such file or directory
第二步:创建目录
# 发现目录不存在,于是创建目录
[root@mars ~]# mkdir /root/findfiles
第三步:查找文件并放入新建的目录中
[root@mars ~]# find / -user jacques -exec cp -a {} /root/findfiles \;
第四步:检查文件是否查找成功
[root@mars ~]# ll /root/findfiles/
total 0
-rw-r--r--. 1 jacques root    0 Oct 12 10:12 gamelan
-rw-r--r--. 1 jacques jacques 0 Oct 12 10:12 jacques
-rw-r--r--. 1 jacques root    0 Oct 12 10:12 libWedgeit.so.1.2.3
第十二题:
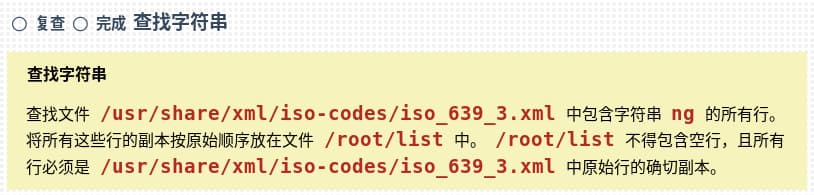
第一步:使用grep命令限制需要查找的内容
[root@mars ~]# grep ng /usr/share/xml/iso-codes/iso_639_3.xml | grep -v "^$" > /root/list
第二步:检查副本是否包含空行
[root@mars ~]# cat -n /root/list
     1	<?xml version="1.0" encoding="UTF-8" ?>
     2	This file gives a list of all languages in the ISO 639-3
     3	    License along with this file; if not, write to the Free Software
     4			reference_name="Solong"
     5			name="Solong" />
		 ......
第十三题:

第一步:打包并压缩
[root@mars ~]# tar czf /root/backup.tar.gz /usr/local
第二步:检查是否打包压缩成功
[root@mars ~]# file backup.tar.gz
backup.tar.gz: gzip compressed data, last modified: Wed Oct 26 20:56:49 2022, from Unix, original size 51200
第二台机器
第一题:

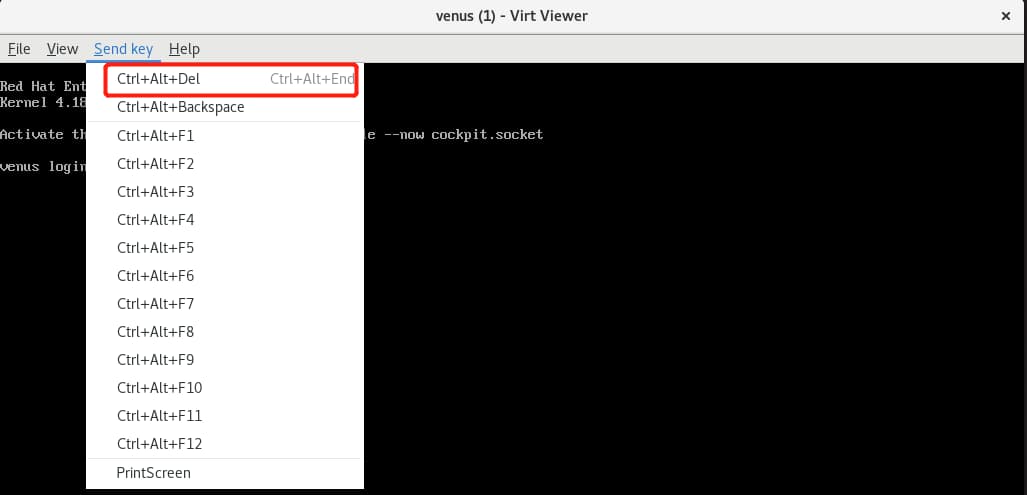
第一步:①打开主机venus ②点击Send key ③选择 Ctrl+Alt+Del 重新启动 ④开机导航页面按e键

第二步:将光标移到Linux 那一行末尾添加如下内容:rd.break console=tty0

第三步:按下:Ctrl + X进入grup救援模式
# 重新挂载/目录
switch_root:/# mount -o rw,remount /sysroot
# 进入/目录
switch_root:/# chroot /sysroot
# 设置root密码
sh-4.4# echo "flectrag"|passwd --stdin root
# 在根目录下创建重新刷新SELinux 安全上下文标记的文件
sh-4.4# touch /.autorelabel
# 退出重启系统
sh-4.4# exit
switch_root:/# reboot
第二题:
第一步:安装yum-utils命令
[root@mars ~]# rpm -ivh http://content/rhel8.2/x86_64/dvd/BaseOS/Packages/yum-utils-4.0.12-3.el8.noarch.rpm
第二步:配置仓库
[root@mars ~]#yum-config-manager --add-repo http://content/rhel8.2/x86_64/dvd/BaseOS
[root@mars ~]#yum-config-manager --add-repo http://content/rhel8.2/x86_64/dvd/AppStream
第三步:查找Redhat提供的公钥public key进行签名检查
[root@mars ~]#find / -name *KEY*
[root@mars ~]#rpm --import /etc/pki/rpm-gpg/RPM-GPG-KEY-redhat-release
第三题:

第一步:查看需要调整的逻辑卷所挂载的路径和现有的大小、名字
[root@venus ~]# lvscan
  ACTIVE            '/dev/vgroup/swap' [512.00 MiB] inherit
  ACTIVE            '/dev/myvol/vo' [184.00 MiB] inherit
第二步:查看卷组的容量有多大
[root@venus ~]# vgs
  VG     #PV #LV #SN Attr   VSize   VFree
  myvol    1   1   0 wz--n- 508.00m 324.00m
  vgroup   1   1   0 wz--n-  <2.00g  <1.50g
第三步:使用lvextend进行扩容
[root@venus ~]# lvextend -rL 230M /dev/myvol/vo
第四步:检查lvm大小是否符合
[root@venus ~]# lvscan
  ACTIVE            '/dev/vgroup/swap' [512.00 MiB] inherit
  ACTIVE            '/dev/myvol/vo' [232.00 MiB] inherit

[root@venus ~]# df -Th
Filesystem           Type      Size  Used Avail Use% Mounted on
devtmpfs             devtmpfs  887M     0  887M   0% /dev
tmpfs                tmpfs     914M     0  914M   0% /dev/shm
tmpfs                tmpfs     914M   17M  897M   2% /run
tmpfs                tmpfs     914M     0  914M   0% /sys/fs/cgroup
/dev/vda3            xfs       9.9G  1.6G  8.4G  16% /
/dev/vda2            vfat      100M  6.8M   94M   7% /boot/efi
/dev/mapper/myvol-vo ext4      221M  2.1M  204M   1% /reports		#这里显示的不是230M没有关系存在误差
tmpfs                tmpfs     183M     0  183M   0% /run/user/0
第四题:

第一步:查看一下磁盘空间分配情况
[root@venus ~]# lsblk
NAME            MAJ:MIN RM  SIZE RO TYPE MOUNTPOINT
vda             252:0    0   10G  0 disk
├─vda1          252:1    0    1M  0 part
├─vda2          252:2    0  100M  0 part /boot/efi
└─vda3          252:3    0  9.9G  0 part /
vdb             252:16   0    5G  0 disk
├─vdb1          252:17   0  510M  0 part
│ └─myvol-vo    253:0    0  232M  0 lvm  /reports
└─vdb2          252:18   0    2G  0 part
  └─vgroup-swap 253:1    0  512M  0 lvm  [SWAP]
vdc             252:32   0   10G  0 disk
第二步:使用磁盘分区分出一个swap
[root@venus ~]# fdisk /dev/vdb
Welcome to fdisk (util-linux 2.32.1).
Changes will remain in memory only, until you decide to write them.
Be careful before using the write command.

Command (m for help): p			# 首先p打印一下现在的分区信息
Disk /dev/vdb: 5 GiB, 5368709120 bytes, 10485760 sectors
Units: sectors of 1 * 512 = 512 bytes
Sector size (logical/physical): 512 bytes / 512 bytes
I/O size (minimum/optimal): 512 bytes / 512 bytes
Disklabel type: dos
Disk identifier: 0xdf110c4a

Device     Boot   Start     End Sectors  Size Id Type
/dev/vdb1          2048 1046528 1044481  510M 83 Linux
/dev/vdb2       1046529 5240833 4194305    2G 83 Linux

Command (m for help): n		# 然后按n新建分区
Partition type
   p   primary (2 primary, 0 extended, 2 free)
   e   extended (container for logical partitions)
Select (default p): p		# 再按p添加主分区
Partition number (3,4, default 3): 		# 然后是让你选择主分区代码3,4默认就可以(3)
First sector (5240834-10485759, default 5242880): 		# 之后是选择分区起始位置的大小默认就可以
Last sector,+sectors or +size{K,M,G,T,P} (5242880-10485759, default 10485759): +756M #最后是选择增加的大小+756M

Created a new partition 3 of type 'Linux' and of size 756 MiB.

Command (m for help): p		# 现在按p再查看一下分区信息
Disk /dev/vdb: 5 GiB, 5368709120 bytes, 10485760 sectors
Units: sectors of 1 * 512 = 512 bytes
Sector size (logical/physical): 512 bytes / 512 bytes
I/O size (minimum/optimal): 512 bytes / 512 bytes
Disklabel type: dos
Disk identifier: 0xdf110c4a

Device     Boot   Start     End Sectors  Size Id Type
/dev/vdb1          2048 1046528 1044481  510M 83 Linux
/dev/vdb2       1046529 5240833 4194305    2G 83 Linux
/dev/vdb3       5242880 6791167 1548288  756M 83 Linux

# 为了以后方便正常工作中查看将标识号更改为82(交换分区)
Command (m for help): t		# 按t
Partition number (1-3, default 3): 3		# 选择3
Hex code (type L to list all codes): 82		# 再输入82

Changed type of partition 'Linux' to 'Linux swap / Solaris'.

Command (m for help): p		# 再按p再查看一下分区信息
Disk /dev/vdb: 5 GiB, 5368709120 bytes, 10485760 sectors
Units: sectors of 1 * 512 = 512 bytes
Sector size (logical/physical): 512 bytes / 512 bytes
I/O size (minimum/optimal): 512 bytes / 512 bytes
Disklabel type: dos
Disk identifier: 0xdf110c4a

Device     Boot   Start     End Sectors  Size Id Type
/dev/vdb1          2048 1046528 1044481  510M 83 Linux
/dev/vdb2       1046529 5240833 4194305    2G 83 Linux
/dev/vdb3       5242880 6791167 1548288  756M 82 Linux swap / Solaris		# 更改成功

Command (m for help): w		# 按w保存退出
The partition table has been altered.
Syncing disks.
第三步:查看分区信息
[root@venus ~]# lsblk
NAME            MAJ:MIN RM  SIZE RO TYPE MOUNTPOINT
vda             252:0    0   10G  0 disk
├─vda1          252:1    0    1M  0 part
├─vda2          252:2    0  100M  0 part /boot/efi
└─vda3          252:3    0  9.9G  0 part /
vdb             252:16   0    5G  0 disk
├─vdb1          252:17   0  510M  0 part
│ └─myvol-vo    253:0    0  232M  0 lvm  /reports
├─vdb2          252:18   0    2G  0 part
│ └─vgroup-swap 253:1    0  512M  0 lvm  [SWAP]
└─vdb3          252:19   0  756M  0 part
vdc             252:32   0   10G  0 disk
第四步:格式化分区
[root@venus ~]# mkswap /dev/vdb3
Setting up swapspace version 1, size = 756 MiB (792719360 bytes)
no label, UUID=dd5e8738-83a0-45fb-9014-4533d7a94e8e
第五步:编辑fstab设置开机自动挂载
# 查看UUID
[root@venus ~]# blkid /dev/vdb3
/dev/vdb3: UUID="dd5e8738-83a0-45fb-9014-4533d7a94e8e" TYPE="swap" PARTUUID="df110c4a-03"

# 在末行插入
[root@venus ~]# vim /etc/fstab
UUID="dd5e8738-83a0-45fb-9014-4533d7a94e8e" swap swap defaults 0 0

# 挂载
[root@venus ~]# swapon -a
[root@venus ~]# swapon -s
Filename				Type		Size	Used	Priority
/dev/dm-1                              	partition	524284	0	-2
/dev/vdb3                              	partition	774140	0	-3
第五题:

第一步:先将所有剩余空间给扩展分区
# 在这里解释一下为什么给全部容量,而不是60个拓展块*16M=960M 因为红帽考试存在bug尽量在已知条件给更大的空间
[root@venus ~]# fdisk /dev/vdb

Welcome to fdisk (util-linux 2.32.1).
Changes will remain in memory only, until you decide to write them.
Be careful before using the write command.


Command (m for help): n
Partition type
   p   primary (3 primary, 0 extended, 1 free)
   e   extended (container for logical partitions)
Select (default e):

Using default response e.
Selected partition 4
First sector (5240834-10485759, default 6791168):
Last sector, +sectors or +size{K,M,G,T,P} (6791168-10485759, default 10485759):

Created a new partition 4 of type 'Extended' and of size 1.8 GiB.

Command (m for help): w
The partition table has been altered.
Syncing disks.

Command (m for help): n
All primary partitions are in use.
Adding logical partition 5
First sector (6793216-10485759, default 6793216):
Last sector, +sectors or +size{K,M,G,T,P} (6793216-10485759, default 10485759):

Created a new partition 5 of type 'Linux' and of size 1.8 GiB.

Command (m for help): p
Disk /dev/vdb: 5 GiB, 5368709120 bytes, 10485760 sectors
Units: sectors of 1 * 512 = 512 bytes
Sector size (logical/physical): 512 bytes / 512 bytes
I/O size (minimum/optimal): 512 bytes / 512 bytes
Disklabel type: dos
Disk identifier: 0xdf110c4a

Device     Boot   Start      End Sectors  Size Id Type
/dev/vdb1          2048  1046528 1044481  510M 83 Linux
/dev/vdb2       1046529  5240833 4194305    2G 83 Linux
/dev/vdb3       5242880  6791167 1548288  756M 82 Linux swap / Solaris
/dev/vdb4       6791168 10485759 3694592  1.8G  5 Extended
/dev/vdb5       6793216 10485759 3692544  1.8G 83 Linux

Command (m for help): w
The partition table has been altered.
Failed to add partition 5 to system: Device or resource busy

The kernel still uses the old partitions. The new table will be used at the next reboot.
Syncing disks.

# 在模拟环境中显示需要重启
[root@venus ~]# reboot

# 重启后查看之前创建的vdb5已经创建完成
[root@venus ~]# lsblk
NAME            MAJ:MIN RM  SIZE RO TYPE MOUNTPOINT
vda             252:0    0   10G  0 disk
├─vda1          252:1    0    1M  0 part
├─vda2          252:2    0  100M  0 part /boot/efi
└─vda3          252:3    0  9.9G  0 part /
vdb             252:16   0    5G  0 disk
├─vdb1          252:17   0  510M  0 part
│ └─myvol-vo    253:0    0  232M  0 lvm  /reports
├─vdb2          252:18   0    2G  0 part
│ └─vgroup-swap 253:1    0  512M  0 lvm  [SWAP]
├─vdb3          252:19   0  756M  0 part [SWAP]
├─vdb4          252:20   0    1K  0 part
└─vdb5          252:21   0  1.8G  0 part
vdc             252:32   0   10G  0 disk
第二步:创建pv物理卷
[root@venus ~]#  pvcreate /dev/vdb5
  Physical volume "/dev/vdb5" successfully created.
第三步:创建vg逻辑卷组
[root@venus ~]#  vgcreate qagroup /dev/vdb5 -s 16M
  Volume group "qagroup" successfully created
第四步:创建lv逻辑卷
[root@venus ~]# lvcreate -l 60 -n qa qagroup
  Logical volume "qa" created.
第五步:格式化文件系统
[root@venus ~]# mkfs.ext3 /dev/qagroup/qa
mke2fs 1.45.4 (23-Sep-2019)
Creating filesystem with 245760 4k blocks and 61440 inodes
Filesystem UUID: 04a9f331-7f7d-4b0d-945e-12d48fdba124
Superblock backups stored on blocks:
	32768, 98304, 163840, 229376

Allocating group tables: done
Writing inode tables: done
Creating journal (4096 blocks): done
Writing superblocks and filesystem accounting information: done
第六步:创建挂载的路径
[root@venus ~]# mkdir /mnt/qa
第七步:编辑fstab设置开机自动挂载
# 查看UUID
[root@venus ~]# blkid /dev/qagroup/qa
/dev/qagroup/qa: UUID="04a9f331-7f7d-4b0d-945e-12d48fdba124" SEC_TYPE="ext2" TYPE="ext3"

# 在末行插入
[root@venus ~]# vim /etc/fstab
UUID="04a9f331-7f7d-4b0d-945e-12d48fdba124" /mnt/qa ext3 defaults 0 0

# 挂载
[root@venus ~]# mount -a

#检查
[root@venus ~]# df -Th
Filesystem             Type      Size  Used Avail Use% Mounted on
devtmpfs               devtmpfs  887M     0  887M   0% /dev
tmpfs                  tmpfs     914M     0  914M   0% /dev/shm
tmpfs                  tmpfs     914M   17M  897M   2% /run
tmpfs                  tmpfs     914M     0  914M   0% /sys/fs/cgroup
/dev/vda3              xfs       9.9G  1.7G  8.3G  17% /
/dev/mapper/myvol-vo   ext4      221M  2.1M  204M   1% /reports
/dev/vda2              vfat      100M  6.8M   94M   7% /boot/efi
tmpfs                  tmpfs     183M     0  183M   0% /run/user/0
/dev/mapper/qagroup-qa ext3      929M  1.2M  880M   1% /mnt/qa
第六题:
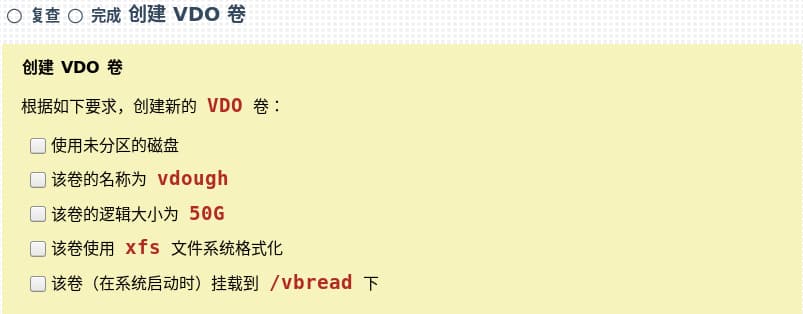
第一步:安装VDO工具
[root@venus ~]# yum -y install vdo kmod-kvdo
第二步:创建VDO虚拟磁盘
# 查看创建VDO的命令
[root@venus ~]# man vdo | grep \#
       # vdo create --name=vdo0 --device=/dev/sdb1 --vdoLogicalSize=10T
       #

[root@venus ~]# vdo create --name=vdough --device=/dev/vdc --vdoLogicalSize=50G
Creating VDO vdough
      The VDO volume can address 6 GB in 3 data slabs, each 2 GB.
      It can grow to address at most 16 TB of physical storage in 8192 slabs.
      If a larger maximum size might be needed, use bigger slabs.
Starting VDO vdough
Starting compression on VDO vdough
VDO instance 0 volume is ready at /dev/mapper/vdough
第三步:格式化VDO
[root@venus ~]#  mkfs.xfs -K /dev/mapper/vdough
meta-data=/dev/mapper/vdough     isize=512    agcount=4, agsize=3276800 blks
         =                       sectsz=4096  attr=2, projid32bit=1
         =                       crc=1        finobt=1, sparse=1, rmapbt=0
         =                       reflink=1
data     =                       bsize=4096   blocks=13107200, imaxpct=25
         =                       sunit=0      swidth=0 blks
naming   =version 2              bsize=4096   ascii-ci=0, ftype=1
log      =internal log           bsize=4096   blocks=6400, version=2
         =                       sectsz=4096  sunit=1 blks, lazy-count=1
realtime =none                   extsz=4096   blocks=0, rtextents=0
第四步:创建挂载的路径
[root@venus ~]# mkdir /vbread
第五步:编辑fstab设置开机自动挂载
# 查看UUID
[root@venus ~]# blkid /dev/mapper/vdough
/dev/mapper/vdough: UUID="93e995d3-e334-4735-98c4-f69820ef22ef" TYPE="xfs"

# 在末行插入
[root@venus ~]# vim /etc/fstab
UUID="93e995d3-e334-4735-98c4-f69820ef22ef" /vbread xfs defaults,x-systemd.requires=vdo.service 0 0

# 挂载
[root@venus ~]# mount -a
[root@venus ~]# df -Th
Filesystem             Type      Size  Used Avail Use% Mounted on
devtmpfs               devtmpfs  887M     0  887M   0% /dev
tmpfs                  tmpfs     914M     0  914M   0% /dev/shm
tmpfs                  tmpfs     914M   17M  897M   2% /run
tmpfs                  tmpfs     914M     0  914M   0% /sys/fs/cgroup
/dev/vda3              xfs       9.9G  1.7G  8.3G  17% /
/dev/mapper/myvol-vo   ext4      221M  2.1M  204M   1% /reports
/dev/vda2              vfat      100M  6.8M   94M   7% /boot/efi
tmpfs                  tmpfs     183M     0  183M   0% /run/user/0
/dev/mapper/qagroup-qa ext3      929M  1.2M  880M   1% /mnt/qa
/dev/mapper/vdough     xfs        50G  390M   50G   1% /vbread

## 挂载时defaults后的参数通过man vdo 查找fstab找到
For  /etc/fstab  mounting,  in order to make sure the mount waits for the VDO to start, use the mount
       option x-systemd.requires=vdo.service For example, an /etc/fstab line involving VDO could be the fol‐
       lowing:

       /dev/mapper/vdo0 /vdo xfs defaults,x-systemd.requires=vdo.service 0 0
第七题:

第一步:查看默认适合用那种调优
[root@venus ~]# tuned-adm recommend
virtual-guest
第二步:设置profile为推荐值
[root@venus ~]# tuned-adm profile virtual-guest
第三步:查看是否配置成功
[root@venus ~]# tuned-adm active
Current active profile: virtual-guest
第八题:

配置命令如下:
[kiosk@foundation0 ~]$ ssh containers@venus
containers@venus's password:
Activate the web console with: systemctl enable --now cockpit.socket

This system is not registered to Red Hat Insights. See https://cloud.redhat.com/
To register this system, run: insights-client --register

Last login: Wed Oct 26 19:10:57 2022 from 172.25.250.250
[containers@venus ~]$ sudo -i
[sudo] password for containers:
[root@venus ~]# mkdir /srv/web
[root@venus ~]# tar xf /home/containers/web-content.tgz -C /srv/web/
[root@venus ~]# chown -R containers: /srv/web/
[root@venus ~]# yum module install container-tools -y

输入:ctrl+d 切回普通用户
[root@venus ~]# logout
[containers@venus ~]$ podman login registry.domain250.example.com
Username: admin
Password: redhat321
Login Succeeded!

[containers@venus ~]$ podman run -d --name web -p 8888:8080 \
> -v /srv/web:/var/www/:Z -e HTTPD_MPM=event \
> registry.domain250.example.com/rhel8/httpd-24:1-105
检查:
[containers@venus ~]$ curl localhost:8888
Web Content Test

[containers@venus ~]$ mkdir -p ~/.config/systemd/user/
[containers@venus ~]$ cd ~/.config/systemd/user/
[containers@venus ~]$ podman generate systemd --name web --files --new
[containers@venus ~]$ podman stop web
[containers@venus ~]$ podman rm web
[containers@venus ~]$ systemctl --user daemon-reload
[containers@venus ~]$ systemctl --user enable --now container-web
[containers@venus ~]$ loginctl enable-linger
新增题目(一)
第一题:配置容器自启动

第二题:配置容器持久存储
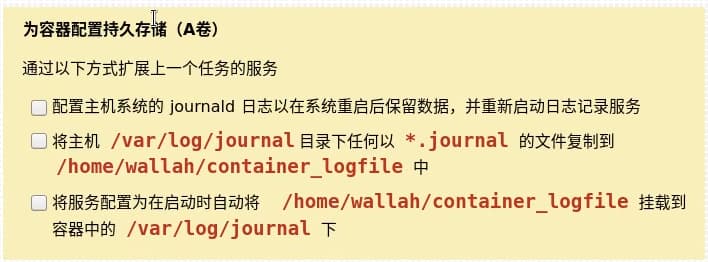
--安装podman
# yum -y module install container-tools

--设置容器持久化
# man journald.conf
# vim /etc/systemd/journald.conf
[Journal]
Storage=auto 取消注释

--检查机器有没有临时日志信息
# ll -d /run/log/journal
drwxr-sr-x. 3 root systemd-journal 60 Oct 24 17:56 /run/log/journal

--创建日志信息目录
# mkdir /var/log/journal

--修改目录/var/log/journal的权限和属组
# chown root:systemd-journal /var/log/journal
# chmod 2755 /var/log/journal

--重启systemd-journald服务
# systemctl restart systemd-journald

--复制文件和修改属主
# cp /var/log/journal/*/system.journal /home/walhalla/container_logfile/
# chown -R wallah ~wallah/

--远程登录到wallah用户
# ssh wallah@node1

--登录到仓库
$ podman login registry.lab.example.com
Username: admin
Password: redhat321
Login Succeeded!

--搜索镜像
$ podman search registry.domain250.example.com/
INDEX NAME DESCRIPTION STARS
OFFICIAL AUTOMATED
example.com registry.domain250.example.com/rhel8/rsyslog 0
...

--创建logserver容器
$ podman run -d --name logserver -v /home/wallah/container_logfile:/var/log/journal:Z registry.domain250.example.com/rhel8/rsyslog

--停止容器
podman stop logserver

--检查systemd的状态
$ loginctl enable-linger
$ loginctl show-user wallah

--创建存放进程目录
$ mkdir -p ~/.config/systemd/user/
$ cd ~/.config/systemd/user/

--生成一个进程
$ podman generate systemd -n logserver -f

--设置容器开机自启
$ systemctl --user enable --now container-logserver
$ systemctl --user status container-logserver

# 如果有题目要求需要在容器里执行语句,方法如下:
--先进入容器
$ podman exec -it logserver /bin/bash
然后去执行语句
第三题:sudo免密操作

# 编辑/etc/sudoers配置文件,进入第110行
[root@mars ~]#vi /etc/sudoers +110
--vi命令行模式yy把现在选中的这条复制下来,p粘贴
# %wheel ALL=(ALL) NOPASSWD: ALL
--组名改成sysmgrs
%sysmgrs ALL=(ALL) NOPASSWD: ALL
第四题:配置用户密码策略

#编辑/etc/login.defs新建用户策略文件,进入第25行
[root@mars ~]# vi /etc/login.defs +25
#修改当行的数字为20
PASS_MAX_DAYS 20
第五题:创建脚本

# 创建脚本文件
[root@mars ~]# vim /usr/bin/myresearch
#!/bin/bash
if [! -d /root/myfiles]
then
			mkdir /root/myfiles
fi

find /usr -size -10M -perm -2000 -exec cp -a {} /root/myfiles \;
# 给脚本执行权限
[root@mars ~]#chmod +x /usr/bin/myresearch
[root@mars ~]#/usr/bin/myresearch
[root@mars ~]#ll -h / root/myfiles/
total 708K
-rWX--S--X.	1 root slocate 	47K 	Aug 12 2018 locate
-r-xr-sr-x.	1 root ssh_keys 619K  Jan 8  2020 ssh- keysign
-rWX--S--X.	1 root utmp 		13K 	Aug 12 2018 utempter
-rwxr-sr-X.	1 root tty 			21K 	DeC 17 2019 write
第六题:设置默认权限
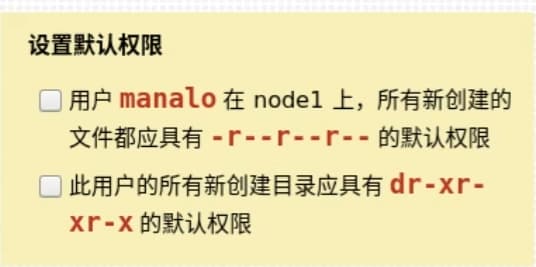
# 切换到用户manalo
[root@mars ~]#su - manalo
# 把umask写进用户家目录下的bashrc
[root@mars ~]#echo 'umask 0222'>>.bashrc
# 重新加载.bashrc文件
[root@mars ~]#source .bashrc
新增题目(二)
1、生成环境变量
生成一个环境变量rhcsa,用户在使用这个变量时输出一句话"This is RHCSA!"
自定义一个命令rhce,用户在使用这个变量时输出一句话"This is RHCE!"
# 使用export生成环境变量,并写进用户家目录下的bashrc
echo 'export rhcsa="echo This is RHCSA!"' ~/.bashrc

# 自定义命令
su - user
$ echo 'alias rhce="echo This is RHCE!"'>>~/.bash
2、欢迎语
登录到普通用户后提示一句欢迎语’hello word !'或者用户在登陆前显示欢迎语提示
配置登录后的欢迎语
重定向欢迎语写入到/etc/motd
# echo 'hello word !' >> /etc/motd 配置登录前的欢迎语
重定向欢迎语写入到/etc/issue
# echo 'hello word !' >> /etc/issue