目录
本文介绍如何在编辑框EditText上高效地输入文本,包括:如何改变编辑框的控件外观,如何利用焦点变更监听器提前校验输入位数,如何利用文本变化监听器自动关闭软键盘。
编辑框EditText
编辑框EditText用于接收软键盘输入的文字,例如用户名、密码、评价内容等等,它由文本试图派生而来,除了TextView已有的各种属性和方法之外,EditText还支持下列XML属性。
- inputType:指定输入文本的类型。输入类型的取值说明见表,若同时使用多种文本类型,则可使用竖线(|)把多种文本类型拼接起来。
- maxLength:指定文本允许输入的最大长度。
- hint:指定提示文本的内容。
- textColorHint:指定提示文本的颜色。
| 输入类型 | 说 明 |
|---|---|
| text | 文本 |
| textPassword | 文本密码。显示时用园点(·)代替 |
| number | 整型数 |
| numberSigned | 带符号的数字。允许在开头带负号(-) |
| numberDecimal | 带小数点的数字 |
| numberPassword | 数字密码。显示时用圆点(·)代替 |
| datetime | 时间日期格式。除了数字外,还允许输入横线(-)、斜杠(/)、空格( )、冒号(:) |
| date | 日期格式。除了数字外,还允许输入横线(-)和斜杠(/) |
| time | 日期格式。除了数字外,还允许输入冒号(:) |
接下来通过XML布局观看编辑框界面效果。
<LinearLayout xmlns:android="http://schemas.android.com/apk/res/android"
android:orientation="vertical"
xmlns:tools="http://schemas.android.com/tools"
android:layout_width="match_parent"
android:layout_height="match_parent"
tools:context=".EditText">
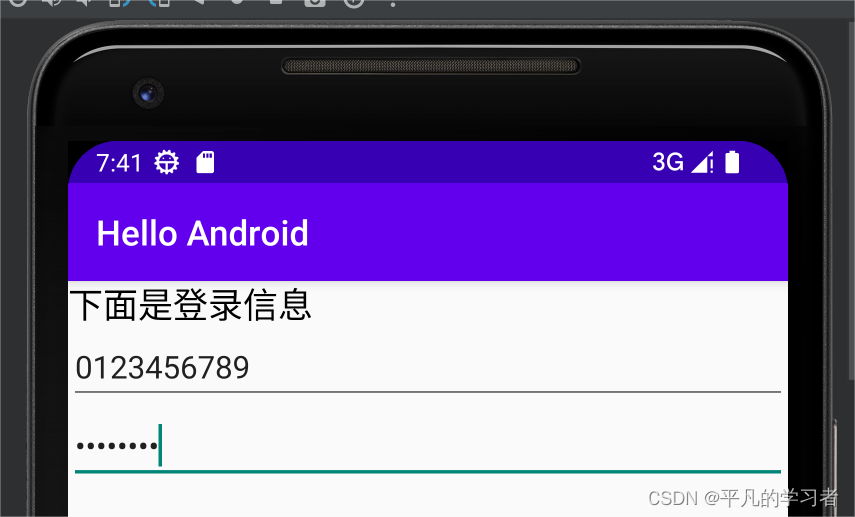
<TextView
android:layout_width="match_parent"
android:layout_height="wrap_content"
android:textSize="20sp"
android:textColor="@color/black"
android:text="下面是登录信息"/>
<EditText
android:layout_width="match_parent"
android:layout_height="wrap_content"
android:inputType="text"
android:maxLength="10"
android:hint="请输入用户名"/>
<EditText
android:layout_width="match_parent"
android:layout_height="wrap_content"
android:inputType="textWebPassword"
android:maxLength="8"
android:hint="请输入密码"/>
</LinearLayout>

EditText默认的下划线背景不甚好看,下面利用状态列表图形将编辑框背景改为更加美观的圆角矩形。
首先编写圆角矩形是形状图形文件。
<shape xmlns:android="http://schemas.android.com/apk/res/android">
<!--指定图形内部填充色-->
<solid android:color="#ffffff"/>
<!--指定形状轮廓的粗细与颜色-->
<stroke
android:width="1dp"
android:color="#aaaaaa"/>
<!--指定形状4个圆角的半径-->
<corners android:radius="5dp"/>
<!--指定形状4个方向的间距-->
<padding
android:bottom="2dp"
android:left="2dp"
android:right="2dp"
android:top="2dp"/>
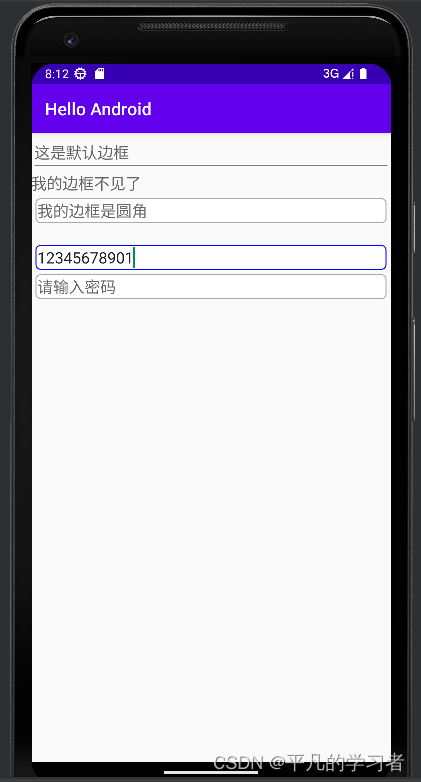
</shape>上述shape_edit_normal.xml定义了一个灰色的圆角矩形,可在未输入时展示该形状。正在输入时候的形状要改为蓝色的圆角矩形,其中轮廓线条的色值从aaaaaa(灰色)改成0000ff(蓝色),具体定义放在shape_edit_focus.xml。
接着编写编辑框背景的状态列表图形文件,主要在selector节点下添加两个item:一个item设置了获得焦点时(android:state_focused="true")的图形为@drawable/shape_edit_focus;另一个item设置了图形@drawable/shape_edit_normal但未指定任何状态,表示其他情况都展示该图形。
<selector xmlns:android="http://schemas.android.com/apk/res/android">
<item android:state_focused="true"
android:drawable="@drawable/shape_edit_focus"/>
<item android:drawable="@drawable/shape_edit_normal"/>
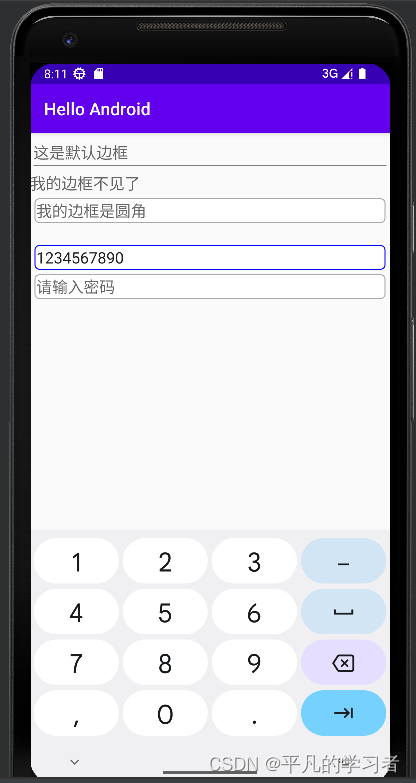
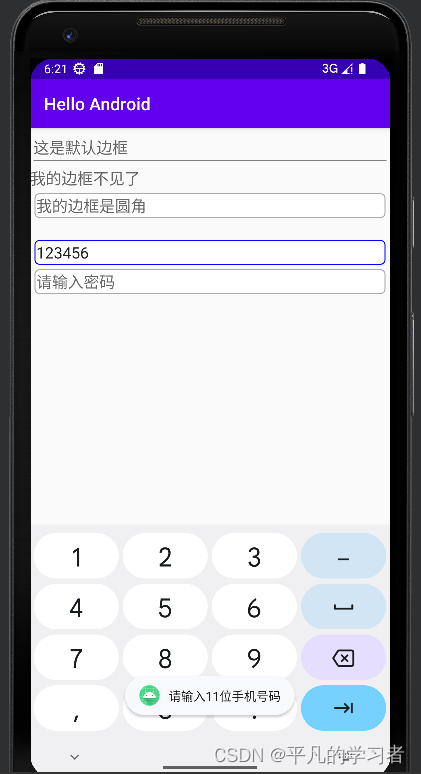
</selector>然后编写测试页面的XML布局文件,一共添加3个EditText标签:第一个EditText标签采用默认的编辑框背景;第二个EditText将background属性设置为@null,此时编辑框不显示任何背景;第三个EditText将background属性设为@drawable/editext_selector,其背景由editext_selector.xml所定义的状态列表图形决定。
<LinearLayout xmlns:android="http://schemas.android.com/apk/res/android"
    android:orientation="vertical"
    xmlns:tools="http://schemas.android.com/tools"
    android:layout_width="match_parent"
    android:layout_height="match_parent"
    tools:context=".EditText">
    <EditText
        android:layout_width="match_parent"
        android:layout_height="wrap_content"
        android:inputType="text"
        android:hint="这是默认边框"/>
    <EditText
        android:layout_width="match_parent"
        android:layout_height="wrap_content"
        android:inputType="text"
        android:hint="我的边框不见了"
        android:background="@null"/>
    <EditText
        android:layout_width="match_parent"
        android:layout_height="wrap_content"
        android:layout_margin="5dp"
        android:inputType="text"
        android:hint="我的边框是圆角"
        android:background="@drawable/editext_selector"/>
</LinearLayout>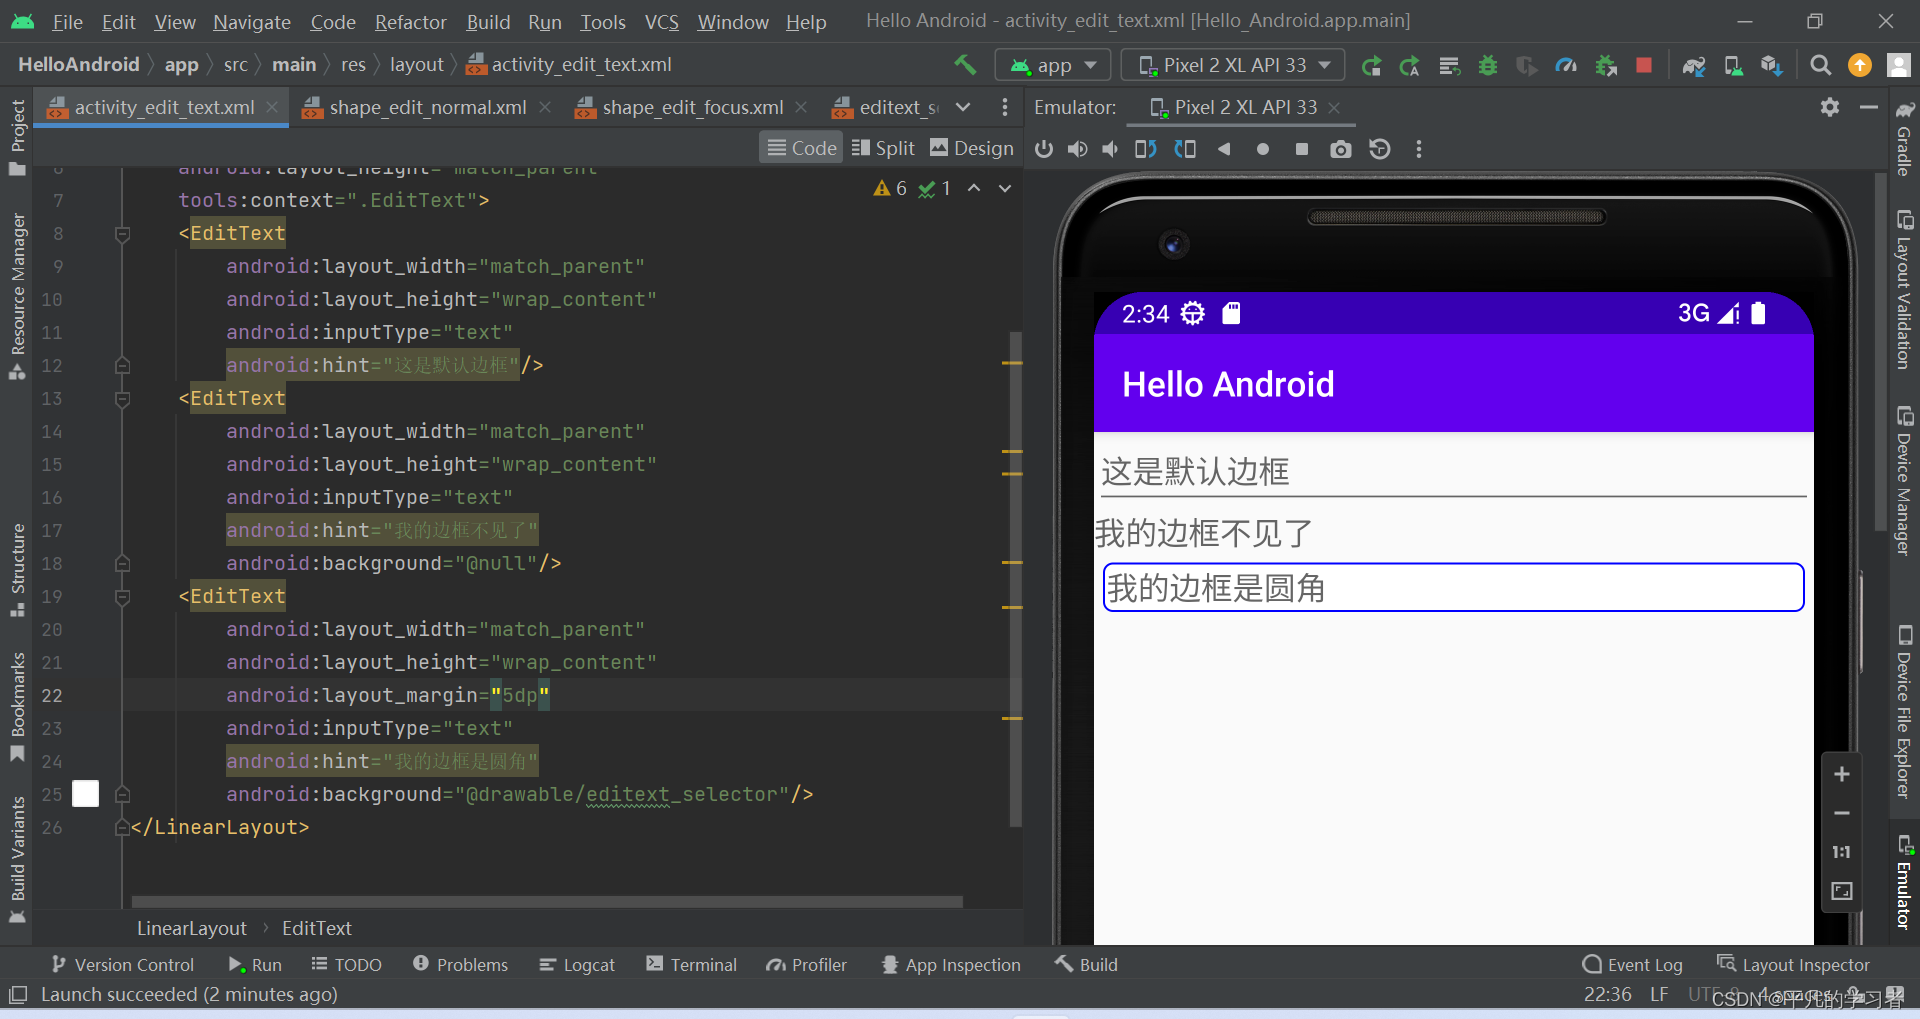
焦点变更监听器
虽然编辑框EditText提供了maxLength属性,用来设置可输入文本的最大长度,但他没有提供对应的minLength属性,也就是无法设置可输入文本的最小位数。既然编辑框不会自动校验位数,势必要求代码另行检查。我们可以通过注册检点变更监听器来实现。
焦点变更监听器来自接口View.OnFocusChangeListener,若想注册该监听器,就要调用编辑框对象的setOnFocusChangeListener方法,即可在光标切换之时触发焦点变更事件。下面是注册焦点变更监听器的代码例子:
public class EditText extends AppCompatActivity implements View.OnFocusChangeListener {


//从布局文件中获取名叫et_password的密码编辑框
et_password = findViewById(R.id.et_password);
//给密码编辑框注册一个焦点变化监听器,一旦焦点发生变化,就触发监听器的onFocusChange方法
et_password.setOnFocusChangeListener(this);
让活动页面实现接口View.OnFocusChangeListener,并重写该接口定义的onFocusChange方法,判断如果密码框获得焦点,就检查输入的手机号是否到达11位:
@Override
    public void onFocusChange(View v,boolean hasFocus){
    //判断密码编辑框是否获得焦点。hasFocus为true表示获得焦点,为false表示失去焦点
        if (v.getId()==R.id.et_password && hasFocus){
            String phone = et_phone.getText().toString();
            if (TextUtils.isEmpty(phone) || phone.length()<11) { // 手机号码不足11位
                // 手机号码编辑框请求焦点,也就是把光标移回手机号码编辑框
                et_phone.requestFocus();
                Toast.makeText(this, "请输入11位手机号码", Toast.LENGTH_SHORT).show();
            }
        }
    }
文本变化监听器
为了方便操作,最好在满足特定条件时自动关闭软键盘,比如手机号码输入满11位时自动关闭软键盘。达到指定位数便自动关闭键盘的功能,可以再分解为两个独立的功能:一个是如何关闭软键盘,另一个是如何判断已输入文字是否达到指定位数。
1.如何关闭软键盘
诚然按下返回键就会关闭软键盘,但这是系统自己关闭的,而非开发者在代码中关闭的。因为输入法软键盘由系统服务INPUT_METHOD_SERVICE管理,所以关闭软键盘也要由该服务处理:
 public static void hideOneInputMethod(Activity act, View v) {
        // 从系统服务中获取输入法管理器
        InputMethodManager imm = (InputMethodManager) act.getSystemService(Context.INPUT_METHOD_SERVICE);
        // 关闭屏幕上的输入法软键盘
        imm.hideSoftInputFromWindow(v.getWindowToken(), 0);
    }
2.如何判断已输入的文字是否达到指定位数
该功能点要求实时监控当前已输入的文本长度,这个监控操作用到文本监听器接口TextWatcher,该接口提供了3个监控方法,具体说明如下:
- beforeTextChanged:在文本改变之前触发。
- onTextChanged:在文本改变过程中触发。
- afterTextChanged:在文本改变之后触发。
具体到编码实现,需要自己写个监听器实现接口TextWatcher,再调用编辑框对象的addTextChangedListener方法注册文本监听器。监听操作建议在afterTextChanged方法中完成,一旦输入文字达到指定长度就关闭软键盘。
// 定义一个编辑框监听器,在输入文本达到指定长度时自动隐藏输入法
    private class HideTextWatcher implements TextWatcher {
        private android.widget.EditText mView; // 声明一个编辑框对象
        private int mMaxLength; // 声明一个最大长度变量

        public HideTextWatcher(android.widget.EditText v, int maxLength) {
            super();
            mView = v;
            mMaxLength = maxLength;
        }

        // 在编辑框的输入文本变化前触发
        public void beforeTextChanged(CharSequence s, int start, int count, int after) {}

        // 在编辑框的输入文本变化时触发
        public void onTextChanged(CharSequence s, int start, int before, int count) {}

        // 在编辑框的输入文本变化后触发
        public void afterTextChanged(Editable s) {
            String str = s.toString(); // 获得已输入的文本字符串
            // 输入文本达到11位(如手机号码),或者达到6位(如登录密码)时关闭输入法
            if ((str.length() == 11 && mMaxLength == 11)
                    || (str.length() == 6 && mMaxLength == 6)) {
                ViewUtil.hideOneInputMethod(EditText.this, mView); // 隐藏输入法软键盘
            }
        }
    }
写好文本监听器代码,还要给手机号码编辑框和密码编辑框分别注册监听器:
        et_password = findViewById(R.id.et_password);
        et_phone = findViewById(R.id.et_phone);
        // 给手机号码编辑框添加文本变化监听器
        et_phone.addTextChangedListener(new HideTextWatcher(et_phone, 11));
        // 给密码编辑框添加文本变化监听器
        et_password.addTextChangedListener(new HideTextWatcher(et_password, 6));