准备工作
验证AWS
可以先手动启动一个EC2实例验证自己创建的VPC, subnet, internet gateway 和routetable等, 确保实例创建后不会出现连接不上的情况.
可以按照下面的链接配置避免连接超时
https://docs.aws.amazon.com/zh_cn/AWSEC2/latest/UserGuide/TroubleshootingInstancesConnecting.html#TroubleshootingInstancesConnectionTimeout
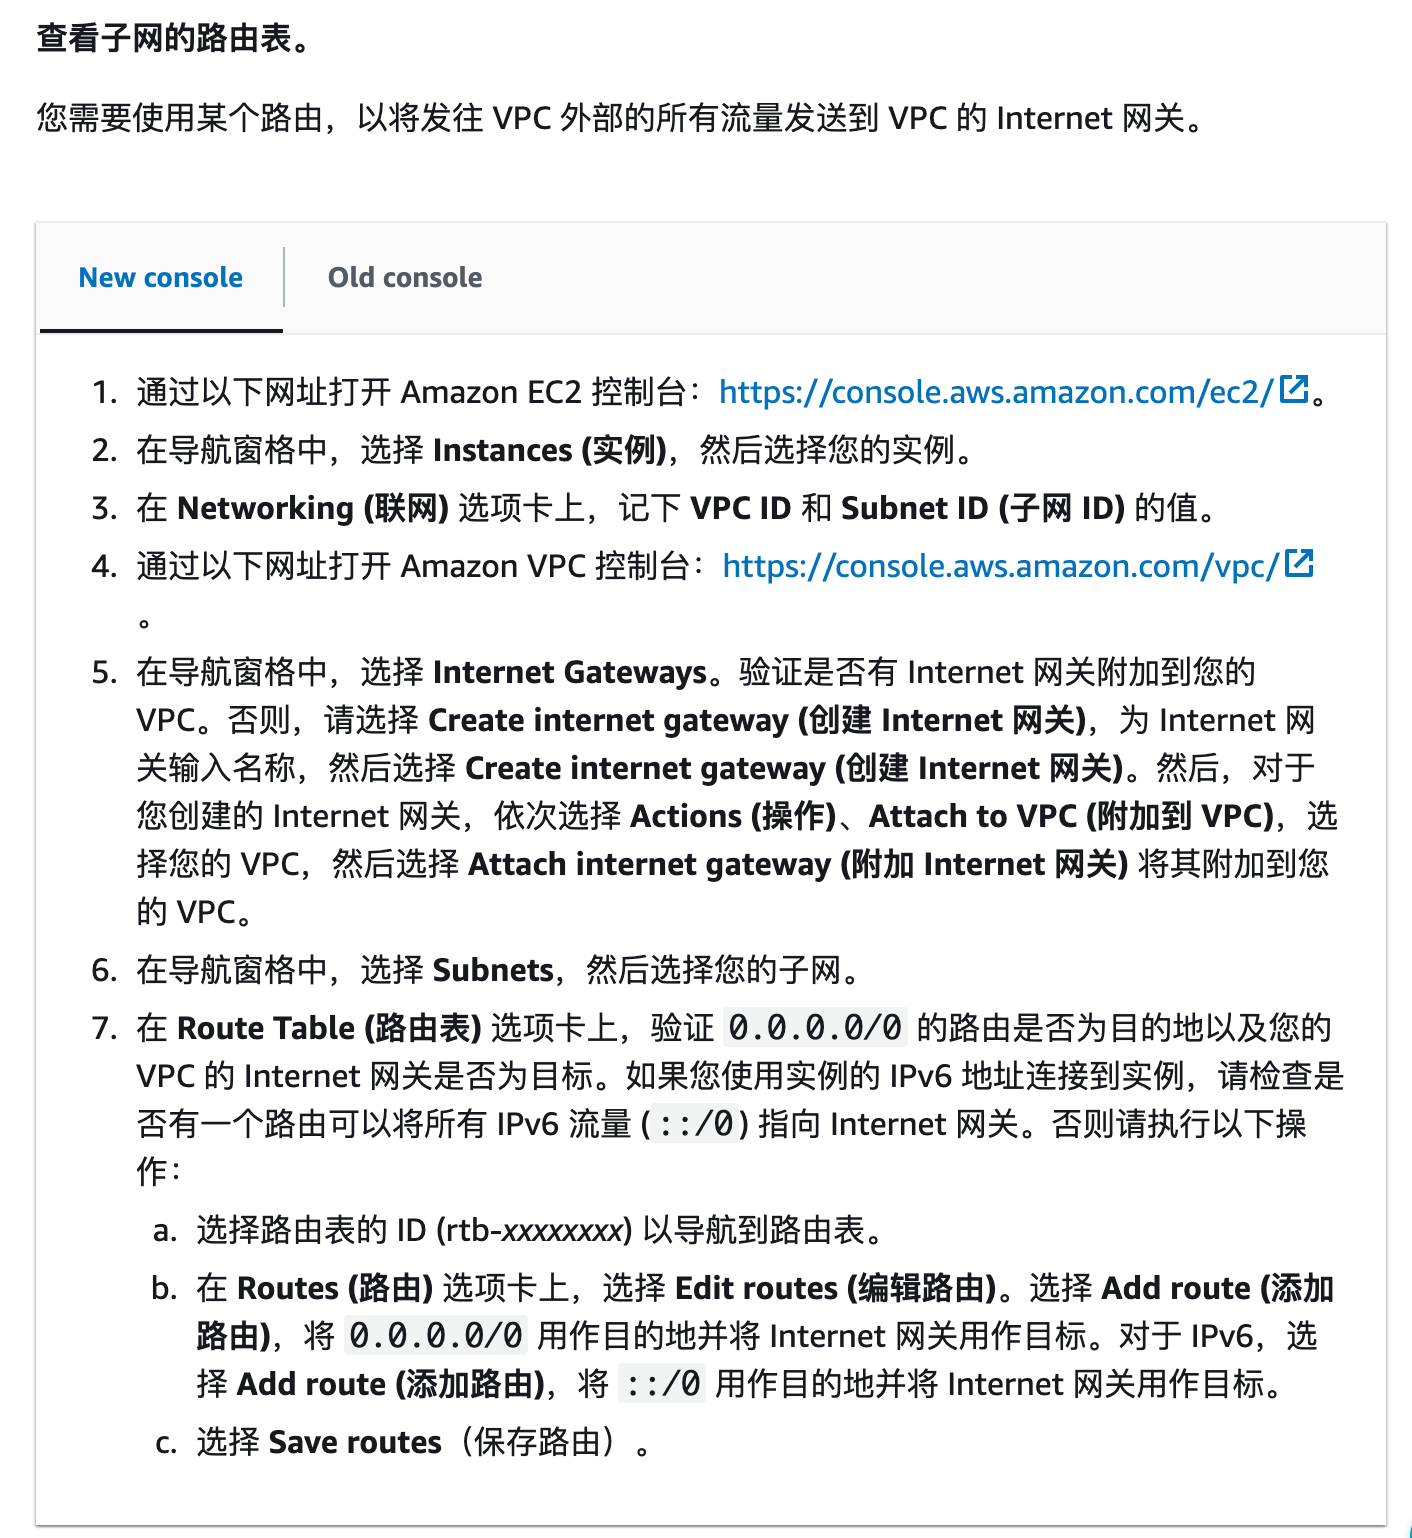
当手动启动的实例能正常启动并连接时说明VPC, subnet等配置没有问题, 可以记录下来用于后续步骤
packer操作
创建HCL文件
参考官方文档 将 下面的内容保存成aws-ubuntu.pkr.hcl 注意: vpc_id, subnet_id, ssh_keypair_name, ssh_private_key_file 这几个参数要替换成自己对应的参数或者注释掉
packer {


	required_plugins {


		amazon = {


			version = ">= 1.2.1"
			source = "github.com/hashicorp/amazon"
		}
	}
}

source "amazon-ebs" "ubuntu" {


	#AMI名称
	ami_name = "learn-packer-linux-aws"
	instance_type = "t2.micro"
	#可用区域
	region = "eu-central-1"
	source_ami_filter {


		filters = {


			#name = "ubuntu/images/*ubuntu-xenial-16.04-amd64-server-*"
			#packer示例的镜像已经不可用,可以在AWS的AMI里面找到可用镜像
			name = "ubuntu/images/hvm-ssd/ubuntu-jammy-22.04-amd64-server-20230208"
			root-device-type = "ebs"
			virtualization-type = "hvm"
		}
		most_recent = true
		owners = ["099720109477"]
	}
	#用户名
	ssh_username = "ubuntu"
	skip_region_validation = true
	ssh_agent_auth = false
	#是否分配公网ip
	associate_public_ip_address = true

	#ssh登录连接超时设置, public_ip表示通过公网ip连接,private_ip表示通过局域网ip连接
	ssh_interface = "public_ip"
	ssh_timeout = "5m"

	#AWS的VPC和subnet,不指定的话会使用默认的VPC和subnet, 这里必须替换成自己的
	vpc_id = "vpc-015962cc334246a68"
	subnet_id = "subnet-038a40d7d3eac7"


	#AWS keypair,可以用已经存在的keypair,不设置keypair相关参数的话packer会自动生成keypair, 这里必须替换成自己的或者注释掉
	ssh_keypair_name = "keypair"
	ssh_private_key_file = "packer_tutorial/keypair.pem"
}


build {


	name = "learn-packer"
	sources = [
	"source.amazon-ebs.ubuntu"
	]
}
如果启动实例时需要指定tag 的话可以在source模块里面加上tags和run_tags 这两个参数来指定, 例如:
source "amazon-ebs" "ubuntu" {


	tags = {

     appname = "app1" }
	run_tags = {

     appname = "app1" }
	#AMI名称
	ami_name = "learn-packer-linux-aws"
	instance_type = "t2.micro"
	#可用区域
	region = "eu-central-1"
	source_ami_filter {


		filters = {


			name = "ubuntu/images/hvm-ssd/ubuntu-jammy-22.04-amd64-server-20230208"
			root-device-type = "ebs"
			virtualization-type = "hvm"
		}
		most_recent = true
		owners = ["099720109477"]
	}
}
更多参数可参考 https://developer.hashicorp.com/packer/plugins/builders/amazon/ebs
设置环境变量
通过下面的方式设置AWS_ACCESS_KEY_ID 和AWS_SECRET_ACCESS_KEY环境变量
export AWS_ACCESS_KEY_ID="<YOUR_AWS_ACCESS_KEY_ID>"
export AWS_SECRET_ACCESS_KEY="<YOUR_AWS_SECRET_ACCESS_KEY>"
也可以在builder模块中指定, 例如:
 "builders": [{


    "type": "amazon-ebs",
    "access_key": "YOUR_AWS_ACCESS_KEY_ID",
    "secret_key": "YOUR_AWS_SECRET_ACCESS_KEY"
     }]
创建AMI
执行下面的命令,然后在aws中观察实例状态即可
packer init .
packer fmt .
packer validate .
packer build aws-ubuntu.pkr.hcl
参考
1. https://developer.hashicorp.com/packer/tutorials/aws-get-started/aws-get-started-build-image
2. https://developer.hashicorp.com/packer/plugins/builders/amazon/ebs
3. https://thefirstapril.com/2019/07/03/Using-Packer-to-create-AMI-Amazon-Machine-Images
4. https://stackoverflow.com/questions/59440394/where-does-packer-store-the-private-key