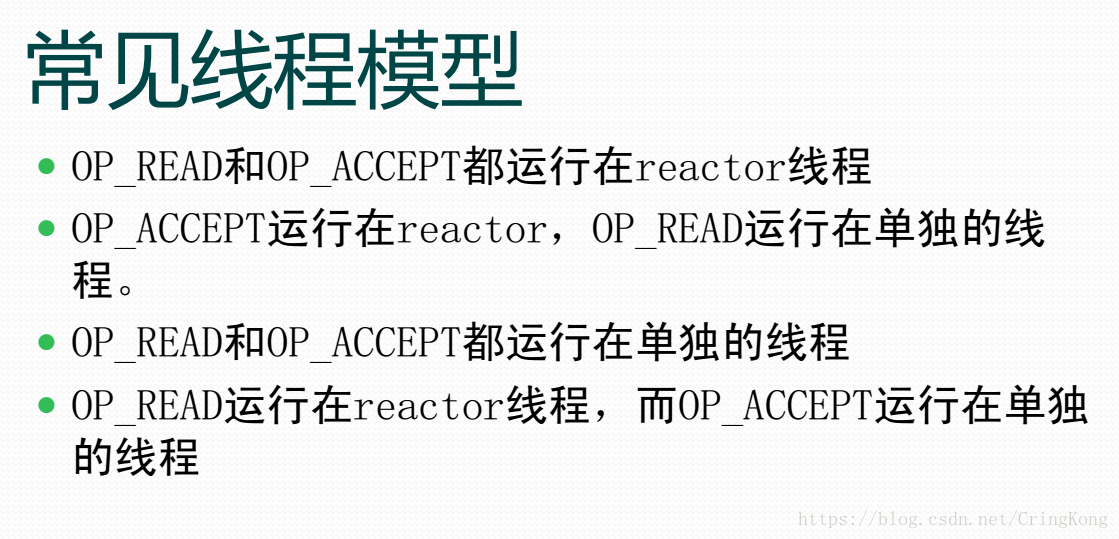
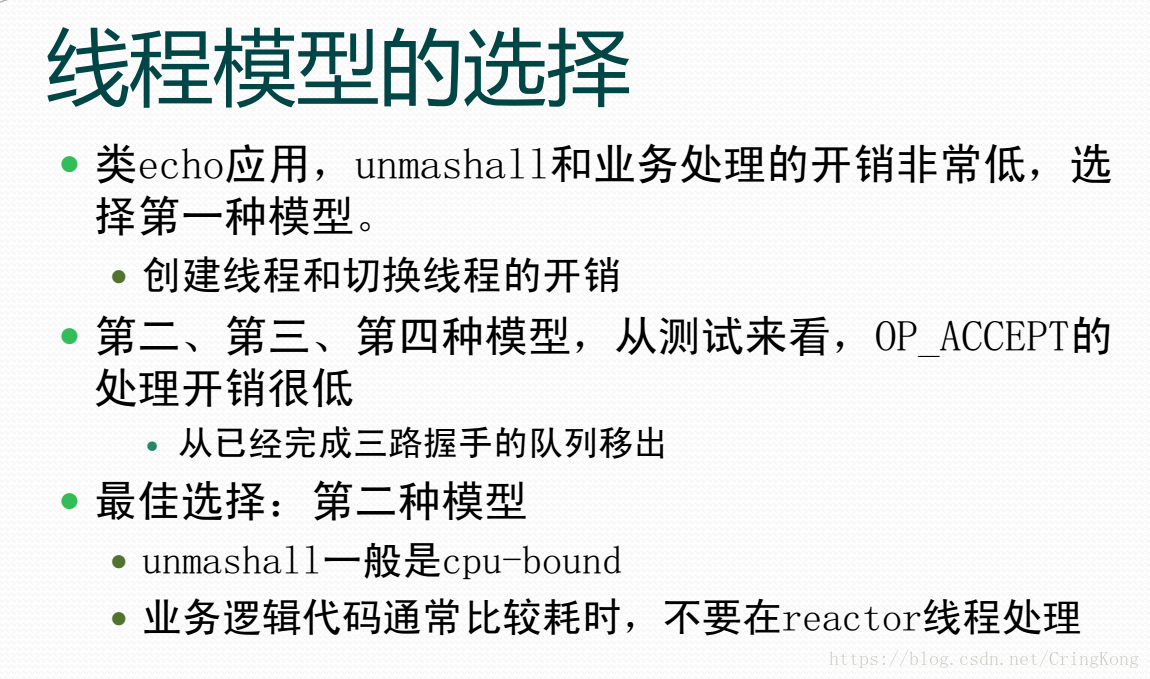
单线程VS多线程
写在前面:
也就是说多线程实现echo服务器实际上是不太科学的选择,但是本文依旧是实现了一个echo服务器。为了不误人子弟,所以请谨慎观看第二部分——自己实现的多线程echo服务器。
在上一篇JavaNIO–3.Reactor模式实现echo服务器 ,设计实现了一个单线程的echo服务器。

本质上这是一个同步的多路复用的I/O模式,其优点是在I/O阶段没有阻塞,而在选择器调用select()方法时会阻塞,并且在数据处理的阶段,因为其是同步设计,所以会占用CPU直到数据处理结束后才进入下一次选择分发。
我们知道,实际上系统I/O是进行了两个阶段,可以参考我写的JavaI/O模型,而非阻塞式I/O只是第一个阶段——数据是否在内核空间准备完毕,是非阻塞的,而I/O的第二个阶段——从内核空间复制到用户空间(NIO中就是从Channel读取到Buffer),依旧是会占用CPU的,从某种意义上来讲,这个过程是与Reactor本身功能无关的,所以我们就认为这个过程和数据处理的过程是可以通过其他线程完成的。
因此推出了一种新的模型,多线Reactor模型。
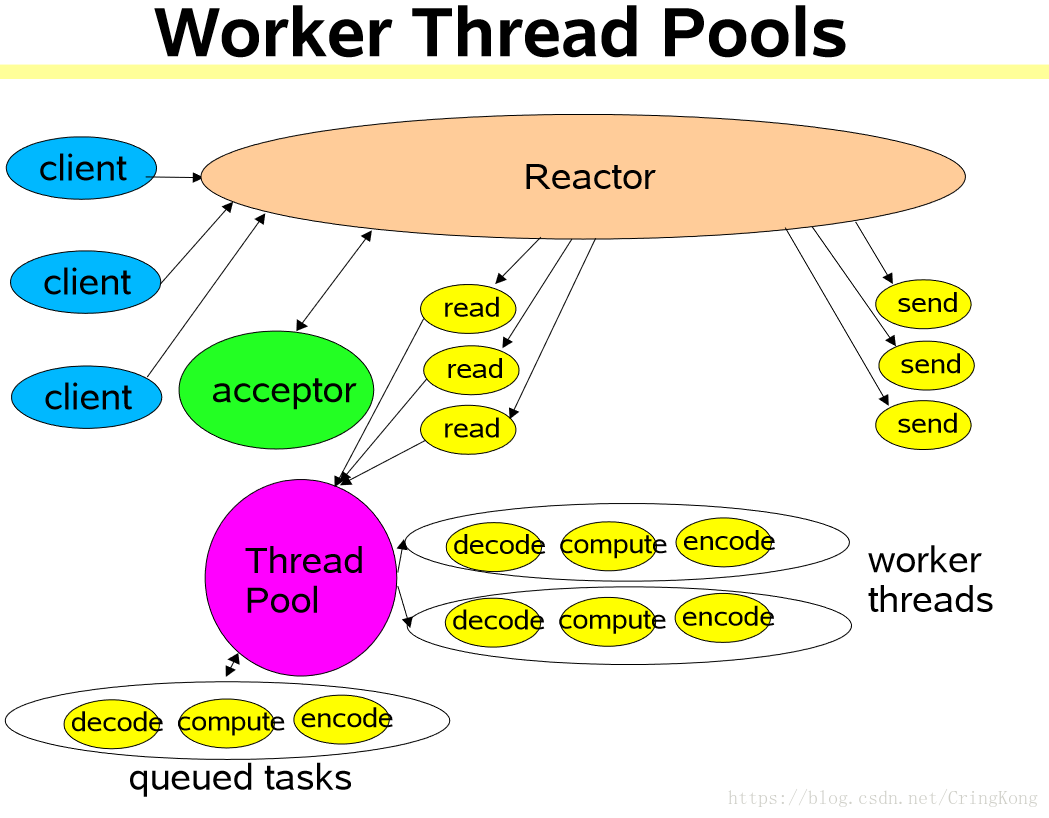
这是Doug Lea大神提出的一种模型,可以看出他的设计思路是,I/O过程依旧是在主线程中的,而服务器实现功能能的过程(decode,compute和encode)使用了多线程。这是一种很经典的服务器实现思路,因为数据处理的过程是耗时比较多的,而使用了非阻塞式I/O的读写过程耗时很少,所以数据处理过程交给了其他线程。
1.模型代码
1.1Reactor模型
Reactor.java这段是Doug Lea设计模型中的Reactor(反应器)
public class Reactor implements Runnable{

    // final变量一定要在构造器中初始化
    // 若为static final则一定要直接初始化或者在static代码块中初始化
    final Selector selector;
    final ServerSocketChannel serverSocket;

    public Reactor(int port) throws IOException {
        // TODO Auto-generated constructor stub
        selector = Selector.open();
        serverSocket = ServerSocketChannel.open();
        serverSocket.socket().bind(new InetSocketAddress(port));
        serverSocket.configureBlocking(false);
        SelectionKey sKey = serverSocket.register(selector, SelectionKey.OP_ACCEPT);
        sKey.attach(new Acceptor());
    }


    /**
     * DispatchLoop
     * 派发循环,循环调用dispatch()方法
     */
    @Override
    public void run() {
        // TODO Auto-generated method stub
        try {
            while(!Thread.interrupted()) {
                selector.select();
                Set<SelectionKey> selected = selector.selectedKeys();
                Iterator<SelectionKey> iterator = selected.iterator();
                while(iterator.hasNext()) {
                    dispatch(iterator.next());
                }
                // 清空selector的兴趣集合,和使用迭代器的remove()方法一样
                selected.clear();
            }
        } catch (Exception e) {
            // TODO: handle exception
        }
    }

    /**
     * 派发任务,相当于判断条件以后再调用指定方法
     * 使用dispatch()可以无差别的直接派发任务到指定对象并且调用指定方法
     * 例如:Accept的接收方法,Handler的处理报文的方法
     * @param key
     */
    private void dispatch(SelectionKey key) {
        System.out.println("发布了一个新任务");
        Runnable r = (Runnable)(key.attachment());
        if (r != null) {
            r.run();
        }
    }

    class Acceptor implements Runnable{
        @Override
        public void run() {
            // TODO Auto-generated method stub
            try {
                SocketChannel socketChannel = serverSocket.accept();
                if (socketChannel != null) {
                    /**
                     * 每次new一个Handler相当于先注册了一个key到selector
                     * 而真正进行读写操作发送操作还是依靠DispatchLoop实现
                     */
                    new Handler(selector, socketChannel);
                }
            } catch (Exception e) {
                // TODO: handle exception
            }
        }
    }
}可以看到这段代码和我们之前熟悉的NIO操作一样,由经典的DispatchLoop进行轮询通道状态并派发任务,由Acceptor 接收请求并创建Handler对象。
1.Handler模型
HandlerWithThreadPool.java这是实际的数据处理类。
public class HandlerWithThreadPool implements Runnable{

    final SocketChannel socket;
    final Selector selector;
    final SelectionKey key;
    final ByteBuffer inputBuffer = ByteBuffer.allocate(1024);
    final ByteBuffer outputBuffer = ByteBuffer.allocate(1024);

    // 初始化一个线程池
    static ThreadPoolExecutor pool = new ThreadPoolExecutor(10, 20, 100, TimeUnit.SECONDS, new LinkedBlockingQueue<Runnable>());

    // 状态码,分别对应读状态,写状态和处理状态
    static final int READING = 1;
    static final int SENDING = 2;
    static final int PROCESSING = 3;
    // 初始的状态码是READING状态,因为Reactor分发任务时新建的Handler肯定是读就绪状态
    private int state = READING;

    public HandlerWithThreadPool(SocketChannel socket,Selector selector) throws IOException {
        this.socket = socket;
        this.selector = selector;

        key = socket.register(selector, 0);
        socket.configureBlocking(false);
        key.interestOps(SelectionKey.OP_READ);
        // attach(this)是为了dispatch()调用
        key.attach(this);
    }

    /** 判断读写数据时候完成的方法 **/
    private boolean inputIsCompelete() {return true;}
    private boolean outputIsCompelete() {return true;}

    /** 对数据的处理类,比如HTTP服务器就会返回HTTP报文 **/
    private void process() {
        // 自己实现的服务器功能
    }

    /**
     * 读入数据,确定通道内数据读完以后
     * 状态码要变为 PROCESSING
     * 需要特别注意的是,本方法是在Reactor线程中执行的
     *
     * @throws IOException
     */
    void read() throws IOException {
        socket.read(inputBuffer);
        if (inputIsCompelete()) {
            state = PROCESSING;
            pool.execute(new Processer());
        }
    }

    /**
     * 这个方法调用了process()方法
     * 而后修改了状态码和兴趣操作集
     * 注意本方法是同步的,因为多线程实际执行的是这个方法
     * 如果不是同步方法,有可能出现
     */
    synchronized void processAndHandOff() {
        process();
        state = SENDING;
        key.interestOps(SelectionKey.OP_WRITE);
    }

    /**
     * 这个内部类完全是为了使用线程池
     * 这样就可以实现数据的读写在主线程内
     * 而对数据的处理在其他线程中完成
     */
    class Processer implements Runnable {
        public void run() {
            processAndHandOff();
        }
    }

    @Override
    public void run() {
        if (state == READING) {
            try {
                read();
            } catch (IOException e) {
                e.printStackTrace();
            }
        }else if (state == SENDING) {
            // 完成数据的发送即可
        }
    }

}
以上代码就是模型中的Handler,我们来分析一下代码。
HandlerWithThreadPool内定义了一个静态的线程池,而静态的线程池其实存在于方法区中,也就是说并不是每一个对象都有一个方线程池,而是整个进程中只有一个线程池。HandlerWithThreadPool的run()方法并不是为了多线程使用,而是为了Reactor中的dispatch()方法调用。- 真正多线程执行的方法是
Processer内部类中的run()方法,这样就能体现出对通道数据的读写I/O过程是在主线程中(Reactor线程),而对于数据的处理(解码编码,服务器功能实现),是在线程池的线程中。
2.自己实现的多线程echo服务器(基于Reactor模式)
2.1 Reactor
public class NioReactor2 {

    private Selector selector;
    private ServerSocketChannel serverSocketChannel;

    public NioReactor2(int port) throws IOException {
        // 初始化Selector和Channel,并完成注册
        selector = Selector.open();
        serverSocketChannel = ServerSocketChannel.open();
        serverSocketChannel.configureBlocking(false);
        SelectionKey selectionKey = serverSocketChannel.register(selector, SelectionKey.OP_ACCEPT);
        selectionKey.attach(new Acceptor());
        serverSocketChannel.bind(new InetSocketAddress(port));
    }

    /**
     * 轮询分发任务
     * @throws IOException
     */
    private void dispatchLoop() throws IOException {
        while(true) {
            selector.select();
            Set<SelectionKey> selectionKeys = selector.selectedKeys();
            Iterator<SelectionKey> iterator = selectionKeys.iterator();

            while(iterator.hasNext()) {
                SelectionKey selectionKey = iterator.next();
                dispatchTask(selectionKey);
            }
            selectionKeys.clear();
        }
    }

    /**
     * 任务分派器的进阶版,耦合性降低,拓展性增强
     * 子类只需要实现Runnable接口,并重写run()方法,就可以实现多种任务的无差别分派
     *
     * @param selectionKey
     */
    private void dispatchTask(SelectionKey taskSelectionKey) {
        Runnable runnable = (Runnable)taskSelectionKey.attachment();
        if (runnable != null) {
            runnable.run();
        }
    }

    /**
     * Accept类,实际TCP连接的建立和SocketChannel的获取在这个类中实现
     * 根据类的实现,可以发现一个Accept类对应一个ServerSocketChannel
     *
     * @author CringKong
     *
     */
    private class Acceptor implements Runnable{

        @Override
        public void run() {
            // TODO Auto-generated method stub
            try {
                SocketChannel socketChannel = serverSocketChannel.accept();
                if (socketChannel != null) {
                    // 创建一个新的处理类
                    new NewHandler(socketChannel, selector);
                }
            } catch (Exception e) {
                // TODO: handle exception
                e.printStackTrace();
            }
        }
    }


    public static void main(String[] args) {
        NioReactor2 reactor;
        try {
            reactor = new NioReactor2(12345);
            reactor.dispatchLoop();
        } catch (IOException e) {
            // TODO Auto-generated catch block
            e.printStackTrace();
        }
    }
}
2.2 Handler
class NewHandler implements Runnable {

    private SocketChannel socketChannel;
    private SelectionKey selectionKey;
    private ByteBuffer oldBuffer;
    private static final ExecutorService pool = Executors.newFixedThreadPool(4);

    /** 这里使用了状态码来防止多线程出现数据不一致等问题 **/
    static final int PROCESSING = 1;
    static final int PROCESSED = 2;
    private volatile int state = PROCESSED;

    public NewHandler(SocketChannel socketChannel, Selector selector) throws IOException {

        // 初始化的oldBuffer为null
        oldBuffer = null;
        this.socketChannel = socketChannel;
        socketChannel.configureBlocking(false);

        // 在构造函数里就注册通道到Selector
        this.selectionKey = socketChannel.register(selector, SelectionKey.OP_READ);
        // attach(this)将自身对象绑定到key上,作用是使dispatch()函数正确使用
        selectionKey.attach(this);
        // Selector.wakeup()方法会使阻塞中的Selector.select()方法立刻返回
        selector.wakeup();
    }

    // 使用线程池执行
    @Override
    public void run() {
        if (state == PROCESSED) {
            // 如果此时没有线程在处理该通道的本次读取,就提交申请到线程池进行读写操作
            pool.execute(new process(selectionKey));
        }else {
            // 如果此时有线程正在进行读写操作,就直接return,选择器会进行下一次选择和任务分派
            return;
        }
    }

    /**
     * 内部类实现对通道数据的读取处理和发送
     *
     * @author CringKong
     *
     */
    private class process implements Runnable {

        private SelectionKey selectionKey;

        public process(SelectionKey selectionKey) {
            this.selectionKey = selectionKey;
            state = PROCESSING;
        }

        /**
         * 这是一个同步方法,因为在reactor中的选择器有可能会出现一种状况:
         * 当process线程已经要对某通道进行读写的时候,有可能Selector会再次选择该通道
         * 因为此时该process线程还并没有真正的进行读写,会导致另一线程重新创建一个process
         * 并试图进行读写操作,此时就会出现cpu资源浪费的情况,或者出现异常,因为线程1在读取通道内容的时候
         * 线程2就会被阻塞,而等到线程2执行操作的时候,线程1已经对通道完成了读写操做
         * 因此可以通过设置对象状态码来防止出现这些问题
         *
         * @param selectionKey
         * @throws IOException
         * @throws InterruptedException
         */
        private synchronized void readDate(SelectionKey selectionKey) throws IOException, InterruptedException {

            ByteBuffer newBuffer = ByteBuffer.allocate(64);

            int read;
            while ((read = socketChannel.read(newBuffer)) <= 0) {
                state = PROCESSED;
                return;
            }

            newBuffer.flip();
            String line = readLine(newBuffer);
            if (line != null) {

                // 如果这次读到了行结束符,就将原来不含有行结束符的buffer合并位一行
                String sendData = readLine(mergeBuffer(oldBuffer, newBuffer));
                if (readLineContent(sendData).equalsIgnoreCase("exit")) { // 如果这一行的内容是exit就断开连接
                    socketChannel.close();
                    state = PROCESSED;
                    return;
                }
                // 然后直接发送回到客户端
                ByteBuffer sendBuffer = ByteBuffer.wrap(sendData.getBytes("utf-8"));
                while (sendBuffer.hasRemaining()) {
                    socketChannel.write(sendBuffer);
                }
                oldBuffer = null;
            } else {
                // 如果这次没读到行结束付,就将这次读的内容和原来的内容合并
                oldBuffer = mergeBuffer(oldBuffer, newBuffer);
            }
            state = PROCESSED;
        }

        @Override
        public void run() {
            // TODO Auto-generated method stub
            try {
                readDate(selectionKey);
            } catch (IOException | InterruptedException e) {
                // TODO Auto-generated catch block
                e.printStackTrace();
            }
        }

    }

    /**
     * 读取ByteBuffer直到一行的末尾 返回这一行的内容,包括换行符
     *
     * @param buffer
     * @return String 读取到行末的内容,包括换行符 ; null 如果没有换行符
     * @throws UnsupportedEncodingException
     */
    private static String readLine(ByteBuffer buffer) throws UnsupportedEncodingException {
        // windows中的换行符表示手段 "\r\n"
        // 基于windows的软件发送的换行符是会是CR和LF
        char CR = '\r';
        char LF = '\n';

        boolean crFound = false;
        int index = 0;
        int len = buffer.limit();
        buffer.rewind();
        while (index < len) {
            byte temp = buffer.get();
            if (temp == CR) {
                crFound = true;
            }
            if (crFound && temp == LF) {
                // Arrays.copyOf(srcArr,length)方法会返回一个 源数组中的长度到length位 的新数组
                return new String(Arrays.copyOf(buffer.array(), index + 1), "utf-8");
            }
            index++;
        }
        return null;
    }

    /**
     * 获取一行的内容,不包括换行符
     *
     * @param buffer
     * @return String 行的内容
     * @throws UnsupportedEncodingException
     */
    private String readLineContent(String line) throws UnsupportedEncodingException {
        System.out.print(line);
        System.out.print(line.length());
        return line.substring(0, line.length() - 2);
    }

    /**
     * 对传入的Buffer进行拼接
     *
     * @param oldBuffer
     * @param newBuffer
     * @return ByteBuffer 拼接后的Buffer
     */
    public static ByteBuffer mergeBuffer(ByteBuffer oldBuffer, ByteBuffer newBuffer) {
        // 如果原来的Buffer是null就直接返回
        if (oldBuffer == null) {
            return newBuffer;
        }
        // 如果原来的Buffer的剩余长度可容纳新的buffer则直接拼接
        newBuffer.rewind();
        if (oldBuffer.remaining() > (newBuffer.limit() - newBuffer.position())) {
            return oldBuffer.put(newBuffer);
        }

        // 如果不是以上两种情况就构建新的Buffer进行拼接
        int oldSize = oldBuffer != null ? oldBuffer.limit() : 0;
        int newSize = newBuffer != null ? newBuffer.limit() : 0;
        ByteBuffer result = ByteBuffer.allocate(oldSize + newSize);

        result.put(Arrays.copyOfRange(oldBuffer.array(), 0, oldSize));
        result.put(Arrays.copyOfRange(newBuffer.array(), 0, newSize));

        return result;
    }

}可以看到Reactor和模型代码的Reactor实现并无二致,而Handler的设计思路是另一种多线程模式。
这种多线程模式是将读写过程完全交给另外的线程,而主线程只负责分发任务,这样设计可以说实现了半异步,因为读写过程也不会占用主线程(reactor)的CPU,同时通过选择器再进行选择。但它并不是完全意义上的异步I/O,因为从操作系统的角度上来讲,并没有实现回调函数和底层的异步I/O过程。
我们来分析一下代码。
NewHandler对象对于一个Scoket连接只创建一次,其中的run()方法并不是为了使用多线程。process内部类是实际的对数据读写操作的对象,无论是读写数据还是数据操作,全部是在这个类内实现,并且是多线程进行操作,也就是说SocketChannel的所有操作都不在主线程内完成。- 需要注意的是并发量较小的时候,
dispatchLoop会出现线程重入的问题,也就是说本身提交到线程1中的SocketChannel还未进行读写操作,此时dispatchLoop认为该通道依旧处于就绪状态,而导致线程2重新进入了同一个SocketChannel的读写操作,就会出现异常,解决方案是使用状态码和同步方法进行读写操作。
参考资料: