前言:下面我们来学习栈和队列,及其相关的OJ题目,来巩固和提高栈和队列相关的知识。内容有点多,覆盖了动图便于理解,希望小伙伴们认真看完。

文章目录
一、栈
1 栈的gif动图

2 栈的性质
- 1 后进先出 (LIFO)
- 2 只能再一端删除即尾插尾删
3 栈的实现方法及其相关接口
1) 思考为什么用动态数组实现栈?
用链表实现栈尾删效率低,就算设置尾指针,但是尾删的时候还是要找尾指针的前面一个,因此效率偏低。用动态数组可以快速实现栈顶元素的删除,数组支持用下标访问,用一个top的变量记录栈顶位置,便可以快速实现尾插尾删
2) 相关接口和代码实现
- 1 需要实现的接口
typedef int STDataType;

typedef struct Stack
{


	STDataType* a;
	int top;
	int capacity;
}ST;

void StackInit(ST* ps);//初始化

void STCheckcapacity(ST* ps);//考虑扩容

void StackDestroy(ST* ps);//销毁

void StackPush(ST* ps, STDataType x);//栈顶插入

void StackPop(ST* ps);//栈顶删除

STDataType StackTop(ST* ps);//取栈顶的数据

int StackSize(ST* ps);//栈的数据个数

bool StackEmpty(ST* ps);//判断栈是不是空,注意为空返回真
- 2 接口实现参考代码
void StackInit(ST* ps)
{


	assert(ps);
	ps->a = NULL;
	ps->top = -1;
	ps->capacity = 0;
}

void STCheckcapacity(ST* ps)
{


	assert(ps);
	if (ps->capacity == ps->top+1)
	{


		ps->capacity = ps->capacity == 0 ? 4 : ps->capacity * 2;
		STDataType* tmp = (STDataType*)realloc(ps->a,sizeof(STDataType) * ps->capacity );
		assert(tmp);
		ps->a = tmp;
	}
}

void StackDestroy(ST* ps)
{


	assert(ps);
	free(ps->a);
	ps->a = NULL;
	ps->capacity = 0;
	ps->top = -1;
}

void StackPush(ST* ps, STDataType x)
{


	assert(ps);
	STCheckcapacity(ps);
	ps->top++;
	ps->a[ps->top] = x;
}

void StackPop(ST* ps)
{


	assert(ps);
	assert(!StackEmpty(ps));
	ps->top--;
}

STDataType StackTop(ST* ps)
{


	assert(ps);
	assert(!StackEmpty(ps));
	return ps->a[ps->top];
}

int StackSize(ST* ps)
{


	assert(ps);
	return ps->top + 1;
}

bool StackEmpty(ST* ps)
{


	assert(ps);
	return ps->top == -1;
}
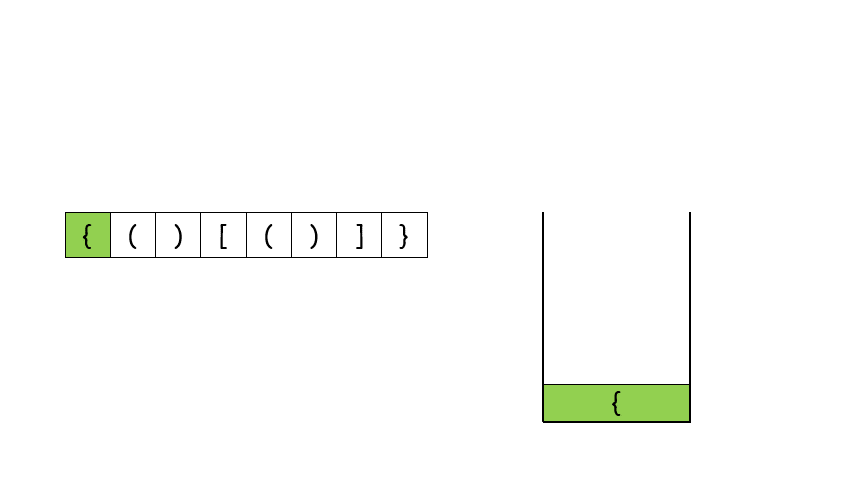
4 栈的相关OJ->20. 有效的括号
1) 题目gif动图
2) 题目链接入口
3) 解题思路->左括号入栈,右括号出栈匹配
-
a 题目要求
-
b 解题思路-> 左括号入栈,右括号出栈匹配
鉴于栈的后进先出的特性,对于给定的字符串括号,遇到左括号 [、{、( 的任意一种便压入栈中,遇到右括号 ]、}、)的任意一种,便出栈一次进行比较,保证一次只匹配一对括号。*s==\0循环结束到匹配完所有的括号 -
c 两种极端情况
-
1 栈空了还遇到右括号
- 1.前面匹配成功后面出现右括号
( ) { } [ ] ] [ ] - 2.全是右括号
] ] ] ] ] ]
- 1.前面匹配成功后面出现右括号
-
2 循环结束还有左括号剩余
- 1.循环结束还有左括号
( ) { } [ ] [ ] { - 2.全是左括号
{ { { { [ 这种情况注意先把动态栈销毁,再返回值
- 1.循环结束还有左括号
-
4) 参考代码
注意c语言需要自己动手实现一个栈,每个人实现的栈代码不同,这里只给出接口应用过程,栈的实现代码不再重复给出
bool isValid(char * s){


    ST st;
    StackInit(&st);
    while(*s)
    {


        if(*s=='(' || *s=='[' || *s== '{')
        {


            //遇到左括号栈入
            StackPush(&st,*s);
            s++;
        }
        else
        {


            //先考虑是不是栈空
            if(StackEmpty(&st))
            {


	            StackDestroy(&st);
                return false;
            }
            else
            {


                //取栈顶的元素+删除
                char top=StackTop(&st);
                StackPop(&st);
                if(
                    ( *s==']' && top!='[' )
                    ||( *s=='}' && top!='{' )
                    ||( *s==')' && top!='(' )
                )
                {


                	StackDestroy(&st);
                    return false;
                }
                //匹配成功循环继续
                else
                {


                    s++;
                }
            }
        }
    }
    //如果栈没空说明有多余的左括号,
    //这里要注意销毁自己写的栈
    bool ret=StackEmpty(&st);
    StackDestroy(&st);
    return ret;
}
二、队列
1 队列的gif动图

2 队列的性质
- 1 先进先出 (FIFO)
- 2 尾插头删
3 队列实现方法及其相关接口
1) 思考为什么用链表实现队列?
队列具有先进先出的特性,需要我们尾插头删
,若用动态数组实现,头删是便需要一直挪位,效率偏低。对此我们使用带尾结点的链表来实现,便可以快速尾插,且链表头删效率本来就高。
2) 相关接口和队列实现
- 1 需要实现的接口
typedef int QDataType;

typedef struct QueueNode
{


	QDataType data;
	struct QueueNode* next;
}QueueNode; //定义结点

typedef struct Queue
{


	struct QueueNode* head;
	struct QueueNode* tail;
	int size;
}Queue;//结构体定义栈

void QueueInit(Queue* pq);//初始化

void QueueDestroy(Queue* pq);//销毁

void QueuePush(Queue* pq, QDataType x);//插入

void QueuePop(Queue* pq);//删除

QDataType QueueFront(Queue* pq);//取头数据

QDataType QueueBack(Queue* pq);//取尾数据

bool QueueEmpty(Queue* pq);//判断是否为空

void QueuePrint(Queue* pq);//打印
- 2 接口实现参考代码
void QueueInit(Queue* pq)
{


	assert(pq);
	pq->head = pq->tail = NULL;
	pq->size = 0;
}

void QueueDestroy(Queue* pq)
{


	assert(pq);
	QueueNode* cur = pq->head;
	while (cur)
	{


		QueueNode* Next = cur->next;
		free(cur);
		cur = Next;
	}
	pq->head = pq->tail = NULL;
	pq->size = 0;
}

void QueuePush(Queue* pq, QDataType x)
{


	assert(pq);
	QueueNode* newnode = (QueueNode*)malloc(sizeof(QueueNode));
	assert(newnode);
	newnode->data = x;
	newnode->next = NULL;
	if (pq->head == NULL)
	{


		pq->head = pq->tail = newnode;
	}
	else
	{


		pq->tail->next = newnode;
		pq->tail = newnode;
	}
	pq->size++;
}

void QueuePop(Queue* pq)
{


	assert(pq);
	assert(!QueueEmpty(pq));
	//考虑只有一个数据的时候
	if (pq->head == pq->tail)
	{


		free(pq->head);
		pq->head = pq->tail = NULL;
	}
	else
	{


		QueueNode* Next = pq->head->next;
		free(pq->head);
		pq->head = Next;
	}
	pq->size--;
}

QDataType QueueFront(Queue* pq)
{


	assert(pq);
	assert(!QueueEmpty(pq));
	return pq->head->data;
}

QDataType QueueBack(Queue* pq)
{


	assert(pq);
	assert(!QueueEmpty(pq));
	return pq->tail->data;
}

bool QueueEmpty(Queue* pq)
{


	assert(pq);
	return pq->size == 0;
}

void QueuePrint(Queue* pq)
{


	assert(pq);
	QueueNode* cur = pq->head;
	while (cur)
	{


		printf("%d->", cur->data);
		cur = cur->next;
	}
	printf("NULL\n");
}
三、环形队列
1 环形队列的gif动图

2 简介
循环队列就是将队列存储空间的最后一个位置绕到第一个位置,形成逻辑上的环状空间,供队列循环使用。在循环队列结构中,当存储空间的最后一个位置已被使用而再要进入队运算时,只需要存储空间的第一个位置空闲,便可将元素加入到第一个位置,即将存储空间的第一个位置作为队尾。循环队列可以更简单防止伪溢出的发生,但队列大小是固定的。
3 循坏队列的实现方法
1)数组版
a 设计思路-> 多开一个空间
在循环队列中,当队列为空时,有front=rear,而当所有队列空间全占满时,也有front=rear。为了区别这两种情况,规定循环队列最多只能有MaxSize-1个队列元素,当循环队列中只剩下一个空存储单元时,队列就已经满了。因此,队列判空的条件是front=rear,而队列判满的条件是front=(rear+1)%MaxSize。
b 相关接口和代码实现
- 1 需要实现的接口
typedef struct {


    int* a;
    int front;
    int rear;
    int k;
} MyCircularQueue;

MyCircularQueue* myCircularQueueCreate(int k);//建立队列

bool myCircularQueueEnQueue(MyCircularQueue* mcq, int value);//队入

bool myCircularQueueDeQueue(MyCircularQueue* mcq);//队出

int myCircularQueueFront(MyCircularQueue* mcq);//取队头数据

int myCircularQueueRear(MyCircularQueue* mcq);//取队尾数据

bool myCircularQueueIsEmpty(MyCircularQueue* mcq);//判空

bool myCircularQueueIsFull(MyCircularQueue* mcq);//判满

void myCircularQueueFree(MyCircularQueue* mcq);//释放

void myCircularQueuePrint(MyCircularQueue* mcq);//打印
- 2 接口实现参考代码
MyCircularQueue* myCircularQueueCreate(int k)
{


	MyCircularQueue* mcq = (MyCircularQueue*)malloc(sizeof(MyCircularQueue));
	assert(mcq);
	mcq->front = mcq->rear = 0;
	mcq->k = k + 1;
	mcq->a = (int*)malloc(sizeof(int) * (k + 1));
	//多开一个空间,tail不存有效值
	assert(mcq->a);
	return mcq;
}

bool myCircularQueueEnQueue(MyCircularQueue* mcq, int value)
{


	assert(mcq);
	if (myCircularQueueIsFull(mcq))
	{


		printf("栈满:%d插入无效\n", value);
		return false;
	}
	else
	{


		mcq->a[mcq->rear] = value;
		mcq->rear = (mcq->rear + 1) % mcq->k;
		return true;
	}
}

bool myCircularQueueDeQueue(MyCircularQueue* mcq)
{


	assert(mcq);
	if (myCircularQueueIsEmpty(mcq))
	{


		printf("已空,无需删除\n");
		return false;
	}
	else
	{


		mcq->front = (mcq->front + 1) % mcq->k;
		return true;
	}
}

int myCircularQueueFront(MyCircularQueue* mcq)
{


	assert(mcq);
	if (myCircularQueueIsEmpty(mcq))
		return -1;
	else
		return mcq->a[mcq->front];
}

int myCircularQueueRear(MyCircularQueue* mcq)
{


	assert(mcq);
	if (myCircularQueueIsEmpty(mcq))
		return -1;
	else
		return mcq->a[(mcq->rear - 1 + mcq->k) % (mcq->k)];
}

bool myCircularQueueIsEmpty(MyCircularQueue* mcq)
{


	assert(mcq);
	return mcq->front == mcq->rear;
}

bool myCircularQueueIsFull(MyCircularQueue* mcq)
{


	assert(mcq);
	return (mcq->rear + 1) % mcq->k == mcq->front;
}

void myCircularQueueFree(MyCircularQueue* mcq)
{


	assert(mcq);
	free(mcq->a);
	free(mcq);
}

void myCircularQueuePrint(MyCircularQueue* mcq)
{


	assert(mcq);
	while (mcq->front != mcq->rear)
	{


		printf("%d ", mcq->a[mcq->front]);
		mcq->front = (mcq->front + 1) % mcq->k;
	}
	printf("\n");
}
注意返回队尾数据时,rear可能为0,不能直接相减,而是应该+周期再减去 1 1 1,即return mcq->a[(mcq->rear - 1 + mcq->k) % (mcq->k)]
2)链表版
a 设计思路-> 开一个哨兵卫的头结点
开一个哨兵卫的头节点,让尾指针不存有效值,当tail->next=front的时候说明队满
b 相关接口和代码实现
- 1 需要实现的接口
typedef int DataType;

typedef struct Node
{


	DataType val;
	struct Node* next;
}Node;

typedef struct MCQ
{


	Node* head;
	Node* tail;
}MCQ;

Node* BuyNode();//创结点

MCQ* Creat(int k);//创建队列

bool MCQIsFull(MCQ* mcq);//判断满

bool MCQIsEmpty(MCQ* mcq);//判断空

void MCQEnter(MCQ* mcq, DataType x);//尾插入

void MCQPop(MCQ* mcq);//头删除

DataType MCQFront(MCQ* mcq);//返回队头元素

DataType MCQRear(MCQ* mcq);//返回队尾元素

void MCQPrint(MCQ* mcq);//打印

void MCQDestroy(MCQ** mcq);//销毁
- 2 接口实现参考代码
Node* BuyNode()
{


	Node* newnode = (Node*)malloc(sizeof(Node));
	assert(newnode);
	newnode->next = NULL;
	return newnode;
}

MCQ* Creat(int k)
{


	MCQ* mcq = (MCQ*)malloc(sizeof(MCQ));
	assert(mcq);
	Node* phead = (Node*)malloc(sizeof(Node));
	mcq->head = mcq->tail = phead;
	while (k--)
	{


		Node* newnode = BuyNode();
		mcq->tail->next = newnode;
		mcq->tail = newnode;
	}
	//单向带头循环->首尾相连
	mcq->tail->next = mcq->head;
	mcq->tail = mcq->head;
	return mcq;
}

bool MCQIsFull(MCQ* mcq)
{


	assert(mcq);
	return mcq->tail->next == mcq->head;
}

bool MCQIsEmpty(MCQ* mcq)
{


	assert(mcq);
	return mcq->head == mcq->tail;
}

void MCQEnter(MCQ* mcq, DataType x)
{


	assert(mcq);
	if (MCQIsFull(mcq))
	{


		printf("已满,%d插入失败\n", x);
	}
	else
	{


		mcq->tail->val = x;
		mcq->tail = mcq->tail->next;
	}
}

void MCQPop(MCQ* mcq)
{


	assert(mcq);
	if (MCQIsEmpty(mcq))
		printf("栈空,无需删除\n");
	else
		mcq->head = mcq->head->next;
}

DataType MCQFront(MCQ* mcq)
{


	assert(mcq);
	if (MCQIsEmpty(mcq))
	{


		printf("栈空, 返回-1\n");
		return -1;
	}
	else
		return mcq->head->val;
}

DataType MCQRear(MCQ* mcq)
{


	assert(mcq);
	if (MCQIsEmpty(mcq))
	{


		printf("栈空,返回-1\n");
		return -1;
	}
	Node* cur = mcq->head;
	while (cur->next != mcq->tail)
	{


		cur = cur->next;
	}
	return cur->val;
}

void MCQPrint(MCQ* mcq)
{


	assert(mcq);
	Node* cur = mcq->head;
	while (cur != mcq->tail)
	{


		printf("%d ", cur->val);
		cur = cur->next;
	}
	printf("\n");
}

void MCQDestroy(MCQ** mcq)
{


	assert(*mcq);
	Node* cur = (*mcq)->head->next;
	while (cur != (*mcq)->head)
	{


		Node* Next = cur->next;
		free(cur);
		cur = Next;
	}
	free(cur);
	free(*mcq);
	*mcq = NULL;
}
在这里注意找队尾的时候是需要遍历的,找到tail指针的前面一个结点。
四、栈和队列的相互实现OJ题
1 用两个栈来实现队列
1) 两个栈实现队列的gif动图

2) 题目链接入口
3) 解题思路->栈后进先出相反性质的两次运用
用两个栈来实现队列,pushST和popST,栈后进先出具有相反的性质,两次后进先出便能实现队列的先进先出
- a 入队列只放到栈pushST入
- b 出队列只从栈popST中出:
队列为空:返回-1;
popST不为空:popST栈顶元素就是出队列元素
栈popST为空:依次将栈pushST中的元素放入popST中,再出popST的栈顶元素就是队列出对元素
4) 参考代码
注意上面有栈的实现过程,这里只给出两个栈如何实现队列的代码
typedef struct {


    ST pushST;
    ST popST;
} MyQueue;


MyQueue* myQueueCreate() {


    MyQueue*q=(MyQueue*)malloc(sizeof(MyQueue));
    StackInit(&q->pushST);
    StackInit(&q->popST);
    return q;
}

void myQueuePush(MyQueue* obj, int x) {


    StackPush(&obj->pushST,x);
}

int myQueuePop(MyQueue* obj) {


    //如果popST没有数据了,就把pushST数据导过去
    //popST的数据就符合先进先出的顺序了
    int front=myQueuePeek(obj);
    StackPop(&obj->popST);
    return front;
}

int myQueuePeek(MyQueue* obj) {


    //如果popST没有数据了,就把pushST数据导过去
    //popST的数据就符合先进先出的顺序了
    if(StackEmpty(&obj->popST))
    {


        while(!StackEmpty(&obj->pushST))
        {


            StackPush(&obj->popST,StackTop(&obj->pushST));
            StackPop(&obj->pushST);
        }
    }
    return StackTop(&obj->popST);
}

bool myQueueEmpty(MyQueue* obj) {


    return StackEmpty(&obj->pushST)&&StackEmpty(&obj->popST);
}

void myQueueFree(MyQueue* obj) {


    StackDestroy(&obj->pushST);
    StackDestroy(&obj->popST);
    free(obj);
}
2 用两个队列来实现栈
1) 两个队列实现栈的gif动图

2) 题目链接入口
3) 解题思路->只保留队出最后一个元素用来栈出
用两个队列来实现栈,首先我们知道,队列是先进先出,栈是后进先出。而两次队列的先进先出并不会改变其性质,让其变成后进先出的栈。对此我们引入一个辅助队列,入栈时让元素进入非空队列,而出栈时让非空队列除了最后一个队入的元素外,其余全部导入空队列,最后一个队入元素,就是栈最后进来的元素。再队出这个元素,依次循环进行就实现了栈的后进先出。
4) 参考代码
注意上面有队列的实现过程,这里只给出两个队列如何实现栈的代码
typedef struct {


    Queue q1;
    Queue q2;
} MyStack;


MyStack* myStackCreate() {


    MyStack*st=(MyStack*)malloc(sizeof(MyStack));
    QueueInit(&st->q1);
    QueueInit(&st->q2);
    return st;
}

void myStackPush(MyStack* obj, int x) {


    //往非空队列导入数据
    if(!QueueEmpty(&obj->q1))
        QueuePush(&obj->q1,x);
    else
        QueuePush(&obj->q2,x);
}

int myStackPop(MyStack* obj) {


    Queue*emptyQ=&obj->q1;
    Queue*existQ=&obj->q2;
    //定义一个空和非空队列指针
    if(!QueueEmpty(&obj->q1))
    {


        emptyQ=&obj->q2;
        existQ=&obj->q1;
    }
    //非空队列数据导入空队列,并保留最后一个元素
    while(existQ->size>1)
    {


        QueuePush(emptyQ,QueueFront(existQ));
        QueuePop(existQ);
    }
    int top=QueueFront(existQ);
    QueuePop(existQ);
    return top;
}

int myStackTop(MyStack* obj) {


    //返回非空队列的队尾元素
    if(!QueueEmpty(&obj->q1))
        return QueueBack(&obj->q1);
    else
        return QueueBack(&obj->q2);
}

bool myStackEmpty(MyStack* obj) {


    return QueueEmpty(&obj->q1)&&QueueEmpty(&obj->q2);
}

void myStackFree(MyStack* obj) {


    QueueDestroy(&obj->q1);
    QueueDestroy(&obj->q2);
    free(obj);
}
五 、总结
通过这篇博客,希望大家对队列、栈和环形队列的类型、性质和用法又有了更深的理解,从学习基本性质到综合应用,一步步提升,一点点提高。今天博客我们就说到这里,期待我们下篇再见。
