前言
Android 的 SystemUI 其实就是 Android 的系统界面,它包括了界面上方的状态栏 status bar,下方的导航栏Navigation Bar,锁屏界面 Keyguard ,电源界面 PowerUI,近期任务界面 Recent Task 等等。在 Andorid 系统源码中,package/apps下放的是系统内置的一些 app,例如 settings,camera,Phone,Message 等等。而在 framework/base/package 下,它们也是系统的 app,SystemUI 就在此目录下。它控制着整个Android系统的界面,但其实他也是一个 app,不同于一般的 app,它不可卸载也不可以被第三方应用替换。对于用户而言,SystemUI 的改动是最能直观感受到的。因此,每个 Android 版本在 SystemUI 上都有比较大的改动。而对开发者而言,理解 Android SystemUI 对优化Android系统界面,改善用户体验十分重要。因为SystemUI 是系统应用,所以它也是一个 APK,有入口 Application,只不过它是由 SystemServer 进程进行启动的。
一、系统启动后在SystemServer进程中启动SystemUIService
1、在Android系统之后,系统首先会启动一个名为Zygote的进程,而Zygote进程又会启动SystemServer进程,SystemServer又会启动SystemUI,这里我们先来看SystemServer的main()方法,main 方法如下:
frameworks/base/services/java/com/android/server/SystemServer.java
public final class SystemServer implements Dumpable {


	public static void main(String[] args) {


	    new SystemServer().run();
	}
}
2、main 方法里启动了 run() 方法,而在 run 方法中调用了startOtherServices() 方法:
public final class SystemServer implements Dumpable {


	private void run(){


	    	...代码省略...
	        // Start services.
	        try {


	            t.traceBegin("StartServices");
	            startBootstrapServices(t);//启动引导服务
	            startCoreServices(t);//启动核心服务
	            startOtherServices(t);//启动其他服务
	        } catch (Throwable ex) {


	            Slog.e("System", "******************************************");
	            Slog.e("System", "************ Failure starting system services", ex);
	            throw ex;
	        } finally {


	            t.traceEnd(); // StartServices
	        }
	    	...代码省略...
	}
}
3、在 startOtherServices() 方法里面,mActivityManagerService的systemReady回调方法中会创建线程去执行startSystemUi方法:
public final class SystemServer implements Dumpable {


    private void startOtherServices() {


            mActivityManagerService.systemReady(() -> {


          		...代码省略...
		        try {


		            startSystemUi(context, windowManagerF);
		        } catch (Throwable e) {


		            reportWtf("starting System UI", e);
		        }
          		...代码省略...
          }
    }
}
4、startSystemUi方法代码如下所示:
public final class SystemServer implements Dumpable {


    //启动SystemUI
    private static void startSystemUi(Context context, WindowManagerService windowManager) {


        PackageManagerInternal pm = LocalServices.getService(PackageManagerInternal.class);
        Intent intent = new Intent();
        intent.setComponent(pm.getSystemUiServiceComponent());
        intent.addFlags(Intent.FLAG_DEBUG_TRIAGED_MISSING);
        //Slog.d(TAG, "Starting service: " + intent);
        context.startServiceAsUser(intent, UserHandle.SYSTEM);
        windowManager.onSystemUiStarted();
    }
 }
可以看到startSystemUi首先获取PackageManagerInternal对象实例pm,再调用pm的getSystemUiServiceComponent方法获取SystemUIService组件的路径,最后再调用startServiceAsUser方法启动SystemUIService服务。
5、在startSystemUi方法中用到的PackageManagerInternal是一个抽象类,getSystemUiServiceComponent也是抽象方法:
frameworks/base/services/core/java/android/content/pm/PackageManagerInternal.java
public abstract class PackageManagerInternal implements PackageSettingsSnapshotProvider {


    ...代码省略...
    /**
     * 抽象方法,返回SystemUI 服务组件的名称
     */
    public abstract ComponentName getSystemUiServiceComponent();

    ...代码省略...
}
要想知道SystemUiService的具体路径,我们就需要知道是谁实现了getSystemUiServiceComponent方法。
6、PackageManagerService的内部类PackageManagerInternalImpl继承了PackageManagerInternal这个抽象类并实现了getSystemUiServiceComponent方法:
frameworks/base/services/core/java/com/android/server/pm/PackageManagerService.java
    private class PackageManagerInternalImpl extends PackageManagerInternal {


    	...代码省略...
        public ComponentName getSystemUiServiceComponent() {


            return ComponentName.unflattenFromString(mContext.getResources().getString(
                    com.android.internal.R.string.config_systemUIServiceComponent));
        }
        ...代码省略...
   }
可以看到 ComonentName 是从一个内部资源字符串com.android.internal.R.string.config_systemUIServiceComponent获取SystemUIService组件完整类名的。
7、通过搜索可以发现config_systemUIServiceComponent这个资源字符串的具体位置和内容:
frameworks/base/core/res/res/values/config.xml
<!-- SystemUI服务组件-->
<string name="config_systemUIServiceComponent" translatable="false">com.android.systemui/com.android.systemui.SystemUIService</string>
二、SystemUIApplication被启动并执行应用组件工厂SystemUIAppComponentFactory所设置的回调方法
1、SystemUI模块在源码中的路径为framework/base/package/SystemUI,本质上来说它也是一个APK,拥有更高的权限且常驻内存,它也有入口Application,也有AndroidManifest.xml清单配置文件:
frameworks/base/packages/SystemUI/AndroidManifest.xml
<manifest xmlns:android="http://schemas.android.com/apk/res/android"
        xmlns:androidprv="http://schemas.android.com/apk/prv/res/android"
        package="com.android.systemui"
        android:sharedUserId="android.uid.systemui"
        xmlns:tools="http://schemas.android.com/tools"
        coreApp="true">
     ...代码省略...
    <application
        android:name=".SystemUIApplication"
        android:persistent="true"
        android:allowClearUserData="false"
        android:backupAgent=".backup.BackupHelper"
        android:killAfterRestore="false"
        android:hardwareAccelerated="true"
        android:label="@string/app_label"
        android:icon="@drawable/icon"
        android:process="com.android.systemui"
        android:supportsRtl="true"
        android:theme="@style/Theme.SystemUI"
        android:defaultToDeviceProtectedStorage="true"
        android:directBootAware="true"
        tools:replace="android:appComponentFactory"
        android:appComponentFactory=".SystemUIAppComponentFactory">
		...代码省略...
        <service android:name="SystemUIService"android:exported="true"/>
        ...代码省略...
    </application>
</manifest>
以上清单文件主要有以下几点值得我们关注:
- SystemUI的入口为SystemUIApplication。
- SystemUI是persistent (持久)应用,当应用因为异常而崩溃的时候,系统会重新拉起这个应用。
- 应用组件工厂属性appComponentFactory指向了SystemUIAppComponentFactory。
- SystemUIService服务的声明,且支持外部唤起。
2、我们知道Android系统在启动一个服务之前,会先检测该服务所对应的进程是否存在,如果不存在则会该创建进程,SystemServer进程在启动SystemUiService服务的时候,同样也需要先检测SystemUIService所对应的进程是否存在;由于是第一次被启动,SystemUI进程自然是不存在的,那么Android系统会先创建SystemUI进程,并进入该进程中代表主线程的ActivityThread类的main方法中,随后会触发ActivityThread比较关键的一个方法handleBindApplication:
frameworks/base/core/java/android/app/ActivityThread.java
public final class ActivityThread extends ClientTransactionHandler {


	...代码省略...
    private void handleBindApplication(AppBindData data) {


        ...代码省略...
        //获取Application的实例对象
        app = data.info.makeApplication(data.restrictedBackupMode, null);
        ...代码省略...
        //调用Application的onCreate()方法
         mInstrumentation.callApplicationOnCreate(app);
        ...代码省略...
   }
ActivityThread的handleBindApplication方法首先会调用data.info.makeApplication方法获取Application实例对象,对于SystemUI来说,其实就是SystemUIApplication,SystemUIApplication实例对象最终是通过类型为LoadedApk的data.info对象调用makeApplication方法获取的。
3、LoadedApk的makeApplication方法关键代码如下:
frameworks/base/core/java/android/app/LoadedApk.java
    public Application makeApplication(boolean forceDefaultAppClass,
            Instrumentation instrumentation) {


        //如果已经创建了Application,就直接返回
        if (mApplication != null) {


            return mApplication;
        }
        ...代码省略...
        try {


            ...代码省略...
            //创建Application的Context
            ContextImpl appContext = ContextImpl.createAppContext(mActivityThread, this);
            //继续调用Instrumentation的newApplication方法创建Application
            app = mActivityThread.mInstrumentation.newApplication(
                    cl, appClass, appContext);
            appContext.setOuterContext(app);
        } catch (Exception e) {


            ...代码省略...
        }
        mActivityThread.mAllApplications.add(app);
        mApplication = app;
        ...代码省略...
        return app;
     }
LoadedApk的makeApplication方法会再次调用Instrumentation的newApplication的方法来获取Application实例对象。
4、Instrumentation的newApplication方法关键代码如下所示:
frameworks/base/core/java/android/app/Instrumentation.java
public class Instrumentation {


	...代码省略...
    public Application newApplication(ClassLoader cl, String className, Context context)
            throws InstantiationException, IllegalAccessException,
            ClassNotFoundException {


        Application app = getFactory(context.getPackageName())
                .instantiateApplication(cl, className);
        app.attach(context);
        return app;
    }

   private AppComponentFactory getFactory(String pkg) {


      if (pkg == null) {


          Log.e(TAG, "No pkg specified, disabling AppComponentFactory");
          return AppComponentFactory.DEFAULT;
      }
      if (mThread == null) {


          Log.e(TAG, "Uninitialized ActivityThread, likely app-created Instrumentation,"
                  + " disabling AppComponentFactory", new Throwable());
          return AppComponentFactory.DEFAULT;
      }
      LoadedApk apk = mThread.peekPackageInfo(pkg, true);
      // This is in the case of starting up "android".
      if (apk == null) apk = mThread.getSystemContext().mPackageInfo;
      return apk.getAppFactory();
  }
}
newApplication首先会调用getFactory方法,getFactory方法会判断pkg和类型为ActivityThead的mThread是否为空,如果为空就直接返回AppComponentFactory的DEFAULT属性:
frameworks/base/core/java/android/app/AppComponentFactory.java
public class AppComponentFactory {


	...代码省略...
    public static final AppComponentFactory DEFAULT = new AppComponentFactory();
}
其实就是AppComponentFactory实例对象;如果mThread不为空,则会调用LoadedApk的getAppFactory方法。
5、LoadedApk和getAppFactory关联的关键代码如下所示:
public final class LoadedApk {


    private AppComponentFactory mAppComponentFactory;
    private AppComponentFactory createAppFactory(ApplicationInfo appInfo, ClassLoader cl) {


        if (mIncludeCode && appInfo.appComponentFactory != null && cl != null) {


            try {


            	//ApplicationInfo的appComponentFactory正好对应了前面在AndroidManifest.xml中配置的appComponentFactory属性
                return (AppComponentFactory)cl.loadClass(appInfo.appComponentFactory).newInstance();
            } catch (InstantiationException | IllegalAccessException | ClassNotFoundException e) {


                Slog.e(TAG, "Unable to instantiate appComponentFactory", e);
            }
        }
        return AppComponentFactory.DEFAULT;
    }

    public AppComponentFactory getAppFactory() {


        return mAppComponentFactory;
    }
getAppFactory直接返回了LoadedApk的属性变量mAppComponentFactory,mAppComponentFactory最早时通过createAppFactory方法进行赋值的,其实就是通过反射将AndroidManifest.xml中appComponentFactory属性所配置的对象实例化,并赋值给mAppComponentFactory。结合前面SystemUI模块的AndroidManifest.xml文件可知,appComponentFactory属性为SystemUIAppComponentFactory。重新回到前面第4步,Instrumentation的newApplication方法在调用getFactory获取SystemUIAppComponentFactory实例对象之后,会调用该对象的instantiateApplicationCompat方法来获取SystemUIApplication实例对象。
6、SystemUIAppComponentFactory是SystemUI模块继承自AppComponentFactory的自定义应用组件工厂,该类的instantiateApplicationCompat方法如下所示:
frameworks/base/packages/SystemUI/src/com/android/systemui/SystemUIAppComponentFactory.java
import androidx.core.app.AppComponentFactory;
public class SystemUIAppComponentFactory extends AppComponentFactory {


	...代码省略...
    @NonNull
    @Override
    public Application instantiateApplicationCompat(
            @NonNull ClassLoader cl, @NonNull String className)
            throws InstantiationException, IllegalAccessException, ClassNotFoundException {


         //获取Application的实例对象
        Application app = super.instantiateApplicationCompat(cl, className);
        if (app instanceof ContextInitializer) {


        //为Application设置回调方法
            ((ContextInitializer) app).setContextAvailableCallback(
                    context -> {


                        SystemUIFactory.createFromConfig(context);
                        SystemUIFactory.getInstance().getSysUIComponent().inject(SystemUIAppComponentFactory.this);
                    }
            );
        }
        return app;
    }
	...代码省略...
}
SystemUIAppComponentFactory首先调用父类的instantiateApplicationCompat获取SystemUIApplication实例对象,然后会调用该对象的setContextAvailableCallback方法为该对象设置回调方法。
7、再次回到前面第2步,在ActivityThread的handleBindApplication方法中:
public final class ActivityThread extends ClientTransactionHandler {


	...代码省略...
    private void handleBindApplication(AppBindData data) {


        ...代码省略...
        //获取Application的实例对象
        app = data.info.makeApplication(data.restrictedBackupMode, null);
        ...代码省略...
        //调用Application的onCreate()方法
         mInstrumentation.callApplicationOnCreate(app);
        ...代码省略...
当获取到SystemUIApplication的实例之后,会继续调用Instrumentation的callApplicationOnCreate方法。
8、Instrumentation的callApplicationOnCreate方法如下所示:
public class Instrumentation {
    public void callApplicationOnCreate(Application app) {
        app.onCreate();
    }
}
callApplicationOnCreate方法会触发SystemUIApplication的onCreate方法。
9、SystemUIApplication的onCreate方法如下所示:
public class SystemUIApplication extends Application implements
        SystemUIAppComponentFactory.ContextInitializer {


   ...代码省略...
   private SystemUIAppComponentFactory.ContextAvailableCallback mContextAvailableCallback;
   ...代码省略...
    @Override
    public void onCreate() {


        super.onCreate();
         ...代码省略...
        //执行在SystemUIAppComponentFactory方法中设置的回调对象的onContextAvailable方法
        mContextAvailableCallback.onContextAvailable(this);
        ...代码省略...
    }

  ...代码省略...
  //SystemUIAppComponentFactory设置回调就是调用的这个方法
      @Override
  public void setContextAvailableCallback(SystemUIAppComponentFactory.ContextAvailableCallback callback) {


        mContextAvailableCallback = callback;
  }
}
SystemUIApplication的onCreate会调用回调对象mContextAvailableCallback的onContextAvailable方法。
三、SystemUIFactory创建SystemUI模块所需的各种Dagger2组件
1、第二节第6步我们有提到SystemUIAppComponentFactory为SystemUIApplication设置回调方法所对应的关键代码:
    	 //为Application设置回调方法
        ((ContextInitializer) app).setContextAvailableCallback(
                context -> {


                    SystemUIFactory.createFromConfig(context);
                    SystemUIFactory.getInstance().getSysUIComponent().inject(SystemUIAppComponentFactory.this);
                }
        );
SystemUIApplication的onCreate回调该方法,该方法会先执行SystemUIFactory的createFromConfig方法,createFromConfig的主要功能是创建SystemUIFactory实例对象,SystemUIFactory关于createFromConfig方法的相关代码如下所示:
public class SystemUIFactory {


    static SystemUIFactory mFactory;
    public static void createFromConfig(Context context) {


        createFromConfig(context, false);
    }

    @VisibleForTesting
    public static void createFromConfig(Context context, boolean fromTest) {


        if (mFactory != null) {


            return;
        }
        final String clsName = context.getString(R.string.config_systemUIFactoryComponent);
        if (clsName == null || clsName.length() == 0) {


            throw new RuntimeException("No SystemUIFactory component configured");
        }
        try {


            Class<?> cls = null;
            cls = context.getClassLoader().loadClass(clsName);
            //创建SystemUIFactory实例
            mFactory = (SystemUIFactory) cls.newInstance();
            //执行init方法
            mFactory.init(context, fromTest);
        } catch (Throwable t) {


            Log.w(TAG, "Error creating SystemUIFactory component: " + clsName, t);
            throw new RuntimeException(t);
        }
    }
}
createFromConfig方法会进一步调用createFromConfig(context, false)方法,该方法首先获取R.string.config_systemUIFactoryComponent所对应的字符串:
frameworks/base/packages/SystemUI/res/values/config.xml
<string name="config_systemUIFactoryComponent" translatable="false">com.android.systemui.SystemUIFactory</string>
config_systemUIFactoryComponent所存储的正是SystemUIFactory的类名,在获取到该字符串之后,会通过反射将该字符串转化为SystemUIFactory实例对象,并执行init方法。这里明明已经可以执行SystemUIFactory的静态方法了为什么还要通过类名路径来创建实例对象呢?之所以这么设计,其实是为了方面开发人员在项目中嵌入自定义的SystemUIFactory组件工厂。
2、SystemUIFactory和init方法相关的代码如下所示:
public class SystemUIFactory {


    private GlobalRootComponent mRootComponent;//SystemUI应用的Dagger2根组件
    private WMComponent mWMComponent;//和WindowManager有关的Dagger2子组件
    private SysUIComponent mSysUIComponent;//和SystemUI核心组件有关的Dagger2子组件
    private boolean mInitializeComponents;//是否对组件进行初始化

	//初始化SystemUI模块的所有Dagger2组件
    @VisibleForTesting
    public void init(Context context, boolean fromTest)
            throws ExecutionException, InterruptedException {


        // 如果不是为了进行测试、且应用属于System用户组、进程名和com.andorid.systemui相等
        mInitializeComponents = !fromTest
                && android.os.Process.myUserHandle().isSystem()
                && ActivityThread.currentProcessName().equals(ActivityThread.currentPackageName());
        //构建本地根组件GlobalRootComponent实例对象
        mRootComponent = buildGlobalRootComponent(context);
        //构建子组件WMComponent实例对象
        mWMComponent = mRootComponent.getWMComponentBuilder().build();
        if (mInitializeComponents) {


        	//WMComponent子组件初始化
            mWMComponent.init();
        }
        //获取SysUIComponent的建造者
        SysUIComponent.Builder builder = mRootComponent.getSysUIComponent();
        if (mInitializeComponents) {


        	//调用prepareSysUIComponentBuilder返回SysUIComponent的建造者
            builder = prepareSysUIComponentBuilder(builder, mWMComponent)
                    .setPip(mWMComponent.getPip())
                    .setLegacySplitScreen(mWMComponent.getLegacySplitScreen())
                    .setSplitScreen(mWMComponent.getSplitScreen())
                    .setOneHanded(mWMComponent.getOneHanded())
                    .setBubbles(mWMComponent.getBubbles())
                    .setHideDisplayCutout(mWMComponent.getHideDisplayCutout())
                    .setShellCommandHandler(mWMComponent.getShellCommandHandler())
                    .setAppPairs(mWMComponent.getAppPairs())
                    .setTaskViewFactory(mWMComponent.getTaskViewFactory())
                    .setTransitions(mWMComponent.getTransitions())
                    .setStartingSurface(mWMComponent.getStartingSurface())
                    .setDisplayAreaHelper(mWMComponent.getDisplayAreaHelper())
                    .setTaskSurfaceHelper(mWMComponent.getTaskSurfaceHelper())
                    .setRecentTasks(mWMComponent.getRecentTasks())
                    .setCompatUI(Optional.of(mWMComponent.getCompatUI()))
                    .setDragAndDrop(Optional.of(mWMComponent.getDragAndDrop()));
        } else {


       		...代码省略...
        }
        //构建SysUIComponent实例对象
        mSysUIComponent = builder.build();
        if (mInitializeComponents) {


        	//SysUIComponent子组件初始化
            mSysUIComponent.init();
        }
        //创建Dependency实例,不同组件之间沟通的桥梁
        Dependency dependency = mSysUIComponent.createDependency();
        //初始化Dependency
        dependency.start();
    }
}
init方法主要就是获取SystemUI模块的唯一Dagger2根组件mRootComponent、与WindowManager相关的Dagger2子组件mWMComponent、与SystemUI核心组件有关的Dagger2子组件mSysUIComponent,并对这三个组件进行初始化,最后还会创建Dependency实例对象并进行初始化,Dependency是SystemUI模块不同组件之间沟通的桥梁。
3、继续看SystemUIAppComponentFactory为SystemUIApplication所设置的回调方法:
    	 //为Application设置回调方法
        ((ContextInitializer) app).setContextAvailableCallback(
                context -> {


                    SystemUIFactory.createFromConfig(context);
                    SystemUIFactory.getInstance().getSysUIComponent().inject(SystemUIAppComponentFactory.this);
                }
        );
在执行完SystemUIFactory的createFromConfig方法创建SystemUIFactory实例对象,获取各种Dagger2组件并进行初始化之后,便会调用SystemUIFactory的getSysUIComponent方法获取SysUIComponent实例对象,调用该实例对象的inject(SystemUIAppComponentFactory factory)方法对SystemUIAppComponentFactory对象进行依赖注入。
4、SysUIComponent和inject(SystemUIAppComponentFactory factory)方法的关键代码:
frameworks/base/packages/SystemUI/src/com/android/systemui/dagger/SysUIComponent.java
@SysUISingleton//单例
@Subcomponent(//子组件
modules = {

    //当前连接组件用到的Module(Module会提供我们需要的各种对象实例)
        DefaultComponentBinder.class,
        DependencyProvider.class,
        SystemUIBinder.class,
        SystemUIModule.class,
        SystemUIDefaultModule.class})
public interface SysUIComponent {


	//调用这个方法对SystemUIAppComponentFactory进行依赖注入
    void inject(SystemUIAppComponentFactory factory);
 }
SysUIComponent的inject(SystemUIAppComponentFactory factory)方法被执行之后,SystemUIAppComponentFactory类中有被@Inject注解标记的属性变量都会被赋值。事实上SystemUIAppComponentFactory类中只有一个被@Inject注解标记的属性变量mComponentHelper:
public class SystemUIAppComponentFactory extends AppComponentFactory {


    @Inject
    public ContextComponentHelper mComponentHelper;//Dagger2依赖注入会对这个对象进行赋值
}
在执行完inject方法之后,类型为ContextComponentHelper的mComponentHelper属性便会被赋值,ContextComponentHelper这个类提供了获取SystemUI模块常用类实例对象的方法:
frameworks/base/packages/SystemUI/src/com/android/systemui/dagger/ContextComponentHelper.java
public interface ContextComponentHelper {


    Activity resolveActivity(String className);

    RecentsImplementation resolveRecents(String className);

    Service resolveService(String className);

    SystemUI resolveSystemUI(String className);

    BroadcastReceiver resolveBroadcastReceiver(String className);
}
ContextComponentHelper 接口提供了五个方法,分别通过类名返回Activity、RecentsImplementation、Service、SystemUI、BroadcastReceiver类型的实例对象。该接口目前只有一个实现类ContextComponentResolver。
frameworks/base/packages/SystemUI/src/com/android/systemui/dagger/ContextComponentResolver.java
//在SystemUI模块通过dagger依赖注入的这个对象为单例
@SysUISingleton
public class ContextComponentResolver implements ContextComponentHelper {


    private final Map<Class<?>, Provider<Activity>> mActivityCreators;
    private final Map<Class<?>, Provider<Service>> mServiceCreators;
    private final Map<Class<?>, Provider<SystemUI>> mSystemUICreators;
    private final Map<Class<?>, Provider<RecentsImplementation>> mRecentsCreators;
    private final Map<Class<?>, Provider<BroadcastReceiver>> mBroadcastReceiverCreators;

	//由于构造方法添加了@Inject注解
	//mActivityCreators、mServiceCreators、mSystemUICreators、mRecentsCreators、mBroadcastReceiverCreators都会被实例化
    @Inject
    ContextComponentResolver(Map<Class<?>, Provider<Activity>> activityCreators,
            Map<Class<?>, Provider<Service>> serviceCreators,
            Map<Class<?>, Provider<SystemUI>> systemUICreators,
            Map<Class<?>, Provider<RecentsImplementation>> recentsCreators,
            Map<Class<?>, Provider<BroadcastReceiver>> broadcastReceiverCreators) {


        mActivityCreators = activityCreators;
        mServiceCreators = serviceCreators;
        mSystemUICreators = systemUICreators;
        mRecentsCreators = recentsCreators;
        mBroadcastReceiverCreators = broadcastReceiverCreators;
    }
	//通过类名获取Activity实例对象
    @Override
    public Activity resolveActivity(String className) {


        return resolve(className, mActivityCreators);
    }
	//通过类名获取BroadcastReceiver实例对象
    @Override
    public BroadcastReceiver resolveBroadcastReceiver(String className) {


        return resolve(className, mBroadcastReceiverCreators);
    }
	//通过类名获取RecentsImplementation实例对象
    @Override
    public RecentsImplementation resolveRecents(String className) {


        return resolve(className, mRecentsCreators);
    }
	//通过类名获取Service实例对象
    @Override
    public Service resolveService(String className) {


        return resolve(className, mServiceCreators);
    }
	//通过类名获取SystemUI实例对象
    @Override
    public SystemUI resolveSystemUI(String className) {


        return resolve(className, mSystemUICreators);
    }

    // 依据名称得到的class类名去查询Provider实例,进而取得class类名对应实例对象
    private <T> T resolve(String className, Map<Class<?>, Provider<T>> creators) {


        try {


            Class<?> clazz = Class.forName(className);
            Provider<T> provider = creators.get(clazz);
            return provider == null ? null : provider.get();
        } catch (ClassNotFoundException e) {


            return null;
        }
    }
}
由于ContextComponentResolver的构造方法添加了@Inject注解,这样mActivityCreators、mServiceCreators、mSystemUICreators、mRecentsCreators、mBroadcastReceiverCreators都会被实例化,后续其他类可以通过调用此类的resolveActivity、resolveBroadcastReceiver、resolveRecents、resolveService、resolveSystemUI这五个方法获取className对应的Activity、BroadcastReceiver、RecentsImplementation、Service、SystemUI实例对象;特别是resolveSystemUI这个方法,接下来我们便会用到。
5、下面用一张图总结一下前面三节的源码调用流程:
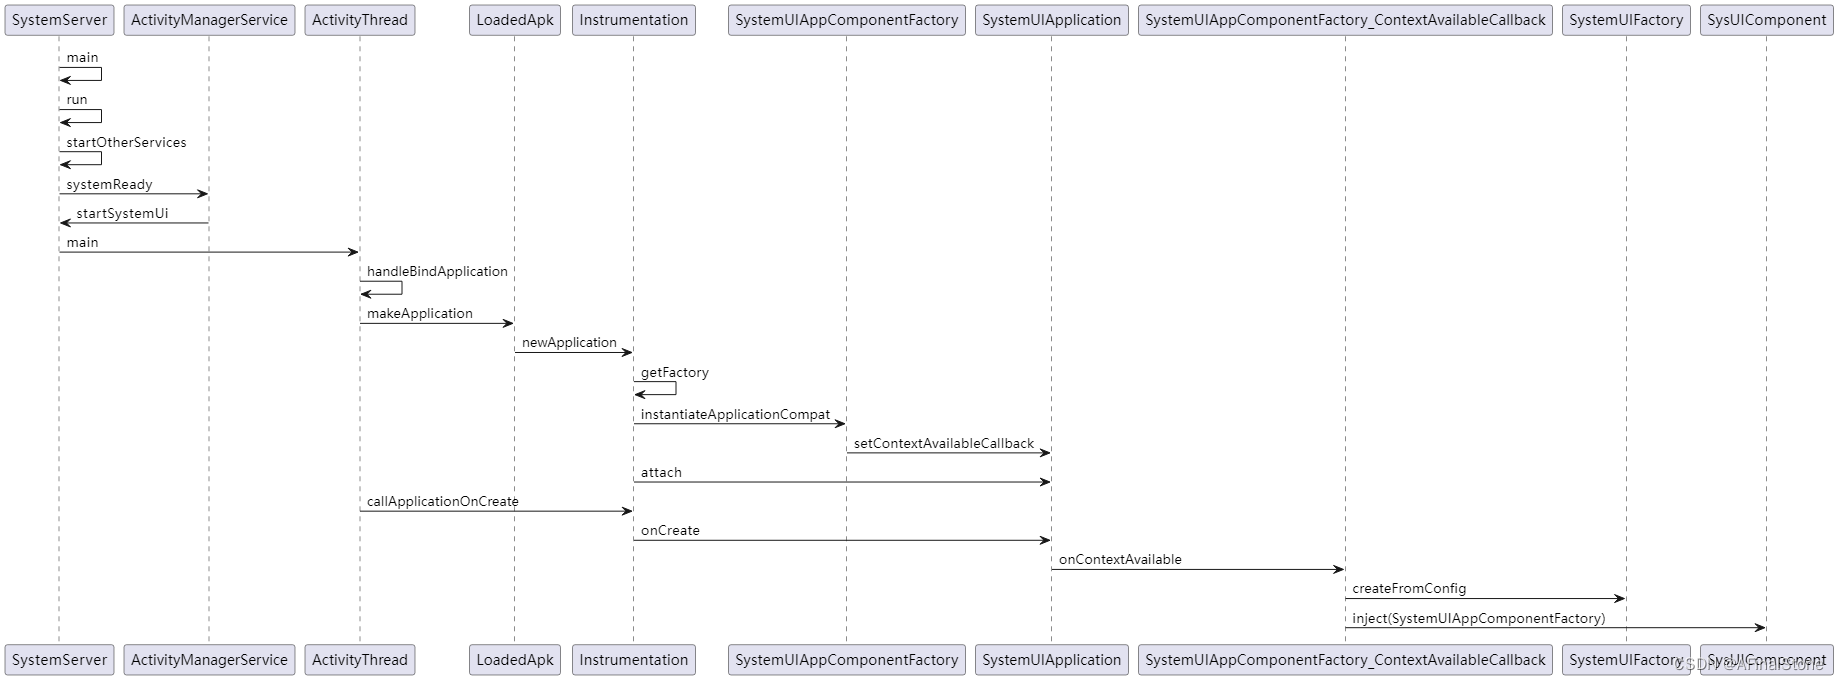
再用简短的几句话对前面三节做个总结:
SystemServer在启动SystemUIService服务之前,由于检测到该服务所对应的进程不存在,于是便创建了该进程和该进程所对应的SystemUIApplication,执行SystemUIApplication的onCreate方法,并执行SystemUIAppComponentFactory所设置的回调方法,在回调方法中调用SystemUIFactory的createFromConfig方法创建了SystemUI模块的所有Dagger2组件。
四、在 SystemUIService启动SystemUI模块所需的所有组件。
1、前面第二节第9步,我们讲了在SystemUIApplication的onCreate方法中会执行SystemUIAppComponentFactory所设置的回调方法,待该回调方法执行完毕,SystemUIApplication的onCreate方法会继续往下执行:
public class SystemUIApplication extends Application implements
        SystemUIAppComponentFactory.ContextInitializer {


   ...代码省略...
    private ContextComponentHelper mComponentHelper;//前面有介绍过这个类,调用这个类的方法可以获取到SystemUI模块的各种实例对象
    private BootCompleteCacheImpl mBootCompleteCache;
    private SystemUI[] mServices;//SystemUI模块的各种SystemUI组件
    private boolean mServicesStarted;//组件是否已经被启动
    private SystemUIAppComponentFactory.ContextAvailableCallback mContextAvailableCallback;//回调方法
    private GlobalRootComponent mRootComponent;//根组件
    private SysUIComponent mSysUIComponent;//SystemUI子组件
   ...代码省略...
    @Override
    public void onCreate() {


        super.onCreate();
         ...代码省略...
        //执行在SystemUIAppComponentFactory方法中设置的回调
        mContextAvailableCallback.onContextAvailable(this);
        //对成员变量进行赋值
        mRootComponent = SystemUIFactory.getInstance().getRootComponent();
        mSysUIComponent = SystemUIFactory.getInstance().getSysUIComponent();
        mComponentHelper = mSysUIComponent.getContextComponentHelper();
        mBootCompleteCache = mSysUIComponent.provideBootCacheImpl();
        ...代码省略...
        if (Process.myUserHandle().equals(UserHandle.SYSTEM)) {


           ...代码省略...
            registerReceiver(new BroadcastReceiver() {


                @Override
                public void onReceive(Context context, Intent intent) {


                    if (mBootCompleteCache.isBootComplete()) return;
                    if (DEBUG) Log.v(TAG, "BOOT_COMPLETED received");
                    unregisterReceiver(this);
                    mBootCompleteCache.setBootComplete();
                    if (mServicesStarted) {


                        final int N = mServices.length;
                        for (int i = 0; i < N; i++) {


                            mServices[i].onBootCompleted();
                        }
                    }
                }
            }, bootCompletedFilter);
           ...代码省略...
        } else {


           ...代码省略...
            startSecondaryUserServicesIfNeeded();
        }
    }
SystemUIApplication的onCreate方法会做一些初始化操作,然后会因为一个ifi条件判断,而出现两个分支。
1)如果是系统启动的(SystemServer启动的)就会进入到这个分支中,注册监听 boot completed 的通知,最后完全启动后就会回调各个组件onBootCompleted。
2)如果不是系统启动,例如多用户登录使用的情况,这时候系统其实已经启动过了,就会走 else 的分支进入到 startSecondaryUserServicesIfNeeded()用于启动 SystemUI 所需的服务组件,这个分支是根据用户来启动相应的服务的。
由于这里SystemUI是被SystemServer启动的,所以会执行第一种情况。
2、前面讲了这么多,SystemServer终于等到SystemUIApplication的onCreate方法执行完毕了,这个时候系统才会真正启动SystemServer想要启动的服务SystemUIService,SystemUIService被启动之后会立刻执行onCreate方法:
frameworks/base/packages/SystemUI/src/com/android/systemui/SystemUIService.java
public class SystemUIService extends Service {


    ...代码省略...
    @Override
    public void onCreate() {


        super.onCreate();
        // 启动SystemUI的全部组件
        ((SystemUIApplication) getApplication()).startServicesIfNeeded();
   }
   ...代码省略...
}
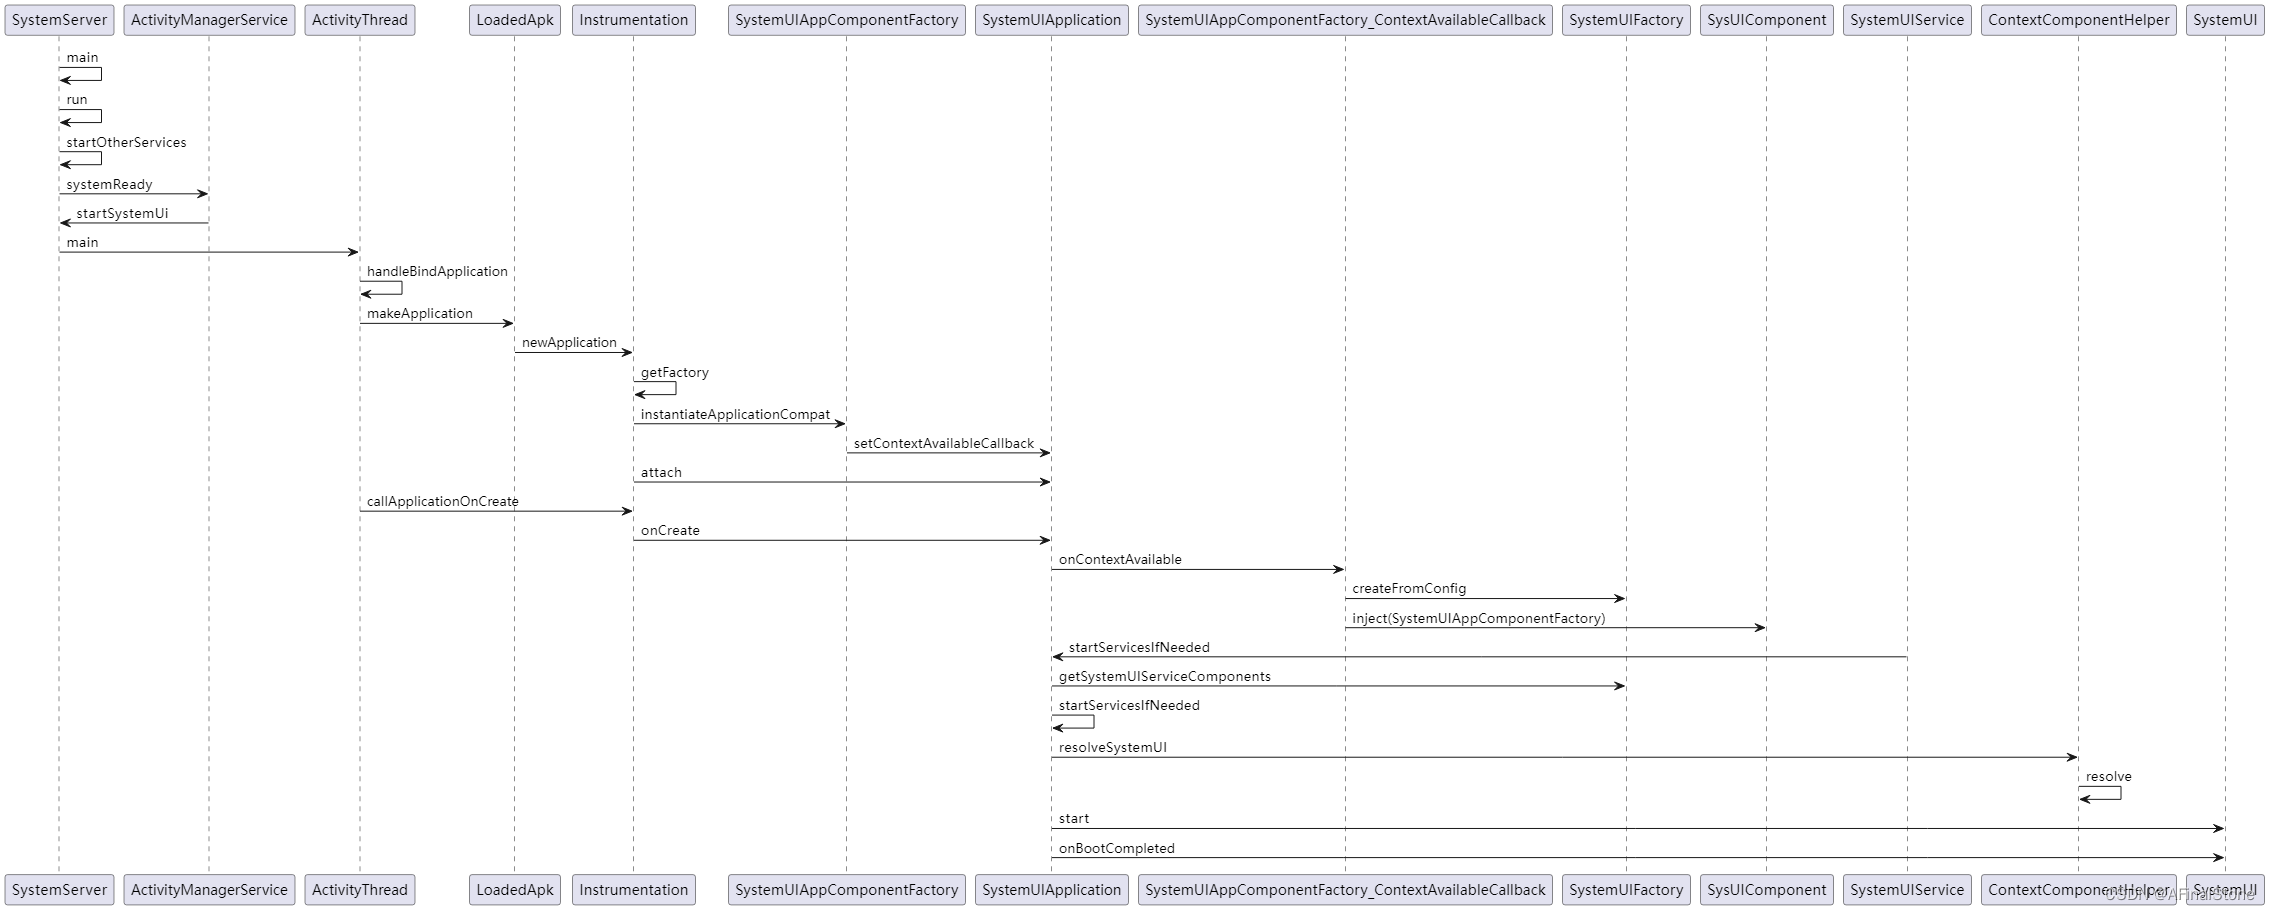
SystemUIService的onCreate方法会重新获取SystemUIApplication实例对象,并调用该对象的startServicesIfNeeded方法。
3、SystemUIApplication的startServicesIfNeeded()方法如下:
public class SystemUIApplication extends Application implements
        SystemUIAppComponentFactory.ContextInitializer {


   ...代码省略...
 public void startServicesIfNeeded() {


        String[] names = SystemUIFactory.getInstance().getSystemUIServiceComponents(getResources());
        startServicesIfNeeded(/* metricsPrefix= */ "StartServices", names);
    }
   ...代码省略...
}
5、SystemUIApplication的startServicesIfNeeded首先通过SystemUIFactory调用getSystemUIServiceComponents获取一个字符串数组赋值给names:
framework/base/packages/SystemUI/src/com/android/systemui/SystemUIFactory.java
public class SystemUIFactory {


   ...代码省略...
    public String[] getSystemUIServiceComponents(Resources resources) {


        return resources.getStringArray(R.array.config_systemUIServiceComponents);
    }
   ...代码省略...
}
R.array.config_systemUIServiceComponents中存储了SystemUI模块所需启动的所有组件:
framework/base/packages/SystemUI/res/values/config.xml
    <string-array name="config_systemUIServiceComponents" translatable="false">
        <item>com.android.systemui.util.NotificationChannels</item><!--通知-->
        <item>com.android.systemui.keyguard.KeyguardViewMediator</item><!--键盘锁状态-->
        <item>com.android.systemui.recents.Recents</item><!--任务列表-->
        <item>com.android.systemui.volume.VolumeUI</item><!--监听音量,并决定是否显示音量的对话框-->
        <item>com.android.systemui.statusbar.phone.StatusBar</item><!--状态栏-->
        <item>com.android.systemui.usb.StorageNotification</item><!--监听 USB 连接状态并发送通知进行提示-->
        <item>com.android.systemui.power.PowerUI</item><!--监听电量状态并在低电量时发送通知-->
        <item>com.android.systemui.media.RingtonePlayer</item><!--用于播放铃声-->
        <item>com.android.systemui.keyboard.KeyboardUI</item><!--键盘锁 UI-->
        <item>com.android.systemui.shortcut.ShortcutKeyDispatcher</item><!--快捷分发器-->
        <item>@string/config_systemUIVendorServiceComponent</item><!--这里可以定义厂商定制的组件-->
        <item>com.android.systemui.util.leak.GarbageMonitor$Service</item><!--用于监控内存泄漏的服务-->
        <item>com.android.systemui.LatencyTester</item><!--仅在 debug 环境执行,用于监听系统测试延迟的模拟动作-->
        <item>com.android.systemui.globalactions.GlobalActionsComponent</item><!--用于显示全局对话框(例如长按电源按键)-->
        <item>com.android.systemui.ScreenDecorations</item><!--处理页面中的显示的形状(如圆角)-->
        <item>com.android.systemui.biometrics.AuthController</item><!--身份验证-->
        <item>com.android.systemui.SliceBroadcastRelayHandler</item><!--允许打开设置App-->
        <item>com.android.systemui.statusbar.notification.InstantAppNotifier</item><!--时应用程序通知-->
        <item>com.android.systemui.theme.ThemeOverlayController</item><!--主题-->
        <item>com.android.systemui.accessibility.WindowMagnification</item><!--放大器-->
        <item>com.android.systemui.accessibility.SystemActions</item>
        <item>com.android.systemui.toast.ToastUI</item>
        <item>com.android.systemui.wmshell.WMShell</item>
    </string-array>
上面所提到的组件并不是Android的四大组件,这些组件其实也都只是普通的Java抽象类,只不过都继承自SystemUI这个抽象类,SystemUI的代码如下所示:
framework/base/packages/SystemUI/src/com/android/systemui/SystemUI.java
public abstract class SystemUI implements Dumpable {


    protected final Context mContext;

    public SystemUI(Context context) {


        mContext = context;
    }

    public abstract void start();

    protected void onConfigurationChanged(Configuration newConfig) {


    }

    @Override
    public void dump(@NonNull FileDescriptor fd, @NonNull PrintWriter pw, @NonNull String[] args) {


    }

    protected void onBootCompleted() {


    }

    public static void overrideNotificationAppName(Context context, Notification.Builder n,
            boolean system) {


        final Bundle extras = new Bundle();
        String appName = system
                ? context.getString(com.android.internal.R.string.notification_app_name_system)
                : context.getString(com.android.internal.R.string.notification_app_name_settings);
        extras.putString(Notification.EXTRA_SUBSTITUTE_APP_NAME, appName);

        n.addExtras(extras);
    }
}
6、重新回到第3步,在获取到SystemUI模块所有继承自SystemUI抽象类的组件类名数组并赋值给names之后,便会调用SystemUIApplication的startServicesIfNeeded(“StartServices”, names)方法:
    private void startServicesIfNeeded(String metricsPrefix, String[] services) {


        if (mServicesStarted) {

    //如果服务已经启动直接返回
            return;
        }
        mServices = new SystemUI[services.length];
    	...代码省略...
        final int N = services.length;
        for (int i = 0; i < N; i++) {


            String clsName = services[i];//具体SystemUI组件类的完整路径
            long ti = System.currentTimeMillis();
            try {


                SystemUI obj = mComponentHelper.resolveSystemUI(clsName);//ComponentHelper的resolveSystemUI方法可以通过类名拿到具体的SystemUI实例对象
                if (obj == null) {

    //如果通过ComponentHelper的resolveSystemUI没有成功获取到实例对象,则通过反射创建,代码基本上不会走这里。
                    Constructor constructor = Class.forName(clsName).getConstructor(Context.class);
                    obj = (SystemUI) constructor.newInstance(this);//通过反射创建实例对象
                }
                mServices[i] = obj;//将获取的obj实例对象赋值到数组中。
            } catch (ClassNotFoundException
                    | NoSuchMethodException
                    | IllegalAccessException
                    | InstantiationException
                    | InvocationTargetException ex) {


                throw new RuntimeException(ex);
            }
            ...代码省略...
            mServices[i].start();
    		...代码省略...
            if (mBootCompleteCache.isBootComplete()) {


                mServices[i].onBootCompleted();
            }
    		...代码省略...
        }
    	...代码省略...
        mServicesStarted = true;//服务已经被启动
    }
总结一下上面的代码的关键点:
1)其中有一个 for 循环,循环里第一句就是将service[i] 赋值给clsName, 而service[i]的赋值就是各个SystemUI的具体类对象路径
2)调用ComponentHelper的resolveSystemUI方法,获取clsName所对应的SystemUI实例对象并将该对象赋值给obj。
3)如果obj为null,则会继续通过反射创建clsName所对应的SystemUI实例对象,代码基本上不会走这里。
4)将创建的SystemUI实例对象obj存储到类型为SystemUI的mServices数组中,并调用该对象的start() 方法启动相关类的服务,启动完成后,再调用该类的onBootCompleted( ) 方法。
五、总结
1、Android 系统在启动之后,首先会Zygote进程,Zygote进程又会进一步启动 SystemServer进程,它会启动各种系统所需要的服务,在监听AMS启动完毕之后,还会启动SystemUIService。
2、在启动SystemUIService服务之前,系统首先会创建SystemUI对应的进程,获取SystemUIAppComponentFactory实例对象,调用instantiateApplicationCompat创建SystemUIApplication实例对象并设置回调方法。
3、执行SystemUIApplication的onCreate方法,执行SystemUIAppComponentFactory所设置的回调方法,调用SystemUIFactory的createFromConfig方法创建SystemUI模块所需的Dagger2组件并初始化。
4、继续执行SystemUIApplication的onCreate方法,初始化监听boot completed等通知,待系统完成启动后会执行各个组件的onBootCompleted方法。
5、启动SystemUIService服务,执行该服务的onCreate方法,在该服务的onCreate方法中会再次调用SystemUIApplication的startServicesIfNeeded() 方法,该方法调用ContextComponentHelper的resolveSystemUI方法获取所有SystemUI组件,执行组件的start方法和onBootCompleted方法,并都保存到mServices 数组中。