集合
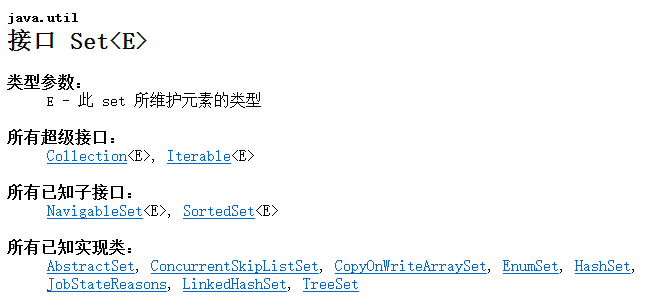
Set接口和常用方法
Set接口基本介绍
无序(添加和取出的顺序不一致),没有索引
不允许重复元素,所以最多包含一个null
JDK API中Set接口的实现类有:
Set接口的常用方法
和List接口一样,Set接口也是Collection的子接口,因此,常用方法和Collection接口一样。
同Collection的遍历方式一样,因为Set接口是Collection接口的子接口。
可以使用迭代器
增强for
不能使用索引的方式来获取
package com14.set_;

import java.util.HashSet;
import java.util.Iterator;
import java.util.Set;

/**
 * @author 甲柒
 * @version 1.0
 * @title SetMethod
 * @package com14.set_
 * @time 2023/2/23 16:41
 */
@SuppressWarnings({"all"})
public class SetMethod {
    public static void main(String[] args) {
        //解读
        //1、以Set接口的实现类HashSet来讲解Set接口的方法
        //2、Set接口实现类的对象(Set接口),不能存放重复的元素,可以添加一个null
        //3、Set接口对象存放数据是无序的(即添加的顺序和取出的顺序不一致)
        //4、取出的顺序虽然不是添加的顺序,但他是固定的
        Set set = new HashSet();
        set.add("john");
        set.add("luck");
        set.add("john");//重复
        set.add("jack");
        set.add(null);
        set.add(null);//再次添加null

        for (int i = 0; i < 10; i++) {
            System.out.println("set=" + set);
        }

        //遍历
        //方式1:
        System.out.println("=====迭代器=====");
        Iterator iterator = set.iterator();
        while (iterator.hasNext()) {
            Object next = iterator.next();
            System.out.println("next=" + next);
        }
        set.remove(null);
        //方式2:
        System.out.println("======增强for======");
        for (Object o : set) {
            System.out.println("obj=" + o);
        }
        //set接口对象不能通过索引来获取
    }
}
Set接口的常用方法举例
Set接口实现类-HashSet
HashSet的全面说明
HashSet实现了Set接口。
HashSet实际上是HashMap,看源码。
public HashSet() {
    map = new HashMap<>();
}
可以存放null值,但是只能有一个null。
HashSet不保证元素是有序的,取决于hash后,再确定索引的结果。(即不保证存放元素的顺序和取出顺序一致)
不能有重复元素/对象。
package com14.set_;

import java.util.HashSet;
import java.util.Set;

/**
 * @author 甲柒
 * @version 1.0
 * @title HashSet_
 * @package com14.set_
 * @time 2023/2/24 9:11
 */
@SuppressWarnings({"all"})
public class HashSet_ {
    public static void main(String[] args) {
        //解读
        //1、构造器的源码
        /*
        public HashSet() {
        map = new HashMap<>();
        }
        */
        Set hashSet = new HashSet();
        hashSet.add(null);
        hashSet.add(null);
        System.out.println("hashSet=" + hashSet);
    }
}
HashSet案例说明
package com14.set_;

import java.util.HashSet;

/**
 * @author 甲柒
 * @version 1.0
 * @title HashSet01
 * @package com14.set_
 * @time 2023/2/24 9:21
 */
@SuppressWarnings({"all"})
public class HashSet01 {
    public static void main(String[] args) {
        HashSet set = new HashSet();
        //说明
        //1、在执行add方法后,返回一个boolean值
        //2、如果添加成功,返回true,否则返回false
        System.out.println(set.add("john"));//true
        System.out.println(set.add("luck"));//true
        System.out.println(set.add("john"));//false
        System.out.println(set.add("jack"));//true
        System.out.println(set.add("tom"));//true

        set.remove("john");
        System.out.println("set=" + set);//输出3个,顺序不确定,但是固定的

        //4、HashSet不能添加相同的元素/数据
        set = new HashSet();
        System.out.println("set=" + set);//空的
        set.add("lucy");//添加成功
        set.add("lucy");//添加失败
        set.add(new Dog("tom"));//添加成功
        set.add(new Dog("tom"));//添加成功
        System.out.println("set=" + set);

        //经典面试题
        //看源码分析,即add到底发生了什么
        set.add(new String("甲柒"));//添加成功
        set.add(new String("甲柒"));//添加失败
        System.out.println("set=" + set);
    }
}

class Dog {
    private String name;

    public Dog(String name) {
        this.name = name;
    }

    @Override
    public String toString() {
        return "Dog{" +
                "name='" + name + '\'' +
                '}';
    }
}
HashSet底层机制说明
分析HashSet底层是HashMap
HashMap底层是(数组+链表+红黑树)
package com14.set_;

/**
 * @author 甲柒
 * @version 1.0
 * @title HashSetStructure
 * @package com14.set_
 * @time 2023/2/24 11:11
 */
@SuppressWarnings({"all"})
public class HashSetStructure {
    public static void main(String[] args) {
        //模拟一个HashSet的底层(HashMap的底层结构)

        //1.创建一个数组,数组的类型是Node[]
        //2.有些人,直接吧Node[]数组称为表
        Node[] table = new Node[16];
        System.out.println("table" + table);
        //3.创建结点
        Node john = new Node("john", null);
        table[2] = john;
        Node jack = new Node("jack", null);
        john.next = jack;//将jack结点挂载到john
        Node rose = new Node("rose", null);
        jack.next = rose;

        Node luck = new Node("luck", null);
        table[3] = luck;//把luck放到table索引为3的位置
        System.out.println("table=" + table);
    }
}

class Node {//结点,存储数据,可以指向下一个结点
    Object item;//存放数据
    Node next;//指向下一个结点

    public Node(Object item, Node next) {
        this.item = item;
        this.next = next;
    }
}
HashSet底层机制说明
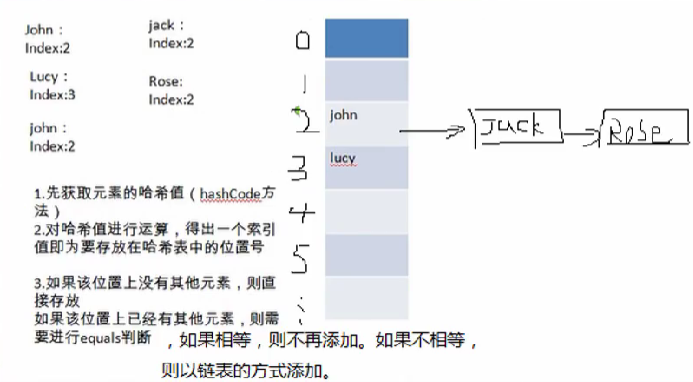
分析HashSet的添加元素底层是如何实现的(hash()+equals)
HashSet底层是HashMap
添加一个元素时,先得到hash值-会转成->索引值
找到存储数据表table,看这个索引位置是否已经存放的有元素
如果没有,直接加入
如果有,调用equals比较,如果相同,就放弃添加,如果不相同,则添加到最后
在Java8中,如果一条链表的元素个数到达TREEIFY_THRESHOLD(默认是8),并且table的大小>=MIN_TREEIFY_CAPACITY(默认64),就会进行树化(红黑树)
package com14.set_;

import java.util.HashSet;

/**
 * @author 甲柒
 * @version 1.0
 * @title HashSetSource
 * @package com14.set_
 * @time 2023/2/24 18:53
 */
@SuppressWarnings({"all"})
public class HashSetSource {
    public static void main(String[] args) {
        HashSet hashSet = new HashSet();
        hashSet.add("java");
        hashSet.add("php");
        hashSet.add("java");
        System.out.println("set=" + hashSet);

        /*
        HashSet源码解读
        1.执行HashSet()
            public HashSet(){
                map = new HashMap<>();
            }
        2.执行add()
            public boolean add(E e) {//e = "java"
                return map.put(e, PRESENT)==null;//PRESENT = private static final Object PRESENT = new Object();
            }
        3.执行put()该方法会执行hash(key)得到key对应的hash值 算法(h = key.hashCode()) ^ (h >>> 16)
            public V put(K key, V value) {//key = "java" value = "PRESENT"
                return putVal(hash(key), key, value, false, true);
            }
        4.执行
                final V putVal(int hash, K key, V value, boolean onlyIfAbsent,
                           boolean evict) {
                Node<K,V>[] tab; Node<K,V> p; int n, i;//定义了辅助变量
                //table就是HashMap的一个数组,类型是Node[]
                //if语句表示如果当前table是null,或者 大小=0
                //就是第一次扩容,到16个空间
                if ((tab = table) == null || (n = tab.length) == 0)
                    n = (tab = resize()).length;
                //(1)根据Key,得到的hash值 去计算该key应该存放在table表的哪个索引位置
                //并且把这个位置的对象,赋给p
                //(2)判断p是否为null
                //(2.1)如果p为null,表示还没有存放元素,就创建一个Node(key = "java", value = PRESENT)
                //(2.2)就放在该位置 table[i] = newNode(hash, key, value, null)
                if ((p = tab[i = (n - 1) & hash]) == null)
                    tab[i] = newNode(hash, key, value, null);
                else {
                //一个开发提示:在需要局部变量(辅助变量)时候,在创建
                    Node<K,V> e; K k;
                    //如果当前索引位置对应的链表第一个元素和准备添加的key的hash一样
                    //并且满足 下面两个条件之一
                    //(1)准备加入的key和p指向的Node结点的key是同一个对象
                    //(2)p指向Node结点的key的equals()和准备加入的key比较后相同
                    //就不能加入
                    if (p.hash == hash &&
                        ((k = p.key) == key || (key != null && key.equals(k))))
                        e = p;
                    //再判断p是不是一颗红黑树
                    else if (p instanceof TreeNode)
                        e = ((TreeNode<K,V>)p).putTreeVal(this, tab, hash, key, value);
                    else {
                    //如果table对应索引位置,已经是一个链表,就使用for循环比较
                    //(1)依次和该链表的每一个元素比较后,都不相同,则加入到该链表的最后
                    //   注意 在把元素添加到链表之后,立即判断 该链表是否已经达到8个结点
                    //   ,就调用treeifBin() 对当前这个链表进行树化(转化成红黑树)
                    //   注意 在转化成红黑树时,要进行判断,判断条件如下
                    //   if (tab == null || (n = tab.length) < MIN_TREEIFY_CAPACITY)
                    //            resize();
                    //   如果上面条件成立,先table扩容,
                    //   只有上面条件不成立时,才进行转化成红黑树
                    //(2)在依次比较的过程中,如果有相同情况,就直接break
                        for (int binCount = 0; ; ++binCount) {
                            if ((e = p.next) == null) {
                                p.next = newNode(hash, key, value, null);
                                if (binCount >= TREEIFY_THRESHOLD - 1) // -1 for 1st
                                    treeifyBin(tab, hash);
                                break;
                            }
                            if (e.hash == hash &&
                                ((k = e.key) == key || (key != null && key.equals(k))))
                                break;
                            p = e;
                        }
                    }
                    if (e != null) { // existing mapping for key
                        V oldValue = e.value;
                        if (!onlyIfAbsent || oldValue == null)
                            e.value = value;
                        afterNodeAccess(e);
                        return oldValue;
                    }
                }
                ++modCount;
                if (++size > threshold)
                    resize();
                afterNodeInsertion(evict);
                return null;
            }

        */
    }
}
分析HashSet的扩容和转成红黑树机制
HashSet底层是HashMap,第一次添加时,table数组扩容到16,临界值(threshold)是16*加载因子(loadFactor)是0.75 = 12
如果table数组使用到了临界值12,就会扩容到16 * 2 =32,新的临界值就是32* 0.75 = 24,以此类推
在Java8中,如果一条链表的元素个数到达TREEIFY_THRESHOLD(默认是8),并且table的大小>=MIN_TREEIFY_CAPACITY(默认64),就会进行树化(红黑树),否则仍然采用数组扩容机制
package com14.set_;

import java.util.HashSet;

/**
 * @author 甲柒
 * @version 1.0
 * @title HashSetIncrement
 * @package com14.set_
 * @time 2023/2/25 12:03
 */
@SuppressWarnings({"all"})
public class HashSetIncrement {
    public static void main(String[] args) {
//        1. HashSet底层是HashMap,第一次添加时,table数组扩容到16,
//        临界值(threshold)是16*加载因子(loadFactor)是0.75 = 12
//        2. 如果table数组使用到了临界值12,就会扩容到16 * 2 =32,
//        新的临界值就是32* 0.75 = 24,以此类推
        HashSet hashSet = new HashSet();
//        for (int i = 0; i < 100; i++) {
//            hashSet.add(i);//1,2,3,4,5...100
//        }
//        3. 在Java8中,如果一条链表的元素个数到达TREEIFY_THRESHOLD(默认是8),
//        并且table的大小>=MIN_TREEIFY_CAPACITY(默认64),就会进行树化(红黑树),
//        否则仍然采用数组扩容机制
//        for (int i = 1; i <= 12; i++) {
//            hashSet.add(new A(i));
//        }
//        System.out.println("hashSet=" + hashSet);

        //当我们向hashset增加一个元素,-> Node -> 加入table,就算是增加了一个
        for (int i = 1; i <= 7; i++) {//在table的某一条链表上添加了 7个A对象
            hashSet.add(new A(i));
        }

        for (int i = 1; i <= 7; i++) {//在table的另外一条链表上添加了 7个B对象
            hashSet.add(new B(i));
        }

    }
}

class B {
    private int n;

    public B(int n) {
        this.n = n;
    }

    @Override
    public int hashCode() {
        return 200;
    }
}

class A {
    private int n;

    public A(int n) {
        this.n = n;
    }

    @Override
    public int hashCode() {
        return 100;
    }
}
HashSet练习题
定义一个Employee类,该类包含:private成员属性name,age 要求:
创建3个Employee对象放入HashSet中
当name和age的值相同时,认为是相同员工,不能添加到HashSet集合中
package com14.set_;

import java.util.HashSet;
import java.util.Objects;

/**
 * @author 甲柒
 * @version 1.0
 * @title HashSetExercise
 * @package com14.set_
 * @time 2023/2/25 12:47
 */
@SuppressWarnings({"all"})
public class HashSetExercise {
    public static void main(String[] args) {
//        定义一个Employee类,该类包含:private成员属性name,age 要求:
//        1. 创建3个Employee对象放入HashSet中
//        2. 当name和age的值相同时,认为是相同员工,不能添加到HashSet集合中
        HashSet hashSet = new HashSet();
        hashSet.add(new Employee("milan", 18));//ok
        hashSet.add(new Employee("tom", 28));//ok
        hashSet.add(new Employee("milan", 18));//加入失败
        //问 加入了几个 3个/2个
        System.out.println("hashSet=" + hashSet);
    }
}

//创建Employee
class Employee {
    private String name;
    private int age;

    public Employee(String name, int age) {
        this.name = name;
        this.age = age;
    }

    public String getName() {
        return name;
    }

    public void setName(String name) {
        this.name = name;
    }

    public int getAge() {
        return age;
    }

    public void setAge(int age) {
        this.age = age;
    }

    @Override
    public String toString() {
        return "Employee{" +
                "name='" + name + '\'' +
                ", age=" + age +
                '}';
    }
    //如果name和age值相同,则返回相同的hash值

    @Override
    public boolean equals(Object o) {
        if (this == o) return true;
        if (o == null || getClass() != o.getClass()) return false;
        Employee employee = (Employee) o;
        return age == employee.age && Objects.equals(name, employee.name);
    }

    @Override
    public int hashCode() {
        return Objects.hash(name, age);
    }
}
HashSet练习题2
定义一个Employee类,该类包含:private成员属性name,sal,birthday(MyDate类型),其中birthday为MyDate类型(属性包括:year,month,day),要求:
创建3个Employee放入HashSet中
当name和birthday的值相同时,认为是相同员工,不能添加到HashSet集合中
package com14.set_;

import java.util.HashSet;
import java.util.Objects;

/**
 * @author 甲柒
 * @version 1.0
 * @title HashSetExercise02
 * @package com14.set_
 * @time 2023/2/25 13:25
 */
@SuppressWarnings({"all"})
public class HashSetExercise02 {
    public static void main(String[] args) {
        HashSet hashSet = new HashSet();
        hashSet.add(new Employee02("甲柒", 4800.00, new MyDate(2000, 10, 12)));
        hashSet.add(new Employee02("tom", 6800.00, new MyDate(1997, 05, 23)));
        hashSet.add(new Employee02("甲柒", 2500.00, new MyDate(2000, 10, 12)));
        System.out.println(hashSet.toString());
    }
}

class Employee02 {
    private String name;
    private double sal;
    private MyDate birthday;

    public Employee02(String name, double sal, MyDate birthday) {
        this.name = name;
        this.sal = sal;
        this.birthday = birthday;
    }

    public String getName() {
        return name;
    }

    public void setName(String name) {
        this.name = name;
    }

    public double getSal() {
        return sal;
    }

    public void setSal(double sal) {
        this.sal = sal;
    }

    public MyDate getBirthday() {
        return birthday;
    }

    public void setBirthday(MyDate birthday) {
        this.birthday = birthday;
    }

    @Override
    public boolean equals(Object o) {
        if (this == o) return true;
        if (o == null || getClass() != o.getClass()) return false;
        Employee02 that = (Employee02) o;
        return Objects.equals(name, that.name) && Objects.equals(birthday, that.birthday);
    }

    @Override
    public int hashCode() {
        return Objects.hash(name, birthday);
    }

    @Override
    public String toString() {
        return "Employee02{" +
                "name='" + name + '\'' +
                ", sal=" + sal +
                ", birthday=" + birthday +
                '}';
    }
}

class MyDate {
    private int year;
    private int month;
    private int day;

    public MyDate(int year, int month, int day) {
        this.year = year;
        this.month = month;
        this.day = day;
    }

    public int getYear() {
        return year;
    }

    public void setYear(int year) {
        this.year = year;
    }

    public int getMonth() {
        return month;
    }

    public void setMonth(int month) {
        this.month = month;
    }

    public int getDay() {
        return day;
    }

    public void setDay(int day) {
        this.day = day;
    }

    @Override
    public boolean equals(Object o) {
        if (this == o) return true;
        if (o == null || getClass() != o.getClass()) return false;
        MyDate myDate = (MyDate) o;
        return year == myDate.year && month == myDate.month && day == myDate.day;
    }

    @Override
    public int hashCode() {
        return Objects.hash(year, month, day);
    }

    @Override
    public String toString() {
        return year + "-" + month + "-" + day;
    }
}
Set接口实现类-LinkedHashSet
LinkedHashSet的全面说明
LinkedHashSet是HashSet的子类
LinkedHashSet底层是一个LinkedHashMap,底层维护了一个数组+双向链表
LinkedHashSet根据元素的hashCode值来决定元素的存储位置,同时使用链表维护元素的次序(图),这使得元素看起来使以插入顺序保存的
LinkedHashSet不允许添加重复元素
package com14.set_;

import java.util.LinkedHashSet;

/**
 * @author 甲柒
 * @version 1.0
 * @title LinkedHashSetSource
 * @package com14.set_
 * @time 2023/2/26 8:46
 */
@SuppressWarnings({"all"})
public class LinkedHashSetSource {
    public static void main(String[] args) {
        //分析一下LinkedHashSet的底层机制
        LinkedHashSet set = new LinkedHashSet();
        set.add(new String("AA"));
        set.add(456);
        set.add(456);
        set.add(new Customer("刘", 10086));
        set.add(123);
        set.add("甲柒");
        System.out.println("set=" + set);
        //解读
        //1.LinkedHashSet加入顺序和元素取出顺序一致
        //2.LinkedHashSet底层维护的是一个LinkedHashMap(是HashMap的子类)
        //3.LinkedHashSet底层结构(数组table+双向链表)
        //4.添加第一次时,直接将 数组table扩容到16,存放的节点类型是LinkedHashMap$Entry
        //5.数组是HashMap$Node[] 存放的元素/数据是LinkedHashMap$Entry
//        继承关系是在内部类完成的
//        static class Entry<K,V> extends HashMap.Node<K,V> {
//            LinkedHashMap.Entry<K,V> before, after;
//            Entry(int hash, K key, V value, HashMap.Node<K,V> next) {
//                super(hash, key, value, next);
//            }
//        }
    }
}

class Customer {
    private String name;
    private int id;

    public Customer(String name, int id) {
        this.name = name;
        this.id = id;
    }

    public String getName() {
        return name;
    }

    public void setName(String name) {
        this.name = name;
    }

    public int getId() {
        return id;
    }

    public void setId(int id) {
        this.id = id;
    }
}
说明
在LinkedHashSet中维护了一个hash表和双向链表(LinkedHashSet有head和tail)
每一个节点有pre和next属性,这样可以形成双向链表
在添加每一个元素时,先求hash值,再求索引,确定该元素在hashtable的位置,然后将添加的元素加入到双向链表(如果已经存在,不在添加[原则和hashset一样])
这样的话,遍历LinkedHashSet也能确保插入顺序和遍历顺序一致
LinkedHashSet练习题
Car类(属性:name,price),如果name和price一样,则认为是相同元素,就不能添加。
package com14.set_;

import java.util.LinkedHashSet;
import java.util.Objects;

/**
 * @author 甲柒
 * @version 1.0
 * @title LinkedHashSetExercise
 * @package com14.set_
 * @time 2023/2/26 9:44
 */
@SuppressWarnings({"all"})
public class LinkedHashSetExercise {
    public static void main(String[] args) {
        LinkedHashSet linkedHashSet = new LinkedHashSet();
        linkedHashSet.add(new Car("奥拓", 10000));//ok
        linkedHashSet.add(new Car("奥迪", 300000));//ok
        linkedHashSet.add(new Car("奥迪", 300000));//
        linkedHashSet.add(new Car("法拉利", 10000000));//ok
        linkedHashSet.add(new Car("保时捷", 70000000));//ok
        linkedHashSet.add(new Car("奥迪", 300000));//

        System.out.println("linkedHashSet=" + linkedHashSet);
    }
}

//    Car类(属性:name,price),如果name和price一样,
//    则认为是相同元素,就不能添加。
class Car {
    private String name;
    private double price;

    public Car(String name, double price) {
        this.name = name;
        this.price = price;
    }

    public String getName() {
        return name;
    }

    public void setName(String name) {
        this.name = name;
    }

    public double getPrice() {
        return price;
    }

    public void setPrice(double price) {
        this.price = price;
    }

    //重写equals方法和hashCode方法
//当name和price相同时,就返回相同的hashCode值,equals返回t
    @Override
    public boolean equals(Object o) {
        if (this == o) return true;
        if (o == null || getClass() != o.getClass()) return false;
        Car car = (Car) o;
        return Double.compare(car.price, price) == 0 && Objects.equals(name, car.name);
    }

    @Override
    public int hashCode() {
        return Objects.hash(name, price);
    }

    @Override
    public String toString() {
        return "\nCar{" +
                "name='" + name + '\'' +
                ", price=" + price +
                '}';
    }
}
Map接口和常用方法
Map接口实现类的特点[JDK8]
Map与Collection并列存在,用于保存具有映射关系的数据:Key-Value
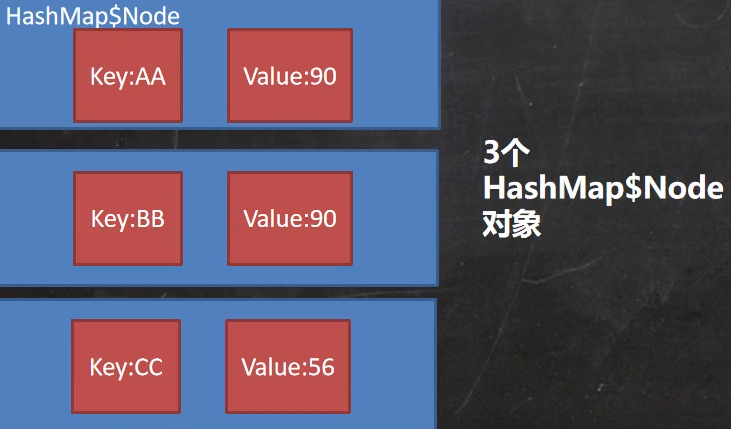
Map中的key和value可以是任何引用类型的数据,会封装到HashMap$Node对象中
Map中的key不允许重复,原因和HashSet一样
Map中的value可以重复
Map的key可以为null,value也可以为null,注意key为null,只能有一个,value为null,可以多个
常用String类作为Map的key
key和value之间存在一对一关系,即通过指定的key总能找到对应的value
package com14.map_;

import java.util.HashMap;
import java.util.Map;

/**
 * @author 甲柒
 * @version 1.0
 * @title Map_
 * @package com14.map_
 * @time 2023/2/26 10:39
 */
@SuppressWarnings({"all"})
public class Map_ {
    public static void main(String[] args) {
        //解读Map接口实现类的特点,使用实现类HashMap
        //1. Map与Collection并列存在,用于保存具有映射关系的数据:Key-Value(双列元素)
        //2.Map中的 key 和 value 可以是任何引用类型的数据,会封装到HashMap$Node 对象中
        //3.Map中的 key 不允许重复,原因和HashSet一样
        //4.Map中的value可以重复
        //5.Map的key可以为null,value也可以为null,注意key为null,只能有一个,value为null,可以多个
        //6.常用String类作为Map的key
        //7. key和value之间存在一对一关系,即通过指定的key总能找到对应的value
        Map map = new HashMap();
        map.put("no1", "甲柒");//k-v
        map.put("no2", "张无忌");//k-v
        map.put("no1", "價柒");//当有相同的k,就等价于替换
        map.put("no3", "张无忌");//k-v
        map.put(null, null);//k-v
        map.put(null, "abc");//等价替换
        map.put("n04", null);//k-v
        map.put("n05", null);//k-v
        map.put(1, "铁甲小宝");//k-v
        map.put(new Object(), "齐天大圣");
        //通过get方法,传入key,会返回对应的value
        System.out.println(map.get("no2"));//张无忌
        System.out.println("map=" + map);
    }
}
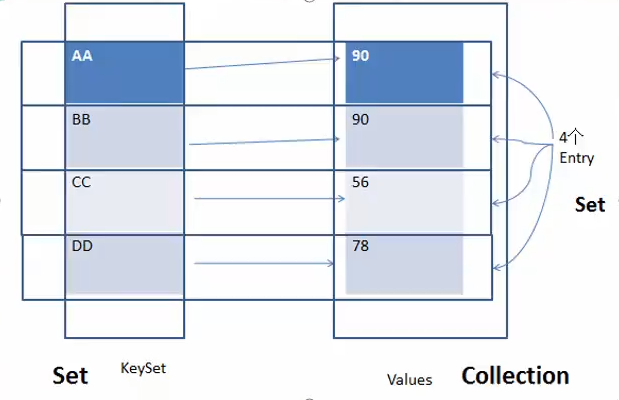
Map存放数据的key-value示意图,一对k-v是在一个HashMap$Node中的,因为Node实现了Entry接口,一些书上也说一对k-v就是一个Entry
package com14.map_;

import java.util.Collection;
import java.util.HashMap;
import java.util.Map;
import java.util.Set;

/**
 * @author 甲柒
 * @version 1.0
 * @title MapSource_
 * @package com14.map_
 * @time 2023/2/26 13:08
 */
@SuppressWarnings({"all"})
public class MapSource_ {
    public static void main(String[] args) {
        HashMap map = new HashMap();
        map.put("no1", "甲柒");//k-v
        map.put("no2", "派大星");//k-v
        map.put(new Car(), new Person());//k-v
        //解读
        //1.k-v最后是HashMap$Node node = newNode(hash, key, value, null)
        //2.k-v为了方便程序员的遍历,还会创建EntrySet集合,该集合存放的元素的类型Entry,而一个Entry
        //  对象就有k,v EntrySet<Entry<K,V>> 即:transient Set<Map.Entry<K,Y>> entrySet
        //3.在entrySet中,定义的类型是Map.Entry,但是实际上存放的还是HashMap$Node
        //  这是因为static class Node<K,Y> implements Map.Entry<K,Y>
        //4.当把HashMap$Node对象存放到entrySet就方便我们的遍历,因为Map.Entry提供了重要方法
        //  K getKey(); V getValue();

        Set set = map.entrySet();
        System.out.println(set.getClass());//HashMap$EntrySet
        for (Object obj : set) {
//            System.out.println(obj.getClass());//HashMap$Node
            //为了从HashMap$Node 取出k-v
            //1.先做一个向下转型
            Map.Entry entry = (Map.Entry) obj;
            System.out.println(entry.getKey() + "-" + entry.getValue());
        }
        Set set1 = map.keySet();
        System.out.println(set1.getClass());
        Collection values = map.values();
        System.out.println(values.getClass());

    }
}

class Car {

}

class Person {

}
Map体系的继承图
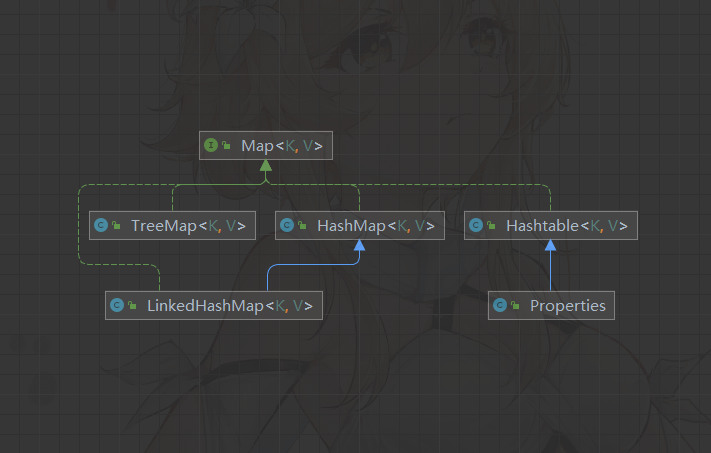
对Map体系图的说明
Map接口常用方法
put:添加
remove:根据键删除映射关系
get:根据键获取值
size:获取元素个数
isEmpty:判断个数是否为0
clear:清除
containsKey:查找键是否存在
package com14.map_;
import java.util.HashMap;
/**
* @author 甲柒
* @version 1.0
* @title MapMethod
* @package com14.map_
* @time 2023/2/26 14:40
*/
@SuppressWarnings({"all"})
public class MapMethod {
public static void main(String[] args) {
//演示map接口常用方法
// 1. put:添加
HashMap map = new HashMap();
map.put("邓超", new Book("", 100));//ok
map.put("邓超", "孙俪");//替换
map.put("王宝强", "马蓉");//ok
map.put("宋喆", "马蓉");//ok
map.put("小黑子", null);//ok
map.put(null, "刘亦菲");//ok
map.put("鹿晗", "蔡徐坤");//ok
System.out.println("map=" + map);
// 2. remove:根据键删除映射关系
map.remove("王宝强");
System.out.println("map=" + map);
// 3. get:根据键获取值
Object o = map.get("鹿晗");
System.out.println("o=" + o);//蔡徐坤
// 4. size:获取元素个数
System.out.println("k-v=" + map.size());//5
// 5. isEmpty:判断个数是否为0
System.out.println(map.isEmpty());//false
// 6. clear:清除
// map.clear();
System.out.println("map=" + map);
// 7. containsKey:查找键是否存在
System.out.println("结果=" + map.containsKey("鹿晗"));
}
}
class Book {
private String name;
private int num;
public Book(String name, int num) {
this.name = name;
this.num = num;
}
public String getName() {
return name;
}
public void setName(String name) {
this.name = name;
}
public int getNum() {
return num;
}
public void setNum(int num) {
this.num = num;
}
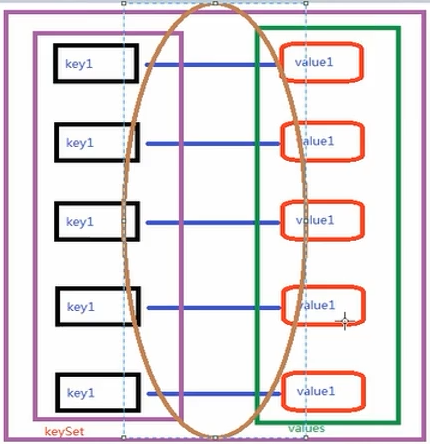
}Map接口遍历方法
Map遍历的示意图(比List,和Set复杂点,但是基本原理一样)
Map遍历方式案例演示
containskey:查找键是否存在、
keySet:获取所有的键
entrySet:获取所有的关系
values:获取所有的值
package com14.map_;

import java.util.*;

/**
 * @author 甲柒
 * @version 1.0
 * @title MapFor
 * @package com14.map_
 * @time 2023/2/26 15:10
 */
@SuppressWarnings({"all"})
public class MapFor {
    public static void main(String[] args) {
        Map map = new HashMap();
        map.put("邓超", "孙俪");
        map.put("王宝强", "马蓉");
        map.put("宋喆", "马蓉");
        map.put("小黑子", null);
        map.put(null, "刘亦菲");
        map.put("鹿晗", "蔡徐坤");
        //第一组:先取出所有的Key,通过Key取出对应的Value
        Set keyset = map.keySet();
        //(1)增强for
        System.out.println("========增强for 第一组=======");
        for (Object key : keyset) {
            System.out.println(key + "-" + map.get(key));
        }

        //(2)迭代器
        System.out.println("========迭代器 第一组=======");
        Iterator iterator = keyset.iterator();
        while (iterator.hasNext()) {
            Object next = iterator.next();
            System.out.println(next + "-" + map.get(next));
        }

        //第二组:把所有的values取出
        Collection values = map.values();
        //这里可以使用所有Collection使用的遍历方法

        //(1)增强for
        System.out.println("--------增强for取出所有的value--------");
        for (Object o : values) {
            System.out.println(o);
        }

        //(2)迭代器
        System.out.println("--------迭代器取出所有的value--------");
        Iterator iterator1 = values.iterator();
        while (iterator1.hasNext()) {
            Object next = iterator1.next();
            System.out.println(next);
        }

        //第三组:通过EntrySet来获取k-v
        Set entrySet = map.entrySet();

        //(1)增强for
        System.out.println("--------使用EntrySet 的 增强for(第三组)--------");
        for (Object o : entrySet) {
            //将entry转成Map.Entry
            Map.Entry m = (Map.Entry) o;
            System.out.println(m.getKey() + "-" + m.getValue());
        }

        //(2)迭代器
        System.out.println("--------使用EntrySet 的 迭代器(第三组)--------");
        Iterator iterator2 = entrySet.iterator();
        while (iterator2.hasNext()) {
            Object next = iterator2.next();
//            System.out.println(next.getClass());//HashMap$Node 实现-> Map.Entry (getKey,getValue)
            //向下转型Map.Entry
            Map.Entry m = (Map.Entry) next;
            System.out.println(m.getKey() + "-" + m.getValue());
        }
    }
}
Map接口练习题
使用HashMap添加3个员工对象,要求
键:员工id
值:员工对象
并遍历显示工资>18000的员工(遍历方式至少两种)
员工类:姓名、工资、员工id
package com14.map_;

import java.util.*;

/**
 * @author 甲柒
 * @version 1.0
 * @title MapExercise
 * @package com14.map_
 * @time 2023/2/26 16:12
 */
@SuppressWarnings({"all"})
public class MapExercise {
    public static void main(String[] args) {
        //完成代码
        Map hashMap = new HashMap();
        //添加数据
        hashMap.put(1, new Employee("jack", 20000, 1));
        hashMap.put(2, new Employee("tom", 2500, 2));
        hashMap.put(3, new Employee("甲柒", 36000, 3));
        hashMap.put(4, new Employee("太上老君", 6000, 4));
        hashMap.put(5, new Employee("武松", 57000, 5));
        hashMap.put(6, new Employee("武大郎", 76000, 6));

        //遍历两种方式
        //并遍历显示工资>18000的员工(遍历方式至少两种)
        //1.使用keySet ->增强for
        System.out.println("==========增强for===========");
        Set keySet = hashMap.keySet();
        for (Object o : keySet) {
            //先获取value
            Employee employee = (Employee) hashMap.get(o);
            if (employee.getSalary() > 18000) {
                System.out.println(employee);
            }
        }

        //2.使用EntrySet -> 迭代器
        System.out.println("=========迭代器=========");
        Set set = hashMap.entrySet();
        Iterator iterator = set.iterator();
        while (iterator.hasNext()) {
            Object next = iterator.next();
            Map.Entry m = (Map.Entry) next;
            Employee employee = (Employee) m.getValue();
            if (employee.getSalary() > 18000) {
                System.out.println(m.getKey() + "-" + m.getValue());
            }
        }
    }
}

//使用HashMap添加3个员工对象,要求
//键:员工id
//值:员工对象
//并遍历显示工资>18000的员工(遍历方式至少两种)
//员工类:姓名、工资、员工id
class Employee {
    private String name;
    private double salary;
    private int id;

    public Employee(String name, double salary, int id) {
        this.name = name;
        this.salary = salary;
        this.id = id;
    }

    public String getName() {
        return name;
    }

    public void setName(String name) {
        this.name = name;
    }

    public double getSalary() {
        return salary;
    }

    public void setSalary(double salary) {
        this.salary = salary;
    }

    public int getId() {
        return id;
    }

    public void setId(int id) {
        this.id = id;
    }

    @Override
    public boolean equals(Object o) {
        if (this == o) return true;
        if (o == null || getClass() != o.getClass()) return false;
        Employee employee = (Employee) o;
        return id == employee.id && Objects.equals(name, employee.name);
    }

    @Override
    public int hashCode() {
        return Objects.hash(name, id);
    }

    @Override
    public String toString() {
        return "Employee{" +
                "name=" + name +
                ", salary=" + salary +
                ", id=" + id +
                '}';
    }
}
HashMap小结
Map接口的 常用实现类:HashMap、Hashtable和Properties
HashMap是Map接口使用频率最高的实现类
HashMap是以(key-value)键值对的方式来存储数据
key不能重复,但是value可以重复,允许使用null键和null值
如果添加相同的key,则会覆盖原来的key-value,等同于修改(key不会替换,value会替换)
与HashSet一样,不保证映射的顺序,因为底层是以hash表的方式来存储的(JDK8的hashMap底层 数组+链表+红黑树)
HashMap没有实现同步,因此是线程不安全的,方法没有做同步互斥的操作,没有synchronized
Map接口实现类-HashMap
HashMap底层机制及源码剖析
示意图
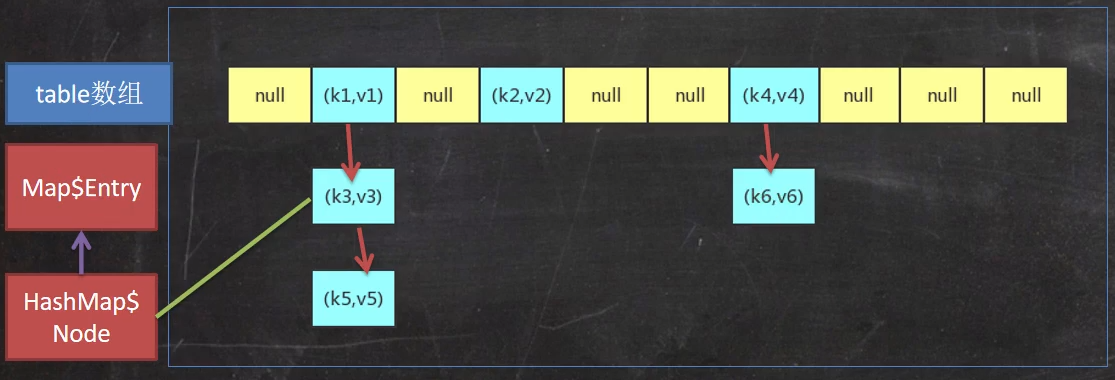
(k,v)是一个Node实现了Map.Entry<K,Y>,查看HashMap的源码可以看到
JDK7.0的HashMap底层实现[数组+链表],JDK8.0底层[数组+链表+红黑树]
扩容机制[和HashSet相同]
HashMap底层维护了Node类型的数组table,默认为null
当创建对象时,将加载因子(loadfactor)初始化为0.75
当添加key-value时,通过key的哈希值得到在table的索引。然后判断该索引处是否有元素,如果没有元素直接添加。如果该索引处有元素,继续判断该元素的key是否和准备加入的key相等。如果相等,则直接替换value;如果不相等需要判断是树结构还是链表结构,做出相应的处理。如果添加时发现容量不够,则需要扩容。
第一次添加,则需要扩容table容量为16,临界值(threshld)为12(16*0.75)
以后再扩容,则需要扩容table容量为原来的2倍,临界值为原来的2倍,即24,以此类推
在Java8中,如果一条链表的元素个数超过TREEIFY_THRESHOLD(默认是8),并且table的大小>=MIN_TREEIFY_CAPACITY(默认64),就会进行树化(红黑树)
HashMap源码解读
package com14.map_;
import java.util.HashMap;
/**
* @author 甲柒
* @version 1.0
* @title HashMapSource01
* @package com14.map_
* @time 2023/2/26 18:21
*/
@SuppressWarnings({"all"})
public class HashMapSource01 {
public static void main(String[] args) {
HashMap map = new HashMap();
map.put("java", 10);//ok
map.put("php", 10);//ok
map.put("java", 20);//替换value
System.out.println("map=" + map);
//解读HashMap的源码
/*
1.执行构造器 new HashMap()
初始化加载因子loadfactor = 0.75
HashMap$Node[] table = null
2.执行put
public V put(K key, V value) {//key = "java" value = 10
return putVal(hash(key), key, value, false, true);
}
3.执行putVal
final V putVal(int hash, K key, V value, boolean onlyIfAbsent,
boolean evict) {
Node<K,V>[] tab; Node<K,V> p; int n, i;//辅助变量
//如果底层的table数组为null,或者length = 0,就扩容到16
if ((tab = table) == null || (n = tab.length) == 0)
n = (tab = resize()).length;
//取出hash值对应的table的索引位置的Node,如果为null,就直接把加入到key-value
//,创建成一个Node,加入该位置即可
if ((p = tab[i = (n - 1) & hash]) == null)
tab[i] = newNode(hash, key, value, null);
else {
Node<K,V> e; K k;//辅助变量
//如果table的索引位置的key的hash和新的key的hash值相同,
//并且满足(table现有的结点的key和准备添加的key是同一个对象 或者 equals返回真)
//就认为不能加入新的k-v
if (p.hash == hash &&
((k = p.key) == key || (key != null && key.equals(k))))
e = p;
else if (p instanceof TreeNode)//如果当前的table的已有的Node是红黑树,就按照红黑树的方式处理
e = ((TreeNode<K,V>)p).putTreeVal(this, tab, hash, key, value);
else {
//如果找到的结点,后面是链表,就循环比较
for (int binCount = 0; ; ++binCount) {//死循环
if ((e = p.next) == null) {//如果整个链表,没有和它相同的,就加在该链表的最后
p.next = newNode(hash, key, value, null);
//加入后,判断当前链表的个数,是否已经到8个,到8个后
//就调用treeifyBin方法进行红黑树的转换
if (binCount >= TREEIFY_THRESHOLD - 1) // -1 for 1st
treeifyBin(tab, hash);
break;
}
//如果在循环比较过程中,发现有相同的,就break,就只是替换value
if (e.hash == hash &&
((k = e.key) == key || (key != null && key.equals(k))))
break;
p = e;
}
}
if (e != null) { // existing mapping for key
V oldValue = e.value;
if (!onlyIfAbsent || oldValue == null)
e.value = value;//替换 key对应的值
afterNodeAccess(e);
return oldValue;
}
}
++modCount;//每增加一个Node就size++
if (++size > threshold)//[12-24-48] 如果size > 临界值,就扩容
resize();
afterNodeInsertion(evict);
return null;
}
5.关于树化(转化成红黑树)
//如果table为null,或者大小还没有到64,暂时不树化,而是进行扩容
//否则才会真正的树化 -> 剪枝
final void treeifyBin(Node<K,V>[] tab, int hash) {
int n, index; Node<K,V> e;
if (tab == null || (n = tab.length) < MIN_TREEIFY_CAPACITY)
resize();
else if ((e = tab[index = (n - 1) & hash]) != null) {
TreeNode<K,V> hd = null, tl = null;
do {
TreeNode<K,V> p = replacementTreeNode(e, null);
if (tl == null)
hd = p;
else {
p.prev = tl;
tl.next = p;
}
tl = p;
} while ((e = e.next) != null);
if ((tab[index] = hd) != null)
hd.treeify(tab);
}
}
*/
}
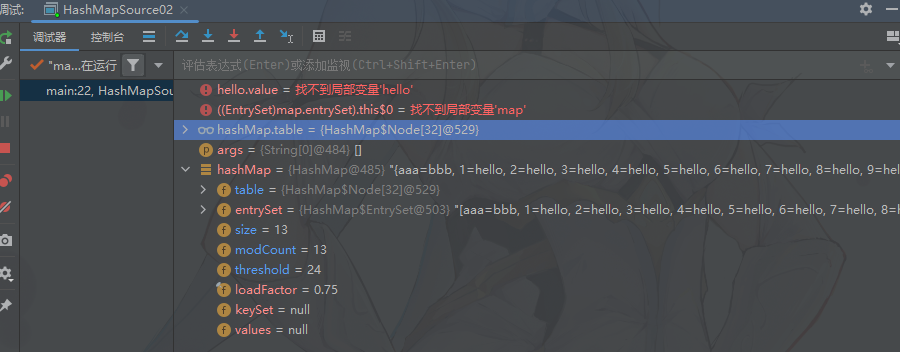
}模拟HashMap触发扩容、树化情况,并Debug验证
package com14.map_;

import java.util.HashMap;

/**
 * @author 甲柒
 * @version 1.0
 * @title HashMapSource02
 * @package com14.map_
 * @time 2023/2/26 20:58
 */
@SuppressWarnings({"all"})
public class HashMapSource02 {
    public static void main(String[] args) {
        HashMap hashMap = new HashMap();
        for (int i = 1; i <= 12; i++) {
            hashMap.put(i, "hello");
        }

        hashMap.put("aaa", "bbb");

        System.out.println("hashMap=" + hashMap);//12个key-value

        //验证table的扩容
        //0 -> 16(12) -> 32(24) -> 64(64*0.75=48) -> 128(96) ->
    }
}

class A {
    private int num;

    public A(int num) {
        this.num = num;
    }

    //所有的A对象的hashCode都是100
    @Override
    public int hashCode() {
        return 100;
    }

    @Override
    public String toString() {
        return "\nnum=" + num;
    }
}
Map接口实现类-Hashtable
Hashtable的基本介绍
存放的元素是键值对:即key-value
Hashtable的key和value都不能为null,否则会抛出NullPointerException
Hashtable使用方法基本上和HashMap一样
Hashtable是线程安全的(synchronized),HashMap是线程不安全的
简单的看下底层结构
Hashtable的应用案例
package com14.map_;

import java.util.Hashtable;

/**
 * @author 甲柒
 * @version 1.0
 * @title HashTableExercise
 * @package com14.map_
 * @time 2023/2/26 21:51
 */
@SuppressWarnings({"all"})
public class HashTableExercise {
    public static void main(String[] args) {
        Hashtable table = new Hashtable();//ok
        table.put("john", 100);//ok
//        table.put(null, 100);//异常NullPointerException
//        table.put("john", null);//异常NullPointerException
        table.put("lucy", 100);//ok
        table.put("tom", 100);//ok
        table.put("tom", 70);//替换
        for (int i = 0; i < 10; i++) {
            table.put("天王盖地虎" + i, "宝塔镇河妖" + i);
        }

        System.out.println(table);

        //简单说明一下Hashtable的底层
        //1.底层有数组 Hashtable$Entry[] 初始化大小为11
        //2.临界值 threshold 8 = 11 * 0.75
        //3.扩容:按照自己的扩容机制来进行即可
        //4.执行 方法 addEntry(hash, key, value, index);//添加key-value 封装到Entry
        //5.当 if (count >= threshold) 满足时,就进行扩容
        //6.按照 int newCapacity = (oldCapacity << 1) + 1; 的大小进行扩容
    }
}
Hashtable和HashMap对比

Map接口实现类-Properties
基本介绍
Properties类继承自Hashtable类并且实现了Map接口,也是使用一种键值对的形式来保存数据
Properties的使用特点和Hashtable类似哦
Properties还可以用于从xxx.properties文件中,加载数据到Properties类对象,并进行读取和修改
说明:xxx.properties文件通常作为配置文件Java 读写Properties配置文件(cnblogs.com)
基本使用
package com14.map_;

import java.util.Properties;

/**
 * @author 甲柒
 * @version 1.0
 * @title Properties_
 * @package com14.map_
 * @time 2023/2/26 23:20
 */
@SuppressWarnings({"all"})
public class Properties_ {
    public static void main(String[] args) {
        //解读
        //1.Properties 继承 Hashtable
        //2.可以通过key-value存放数据,但是key和value不能为null
        //增加
        Properties properties = new Properties();
//        properties.put(null, "abc");//抛出空指针异常NullPointerException
//        properties.put("abc", null);//抛出空指针异常NullPointerException
        properties.put("john", 100);//key-value
        properties.put("lucy",200);
        properties.put("tom", 100);
        properties.put("tom", 80);//如果有相同的key,value被替换
        System.out.println("properties=" + properties);

        //查找  通过k 获取对应的值
        System.out.println(properties.get("tom"));//80

        //删除
        properties.remove("tom");
        System.out.println("properties=" + properties);

        //修改
        properties.put("john", "小黑子");
        System.out.println("properties=" + properties);

        //查找
        System.out.println(properties.get("john"));
        System.out.println(properties.get("lucy"));
        System.out.println(properties.getProperty("lucy"));
    }
}
总结-开发中如何选择集合实现类
在开发中,选择什么集合实现类,主要取决于业务操作特点,然后根据集合实现类特性进行选择,分析如下:
先判断储存的类型(一组对象或一组键对值)
一组对象:Collection接口
允许重复:List
增删多:LinkedList[底层维护了一个双向链表]
改查多:ArrayList[底层维护了Object类型的可变数组]
不允许重复:Set
无序:HashSet[底层是HashMap,维护了一个哈希表 即(数组+链表+红黑树)]
排序:TreeSet
插入和取出顺序一致:LinkedHashSet,维护数组+双向链表
一组键值对:Map
键无序:HashMap[底层是:哈希表 JDK7:数组+链表,JDK8:数组+链表+红黑树]
键排序:TreeMap
键插入和取出顺序一致:LinkedHashMap
读取文件:Properties
Set接口实现类-TreeSet
案例说明
package com14.set_;

import java.util.Comparator;
import java.util.TreeSet;

/**
 * @author 甲柒
 * @version 1.0
 * @title TreeSet_
 * @package com14.set_
 * @time 2023/2/27 8:47
 */
@SuppressWarnings({"all"})
public class TreeSet_ {
    public static void main(String[] args) {

        //解读
        //1.当我们使用无参构造器时,创建TreeSet时,仍然是无序的
        //2.希望添加的元素,按照字符串大小来排序
        //3.使用TreeSet提供的一个构造器可以传入一个比较器
        //  并指定排序规则

//        TreeSet treeSet = new TreeSet();
        TreeSet treeSet = new TreeSet(new Comparator() {
            @Override
            public int compare(Object o1, Object o2) {
                //调用String的compareTo方法进行字符串大小比较
                //return (((String) o2).compareTo((String) o1));
                //要求按照长度大小来排序
                return (((String) o2).length() - ((String) o1).length());//规则:长度相等就认为元素相同,所以没有smith
            }
        });
        //添加数据
        treeSet.add("jack");
        treeSet.add("tom");
        treeSet.add("marry");
        treeSet.add("smith");
        treeSet.add("tom");

        System.out.println("treeSet=" + treeSet);

        //源码解读
        //1.构造器把传入的比较器对象,赋给了TreeSet的底层的TreeMap属性的this.comparator

        /*
            public TreeMap(Comparator<? super K> comparator) {
                this.comparator = comparator;
            }
         */
        //2.在 调用 treeSet.add("tom"),底层就会执行到
        /*
                if (cpr != null) {//cpr 就是我们的匿名内部类(对象)
                    do {
                        parent = t;
                        //动态绑定到我们的匿名内部类(对象)compare
                        cmp = cpr.compare(key, t.key);
                        if (cmp < 0)
                            t = t.left;
                        else if (cmp > 0)
                            t = t.right;
                        else//如果相等,即返回0,这个key就没有加入
                            return t.setValue(value);
                    } while (t != null);
                }
         */
    }
}
Map接口实现类-TreeMap
案例说明
package com14.map_;

import java.util.Comparator;
import java.util.TreeMap;

/**
 * @author 甲柒
 * @version 1.0
 * @title TreeMap_
 * @package com14.map_
 * @time 2023/2/27 9:30
 */
@SuppressWarnings({"all"})
public class TreeMap_ {
    public static void main(String[] args) {

        //使用默认构造器,创建TreeMap,仍是无序的
        //1.按照传入的key(String)的大小进行排序
//        TreeMap treeMap = new TreeMap();
        TreeMap treeMap = new TreeMap(new Comparator() {
            @Override
            public int compare(Object o1, Object o2) {
                //1.按照传入的key(String)的首字母大小进行排序
//                return ((String) o2).compareTo((String) o1);
                //2.按照key(String)的长度的大小排序
                return ((String) o2).length() - ((String) o1).length();
            }
        });
        treeMap.put("jack", "杰克");
        treeMap.put("tom", "汤姆");
        treeMap.put("jerry", "杰瑞");
        treeMap.put("smith", "史密斯");
        treeMap.put("jqq", "甲柒");//按照长度排序,加入失败

        System.out.println("treeMap=" + treeMap);

        //源码解读
        /*
        1.构造器 把传入的实现了Comparator接口的匿名内部类(对象),传给TreeMap的comparator
            public TreeMap(Comparator<? super K> comparator) {
                this.comparator = comparator;
            }
        2.调用put方法
        2.1第一次添加,把key和value封装到Entry对象,放入root
        Entry<K,V> t = root;
        if (t == null) {
            compare(key, key); // type (and possibly null) check

            root = new Entry<>(key, value, null);
            size = 1;
            modCount++;
            return null;
        }
        2.2以后添加
        Comparator<? super K> cpr = comparator;
        if (cpr != null) {
            do {//遍历所有的key
                parent = t;
                cmp = cpr.compare(key, t.key);//动态绑定到匿名内部类的compare
                if (cmp < 0)
                    t = t.left;
                else if (cmp > 0)
                    t = t.right;
                else//如果遍历过程中,发现准备添加key和当前已有的key相等就直接返回(不添加)
                    return t.setValue(value);
            } while (t != null);
        }
         */
    }
}
Collections工具类
Collections工具类介绍
Collections是一个操作Set、List和Map等集合的工具类
Collections中提供了一系列静态方法对集合元素进行排序、查询和修改等操作
排序操作:(均为static方法)
reverse(List):反转List中元素的顺序
shuffle(List):对List集合元素进行随机排序
sort(List):根据元素的自然顺序对指定List集合元素按升序排序
sort(List, Comparator):根据指定的Comparator产生的顺序对List集合元素进行排序
swap(List, int , int):将指定List集合中的i处元素和j处元素进行交换
应用案例演示
 package com14.collections_;

import java.util.ArrayList;
import java.util.Collections;
import java.util.Comparator;

/**
 * @author 甲柒
 * @version 1.0
 * @title Collections_
 * @package com14.collections_
 * @time 2023/2/27 10:39
 */
@SuppressWarnings({"all"})
public class Collections_ {
    public static void main(String[] args) {

        //创建ArrayList集合,用于测试
        ArrayList list = new ArrayList();
        list.add("tom");
        list.add("smith");
        list.add("king");
        list.add("milan");

        //1. reverse(List):反转List中元素的顺序
        Collections.reverse(list);
        System.out.println("list=" + list);
        //2. shuffle(List):对List集合元素进行随机排序
//        for (int i = 0; i < 5; i++) {
//            Collections.shuffle(list);
//            System.out.println("list=" + list);
//        }

        //3. sort(List):根据元素的自然顺序对指定List集合元素按升序排序
        Collections.sort(list);
        System.out.println("=====自然排序后====");
        System.out.println("list=" + list);
        //4. sort(List, Comparator):根据指定的Comparator产生的顺序对List集合元素进行排序
        //希望按照 字符串的长度大小来排序
        Collections.sort(list, new Comparator<Object>() {
            @Override
            public int compare(Object o1, Object o2) {
                if (o1 instanceof String) {//校验代码

                    return ((String) o2).length() - ((String) o1).length();
                }
                return 0;
            }
        });
        System.out.println("字符串长度大小排序=" + list);
        //5. swap(List, int , int):将指定List集合中的i处元素和j处元素进行交换
        Collections.swap(list, 0, 1);//索引不能越界
        System.out.println("交换后=" + list);
    }
}
查找、替换
Object max(Collection):根据元素的自然顺序,返回给定集合中的最大元素
Object max(Collection, Comparator):根据Comparator指定的顺序,返回给定集合中的最大元素
Object min(Collection)
Object min(Collection, Comparator)
int frequency(Collection, Object):返回指定集合中指定元素出现的次数
void copy(List dest, List src):将src中的内容复制到dest中
boolean replaceAll(List list, Object oldVal, Object newVal):使用新值替换List对象的所有旧值
应用案例演示
package com14.collections_;

import java.util.ArrayList;
import java.util.Collections;
import java.util.Comparator;

/**
 * @author 甲柒
 * @version 1.0
 * @title Collections02_
 * @package com14.collections_
 * @time 2023/2/27 11:10
 */
@SuppressWarnings({"all"})
public class Collections02_ {
    public static void main(String[] args) {

        //创建ArrayList集合,用于测试
        ArrayList list = new ArrayList();
        list.add("tom");
        list.add("smith");
        list.add("king");
        list.add("milan");
        list.add("tom");
//        1. Object max(Collection):根据元素的自然顺序,返回给定集合中的最大元素
        System.out.println("自然顺序的最大元素=" + Collections.max(list));
//        2. Object max(Collection, Comparator):根据Comparator指定的顺序,返回给定集合中的最大元素
        //例:返回长度最大的元素
        Object maxObject = Collections.max(list, new Comparator<Object>() {
            @Override
            public int compare(Object o1, Object o2) {
                return ((String) o1).length() - ((String) o2).length();
            }
        });
        System.out.println("maxObject=" + maxObject);
//        3. Object min(Collection)
        System.out.println("自然顺序的最小元素=" + Collections.min(list));
//        4. Object min(Collection, Comparator)
        //例:返回长度最大的元素
        Object minObject = Collections.min(list, new Comparator<Object>() {
            @Override
            public int compare(Object o1, Object o2) {
                return ((String) o1).length() - ((String) o2).length();
            }
        });
        System.out.println("minObject=" + minObject);

//        5. int frequency(Collection, Object):返回指定集合中指定元素出现的次数
        System.out.println("tom出现的次数=" + Collections.frequency(list, "tom"));
//        6. void copy(List dest, List src):将src中的内容复制到dest中
        ArrayList dest = new ArrayList();
        //为了完成一个完整的拷贝,需要先给dest赋值,大小和list.size()一样
        for (int i = 0; i < list.size(); i++) {
            dest.add(null);
        }
        //拷贝
        Collections.copy(dest, list);

        System.out.println("dest=" + dest);
        System.out.println("list=" + list);
//        7. boolean replaceAll(List list, Object oldVal, Object newVal):使用新值替换List对象的所有旧值
        //如果list中有tom就替换成汤姆
        Collections.replaceAll(list, "tom", "汤姆");
        System.out.println("list=" + list);
    }
}