本文主要讲解如何通过build方式构建各个网元的image,因为直接pull的image无法对其进行更改,而build的镜像可以对其源代码进行编辑更改后生成镜像。
参考链接:OAI build iamges
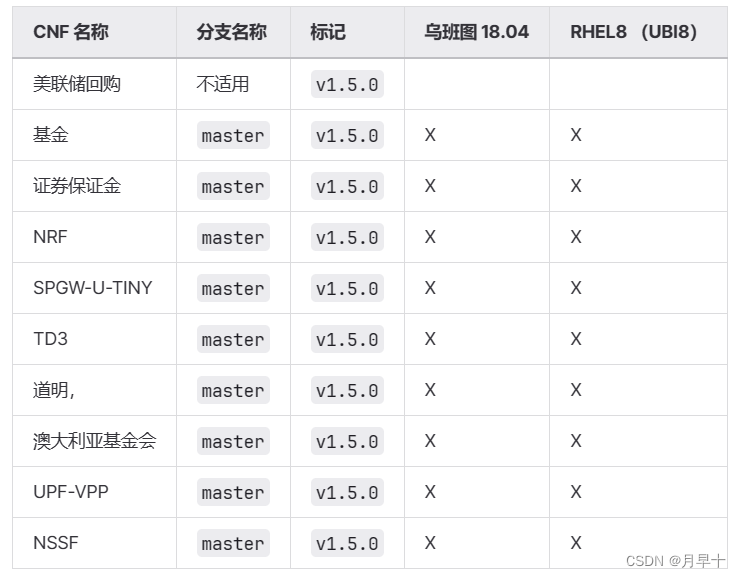
1.获取正确的网络功能分支
此存储库仅包含教程和持续集成脚本。
每个 5G 网络功能源代码都在自己的存储库中进行管理。
它们在文件夹中命名。git sub-modulescomponent
在做任何事情之前,你应该检索每个 git 子模块的代码
总之,就是你要选对要clone的分支,你使用那一个分支的内容,必须在克隆时输入正确的分支
1.1克隆稳定版本
我们建议与所有 git 子模块上的主分支同步。
我们还建议您将此“教程”存储库与提供的标记同步。这样,文件将与每个 cNF .docker-compose保持一致。
在撰写本文时(19/01/2023),发布标签为 v1.5.0。
# Clone directly on the v1.5.0 release tag
#通过修改 v1.5.0到其他分支名,可以下载其他分支的文件
$ git clone --branch v1.5.0 https://gitlab.eurecom.fr/oai/cn5g/oai-cn5g-fed.git
$ cd oai-cn5g-fed
# If you forgot to clone directly to the v1.5.0 release tag
$ git checkout -f v1.5.0

# Synchronize all git submodules
$ ./scripts/syncComponents.sh
---------------------------------------------------------
OAI-NRF     component branch : master
OAI-AMF     component branch : master
OAI-SMF     component branch : master
OAI-SPGW-U  component branch : master
OAI-AUSF    component branch : master
OAI-UDM     component branch : master
OAI-UDR     component branch : master
OAI-UPF-VPP component branch : master
OAI-NSSF    component branch : master
OAI-NEF     component branch : master
OAI-PCF     component branch : master
---------------------------------------------------------
git submodule deinit --all --force
git submodule init
git submodule update
1.2如果你对最新版本感兴趣
所有最新功能都推送到每个 NF 存储库的分支。develop
这意味着我们/您能够构建并且持续集成测试套件确保它
不会破坏任何现有的测试功能。
例如,在撰写本文时,N2 切换支持代码包含在发行版中。
但它尚未经过测试。因此,它没有在发行说明中公布。v1.1.0CHANGELOG.md
无论如何,教程在存储库分支的最新提交上的 docker-compose 文件应支持任何其他未经测试的功能。master oai-cn5g-fed
# Clone
$ git clone  https://gitlab.eurecom.fr/oai/cn5g/oai-cn5g-fed.git
$ cd oai-cn5g-fed
# On an existing repository, resync to the last `master` commit
$ git fetch --prune
$ git checkout master
$ git rebase origin/master

# Synchronize all git submodules
$ ./scripts/syncComponents.sh --nrf-branch develop --amf-branch develop \
                              --smf-branch develop --spgwu-tiny-branch develop \
                              --ausf-branch develop --udm-branch develop \
                              --udr-branch develop --upf-vpp-branch develop \
                              --nssf-branch develop --nef-branch develop \
                              --pcf-branch develop
---------------------------------------------------------
OAI-NRF     component branch : develop
OAI-AMF     component branch : develop
OAI-SMF     component branch : develop
OAI-SPGW-U  component branch : develop
OAI-AUSF    component branch : develop
OAI-UDM     component branch : develop
OAI-UDR     component branch : develop
OAI-UPF-VPP component branch : develop
OAI-NSSF    component branch : develop
OAI-NEF     component branch : develop
OAI-PCF     component branch : develop
---------------------------------------------------------
git submodule deinit --all --force
git submodule init
git submodule update
2.通用参数
如果要重新生成 CN5G 镜像,请注意或可能重复使用 blob
以构建中间层。docker podman cached
在这种情况下,我们建议添加该选项。--no-cache
2.1在Ubuntu主机上
支持如下版本:
- Ubuntu or 18.04bionic
- Ubuntu or 20.04focal
- Ubuntu or 22.04jammy
在构建镜像时,可以指定工作于哪一个基础镜像(默认是ubuntu:bionic)只需要增加此选项:--build-arg BASE_IMAGE=ubuntu:xxxx
3.构建AMF镜像
3.1 在Ubuntu主机上
此例中我构建使用了一个基础镜像:ubuntu:focal
$ docker build --target oai-amf --tag oai-amf:v1.5.0 \
               --file component/oai-amf/docker/Dockerfile.amf.ubuntu \
               --build-arg BASE_IMAGE=ubuntu:focal \
               component/oai-amf
$ docker image prune --force
$ docker image ls
oai-amf                 v1.5.0             f478bafd7a06        1 minute ago          179MB
...
4.构建SMF镜像
4.1 在一个Ubuntu主机上
此例中我构建使用了一个基础镜像:ubuntu:22.04
$ docker build --target oai-smf --tag oai-smf:v1.5.0 \
               --file component/oai-smf/docker/Dockerfile.smf.ubuntu \
               --build-arg BASE_IMAGE=ubuntu:22.04 \
               component/oai-smf
$ docker image prune --force
$ docker image ls
oai-smf                 v1.5.0             f478bafd7a06        1 minute ago          193MB
...
5.构建AMF镜像
5.1 在一个Ubuntu主机上
此例中我构建使用了一个基础镜像:ubuntu:jammy
$ docker build --target oai-nrf --tag oai-nrf:v1.5.0 \
               --file component/oai-nrf/docker/Dockerfile.nrf.ubuntu \
               --build-arg BASE_IMAGE=ubuntu:jammy \
               component/oai-nrf
$ docker image prune --force
$ docker image ls
oai-nrf                 v1.5.0             04334b29e103        1 minute ago          247MB
...
6.构建SPGW-U 镜像
6.1 在一个Ubuntu主机上
注意:SPGWU无法基于 ubuntu:22.04或ubuntu:jammy版本构建,只能使用bionic或focal
此例中我构建使用了一个基础镜像:ubuntu:20.04
$ docker build --target oai-spgwu-tiny --tag oai-spgwu-tiny:v1.5.0 \
               --file component/oai-upf-equivalent/docker/Dockerfile.ubuntu \
               --build-arg BASE_IMAGE=ubuntu:20.04 \
               component/oai-upf-equivalent
$ docker image prune --force
$ docker image ls
oai-spgwu-tiny          v1.5.0             dec6311cef3b        1 minute ago          155MB
...
7.构建AUSF镜像
7.1 在一个Ubuntu主机上
$ docker build --target oai-ausf --tag oai-ausf:v1.5.0 \
               --file component/oai-ausf/docker/Dockerfile.ausf.ubuntu \
               component/oai-ausf
$ docker image prune --force
$ docker image ls
oai-ausf          v1.5.0              77a96de94c23        1 minute ago        231MB
...
8.构建UDM镜像
8.1 在一个Ubuntu主机上
$ docker build --target oai-udm --tag oai-udm:v1.5.0 \
               --file component/oai-udm/docker/Dockerfile.udm.ubuntu \
               component/oai-udm
$ docker image prune --force
$ docker image ls
oai-udm                 v1.5.0             10a4334e31be        1 minute ago          229MB
...
9.构建UDR镜像
9.1 在一个Ubuntu主机上
$ docker build --target oai-udr --tag oai-udr:v1.5.0 \
               --file component/oai-udr/docker/Dockerfile.udr.ubuntu \
               component/oai-udr
$ docker image prune --force
$ docker image ls
oai-udr                 v1.5.0             581e07d59ec3        1 minute ago          234MB
...
10.构建UPF-VPP镜像
10.1 在一个Ubuntu主机上
$ docker build --target oai-upf-vpp --tag oai-upf-vpp:v1.5.0 \
               --file component/oai-upf-vpp/docker/Dockerfile.upf-vpp.ubuntu \
               component/oai-upf-vpp
$ docker image prune --force
$ docker image ls
oai-upf-vpp             v1.5.0             581e07d59ec3        1 minute ago          937MB
...
11.构建NSSF 镜像
3.1 在一个Ubuntu主机上
$ docker build --target oai-nssf --tag oai-nssf:v1.5.0 \
               --file component/oai-nssf/docker/Dockerfile.nssf.ubuntu \
               component/oai-nssf
$ docker image prune --force
$ docker image ls
oai-nssf          v1.5.0              77a96de94c23        1 minute ago        231MB
...
OpenAirInterface通过docker build方式构建amf images
$ docker build --target oai-amf --tag oai-amf:v1.5.0 \
               --file component/oai-amf/docker/Dockerfile.amf.ubuntu \
               --build-arg BASE_IMAGE=ubuntu:focal \
               component/oai-amf
$ docker image prune --force
$ docker image ls
oai-amf                 v1.5.0             f478bafd7a06        1 minute ago          179MB
...
这是一个Docker命令,使用特定的Dockerfile构建OpenAirInterface(OAI)Access和Mobility Management Function(AMF)组件的Docker镜像,并为镜像打上版本号的标签。
以下是命令的不同部分的解释:
- docker build:这是构建Docker镜像的命令。
- –target oai-amf:这指定只构建Dockerfile中的oai-amf阶段。一个Dockerfile可以定义多个阶段,每个阶段都有自己的指令集。
- –tag oai-amf:v1.5.0:这设置正在构建的镜像的名称和版本号。在这种情况下,镜像将被命名为oai-amf,版本号为v1.5.0。
- –file component/oai-amf/docker/Dockerfile.amf.ubuntu:这指定要用于构建镜像的Dockerfile的路径。在这种情况下,文件位于component/oai-amf/docker/Dockerfile.amf.ubuntu。
–build-arg BASE_IMAGE=ubuntu:focal:这指定将传递给Dockerfile的构建参数。在这种情况下,参数是BASE_IMAGE,其值为ubuntu:focal。这允许Dockerfile引用此参数并在构建过程中使用它。 - component/oai-amf:这指定构建上下文,即包含在构建过程中使用的文件的目录。在这种情况下,目录是component/oai-amf。
总的来说,这个命令使用特定的Dockerfile构建OAI AMF组件的Docker镜像,并为镜像打上版本号的标签。然后可以使用生成的镜像在Docker容器中运行AMF组件。