1.准备
excel导入功能需要使用npm包xlsx,所以需要安装xlsx插件,读取和写入都依赖她
$ npm i [email protected]vue-element-admin模板提供了一个导入excel数据的文件,我们只需用即可
代码地址:https://github.com/PanJiaChen/vue-element-admin/blob/master/src/components/UploadExcel/index.vue
将vue-element-admin提供的导入功能新建一个组件,位置:src/components/UploadExcel/index.vue
<template>
<div>
<input ref="excel-upload-input" class="excel-upload-input" type="file" accept=".xlsx, .xls" @change="handleClick">
<div class="drop" @drop="handleDrop" @dragover="handleDragover" @dragenter="handleDragover">
将文件拖到此处
<el-button :loading="loading" style="margin-left:16px;" size="mini" type="primary" @click="handleUpload">
点击上传文件
</el-button>
</div>
</div>
</template>
<script>
import XLSX from 'xlsx'
export default {
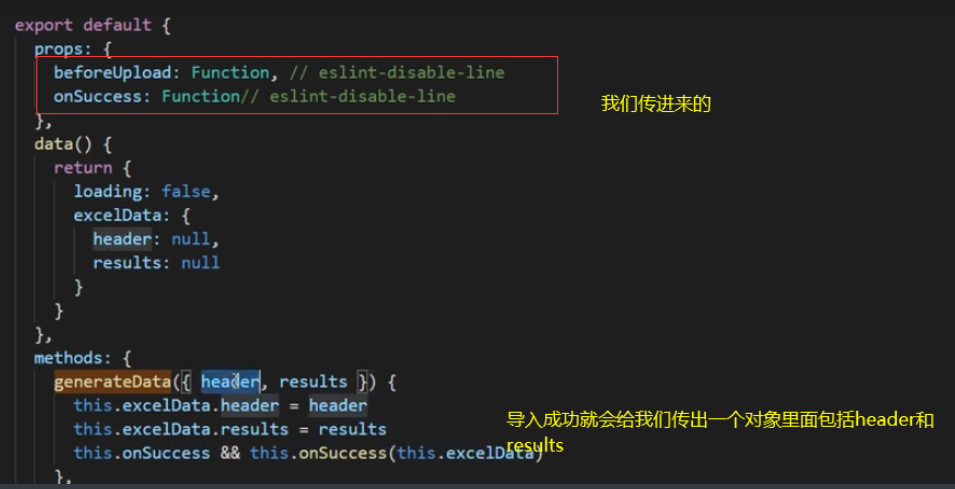
props: {
beforeUpload: Function, // eslint-disable-line
onSuccess: Function// eslint-disable-line
},
data() {
return {
loading: false,
excelData: {
header: null,
results: null
}
}
},
methods: {
generateData({ header, results }) {
this.excelData.header = header
this.excelData.results = results
this.onSuccess && this.onSuccess(this.excelData)
},
handleDrop(e) {
e.stopPropagation()
e.preventDefault()
if (this.loading) return
const files = e.dataTransfer.files
if (files.length !== 1) {
this.$message.error('Only support uploading one file!')
return
}
const rawFile = files[0] // only use files[0]
if (!this.isExcel(rawFile)) {
this.$message.error('Only supports upload .xlsx, .xls, .csv suffix files')
return false
}
this.upload(rawFile)
e.stopPropagation()
e.preventDefault()
},
handleDragover(e) {
e.stopPropagation()
e.preventDefault()
e.dataTransfer.dropEffect = 'copy'
},
handleUpload() {
this.$refs['excel-upload-input'].click()
},
handleClick(e) {
const files = e.target.files
const rawFile = files[0] // only use files[0]
if (!rawFile) return
this.upload(rawFile)
},
upload(rawFile) {
this.$refs['excel-upload-input'].value = null // fix can't select the same excel
if (!this.beforeUpload) {
this.readerData(rawFile)
return
}
const before = this.beforeUpload(rawFile)
if (before) {
this.readerData(rawFile)
}
},
readerData(rawFile) {
this.loading = true
return new Promise((resolve, reject) => {
const reader = new FileReader()
reader.onload = e => {
const data = e.target.result
const workbook = XLSX.read(data, { type: 'array' })
const firstSheetName = workbook.SheetNames[0]
const worksheet = workbook.Sheets[firstSheetName]
const header = this.getHeaderRow(worksheet)
const results = XLSX.utils.sheet_to_json(worksheet)
this.generateData({ header, results })
this.loading = false
resolve()
}
reader.readAsArrayBuffer(rawFile)
})
},
getHeaderRow(sheet) {
const headers = []
const range = XLSX.utils.decode_range(sheet['!ref'])
let C
const R = range.s.r
/* start in the first row */
for (C = range.s.c; C <= range.e.c; ++C) { /* walk every column in the range */
const cell = sheet[XLSX.utils.encode_cell({ c: C, r: R })]
/* find the cell in the first row */
let hdr = 'UNKNOWN ' + C // <-- replace with your desired default
if (cell && cell.t) hdr = XLSX.utils.format_cell(cell)
headers.push(hdr)
}
return headers
},
isExcel(file) {
return /\.(xlsx|xls|csv)$/.test(file.name)
}
}
}
</script>
<style scoped>
.excel-upload-input{
display: none;
z-index: -9999;
}
.drop{
border: 2px dashed #bbb;
width: 600px;
height: 160px;
line-height: 160px;
margin: 0 auto;
font-size: 24px;
border-radius: 5px;
text-align: center;
color: #bbb;
position: relative;
}
</style>我们在需要导入和导出excel的index页面引入此组件
分析一下上面的代码,需要我们传入onSuccess函数
2.实现excel导入
首先我们封装一个向后端请求 数据的接口
/** *
 *  封装一个导入员工的接口,data是数组
 *
 * ***/

export function importEmployee(data) {
  return request({
    url: '/sys/user/batch',
    method: 'post',
    data
  })
}
我们传入onSuccess函数
<template>
  <!-- 公共导入组件 -->
  <upload-excel :on-success="success" />
</template>
import { importEmployee } from '@/api/employees'
// 在methods中修改success函数
async success({ header, results }) {
console.log(results)
//results就是我们通过excel导入进来的数据,之后需要把他传递给后端
}从excel导进来的数据是数组,里面一堆员工信息对象,key值是中文,需要转化成英文导入

import { importEmployee } from '@/api/employees'

// 在methods中修改success函数
async  success({ header, results }) {
      // 如果是导入员工
   //header中的数据是中文,results中的数据也是中文,要和新增的员工的属性是一致的
  //定义一个映射关系对象
        const userRelations = {
          '入职日期': 'timeOfEntry',
          '手机号': 'mobile',
          '姓名': 'username',
          '转正日期': 'correctionTime',
          '工号': 'workNumber'
        }
      // map() 方法返回一个新数组,数组中的元素为原始数组元素调用函数处理后的值
      var newArr = results.map(item => {
        var userInfo = {}
        Object.keys(item).forEach(key => {
          userInfo[userRelations[key]] = item[key]//  相当于 userInfo[mobile]=mobile这种
        })
        return userInfo
      })
      await importEmployee(newArr) // 调用导入接口,newArr就是转化好的数据,向后端发起请求
      this.$message.success('导入excel成功')

    }
但是此时 时间格式不对,当excel中有日期格式的时候,实际转化的值为一个数字,我们需要一个方法进行转化
excel时间转换
  formatDate(numb, format) {
      const time = new Date((numb - 1) * 24 * 3600000 + 1)
      time.setYear(time.getFullYear() - 70)
      const year = time.getFullYear() + ''
      const month = time.getMonth() + 1 + ''
      const date = time.getDate() - 1 + ''
      if (format && format.length === 1) {
        return year + format + month + format + date
      }
      return year + (month < 10 ? '0' + month : month) + (date < 10 ? '0' + date : date)
    }
async success({ header, results }) {
// console.log(header, results)
// results里是 [{…}, {…}, {…},],每一个对象里和userRelations一样
// 自定义一个映射关系
const userRelations = {
'入职日期': 'timeOfEntry',
'手机号': 'mobile',
'姓名': 'username',
'转正日期': 'correctionTime',
'工号': 'workNumber'
}
// 把中文的key变成英文
var newArr = results.map(item => {
var userInfo = {}
// Object.keys(item)得到 ['手机号', '姓名', '入职日期', '转正日期', '工号']
Object.keys(item).forEach(key => {
if (userRelations[key] === 'timeOfEntry' || userRelations[key] === 'correctionTime') {
console.log(item[key])// 44937
console.log(this.formatDate(item[key]))// 20230210
console.log(new Date(this.formatDate(item[key], '/')))// Tue Feb 21 2023 00:00:00 GMT+0800 (中国标准时间)
userInfo[userRelations[key]] = new Date(this.formatDate(item[key], '/'))
} else {
userInfo[userRelations[key]] = item[key]
}
})
return userInfo
})
// 请求接口
await importEmployee(newArr)
this.$message.success('导入excel成功')
},
// 格式化excel时间
formatDate(numb, format) {
const time = new Date((numb - 1) * 24 * 3600000 + 1)
time.setYear(time.getFullYear() - 70)
const year = time.getFullYear() + ''
const month = time.getMonth() + 1 + ''
const date = time.getDate() - 1 + ''
if (format && format.length === 1) {
return year + format + month + format + date
}
return year + (month < 10 ? '0' + month : month) + (date < 10 ? '0' + date : date)
}3.实现excel导出
Excel 的导入导出都是依赖于js-xlsx来实现的。
由于 Export2Excel不仅依赖js-xlsx还依赖file-saver和script-loader。
在 js-xlsx的基础上又封装了Export2Excel.js来方便导出数据。
npm install [email protected] file-saver -S
npm install script-loader -S -D //懒加载,运行和开发时都用到
由于js-xlsx体积还是很大的,导出功能也不是一个非常常用的功能,所以使用的时候建议使用懒加载。使用方法如下:
/*懒加载script-loader的作用,等点击导出按钮时候才会引入这个包然后才会执行导出的方法
import('@/vendor/Export2Excel').then ,意思是先引入包,包引入成功后执行then后得操作,then的参数excel就是包导出的内容,内容里有excel.export_json_to_excel方法里的东西
*/
import('@/vendor/Export2Excel').then(excel => {
  excel.export_json_to_excel({
    header: tHeader, //表头 必填
    data, //具体数据 必填 [[],[]]
    filename: 'excel-list', //非必填
    autoWidth: true, //非必填
    bookType: 'xlsx' //非必填
  })
})
参数 |
说明 |
类型 |
可选值 |
默认值 |
header |
导出数据的表头 |
Array |
/ |
[] |
data |
导出的具体数据 |
Array |
/ |
[[],[]...] |
filename |
导出文件名 |
String |
/ |
excel-list |
autoWidth |
单元格是否要自适应宽度 |
Boolean |
true / false |
true |
bookType |
导出文件类型 |
String |
xlsx, csv, txt, more |
xlsx |
我们现在的数据是这种格式
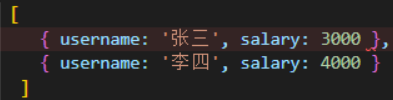
需要变成这种格式才能导出,他没有key,只有value
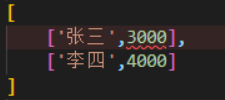
我们最重要的一件事,就是把表头和数据进行相应的对应
因为数据中的key是英文,想要导出的表头是中文的话,需要将中文和英文做对应
 // 导出excel数据
    exportData() {
      //  做操作
      // 表头对应关系
      const headers = {
        '姓名': 'username',
        '手机号': 'mobile',
        '入职日期': 'timeOfEntry',
        '聘用形式': 'formOfEmployment',
        '转正日期': 'correctionTime',
        '工号': 'workNumber',
        '部门': 'departmentName'
      }
      // 懒加载
      import('@/vendor/Export2Excel').then(async excel => {
           // page: this.page.total 的目的是要一次性把全部的员工列表查询出来
          //获取所有员工数据的接口
        const { rows } = await getEmployeeList({ page: 1, size: this.page.total })
        // [["张三", "13811111111","2018","1", "2018", "10002"],["李思", "13911111111","2018","1", "2018", "10002"],...]
        const data = this.formatList(headers, rows)

        excel.export_json_to_excel({
          header: Object.keys(headers),//表头
          data,//把转化好格式的data放这里,data是[[],[]..]格式
          filename: '员工信息表',
          autoWidth: true,
          bookType: 'xlsx'
        })
      })
    },
    // 该方法负责将数组转化成二维数组
    formatList(headers, rows) {
      // 首先遍历数组
      //  [{ username: '张三', mobile: '13811111111', ...},{},{}]  => [[’张三', '13811111111',...],[],[]]
      return rows.map(item => {
          // Object.keys(headers) => ['姓名','手机号',...]
        return Object.keys(headers).map(key => {
          return item[headers[key]] // 张三, 13811111111, 2018, ...
        }) // => ["张三", "13811111111","2018","1", "2018", "10002"]
      }) // [["张三", "13811111111","2018","1", "2018", "10002"],["李四", "13911111111","2018","1", "2018", "10002"]]
    }
此时导出来的数据就是[[],[]..]数组包数组的格式

但是发现日期和聘用形式不对,下面还需要格式化日期
 function formatDate(date, fmt = 'yyyy-MM-dd') {
  if (!(date instanceof Array)) {
    date = new Date(date)
  }
  if (/(y+)/.test(fmt)) {
    fmt = fmt.replace(RegExp.$1, (date.getFullYear() + '').substr(4 - RegExp.$1.length))
  }
  const o = {
    'M+': date.getMonth() + 1,
    'd+': date.getDate(),
    'h+': date.getHours(),
    'm+': date.getMinutes(),
    's+': date.getSeconds()
  }
  for (const k in o) {
    if (new RegExp(`(${k})`).test(fmt)) {
      const str = o[k] + ''
      fmt = fmt.replace(RegExp.$1, (RegExp.$1.length === 1) ? str : padLeftZero(str))
    }
  }
  return fmt
}
聘用形式需要改成文字形式,这个文件在src\api\constant\employees.js下,需要导入
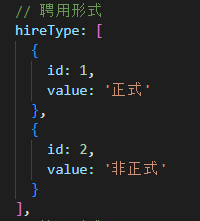
1对应正式,2对应非正式
import EmployeeEnum from '@/api/constant/employees' // 员工信息的枚举
 formatList(headers, rows) {
      // console.log(rows)// [{},{},{}]
      // 需要把 [{ username: '张三', mobile: '13811111111', ...},{},{}]  => [[’张三', '13811111111',...],[],[]]
      // 需要把每个对象里的value取出来组成数组,所以需要把每个对象里的key找到

      return rows.map(item => {
        // item是每个员工信息的对象
        return Object.keys(headers).map(key => { // key是手机号,姓名..
          if (headers[key] === 'timeOfEntry' || headers[key] === 'correctionTime') {
            return formatDate(item[headers[key]])
          } else if (headers[key] === 'formOfEmployment') {
            const isRepeat = EmployeeEnum.hireType.find(obj => {
              // 查找数组中符合条件的第一个元素
              return obj.id === item[headers[key]]
            })
            return isRepeat ? isRepeat.value : '未知'
          }
            // headers[key]是mobile,username
            return item[headers[key]]

        })
      })
    }
复杂表头的导出(拓展)
需要添加两个额外的参数
参数 |
说明 |
类型 |
可选值 |
默认值 |
multiHeader |
复杂表头的部分 |
Array |
/ |
[[]] |
merges |
需要合并的部分 |
Array |
/ |
[] |
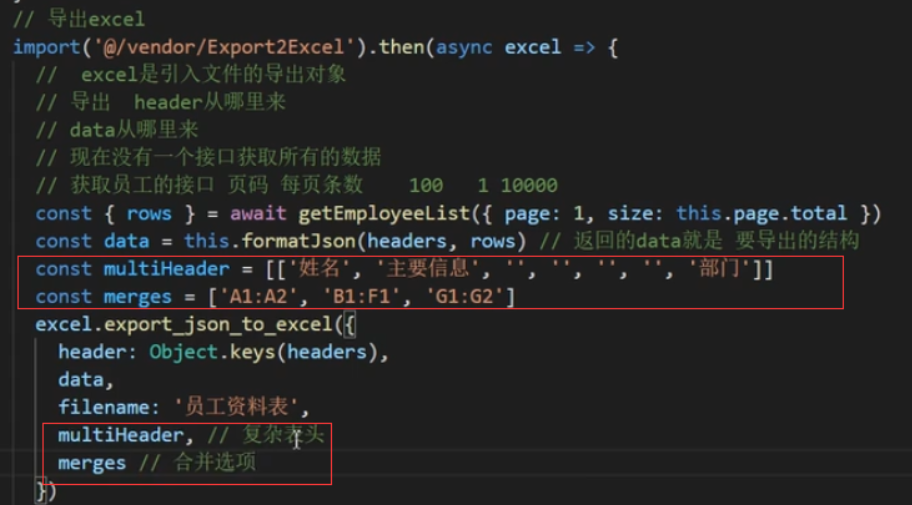
multiHeader里面是一个二维数组,里面的一个元素是一行表头,假设你想得到一个如图的结构

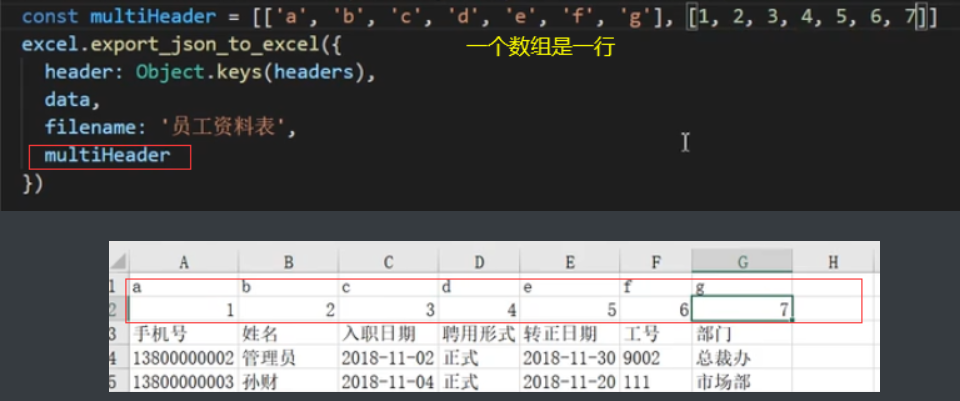
const multiHeader = [['姓名', '主要信息', '', '', '', '', '部门']]

const header = ['姓名', '手机号', '入职日期', '聘用形式', '转正日期', '工号', '部门']
multiHeader中的一行表头中的字段的个数需要和真正的列数相等,假设想要跨列,多余的空间需要定义成空串
它主要对应的是标准的表头
如果,我们要实现其合并的效果, 需要设定merges选项
const merges = ['A1:A2', 'B1:F1', 'G1:G2']merges的顺序是没关系的,只要配置这两个属性,就可以导出复杂表头的excel了