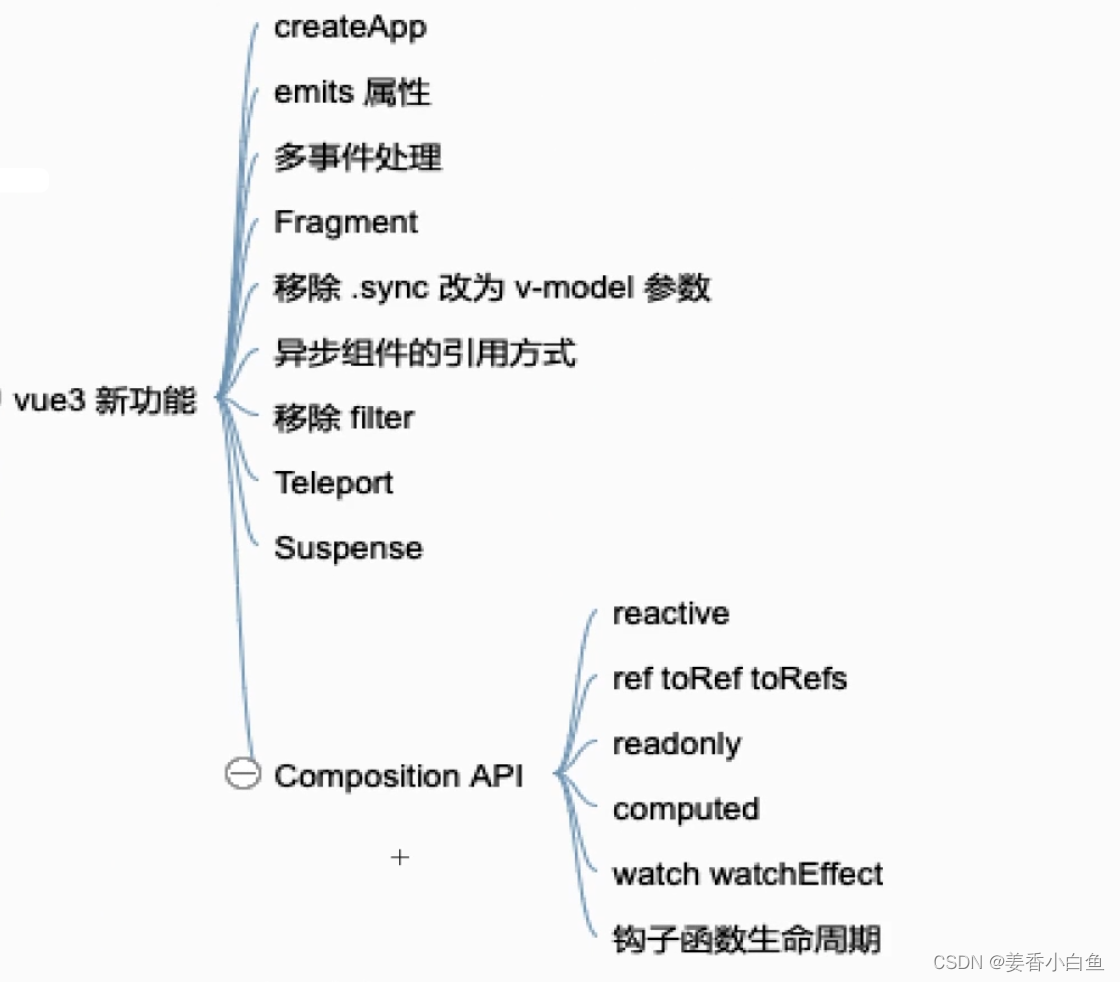
VUE3模块
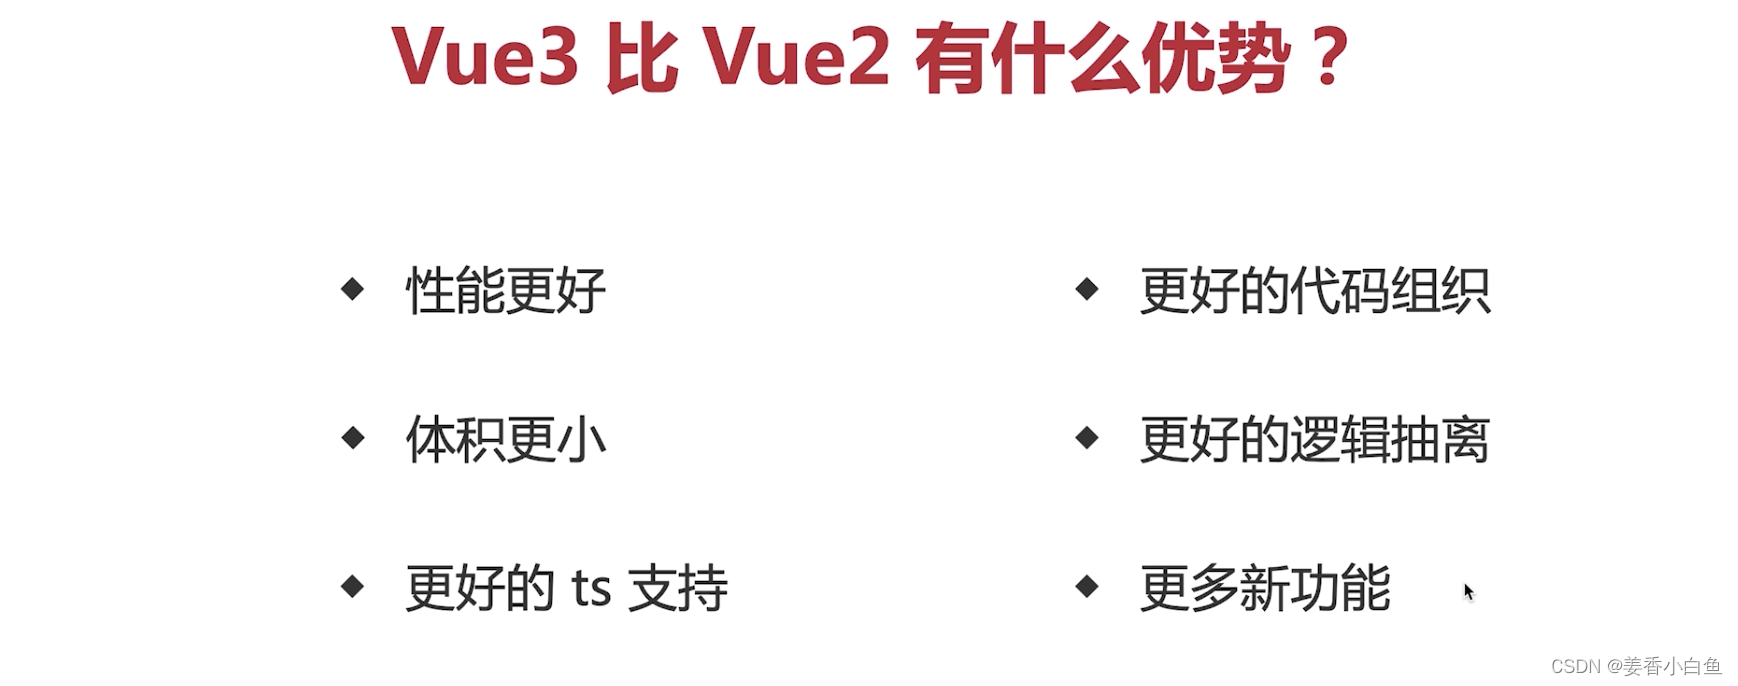
1. VUE3 比 VUE2 有什么优势?
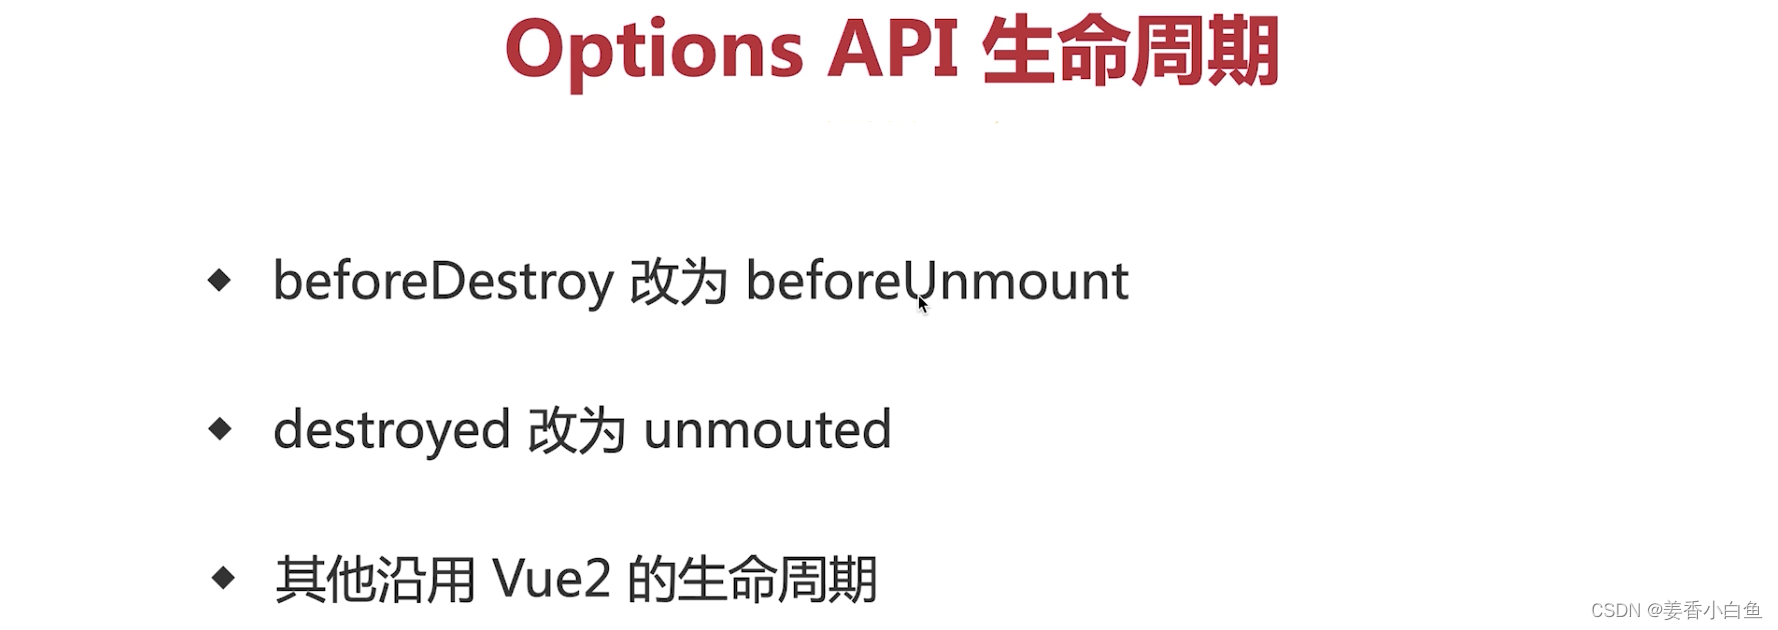
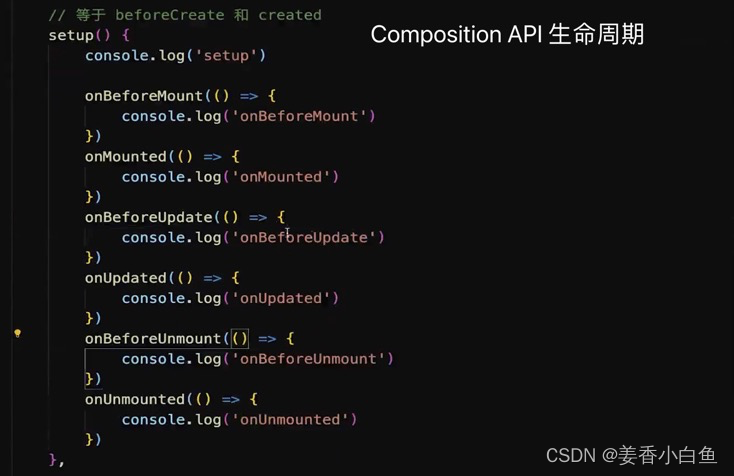
2. VUE3 生命周期

3. ref 、toRef、reactive、toRefs示例
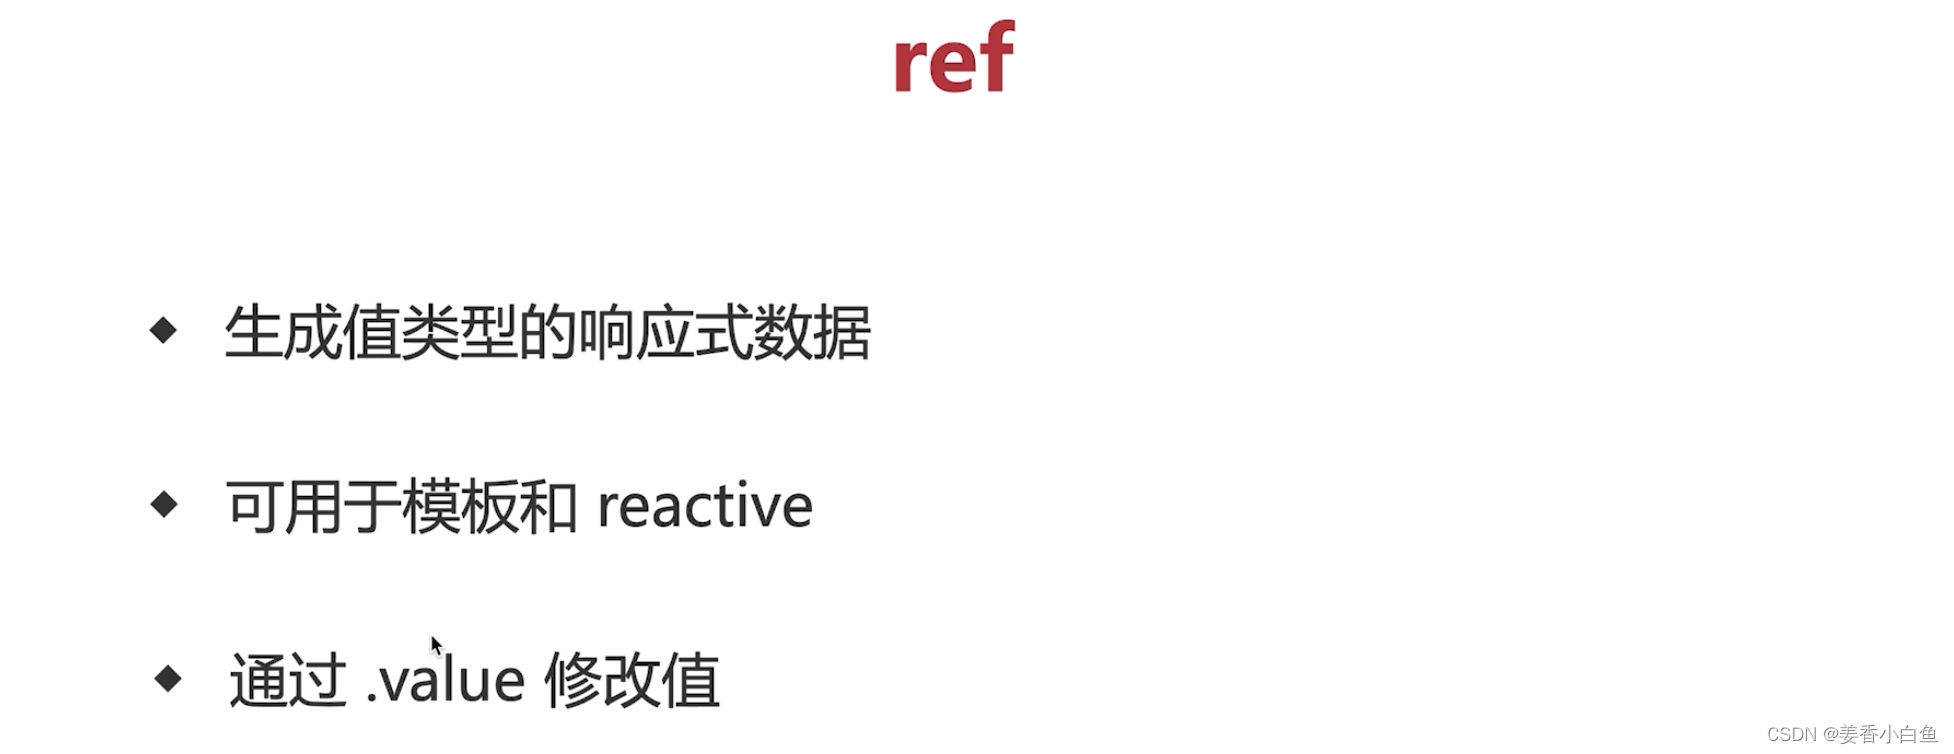
ref 示例
<template>
  <p>ref demo {

    {

     ageRef }}{

    {

     state.name }}</p>
</template>
<script>
import {

     reactive, ref } from 'vue'
export default {


  name: 'Ref',
  setup() {


    const ageRef = ref(20) // 值类型 响应式
    const nameRef = ref('ref的使用')

    const state = reactive({


      name: nameRef,
    })

    setTimeout(() => {


      console.log('ageRef', ageRef.value) // 1.5s后 ageRef 25

      ageRef.value = 25 // .value 修改值
      nameRef.value = '除template模版和reactive中,其他地方都使用.value'
    }, 1500)
    return {


      ageRef,
      state,
    }
  },
}
</script>
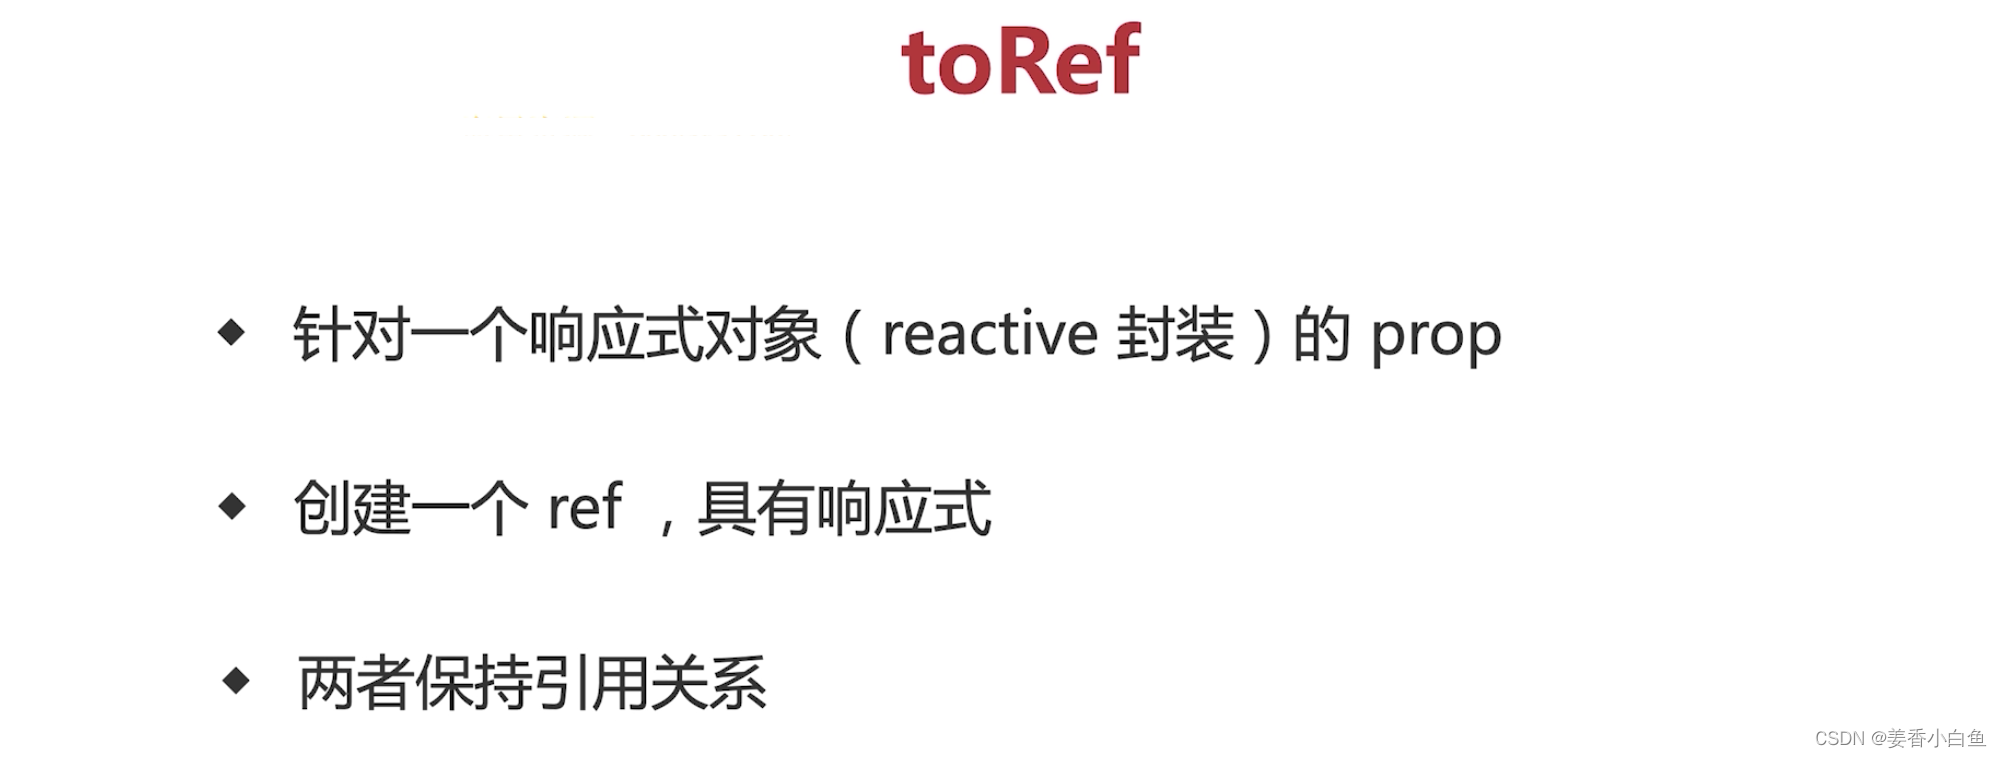
toRef 示例
<template>
  <p>toRef demo --- {

    {

     ageRef }} -- {

    {

     state.name }} {

    {

     state.age }}</p>
</template>

<script>
import {

     toRef } from 'vue'

export default {


  name: 'toRef',
  setup() {


    const state = reactive({


      // 普通对象想实现响应式用 reactive
      age: 20,
      name: 'toRef的使用',
    })

    // toRef 如果用于普通对象(非响应式对象),产出的结果不具备响应式
    // const state = {


    //   age: 20,
    //   name: '普通对象,不具备响应式',
    // }

    // reactive 中的某一个属性想要 单独拿出来 实现响应式 使用 toRef
    const ageRef = toRef(state, 'age') // 引用 state 中的 age属性

    setTimeout(() => {


      state.age = 25
    }, 1500)

    setTimeout(() => {


      ageRef.value = 30 // .value 修改值
    }, 3000)

    return {


      ageRef,
      state,
    }
  }
}
</script>
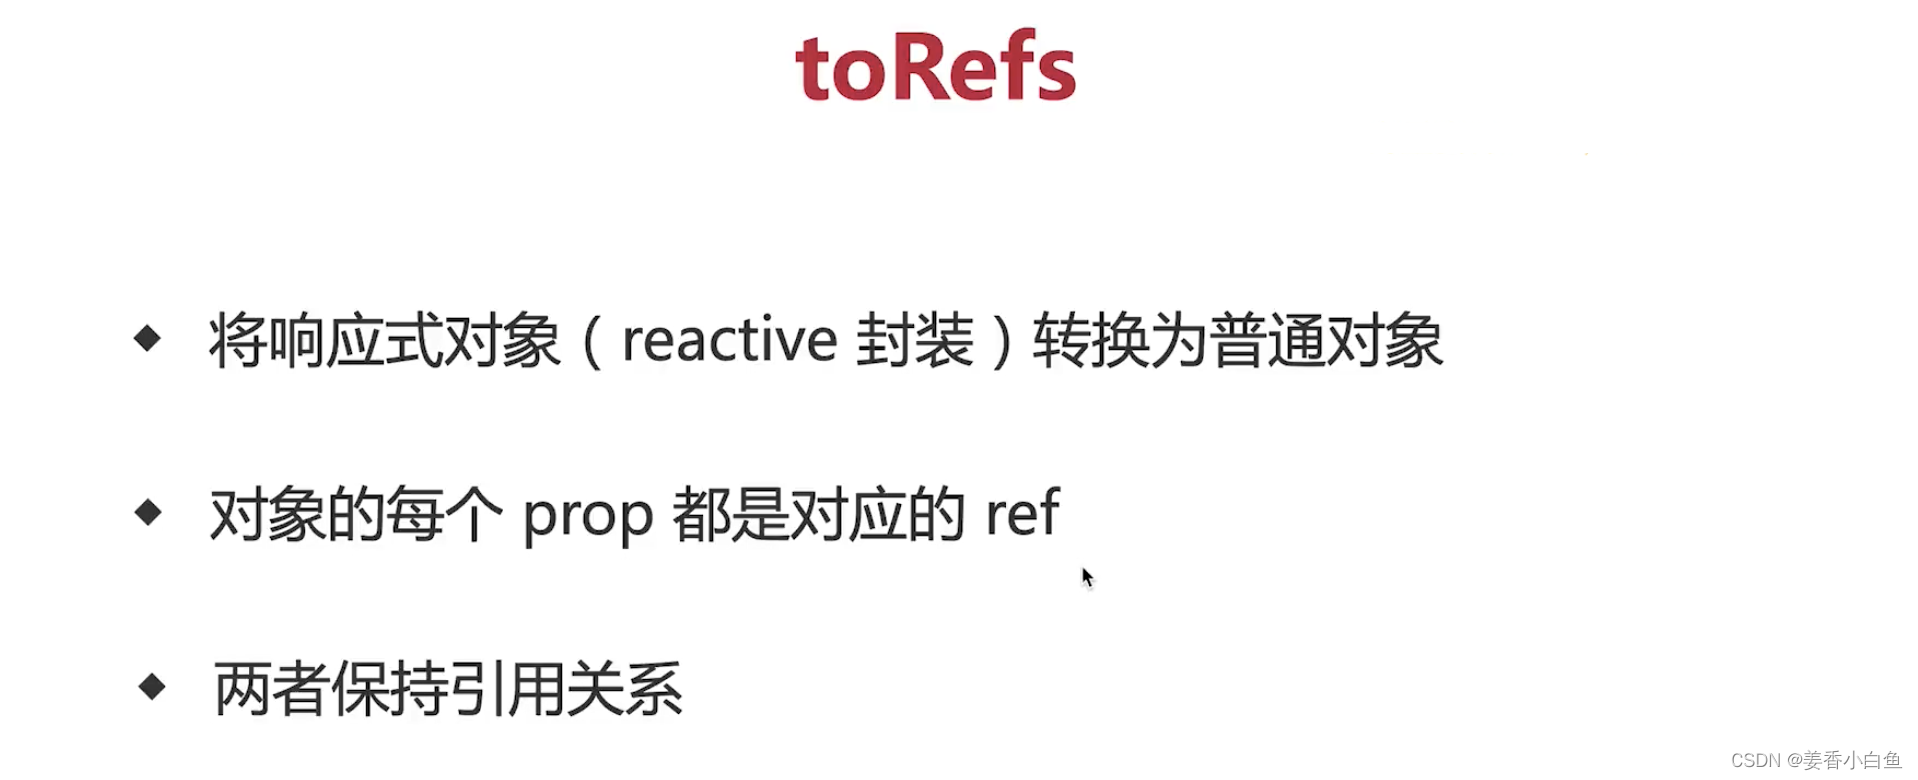
toRefs 示例
<template>
  <p>toRefs demo {

    {

     age }}{

    {

     name }}</p>
</template>

<script>
import {

     toRefs ,reactive} from 'vue'

export default {


  name: 'toRefs',
  setup() {


    const state = reactive({


      age: 20,
      name: 'toRefs示例',
    })

    const stateAsRefs = toRefs(state) // 将响应式对象,变成普通对象

    // 每个属性,都是 ref对象。 因此取出 age 要使用 Ref 结尾命名
    // const { age: ageRef, name: nameRef } = stateAsRefs
    // return {


    //   然后 return 上面命名的 ageRef, 模版中使用 {

    {ageRef}}
    //   ageRef,
    //   nameRef,
    // }
    //  此时一旦 state中的属性多了,需要给每一个都命名,不利用维护.

    setTimeout(() => {


      console.log('如果直接...state,会失去响应式。而使用toRefs没事')
      state.age = 25
    }, 1500)
    // 因此这样 更加方便直观
    return {


      // ...state | 如果直接使用 ...state ,模版中 {

    {name}} 会丢失响应式
      // state | 如果这样使用 state,模版中 需要{

    {state.name}} 不会丢失响应式,但是很繁琐
      ...stateAsRefs, // = return stateAsRefs 这种写法
    }
  },
}
</script>
-
toRef 是针对 state中的 某一个属性 -
toRefs 是针对 state 中的 所有属性
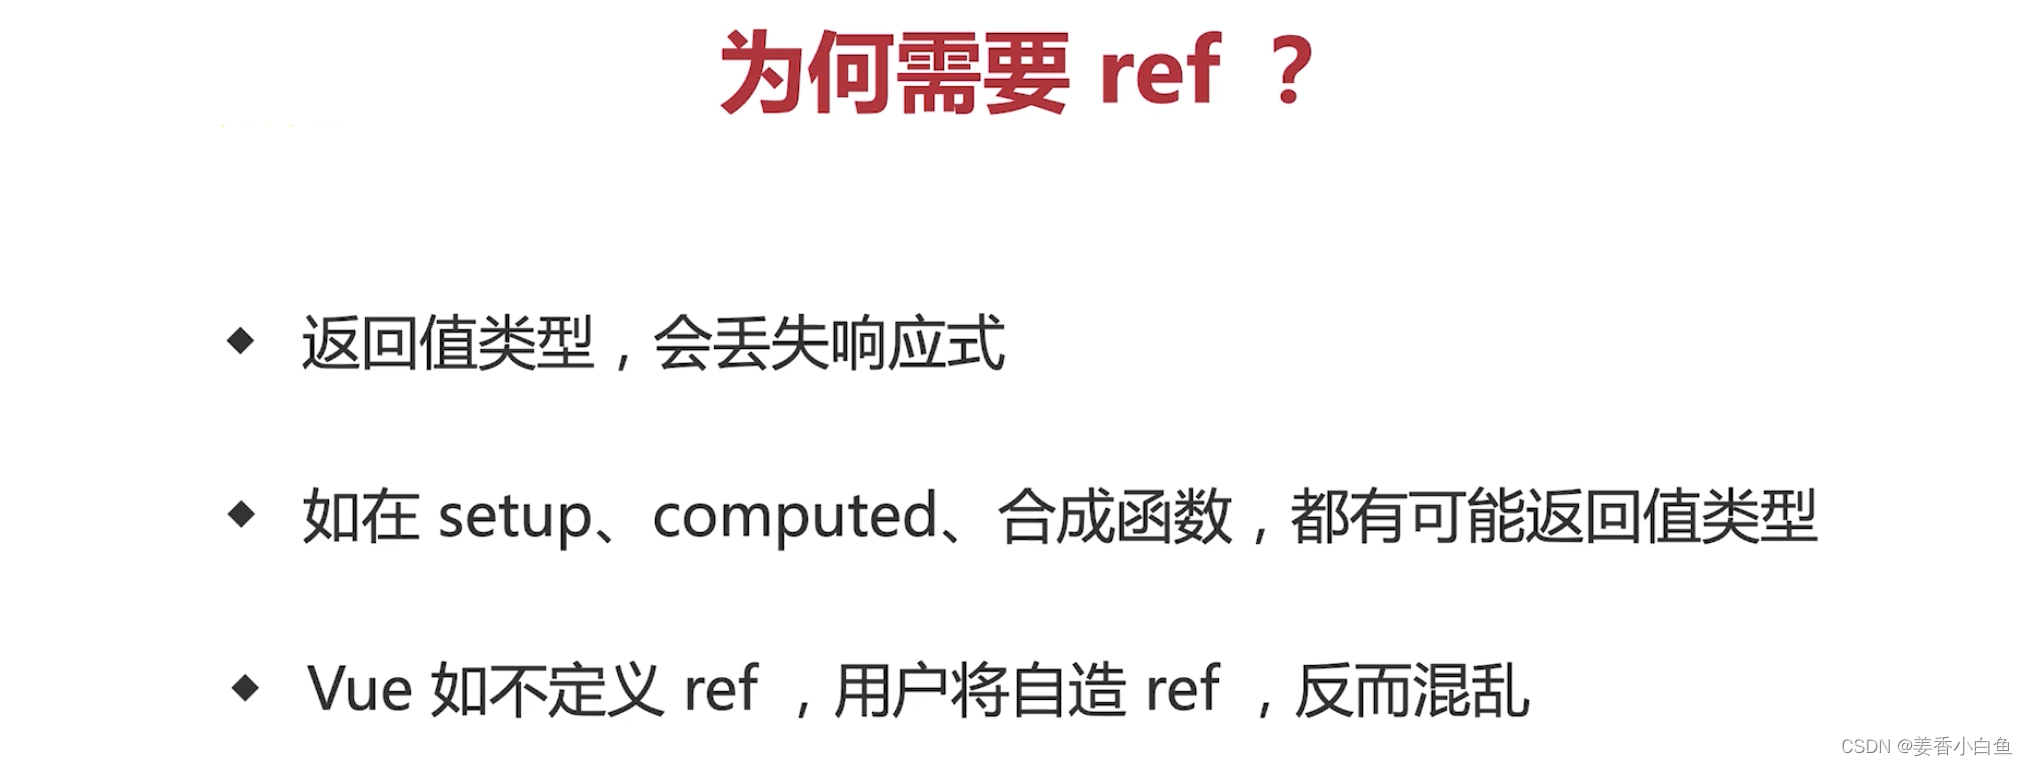
4. 进阶,深入理解ref
为何需要 ref ?
不具备响应式 – 示例
<template>
  <p>
    why ref demo {

    {

     age1 }}-[...state会丢失响应式],|
    {

    {

     state.age }}-[具备响应式]
  </p>
</template>

<script>
import {

     reactive } from 'vue'

export default {


  name: 'WhyRef',
  setup() {


    // Proxy 对象(针对对象才具备响应式)
    const state = reactive({


      age: '20',
      name: 'reactive针对对象,ref针对普通类型',
    })

    let age1 = 20 // 普通值类型,不具备响应式

    setTimeout(() => {


      console.log('普通值类型数据,并不具备响应式')
      age1 = 25 // 普通值类型 不具备响应式
      state.age = 25 // = let age = 25 不具备响应式
    }, 1500)

    return {


      age1, // 普通值类型 不具备响应式
      ...state, // 如果直接使用 ...state ,模版中 {

    {age}} 会丢失响应式
    }
  },
}
</script>
具备响应式 – 示例
<template>
<p>
why ref demo
{
{
state.age }}-[具备响应式] ,| {
{
age1 }}-[具备响应式]
</p>
</template>
<script>
import {
reactive } from 'vue'
export default {
name: 'WhyRef',
setup() {
// Proxy 对象(针对对象才具备响应式)
const state = reactive({
age: '20',
name: 'reactive针对对象,ref针对普通类型',
})
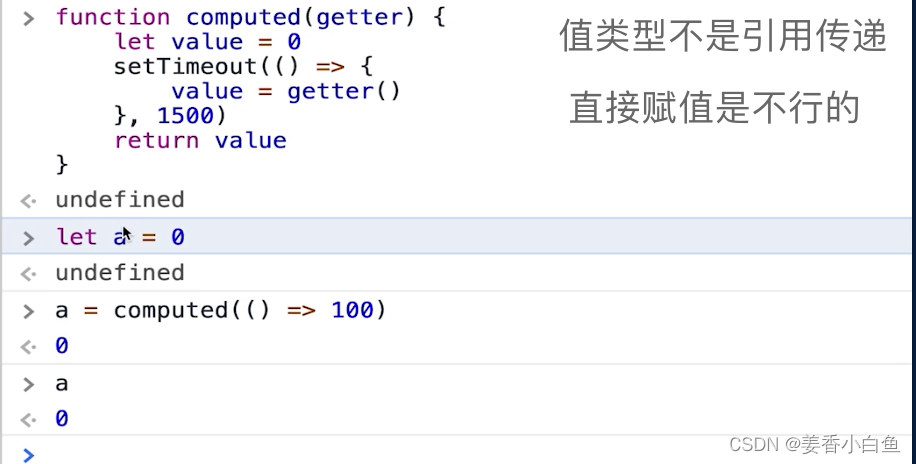
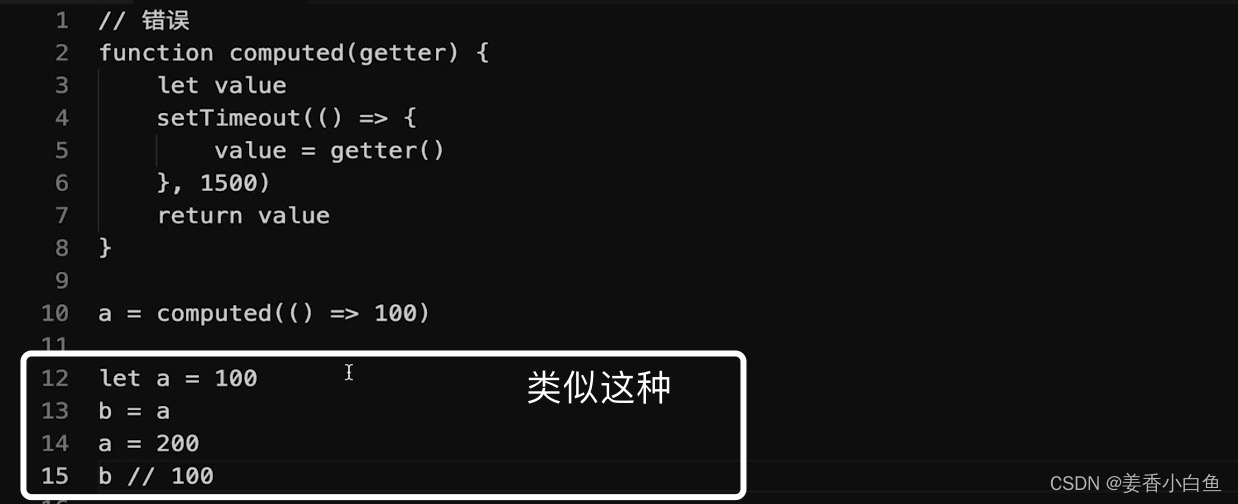
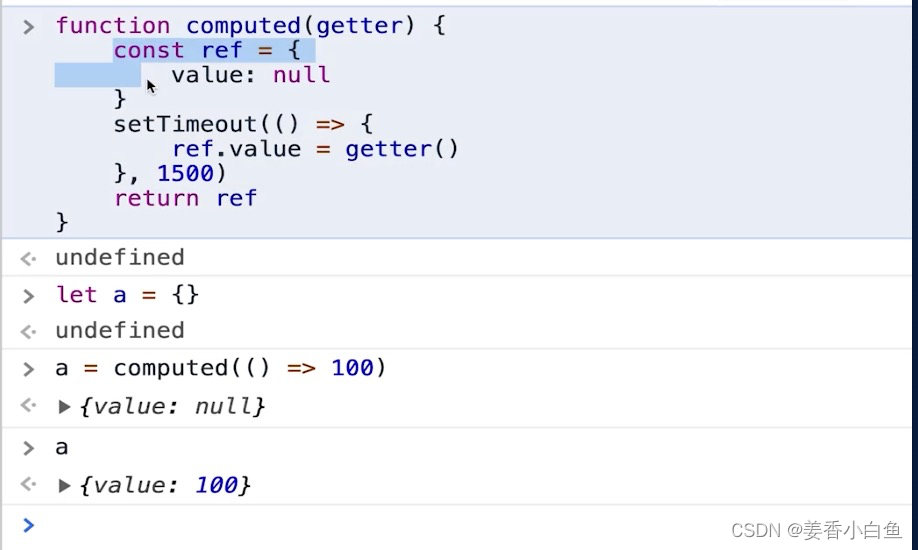
const age1 = computed(() => {
return state.age + 1
})
// computed 返回的也是一个类似 ref的值,类似ref的机制
// 也可以通过 .value来获取值,但是不要修改,computed的值不太适合修改
console.log('age1.value', age1.value)
setTimeout(() => {
state.age = 25 // = let age = 25 不具备响应式
}, 1500)
return {
state, // 模版使用 state.age具备响应式
age1, // 具备响应式
}
},
}
</script>
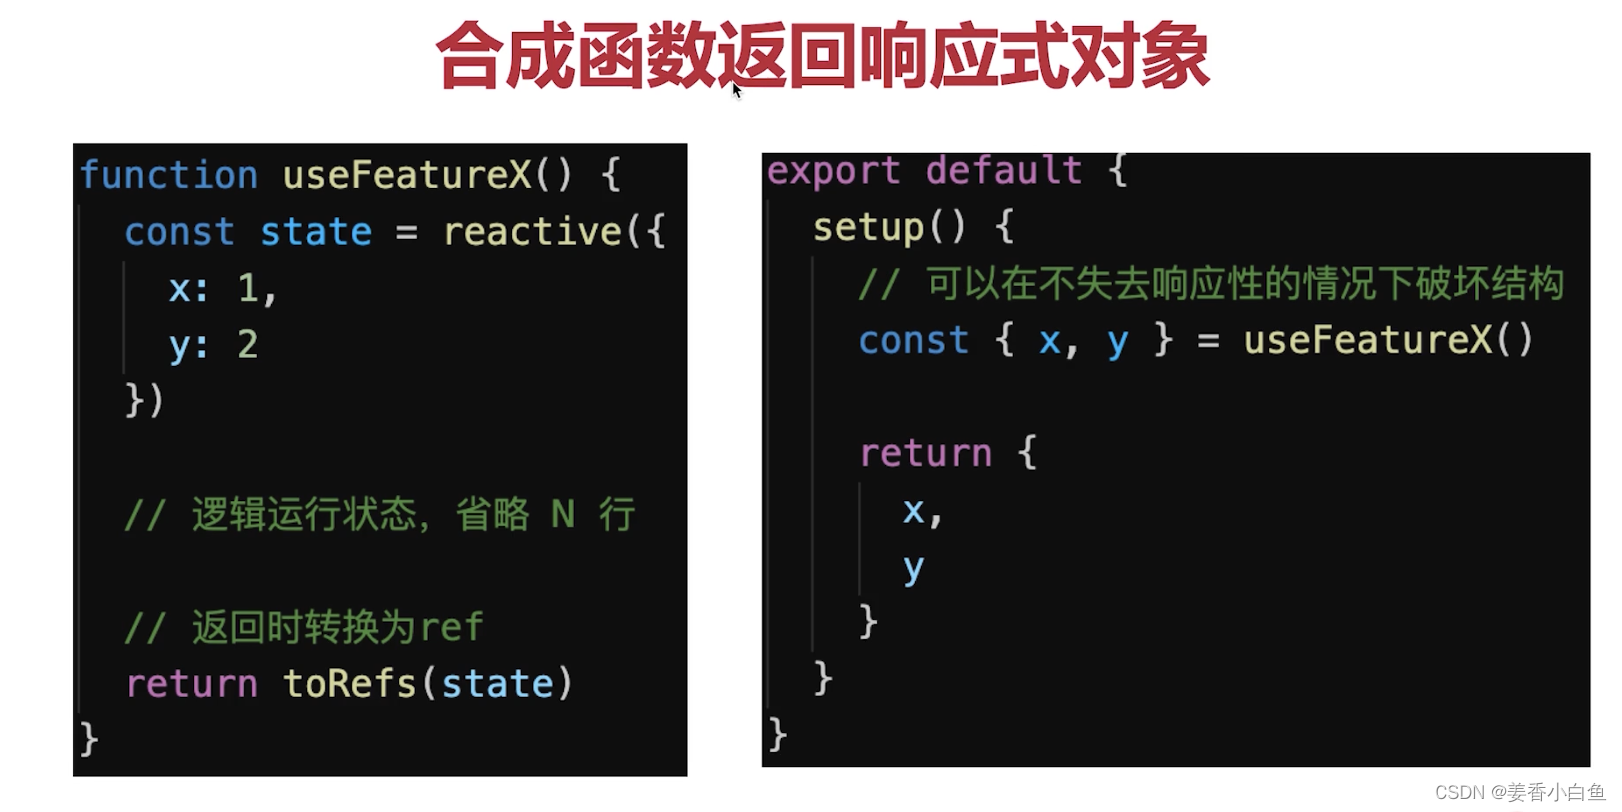
<template>
  <p>{

    {

     x }}{

    {

     y }} -- 此时具备响应式</p>
</template>

<script>
import {

     reactive, toRefs } from 'vue'

function useFeatureX() {


  const state = reactive({


    x: 1,
    y: 2,
  })
  return toRefs(state)
  // return state  模版中{

    { state1.y }} - 不进行结构需要这种方式写
}

export default {


  name: 'WhyRef',
  setup() {


    const {

     x, y } = useFeatureX()
    // const state1 = useFeatureX() 不进行结构
    return {


      // state1, // 不进行结构
    }
  },
}
</script>
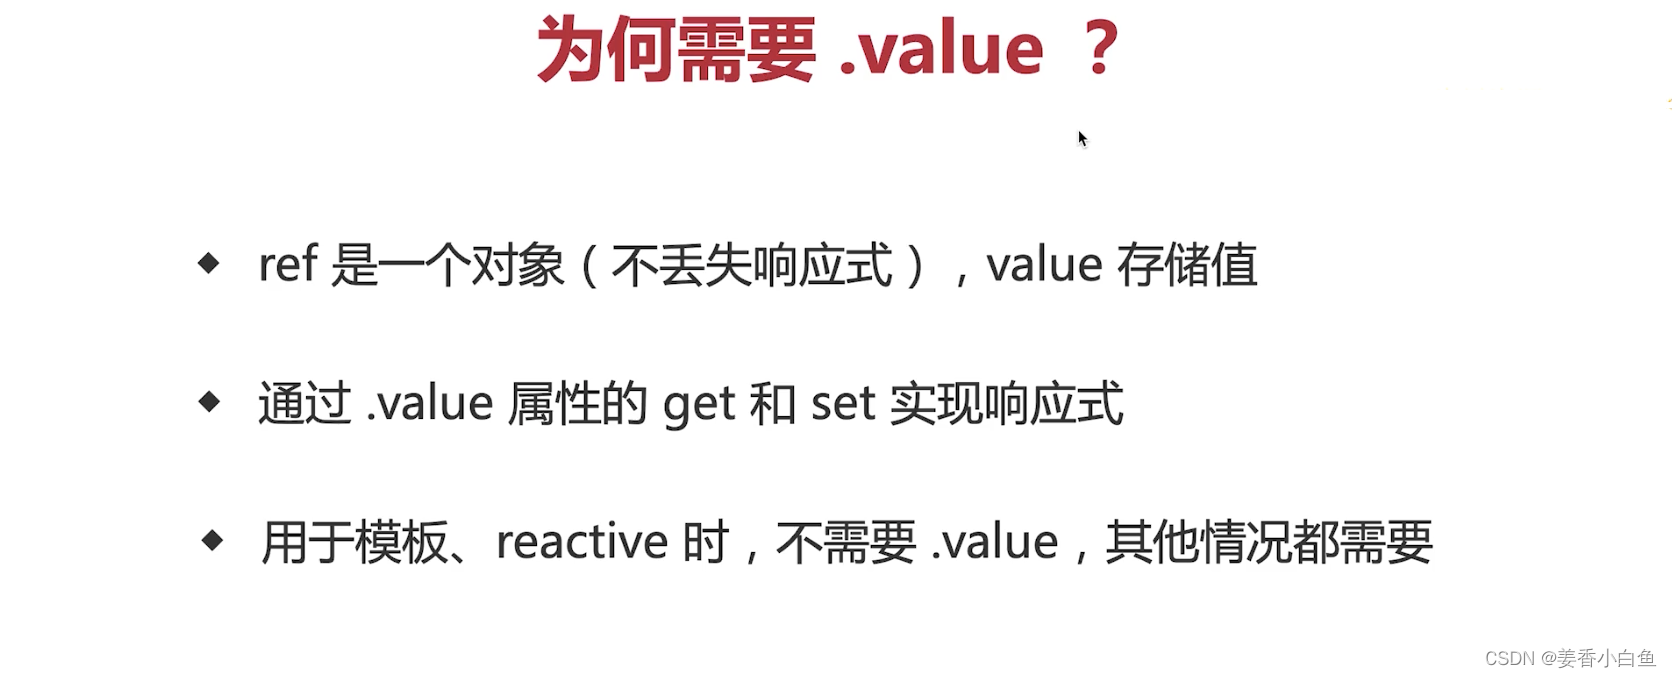
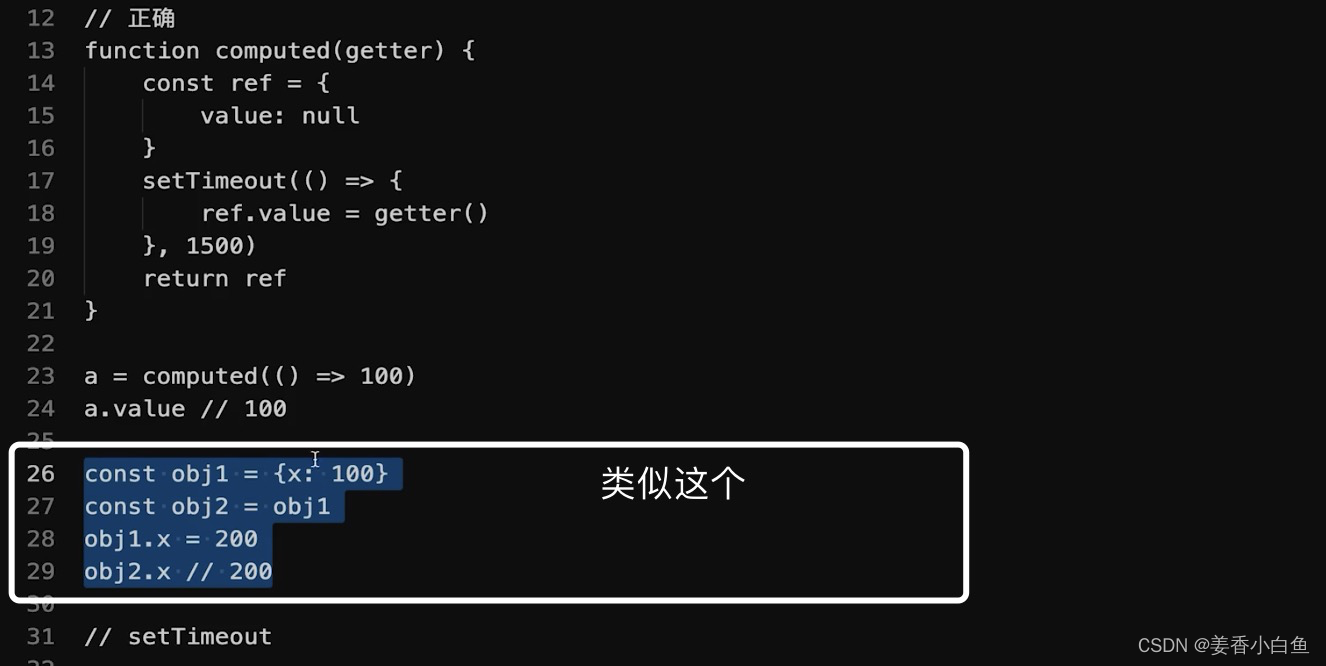
5. 为何需要 .value ?
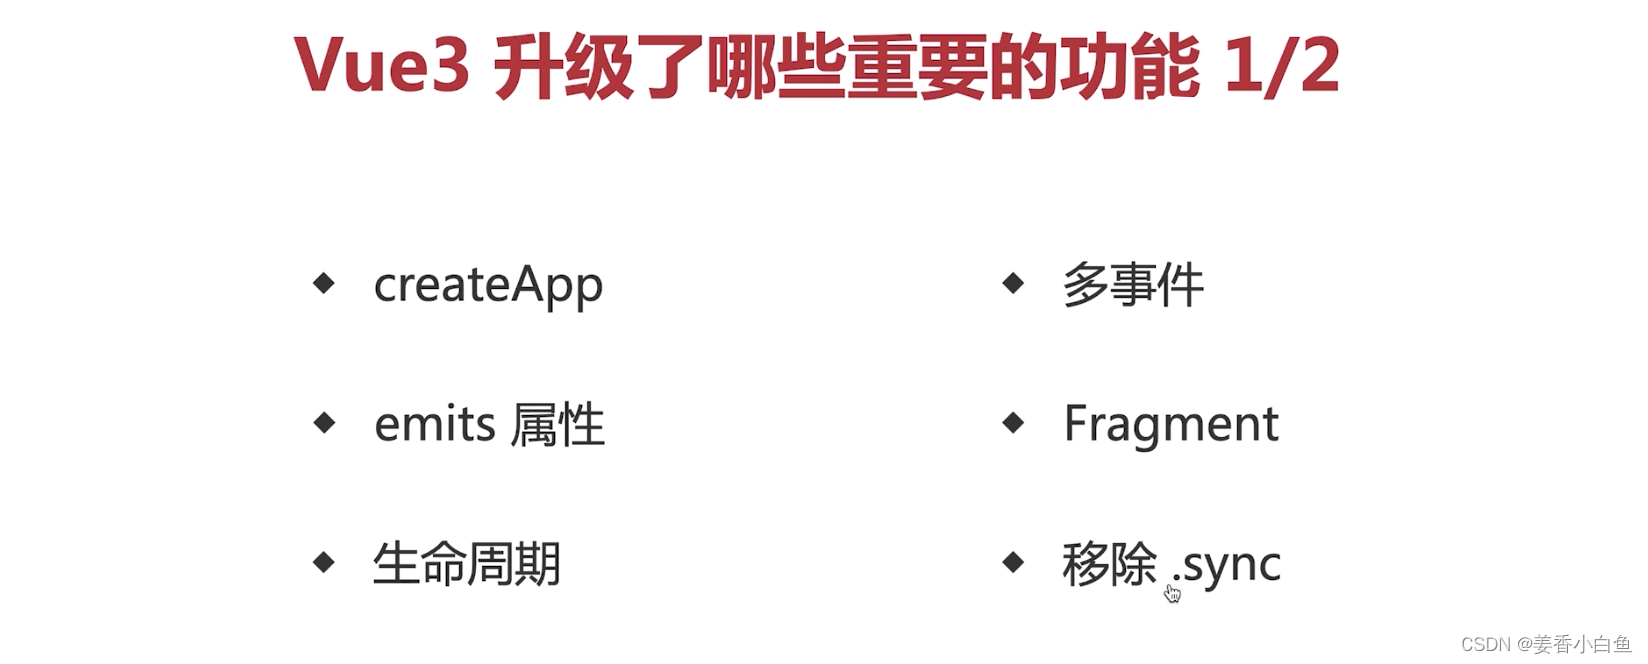
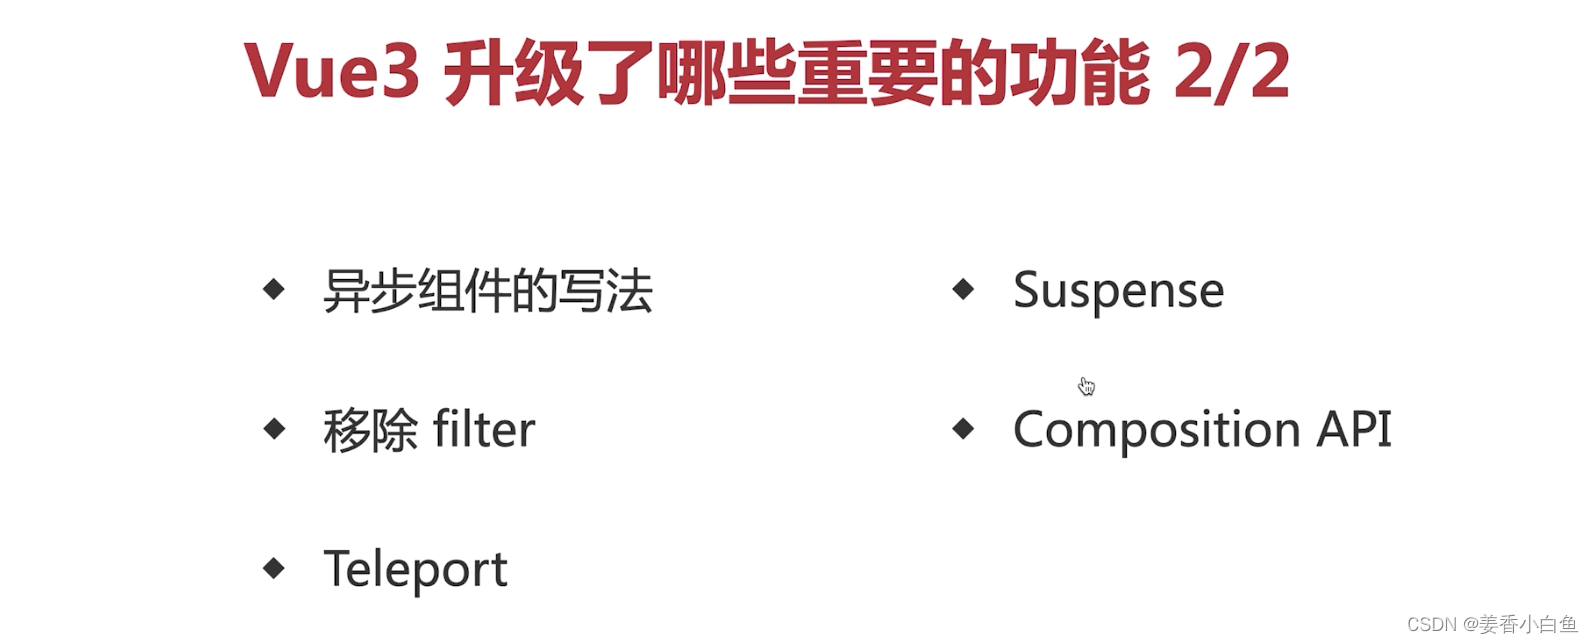
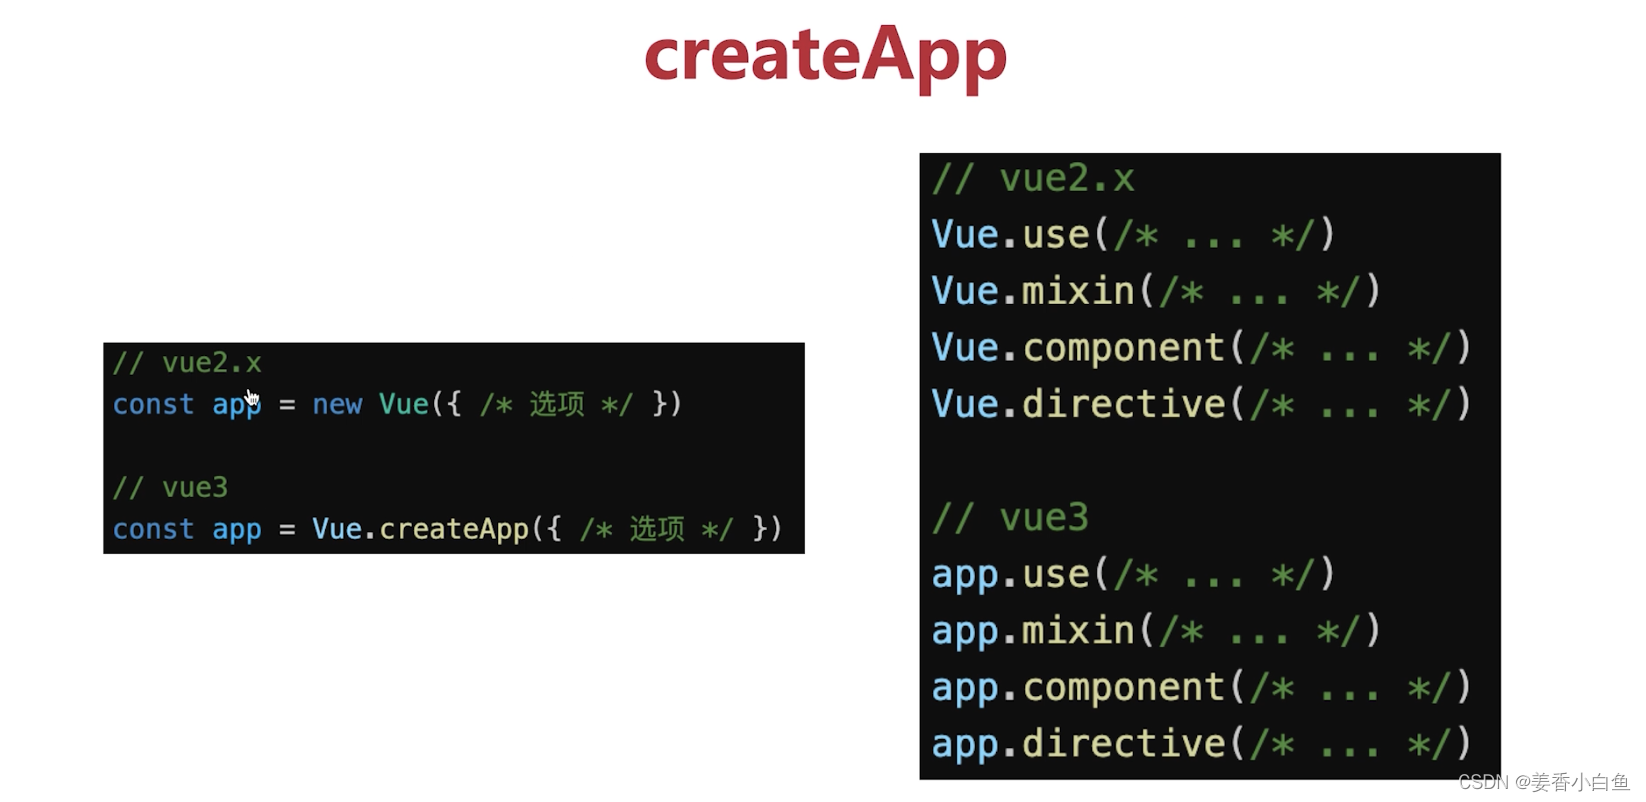
6. VUE3 升级了哪些重要的功能 ?

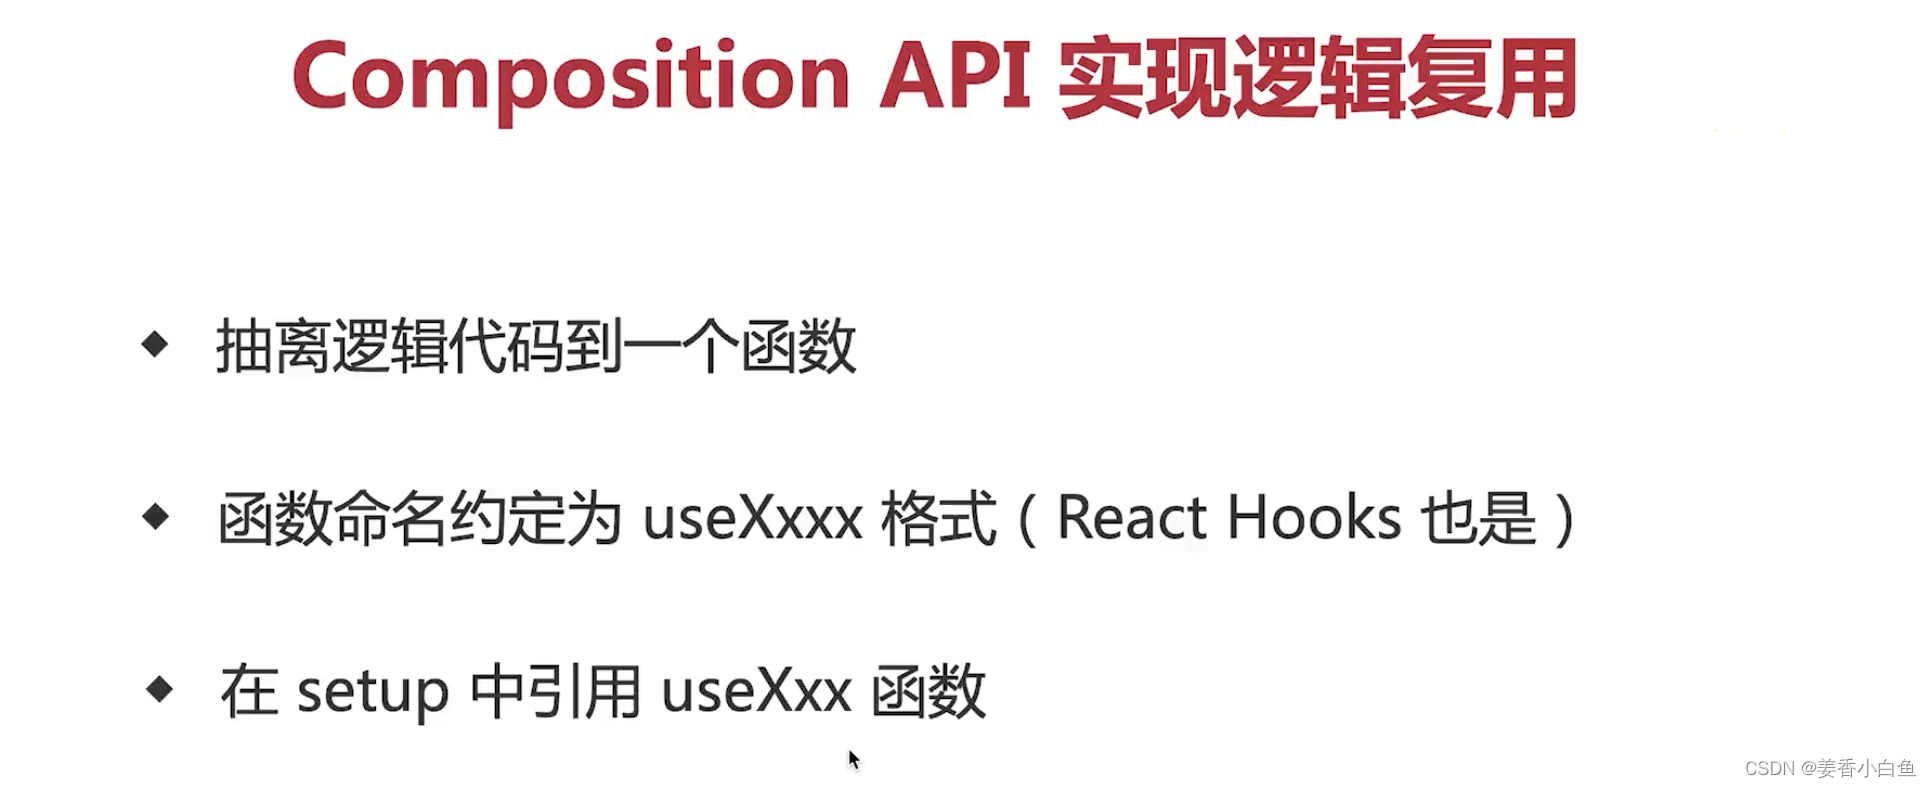
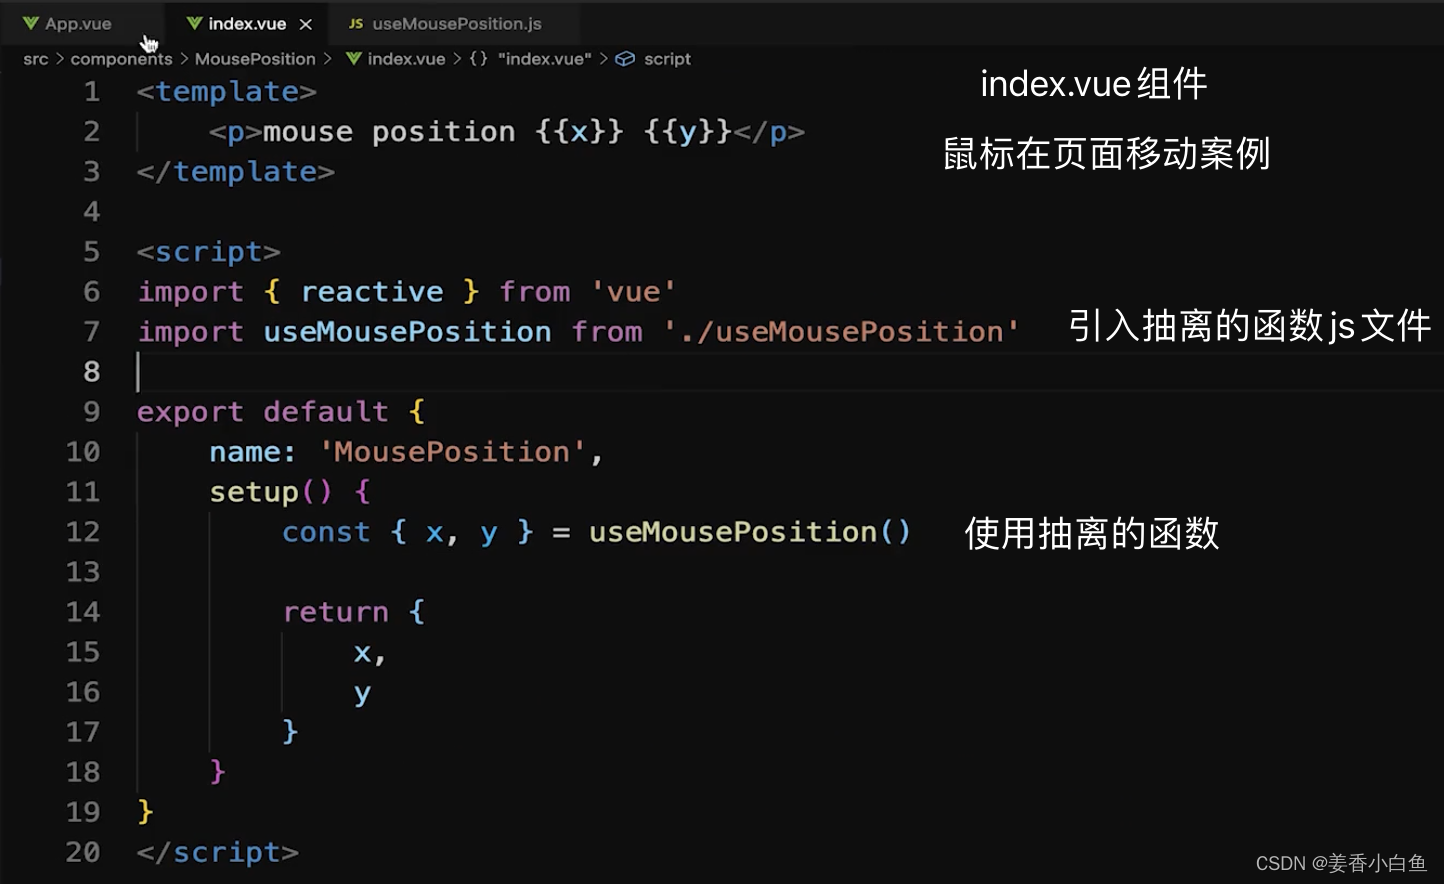
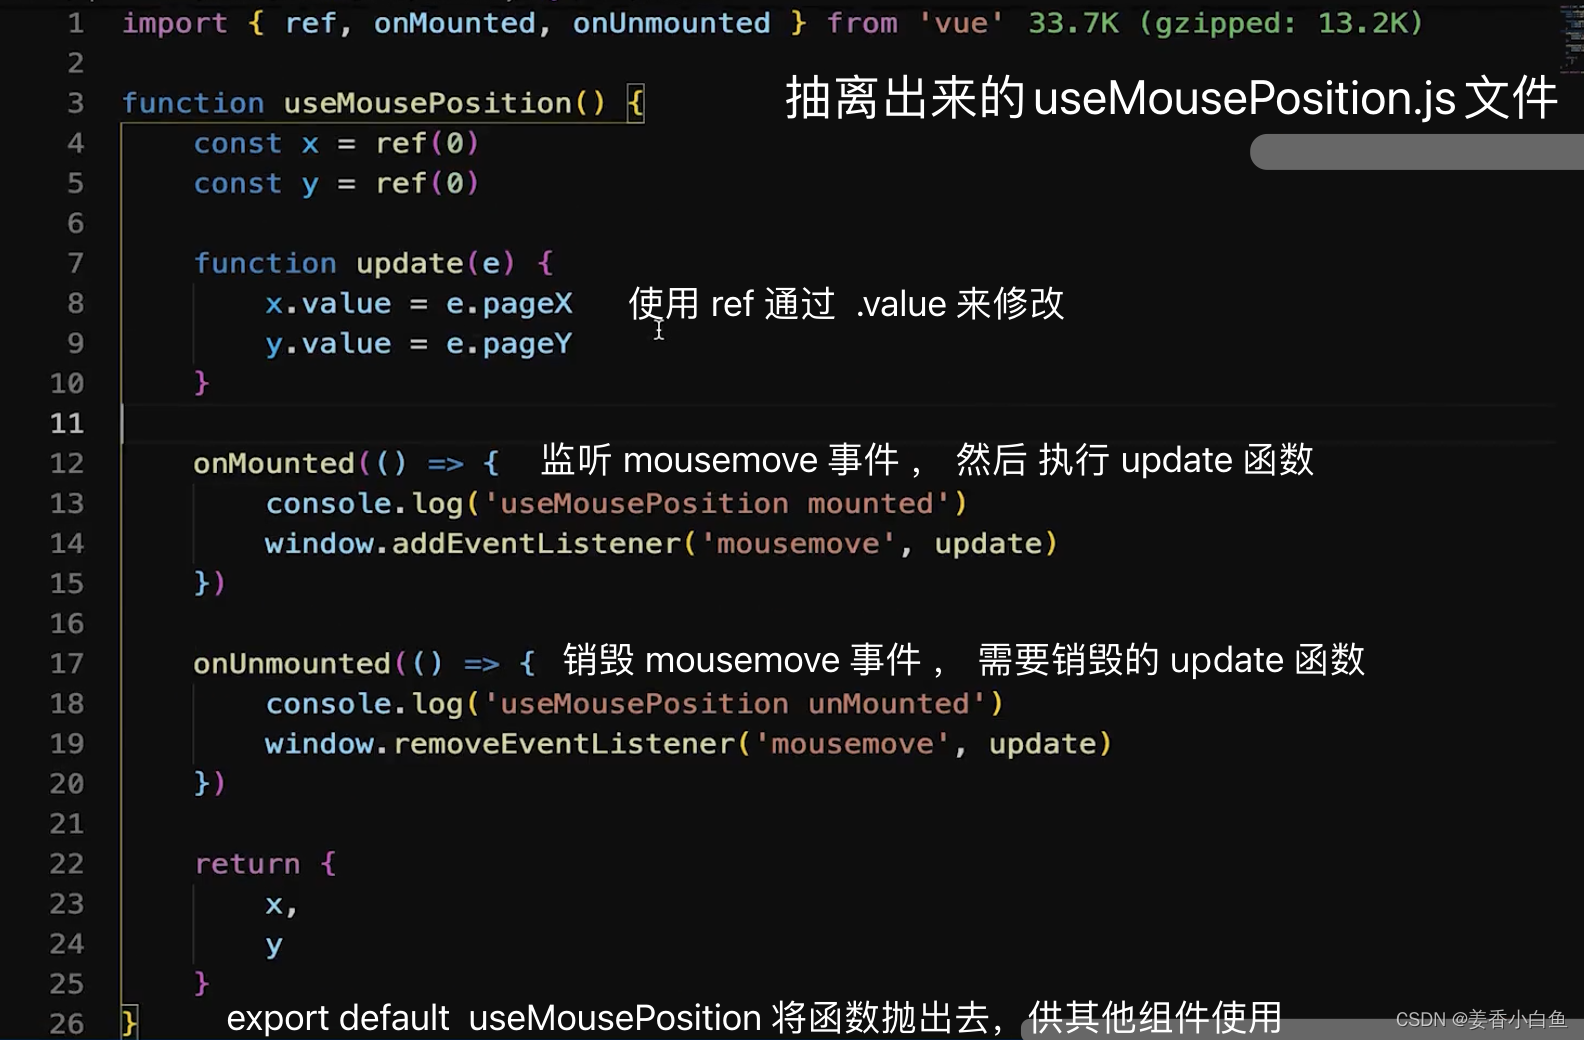
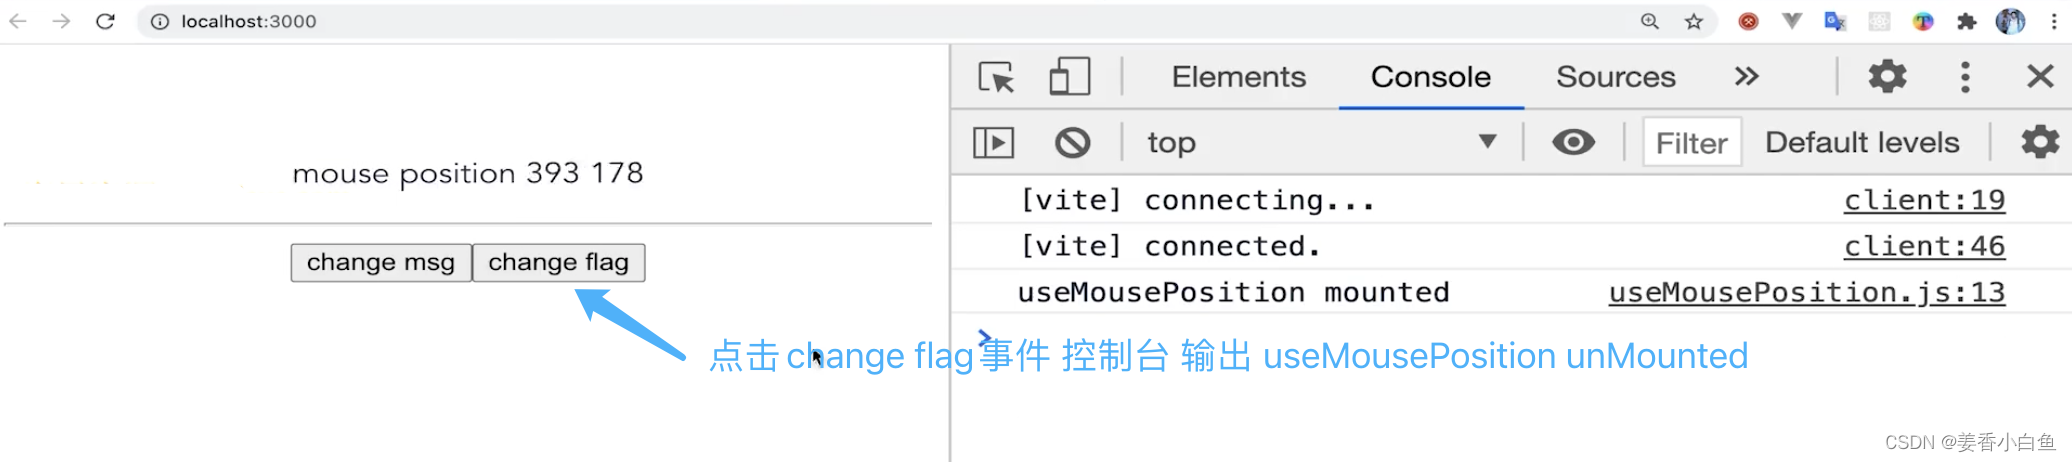
7. 怎么使用Composition API 实现逻辑复用?

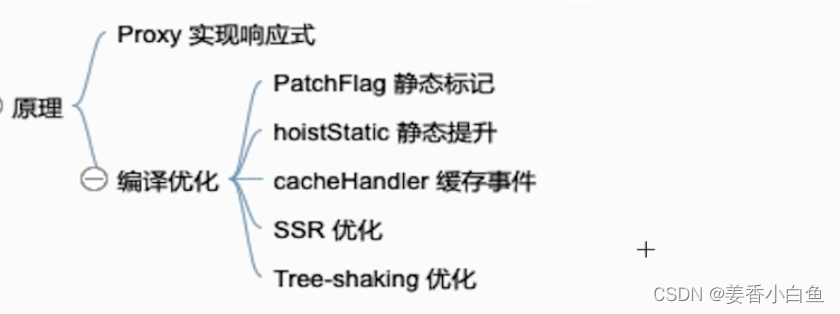
8. VUE3 如何实现响应式?
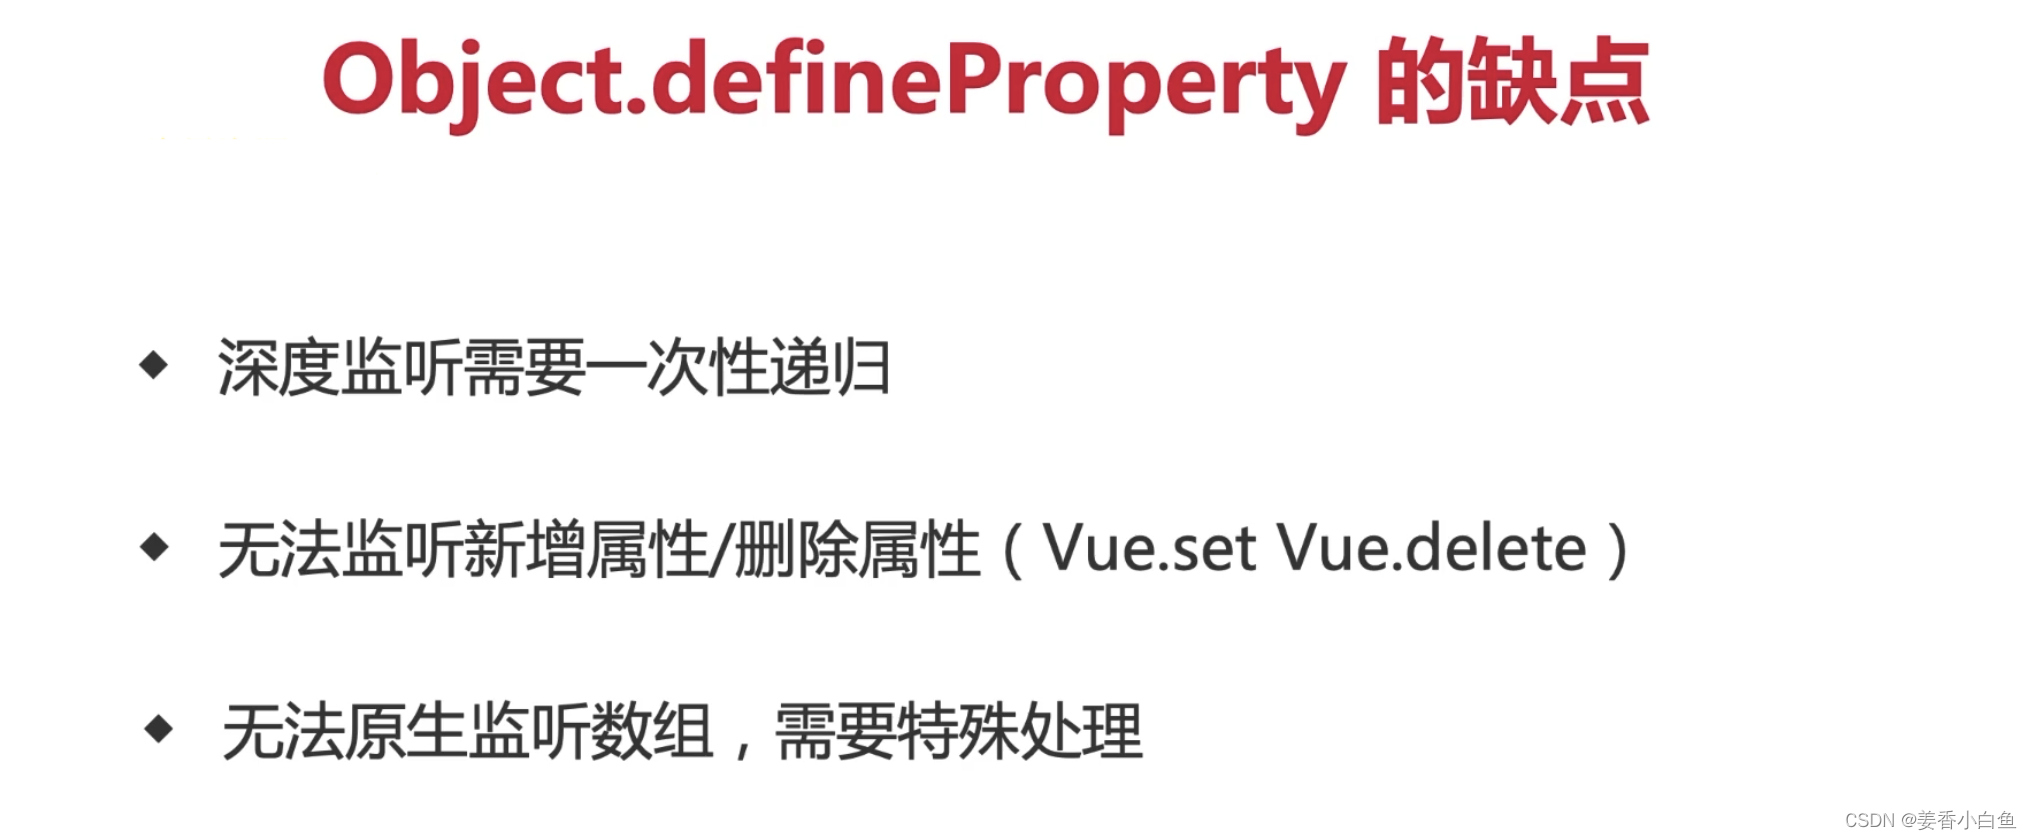
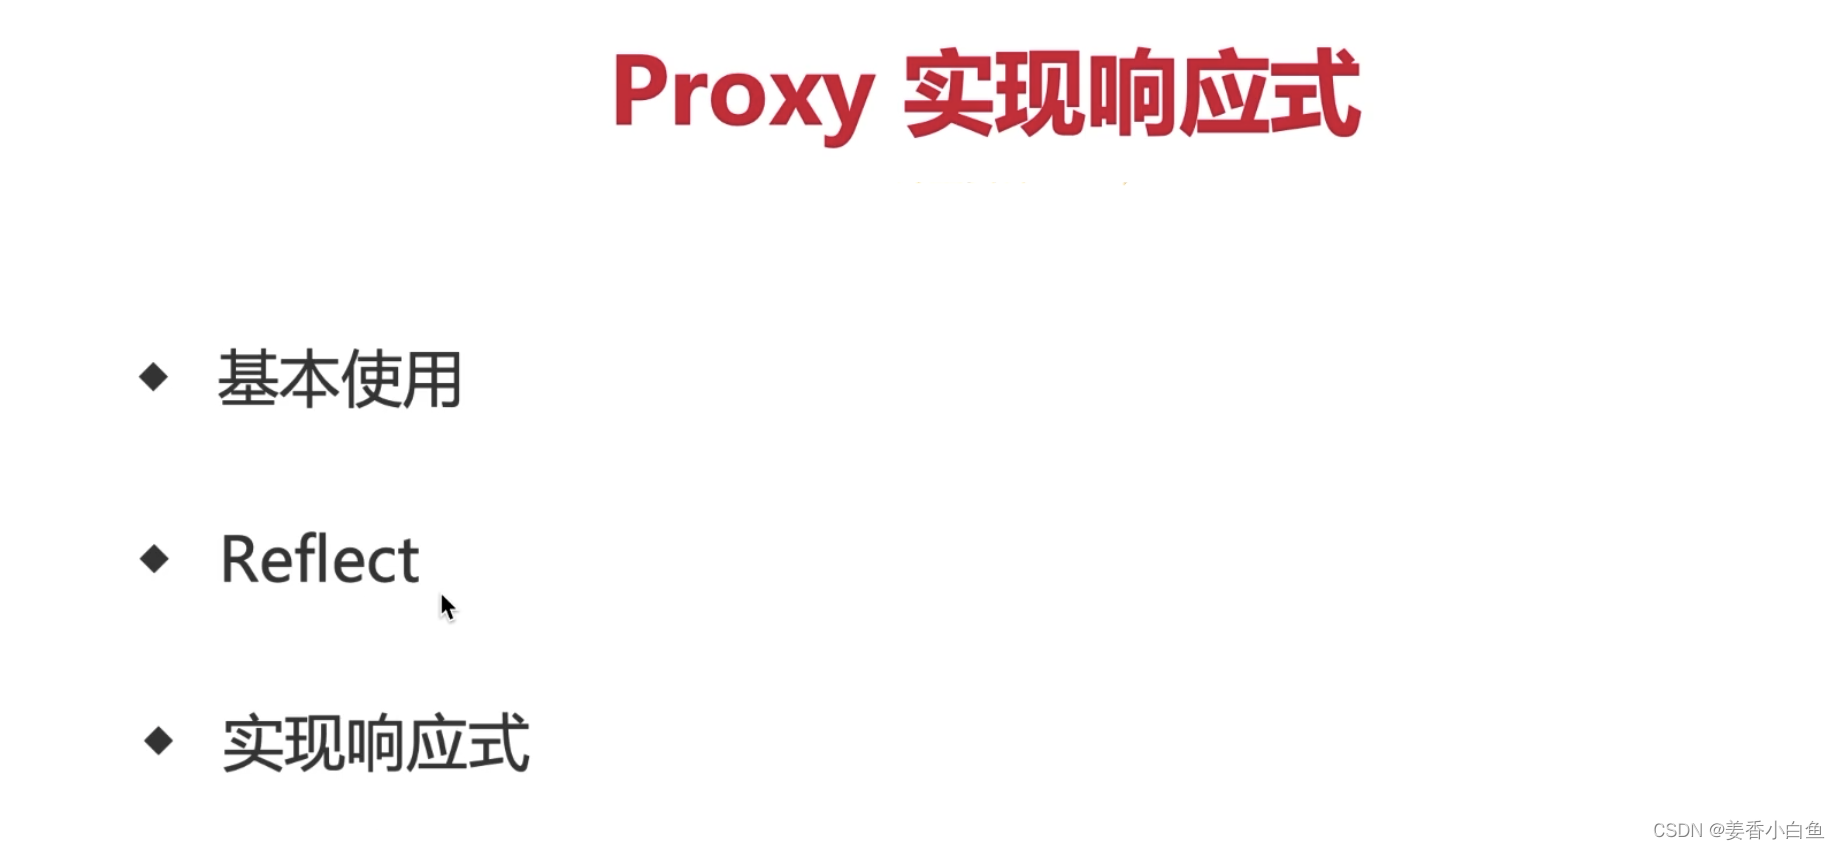
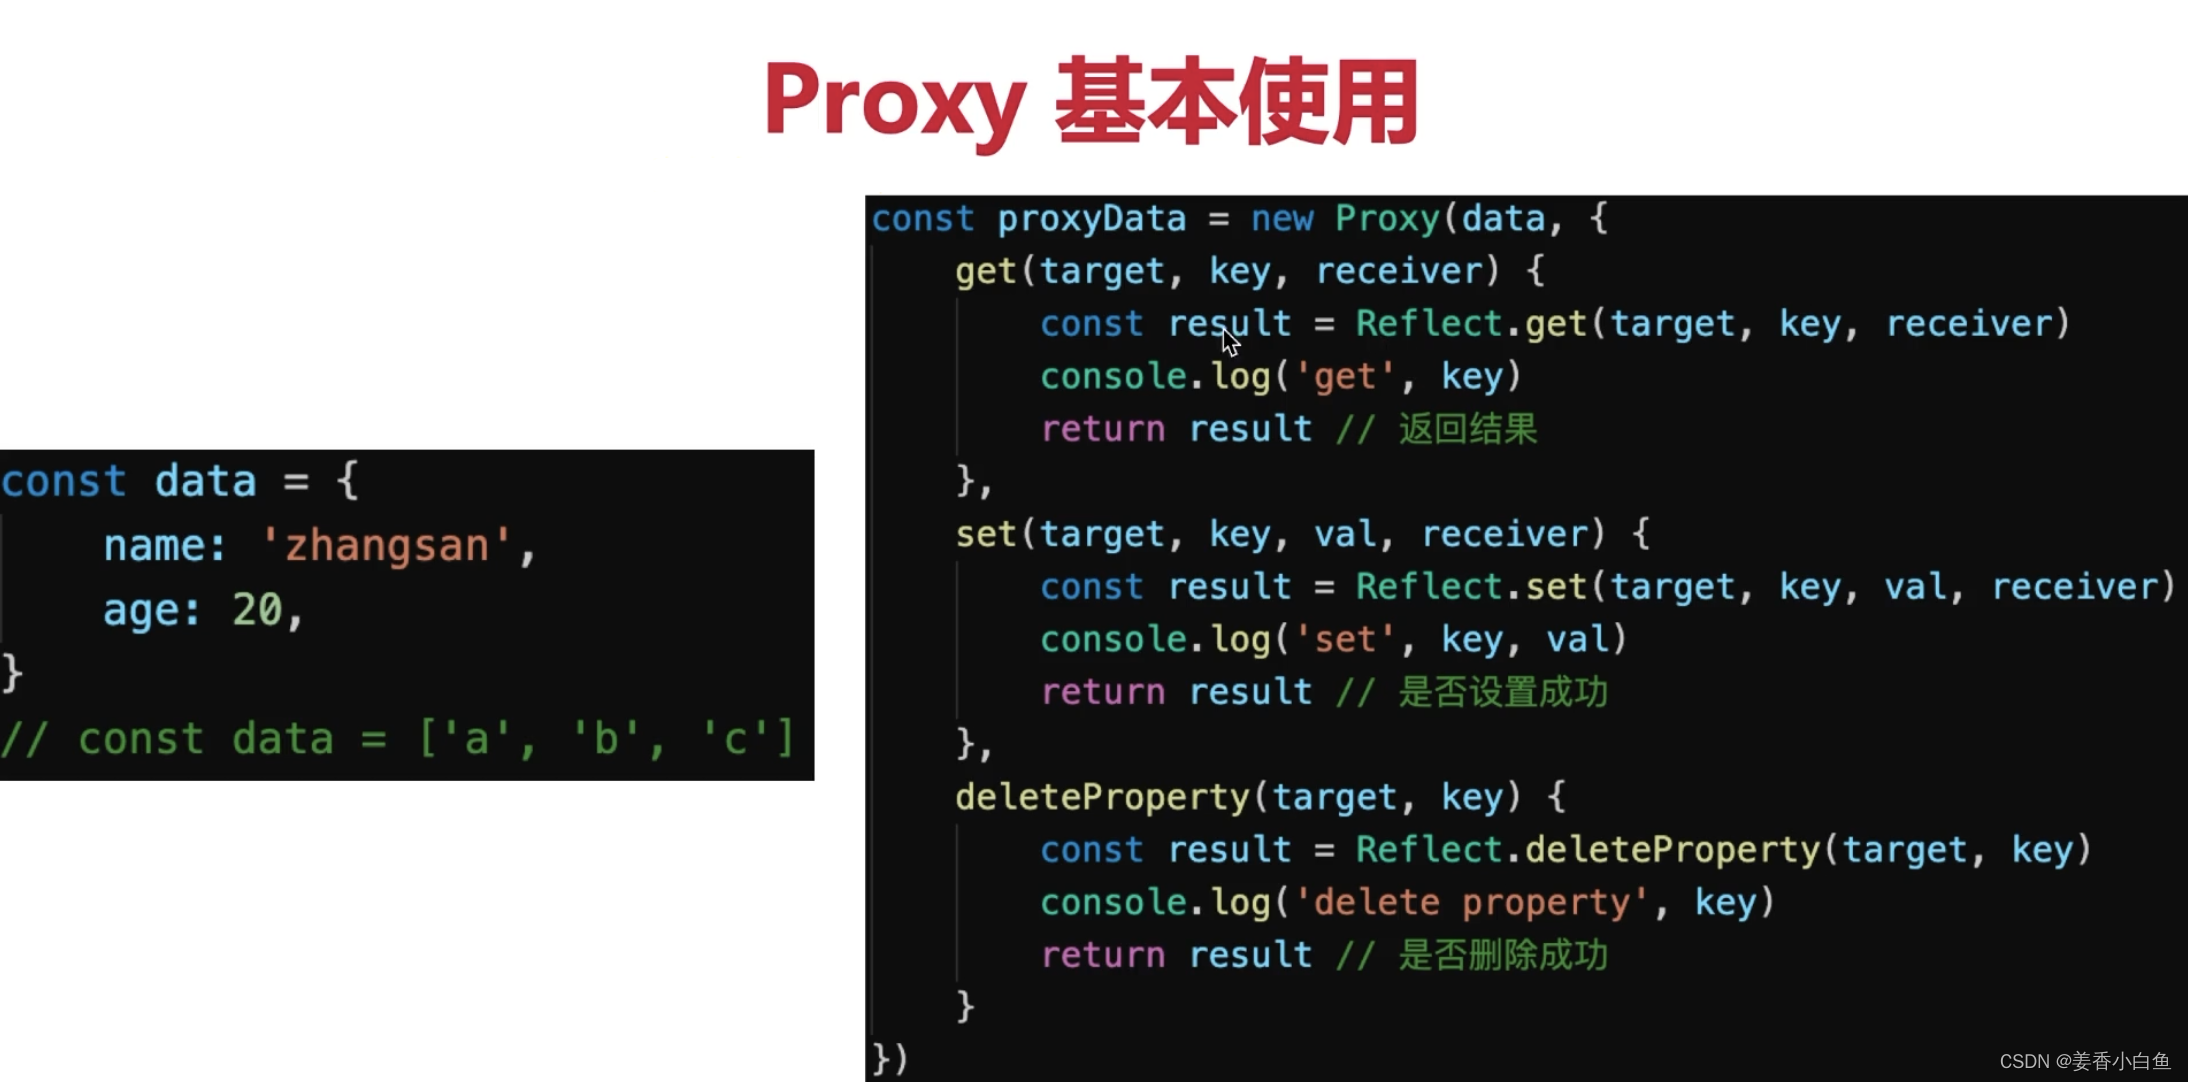
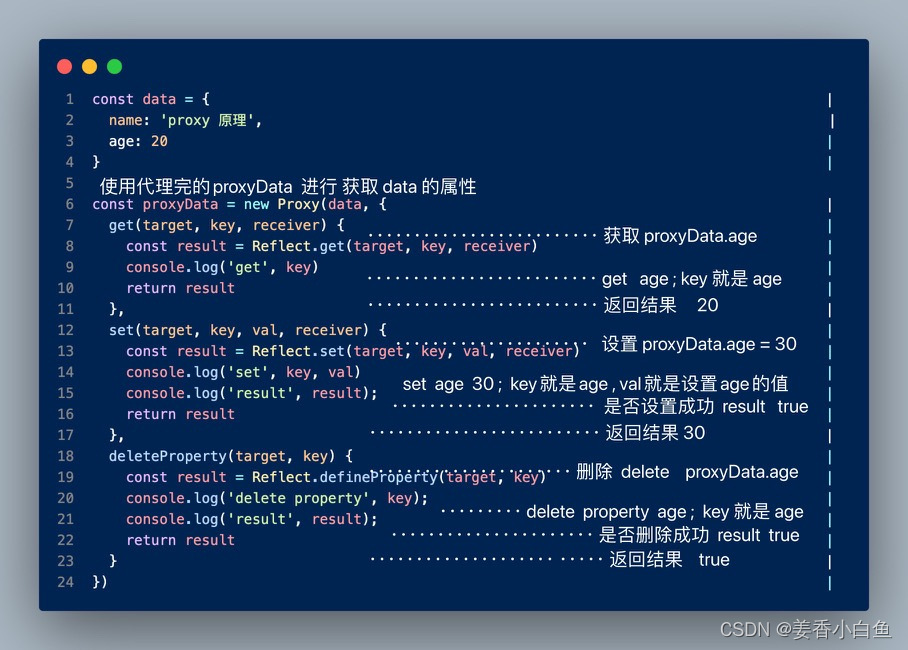

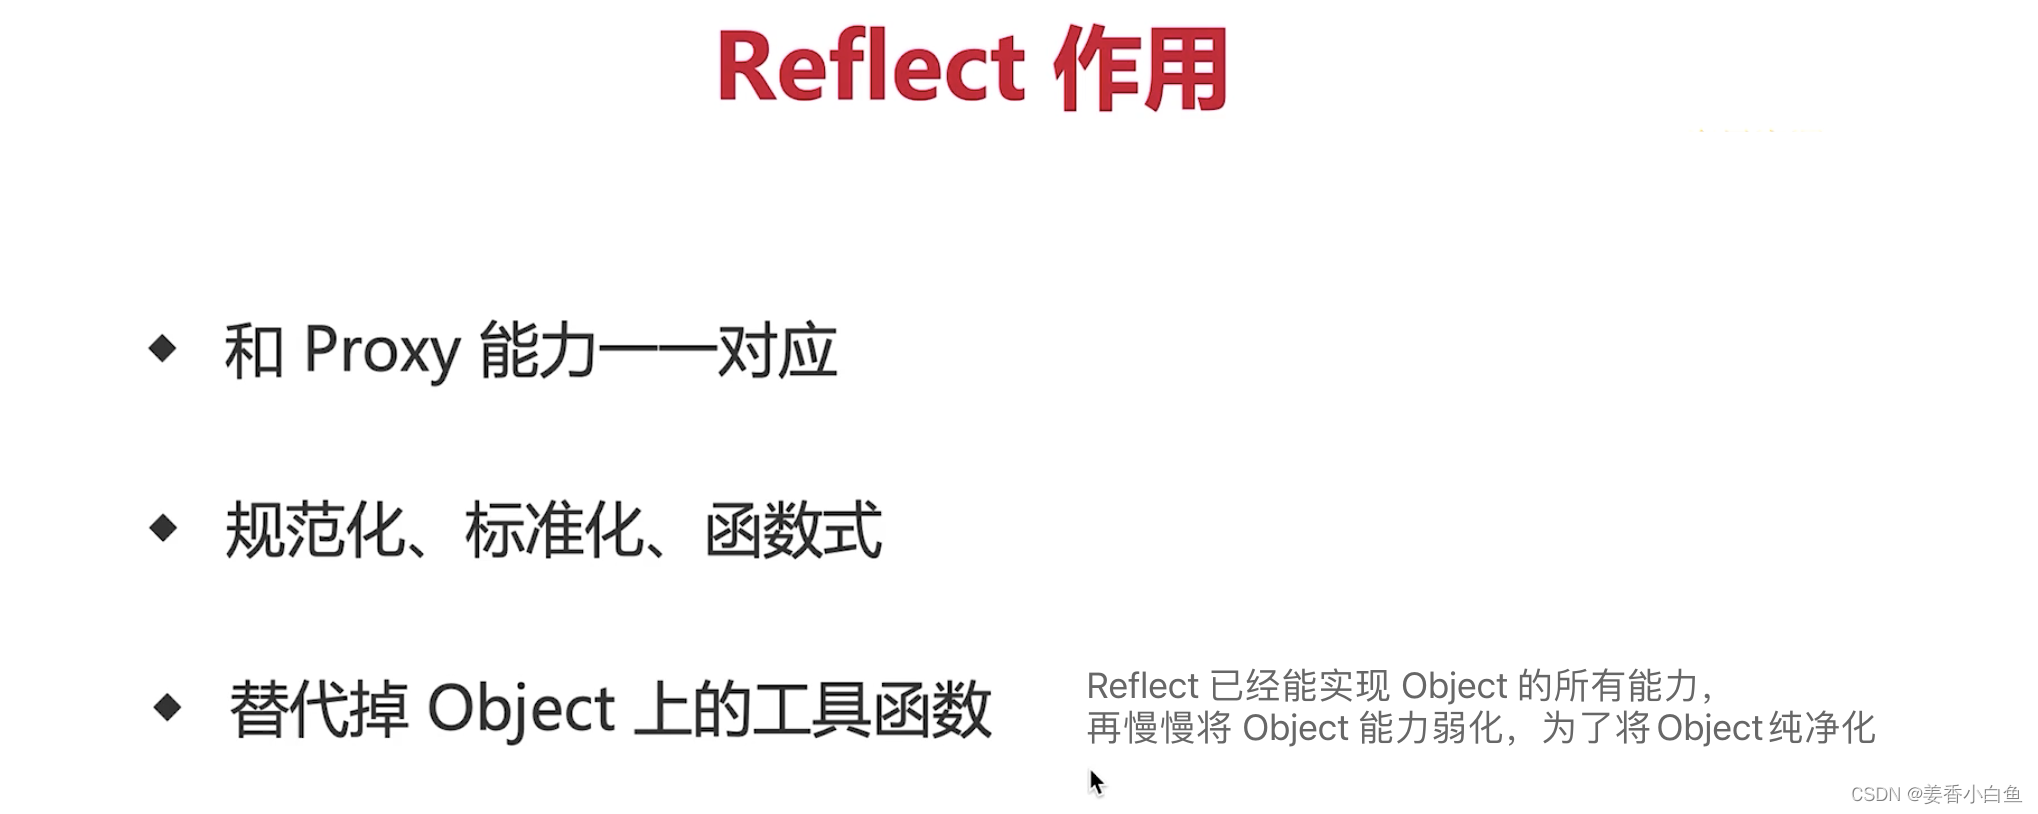
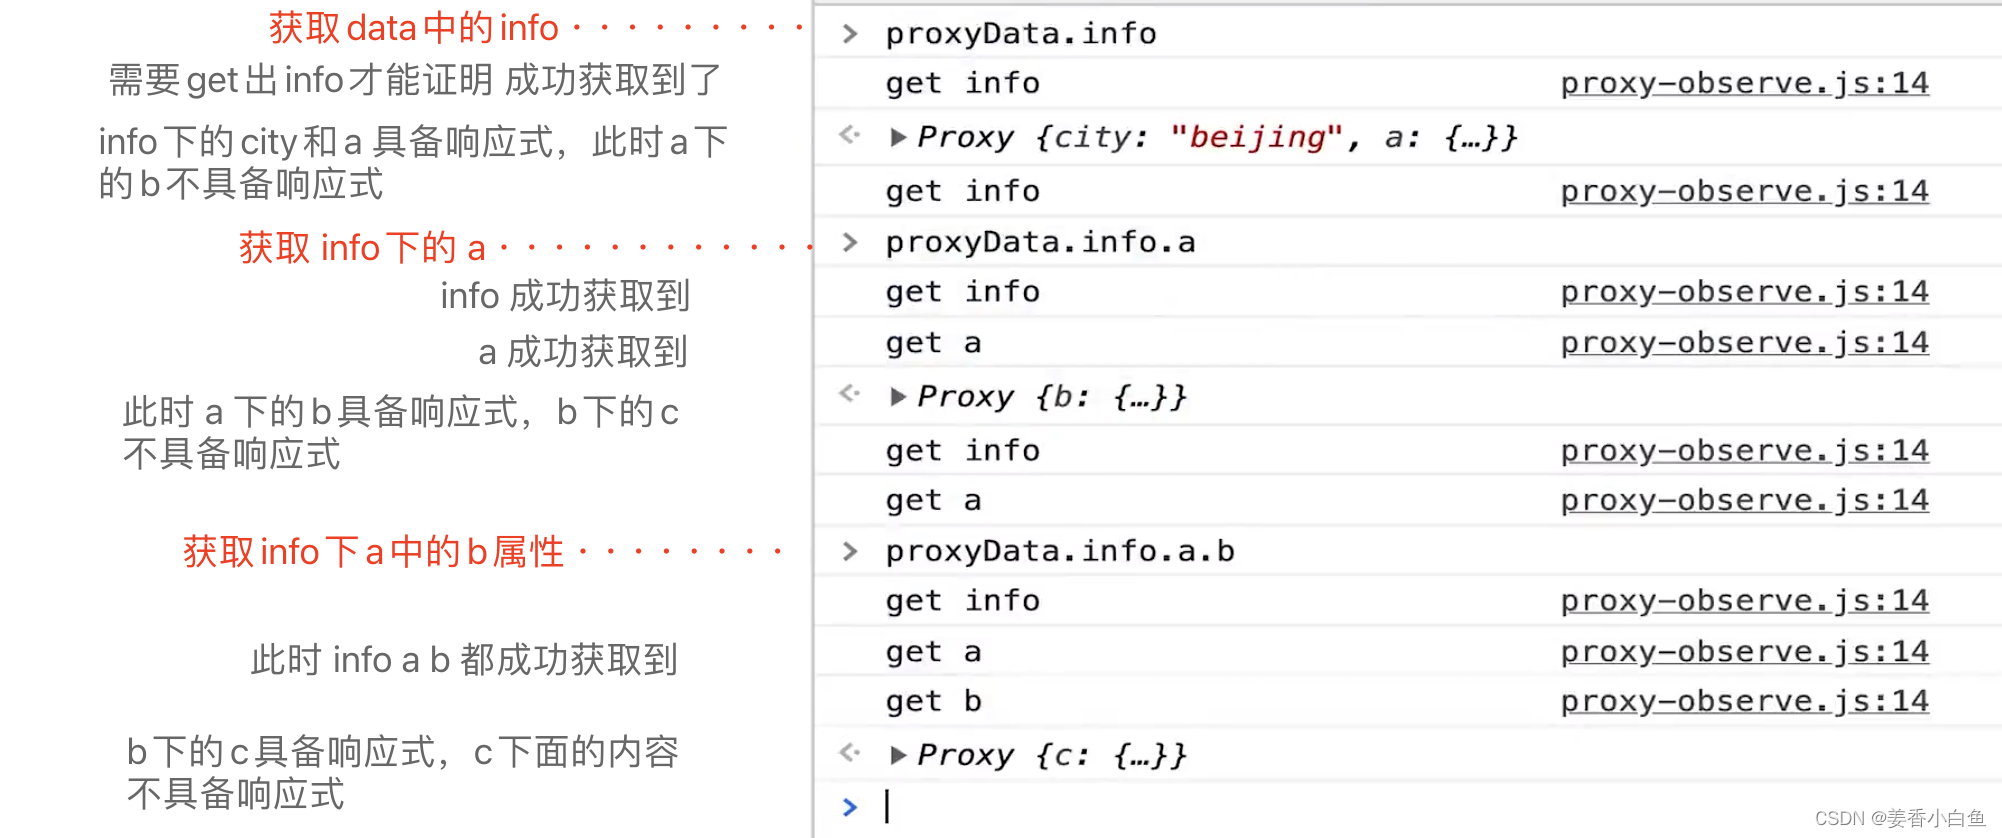
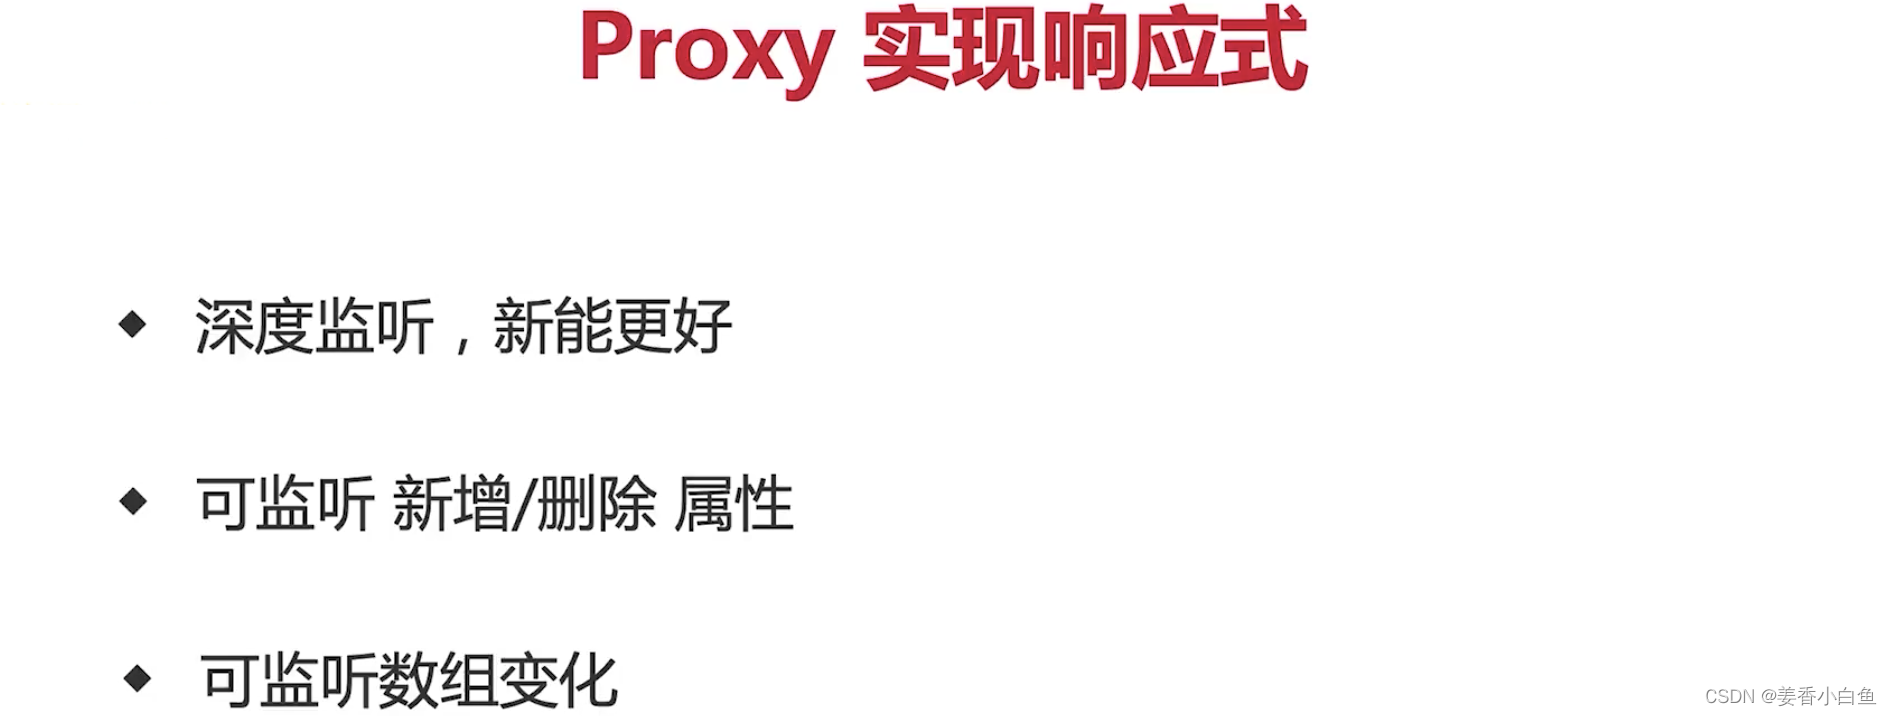
9. 深入 proxy ,看下面封装好的proxy
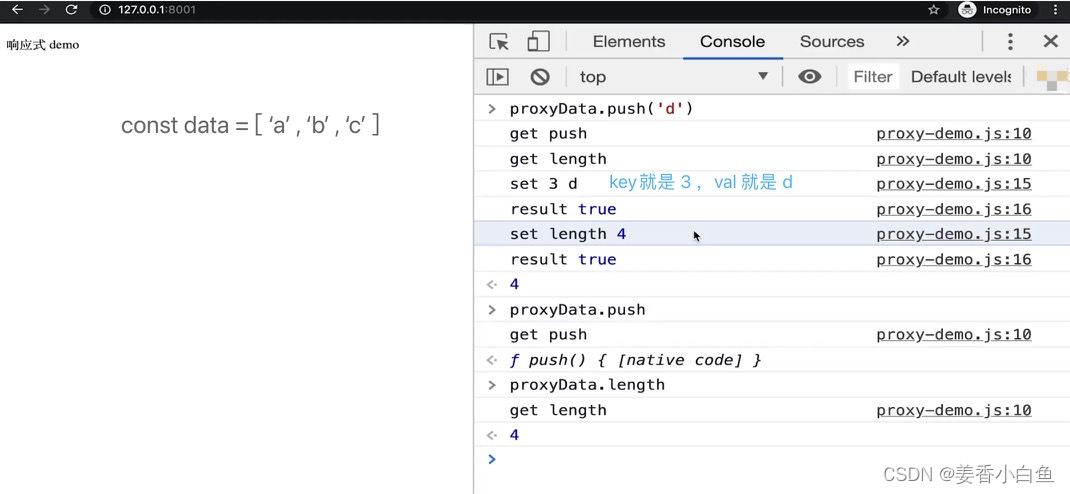
// 创建响应式
function reactive(target = {
}) {
if (typeof target !== 'object' || target == null) {
// 不是对象或数组,则返回
return target
}
// 代理配置
const proxyConf = {
get(target, key, receiver) {
// 只处理本身(非原型的) 属性
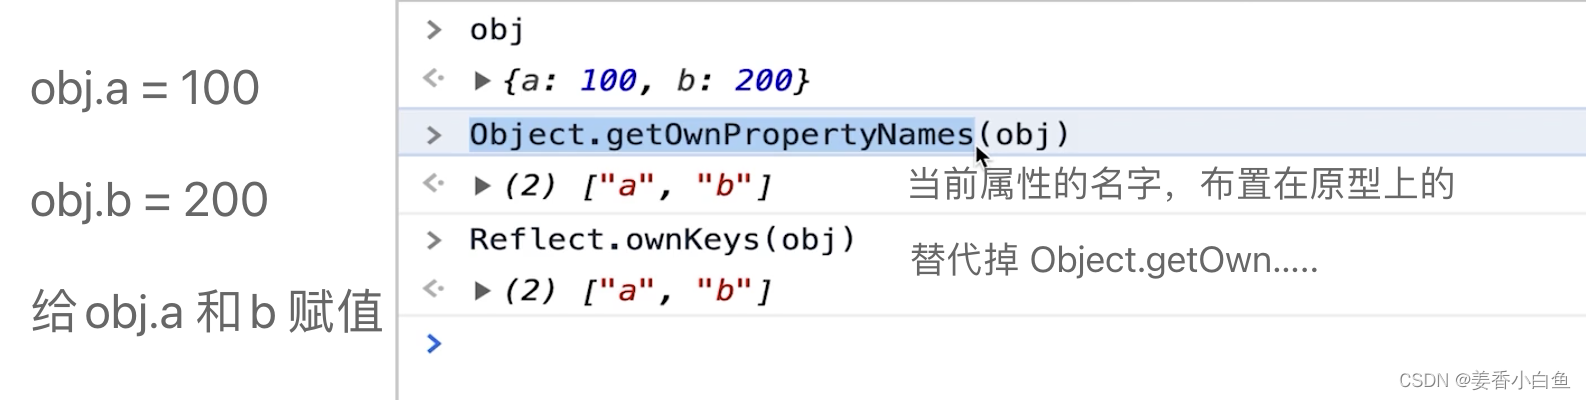
const ownKeys = Reflect.ownKeys(target)
if (ownKeys.includes(key)) {
console.log('get 获取', key) // 监听
}
const result = Reflect.get(target, key, receiver)
//深度监听
// 如果直接返回 retun result , data中的info 会被上面 if判断返回
return reactive(result)// 返回结果
},
set(target, key, val, receiver) {
// 重复的数据,不处理
if (val === target[key]) {
return true
}
// 只处理本身(非原型的) 属性
const ownKeys = Reflect.ownKeys(target)
if (ownKeys.includes(key)) {
console.log('已有的 key', key) // 监听
} else {
console.log('新增的 key', key);
}
const result = Reflect.set(target, key, val, receiver)
console.log('set 设置', key, val);
// console.log('result 是否设置成功',result); // true
return result // 返回结果
},
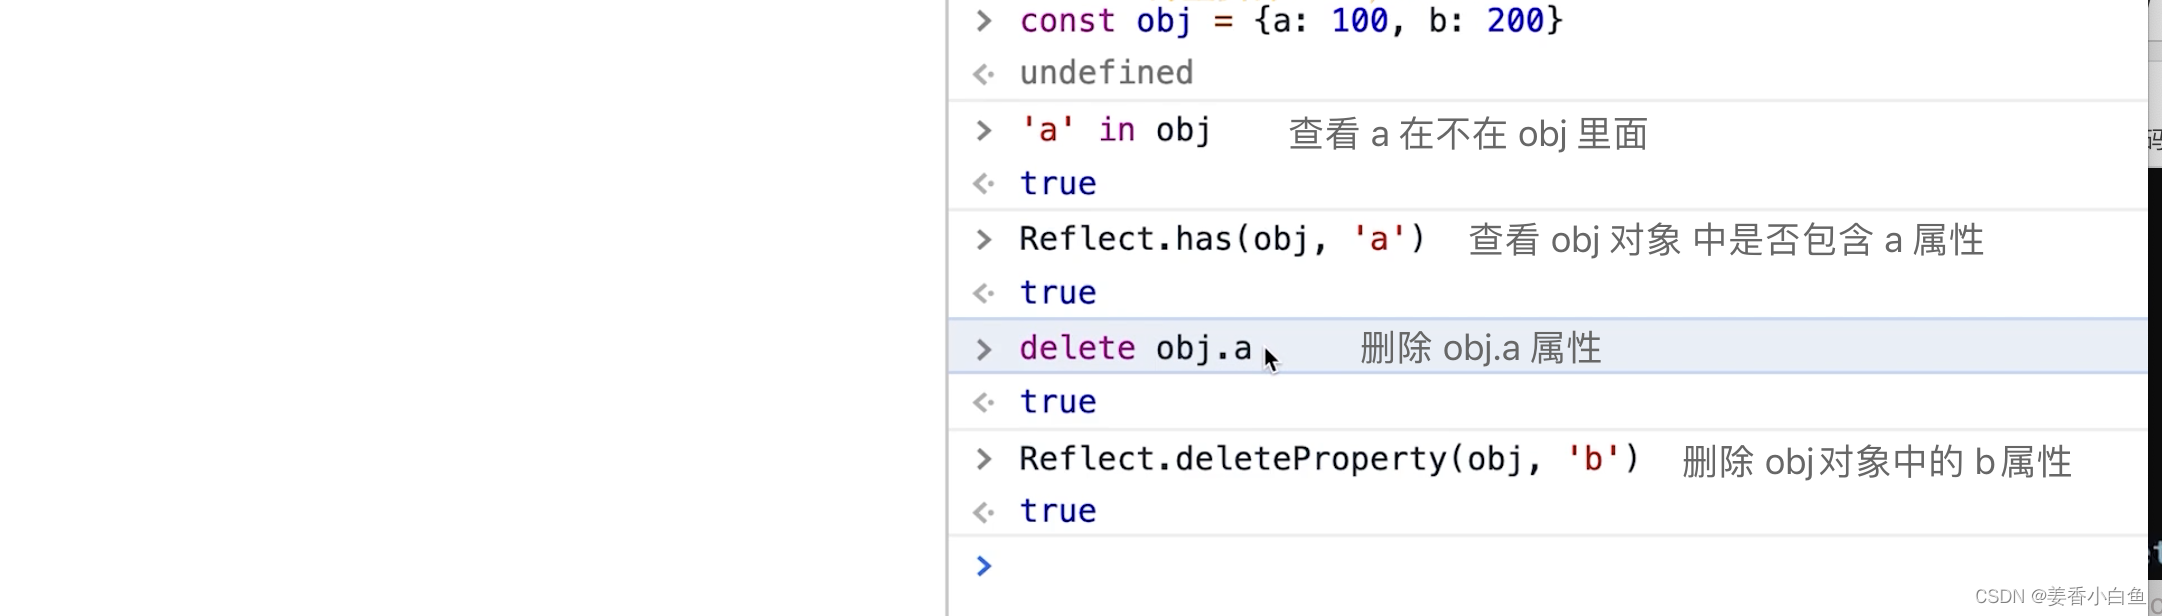
deleteProperty(target, key) {
const result = Reflect.defineProperty(target, key)
console.log('delete property', key);
// console.log('result 是否设置成功',result) // true
return result // 返回结果
}
}
// 生成代理对象
const observed = new Proxy(target, proxyConf)
return observed
}
// 测试数据
const data = {
name: 'proxy实现响应式', // proxyData.name | 会 get name 获取到name名
age: 20,
info: {
// proxyData.info.city | get info 并没有 get到city
city: '北京,需要深度监听', // 在get 时返回 reactive(result) 可以get 到 city
a: {
// 如果访问 a , a具有响应式
b: 100 // b未被访问,b不具备响应式
}
}
}
// 将要实现响应式的 data对象 传入 reactive函数中
const proxyData = reactive(data)
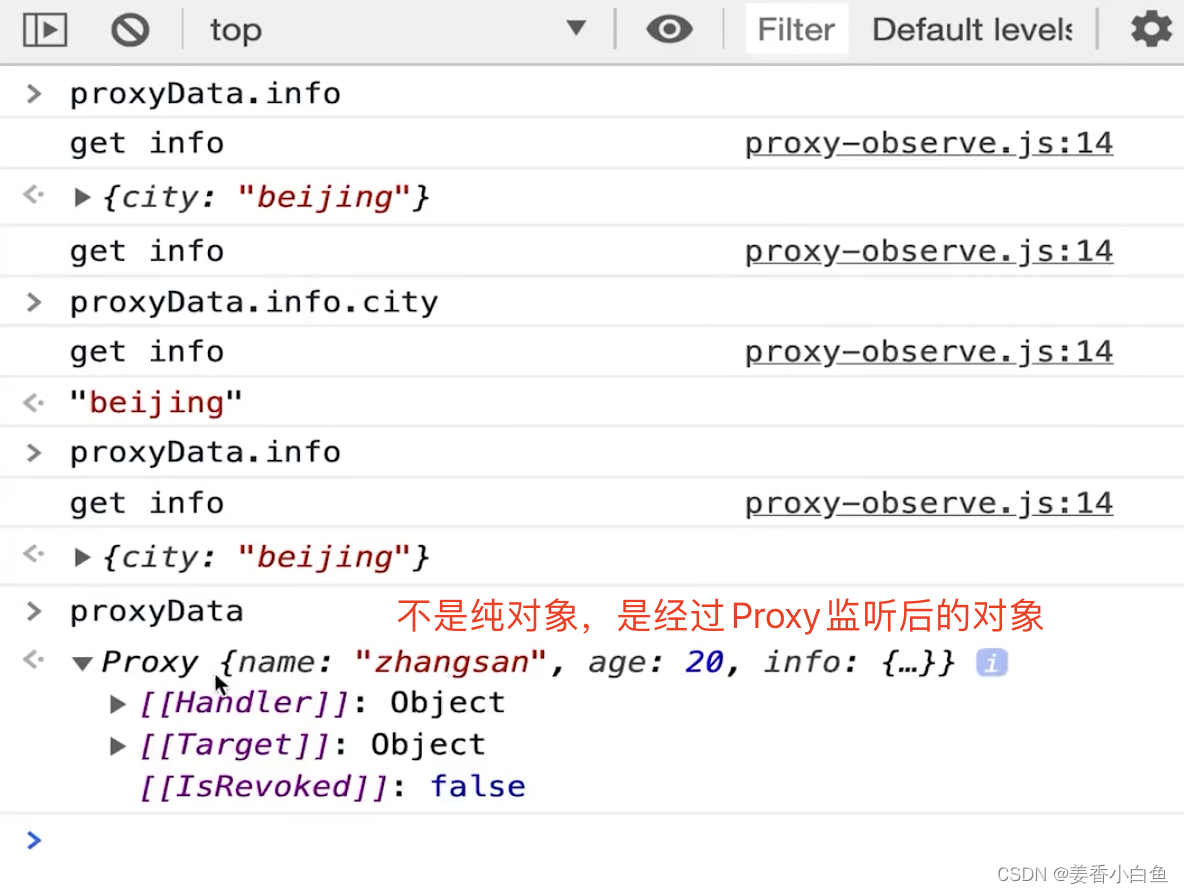
- 性能如何提升的?
- Oject.defineProperty 是一开始就进行递归,直接递归到底
- Proxy 是什么时候get 什么时候再进行递归,不get 获取的不进行递归

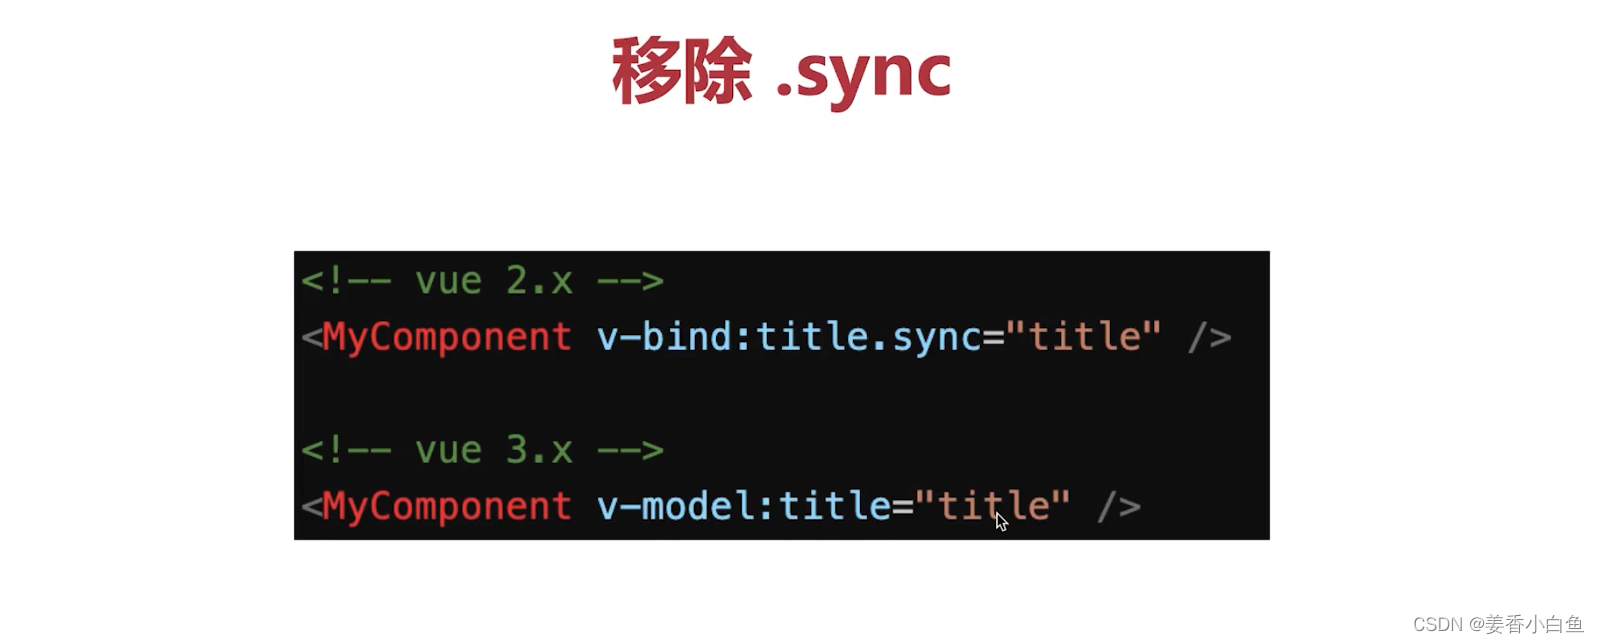
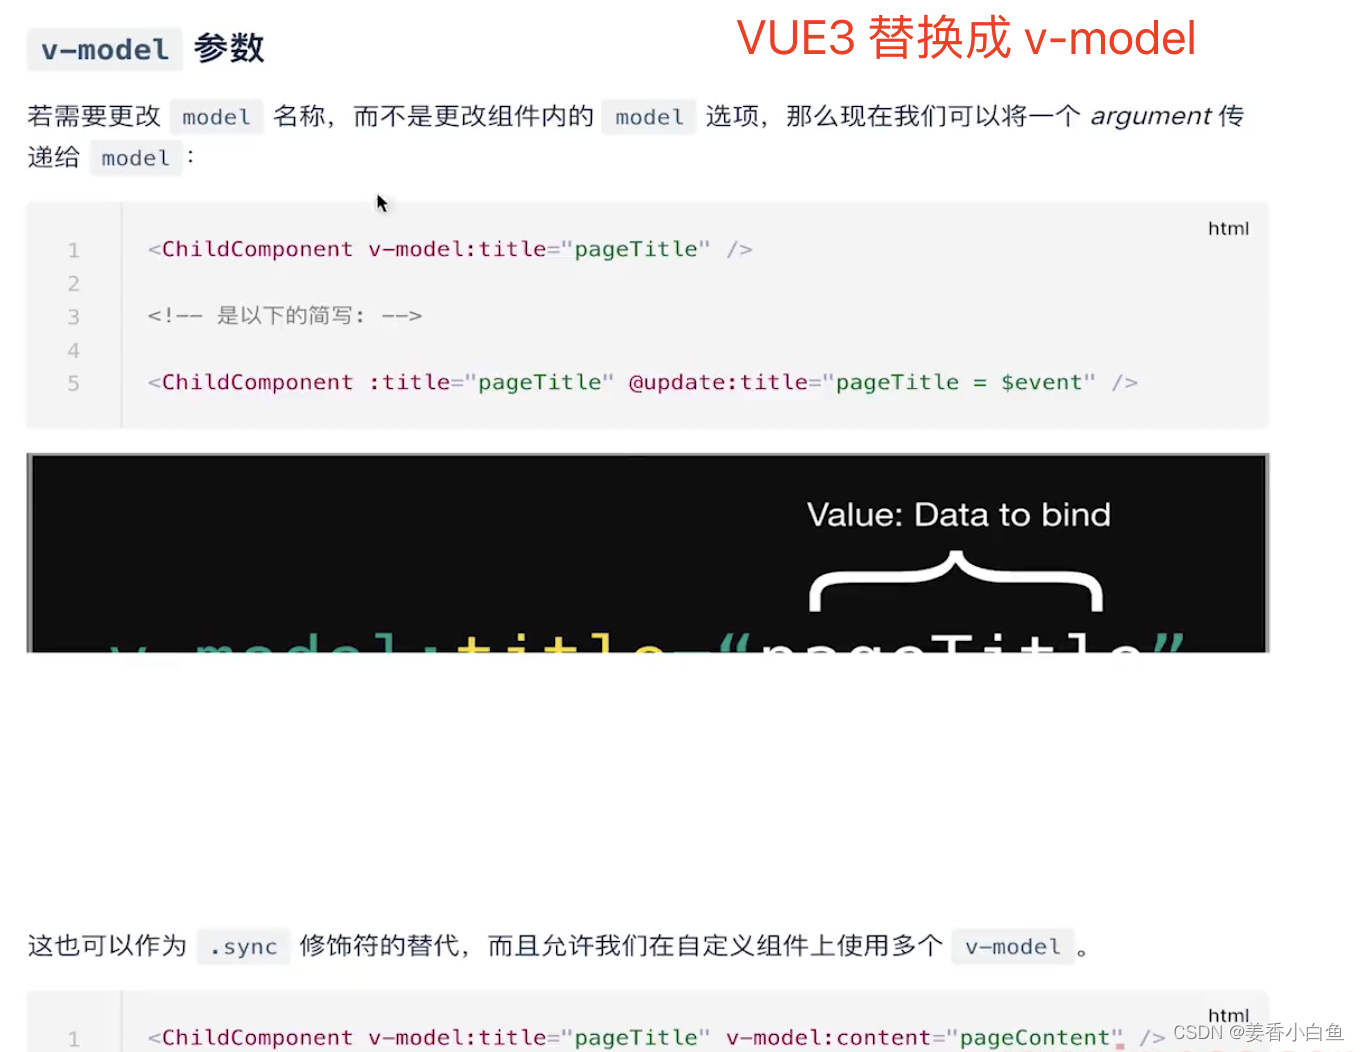
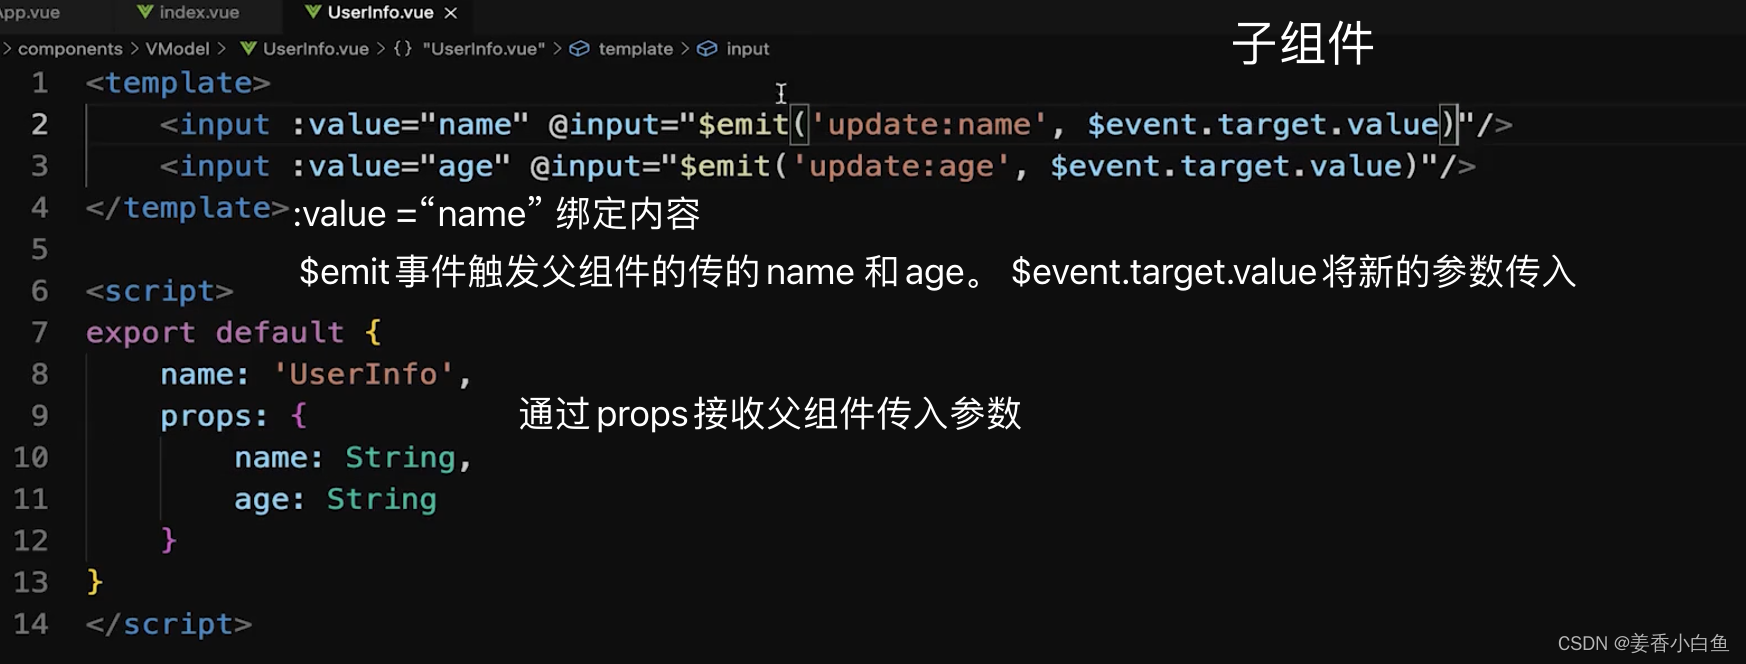
10. V3 移除 .sync属性,用v-model 替代
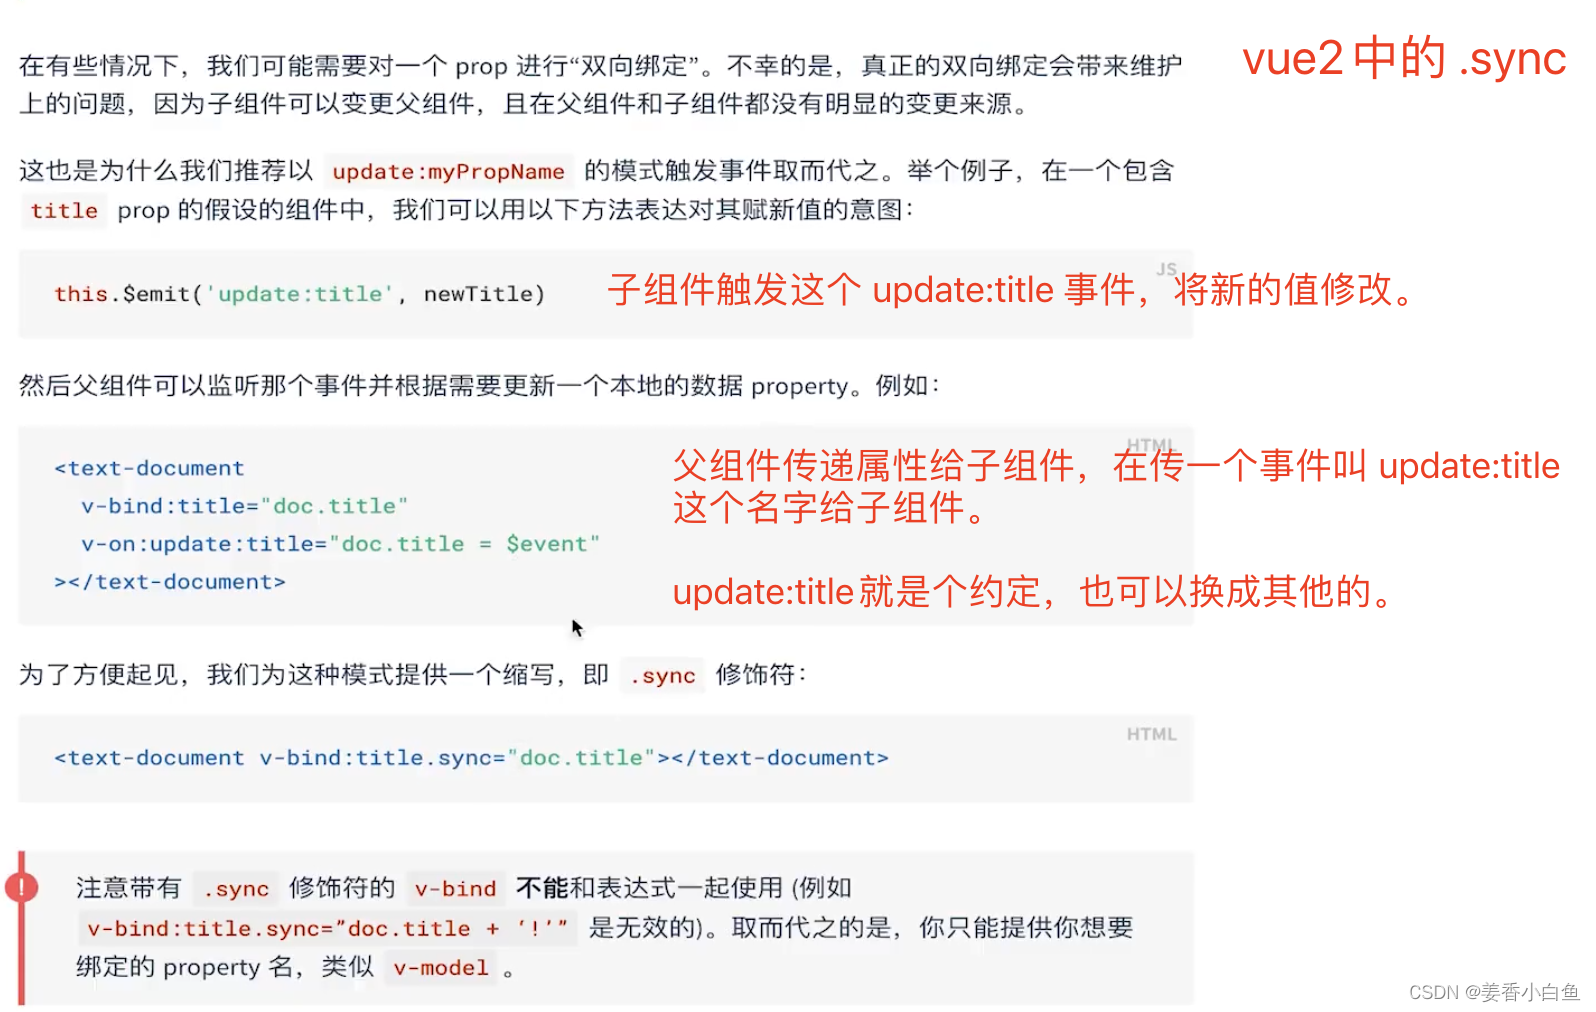
以下是一个示例代码,其中包括一个父组件 和一个子组件 ,它们通过 v-bind 和 $emit 实现了父子数据的双向绑定:
<!-- 父组件 TextDocument.vue -->
<template>
  <div>
    <h1>{

    {

     doc.title }}</h1>
    <title-editor v-bind:title="doc.title" v-on:update:title="updateTitle"></title-editor>
  </div>
</template>

<script>
import TitleEditor from './TitleEditor.vue'

export default {


  components: {


    TitleEditor
  },
  data() {


    return {


      doc: {


        title: "默认标题"
      }
    }
  },
  methods: {


    updateTitle(newTitle) {


      this.doc.title = newTitle;
    }
  }
};
</script>


<!-- 子组件 TitleEditor.vue -->
<template>
  <div>
    <input type="text" v-bind:value="title" v-on:input="updateTitle($event.target.value)">
  </div>
</template>

<script>
export default {


  props: ['title'],
  methods: {


    updateTitle(newTitle) {


      this.$emit('update:title', newTitle);
    }
  }
}
</script>


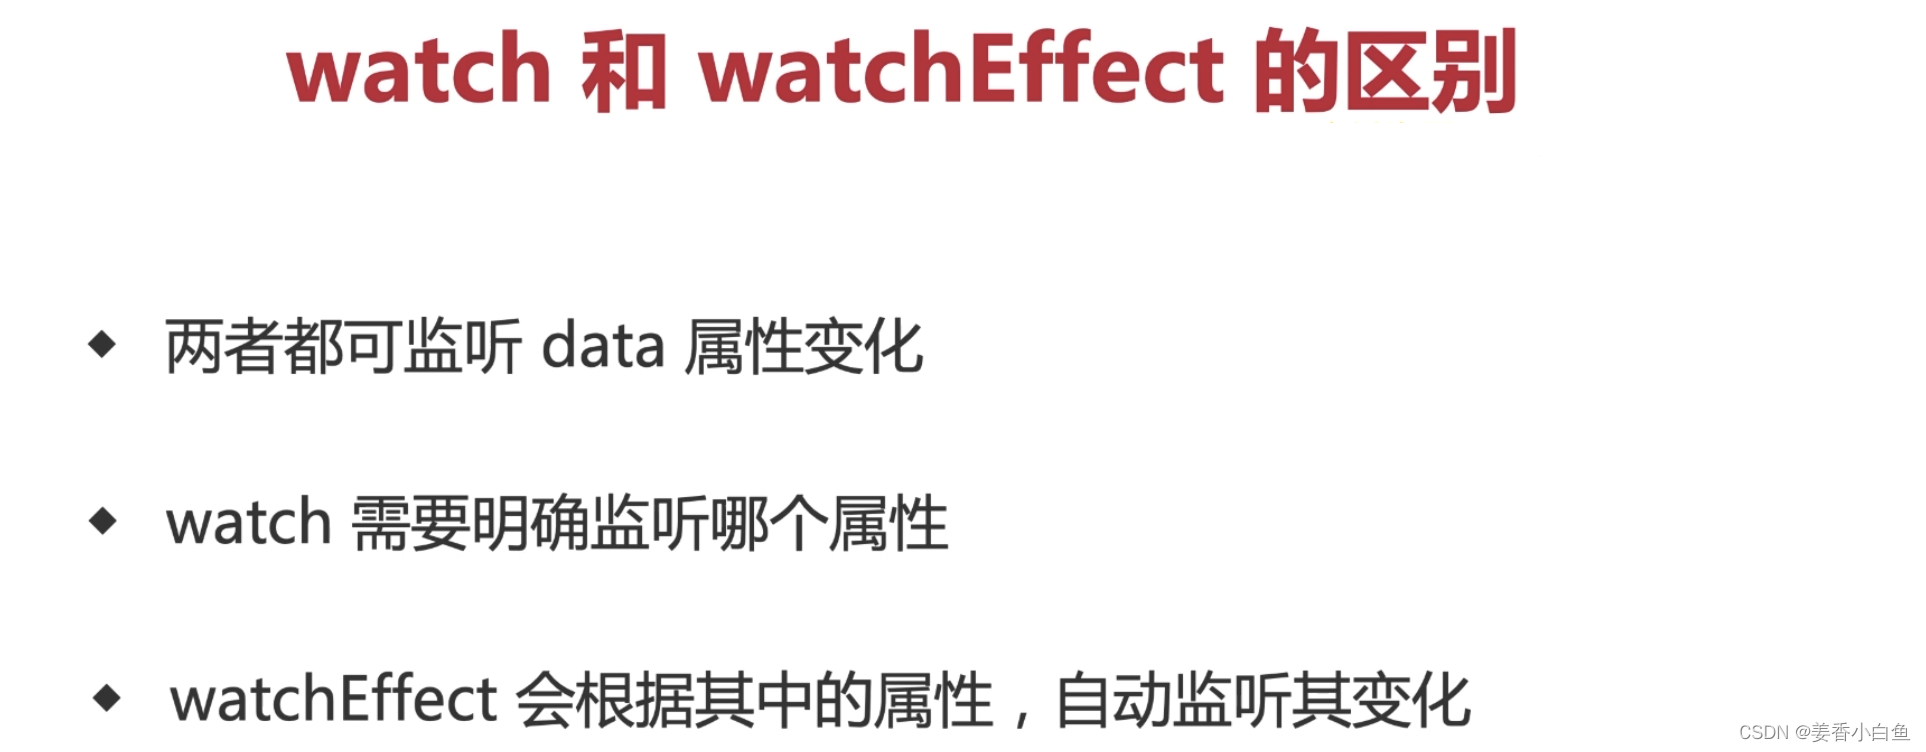
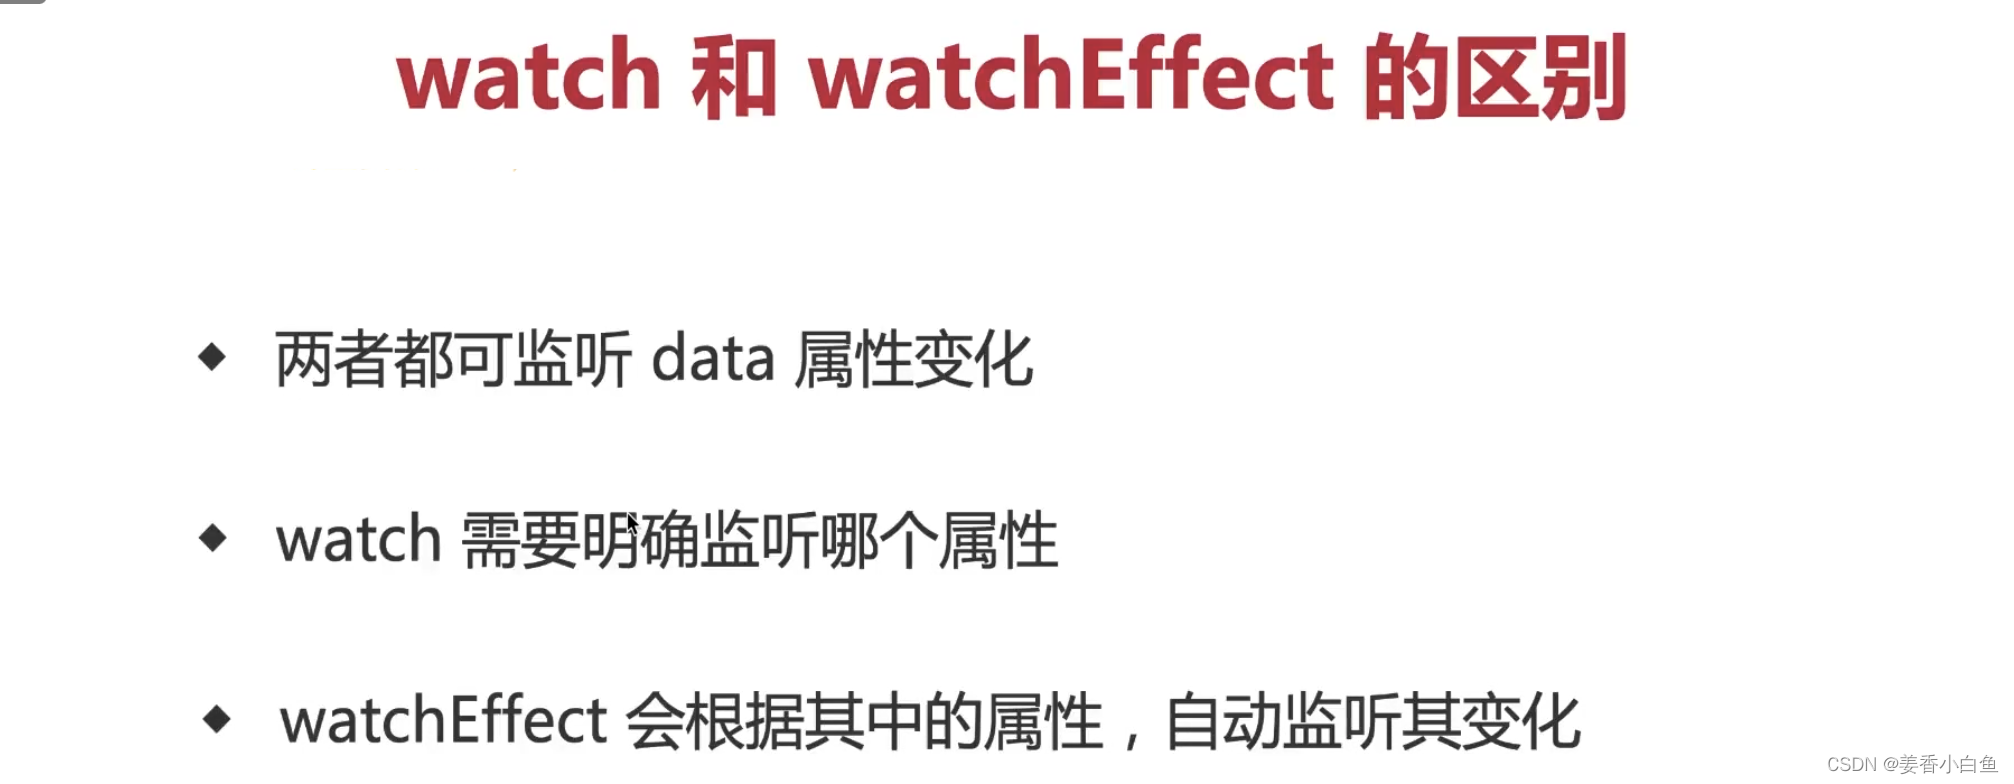
11. watch 和 watchEffect 的区别 ?
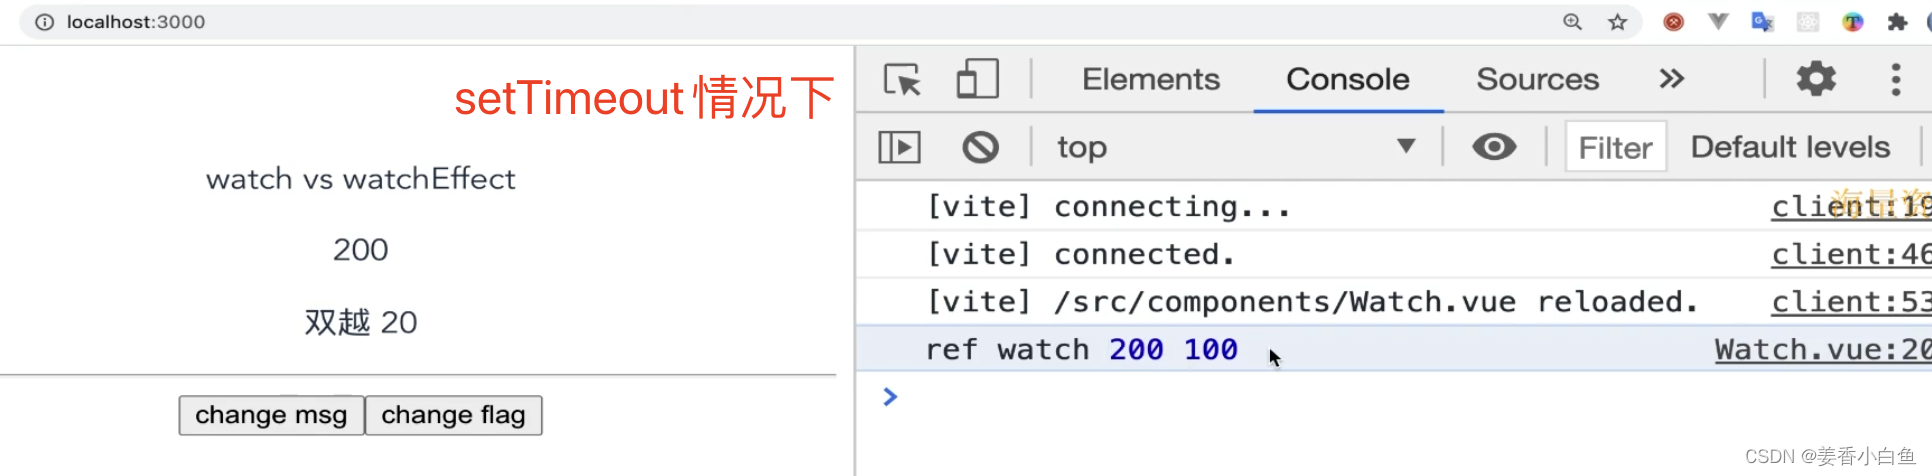
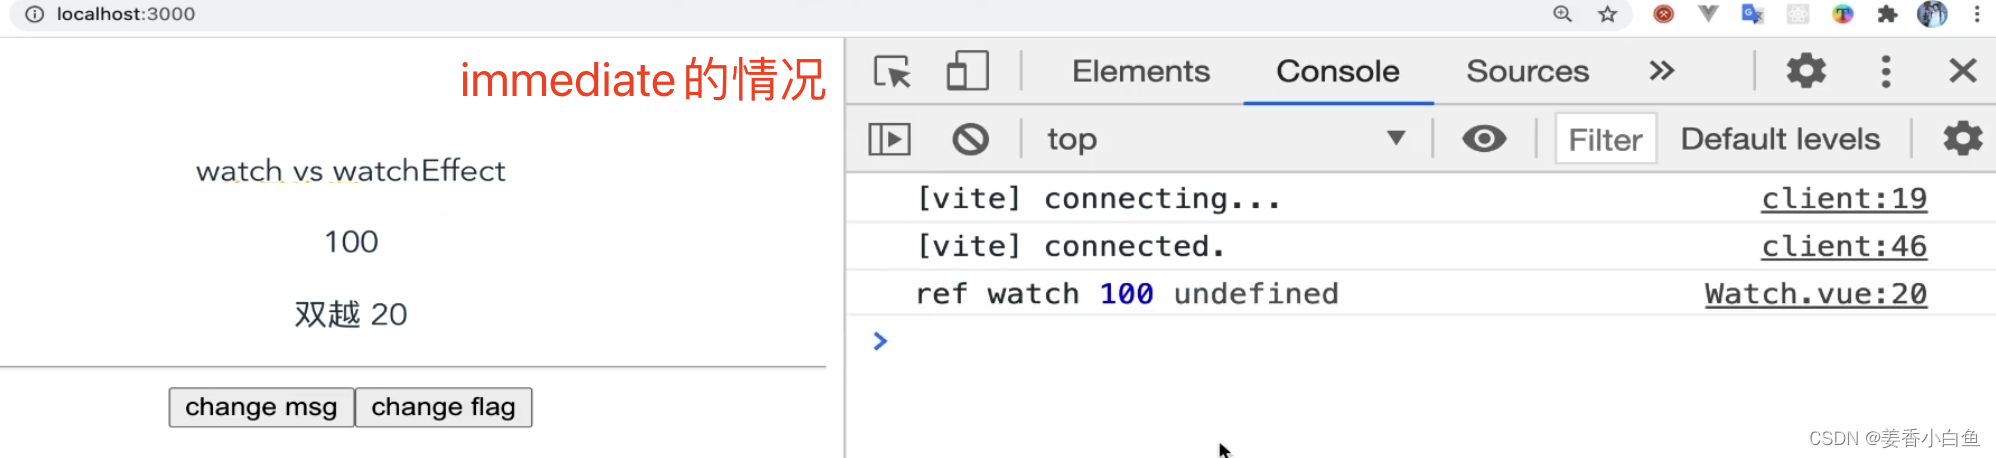
watch 监听 ref 变化
<!-- 先看watch 监听 ref-->
<template>
  <p>watch vs watchEffect</p>
  <p>{

    {

     numberRef }}</p>
  <p>{

    {

     name }}{

    {

     age }}</p>
</template>

<script>
import {

     reactive, ref, toRefs, watch, watchEffect } from 'vue'

export default {


  name: 'watch',
  setup() {


    const numberRef = ref(100) // watch监听
    watch(
      numberRef,
      (newNumber, oldNumber) => {


        // watch 不需要使用.value
        console.log('ref watch', newNumber, oldNumber)
        // 调用setTimeout 打印结果 200 100
      },
      {


        immediate: true, // 初始化之前就监听,可选
        // 打印结果 ref watch 100 undefined
        // 为什么是undefined,因为没有修改值,监听初始化就是undefined
      }
    )

    // setTimeout(() => {


    //   numberRef.value = 200
    // }, 1500)

    return {


      numberRef
    }
  },
}
</script>
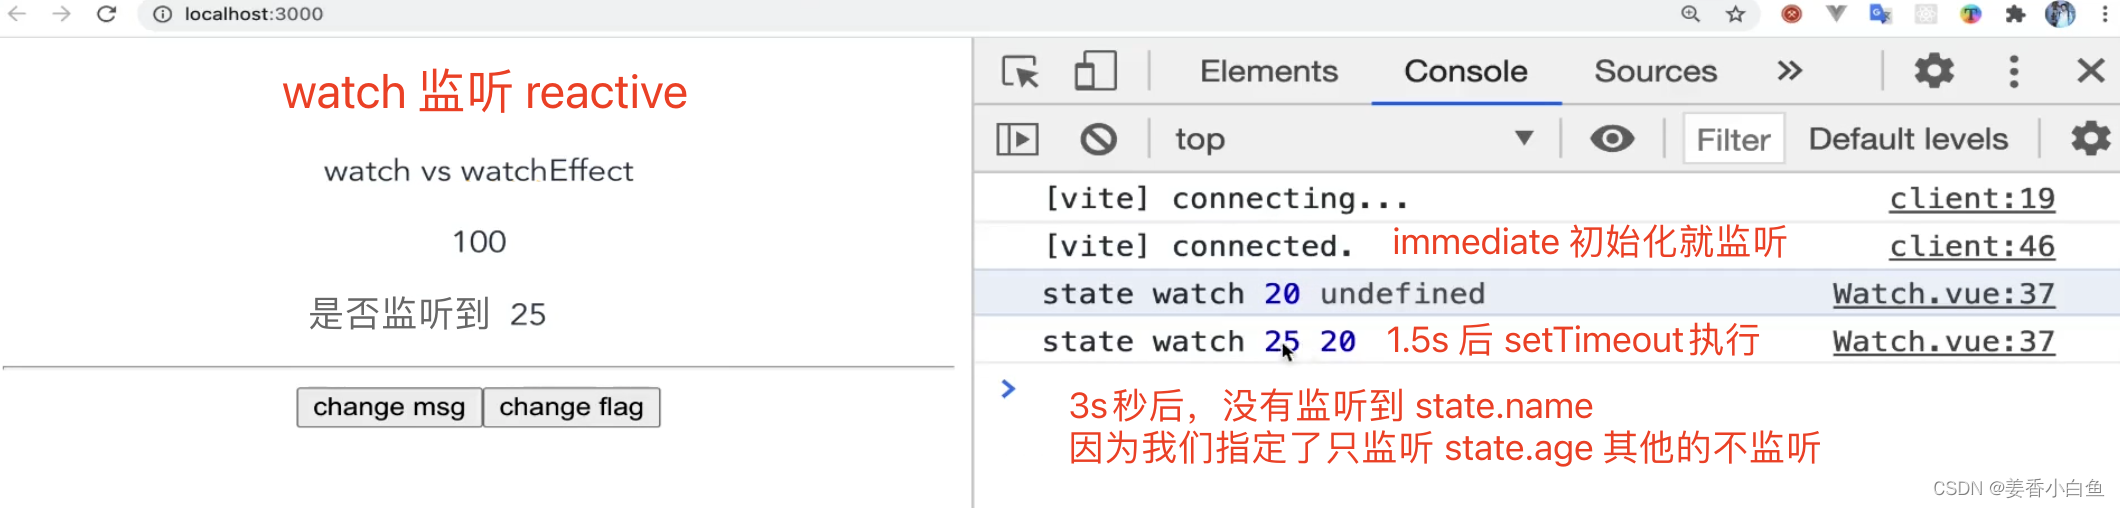
watch 监听 reactive 变化
<template>
  <p>watch vs watchEffect</p>
  <p>{

    {

     numberRef }}</p>
  <p>{

    {

     name }}{

    {

     age }}</p>
</template>
<script>
import {

     reactive, ref, toRefs, watch } from 'vue'
export default {


  name: 'watch',
  setup() {


    const numberRef = ref(100) // watch监听
    const state = reactive({


      name: 'watch 监听 reactive',
      age: 20,
    })

    watch(
      () => state.age,
      // 第二个参数,回调函数
      (newAge, oldAge) => {


        console.log('state watch', newAge, oldAge)
      },
      // 第三个参数,配置项
      {


        immediate: true, // 初始化之前就监听,可选
        deep: true, // 深度监听,
        // 如果age是一个对象或数组,就可以深度监听 其中的变化
      }
    )
    setTimeout(() => {


      state.age = 25
    }, 1500)
    setTimeout(() => {


      state.name = '是否会监听到'
    }, 3000)

    return {


      numberRef,
      ...toRefs(state),
    }
  },
}
</script>
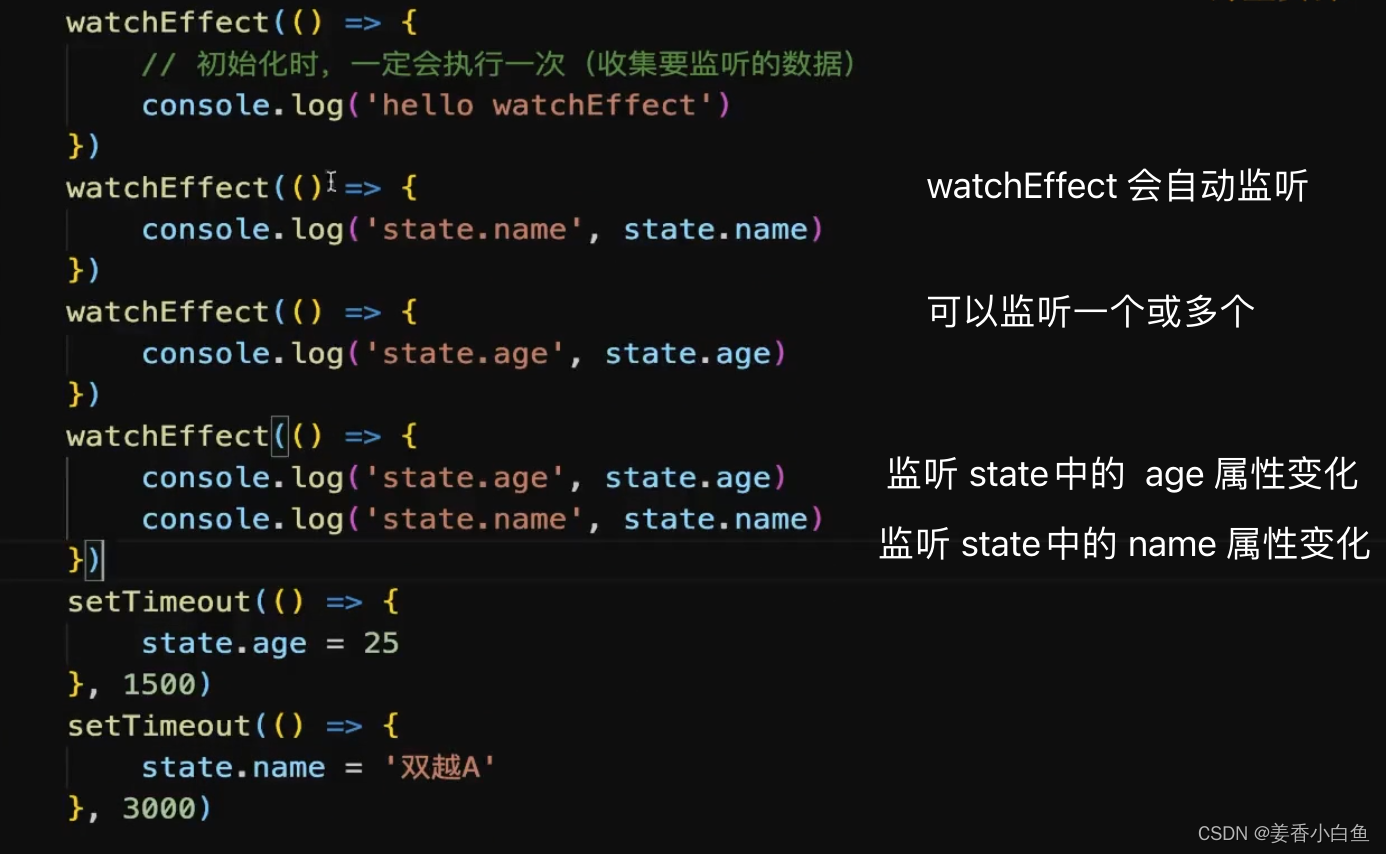
watchEffect 监听 ref 和 reactive
setup中 state数据 和 上面 watch 监听代码一样

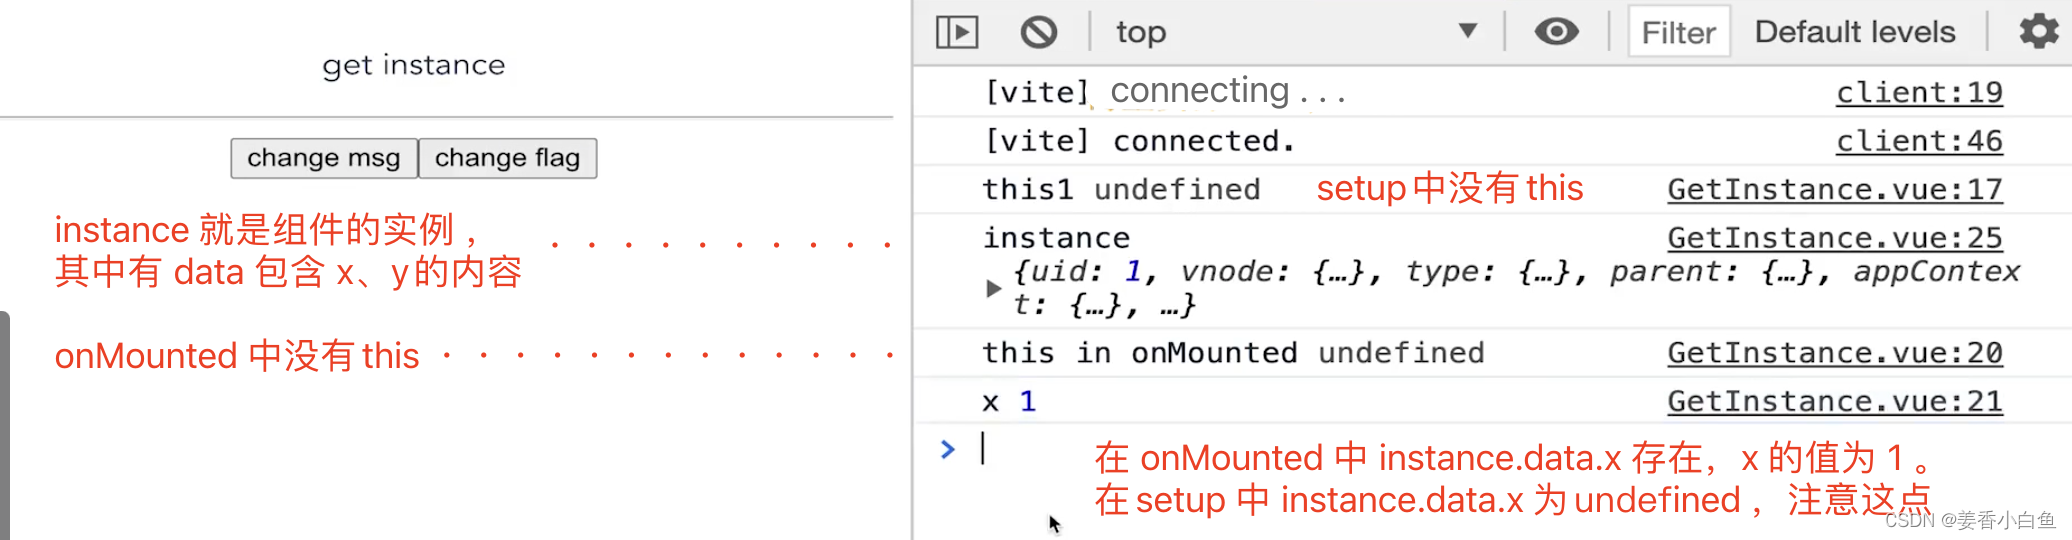
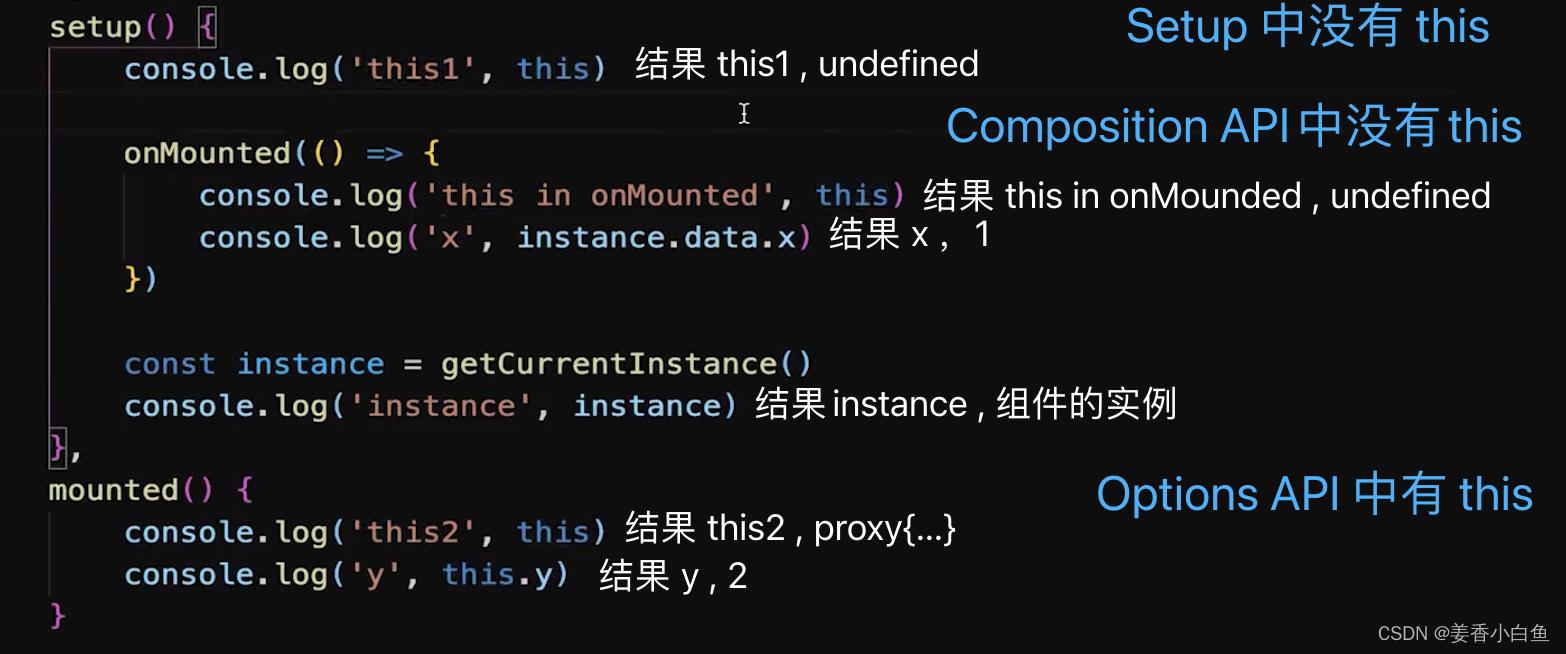
12. setup 中如何获取组件实例
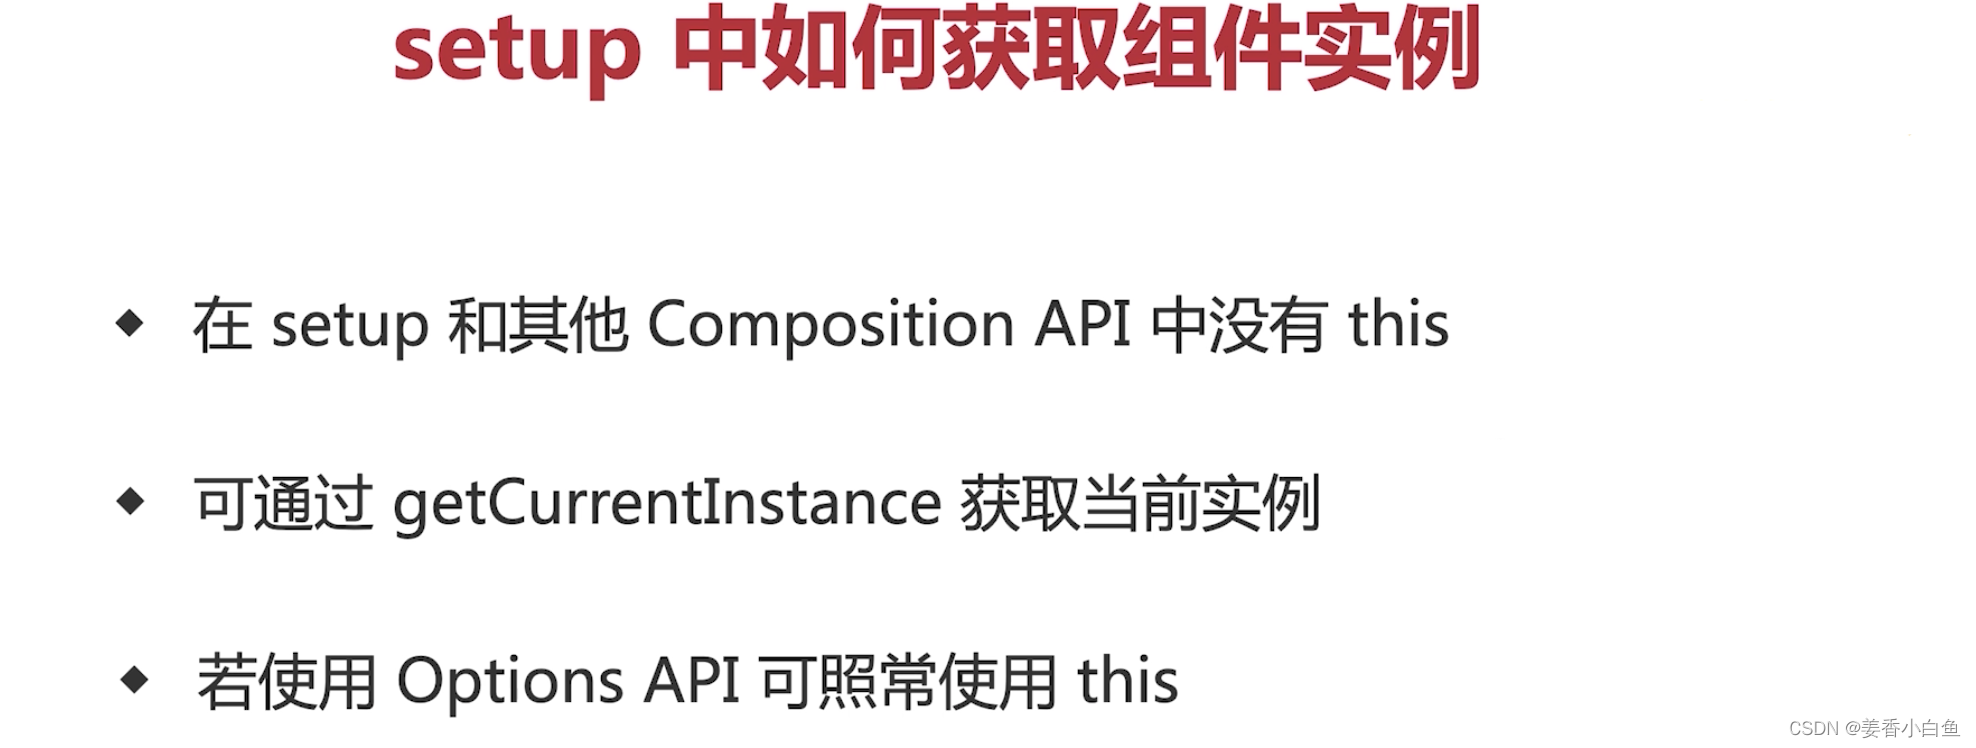
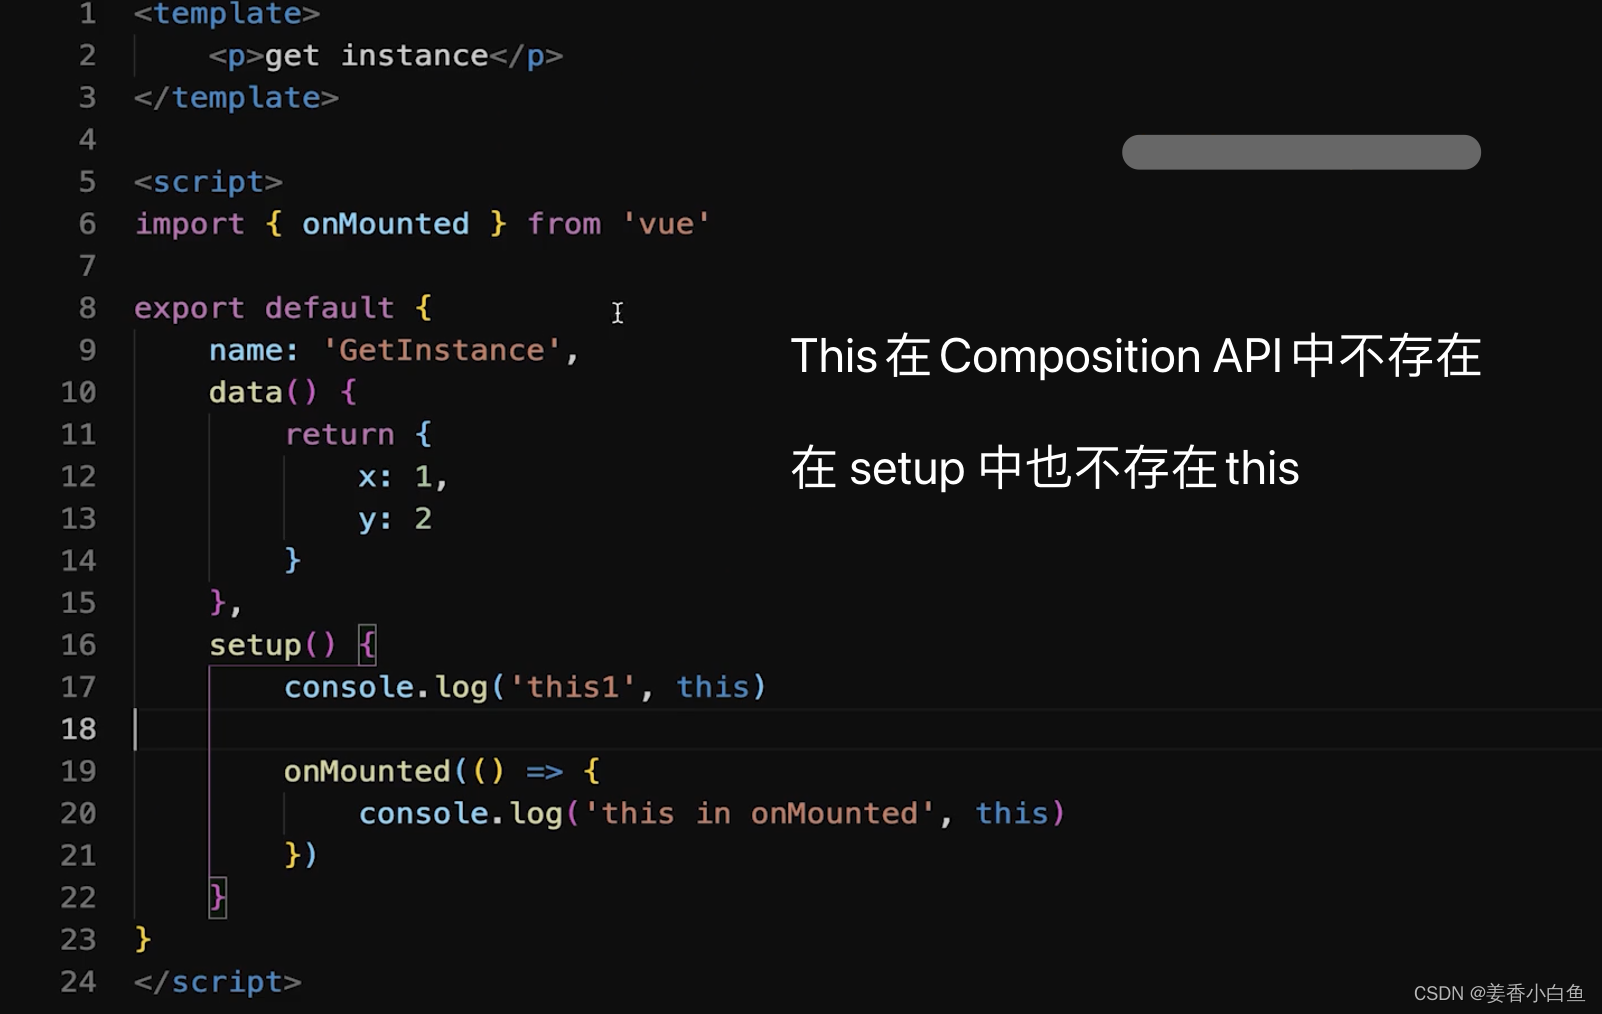
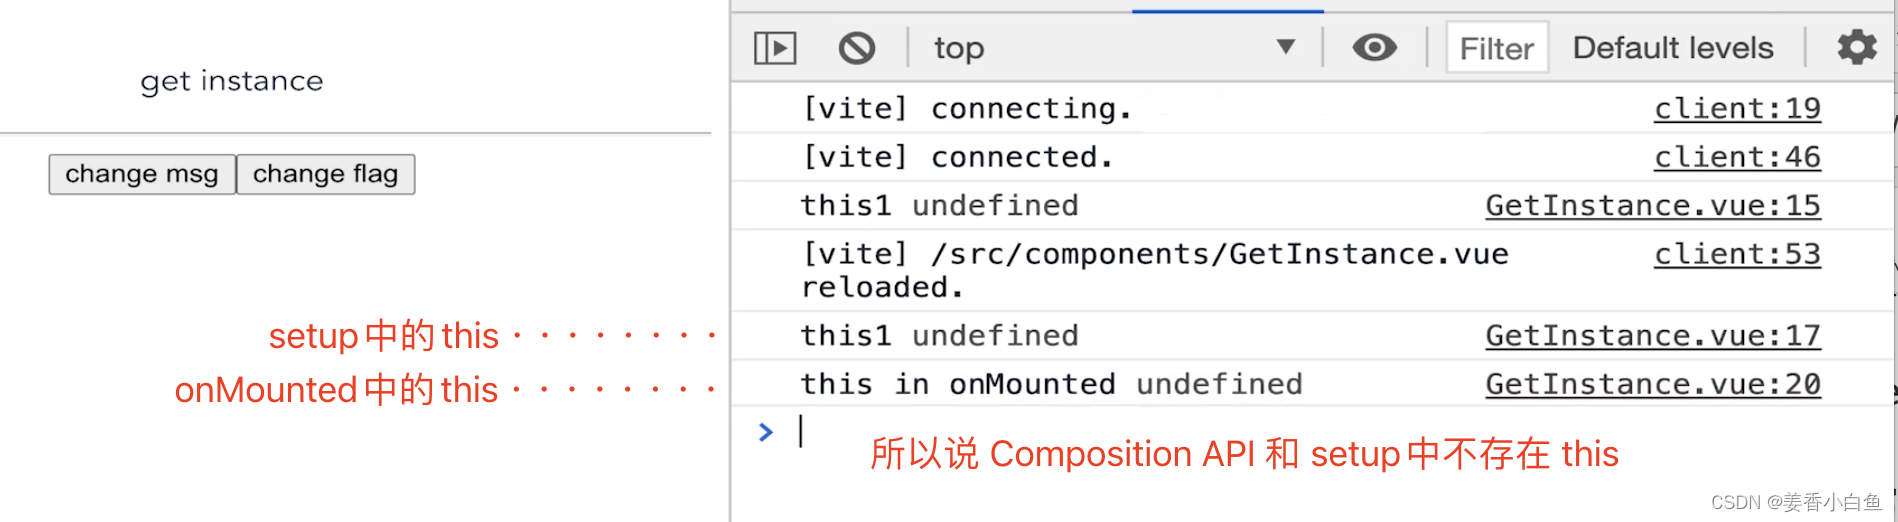
const instance = getCurrentInstance() 就是组件的实例


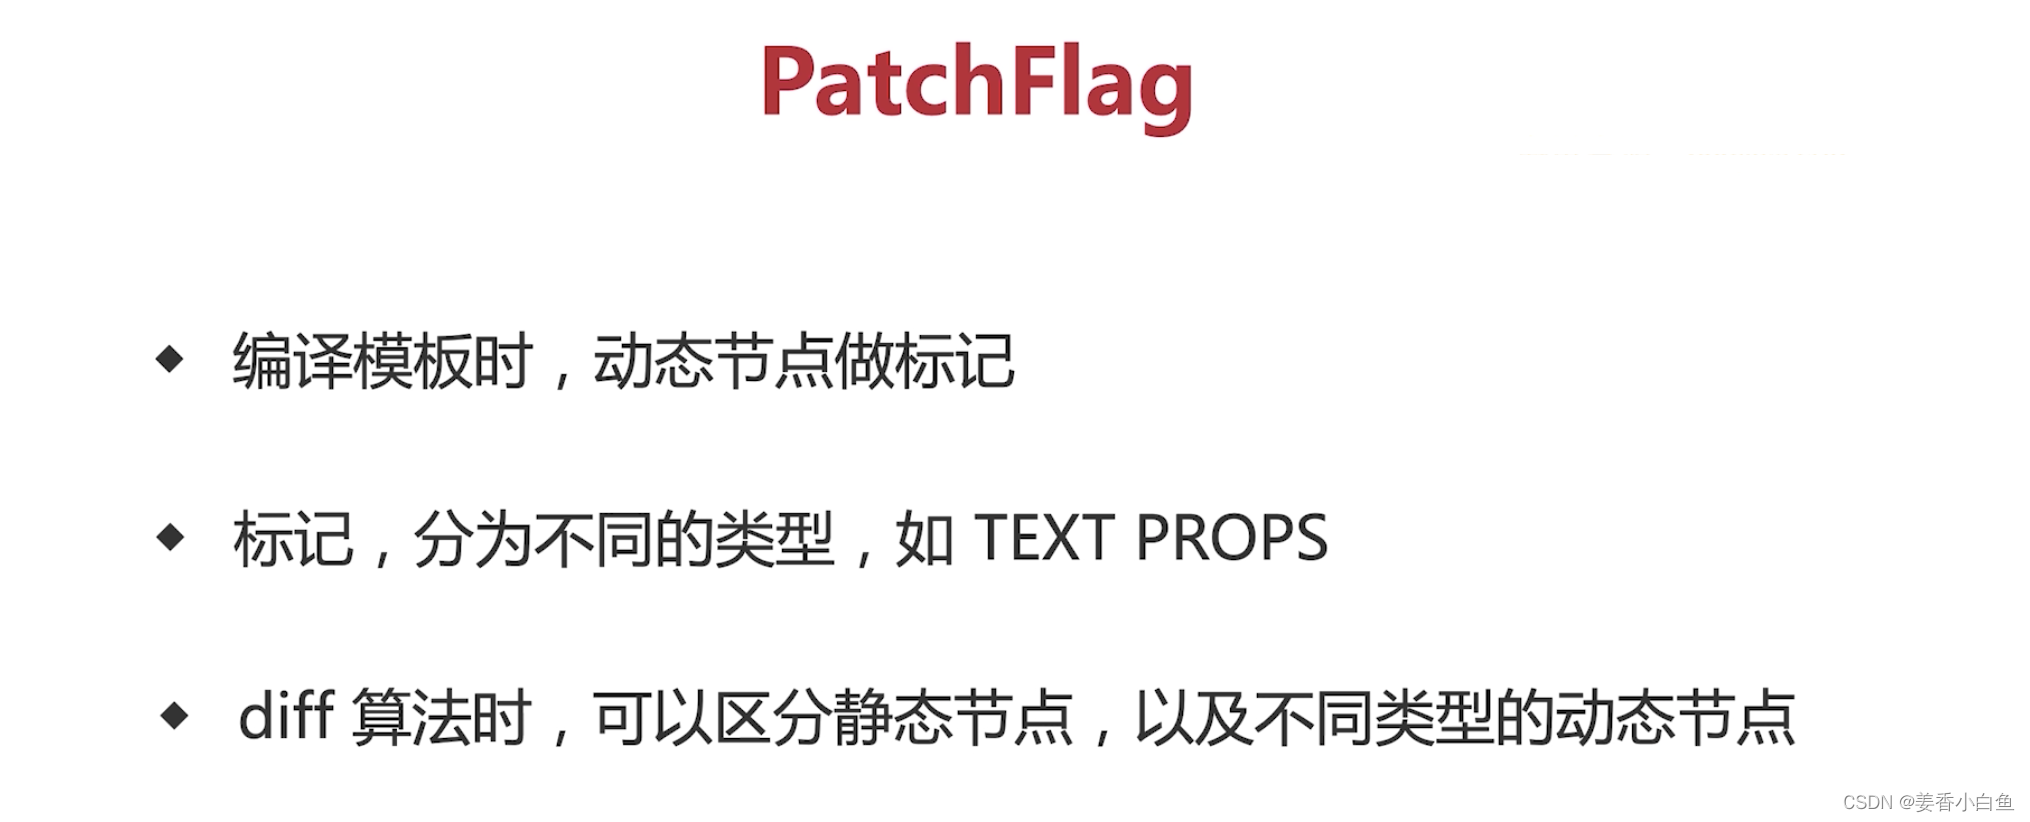
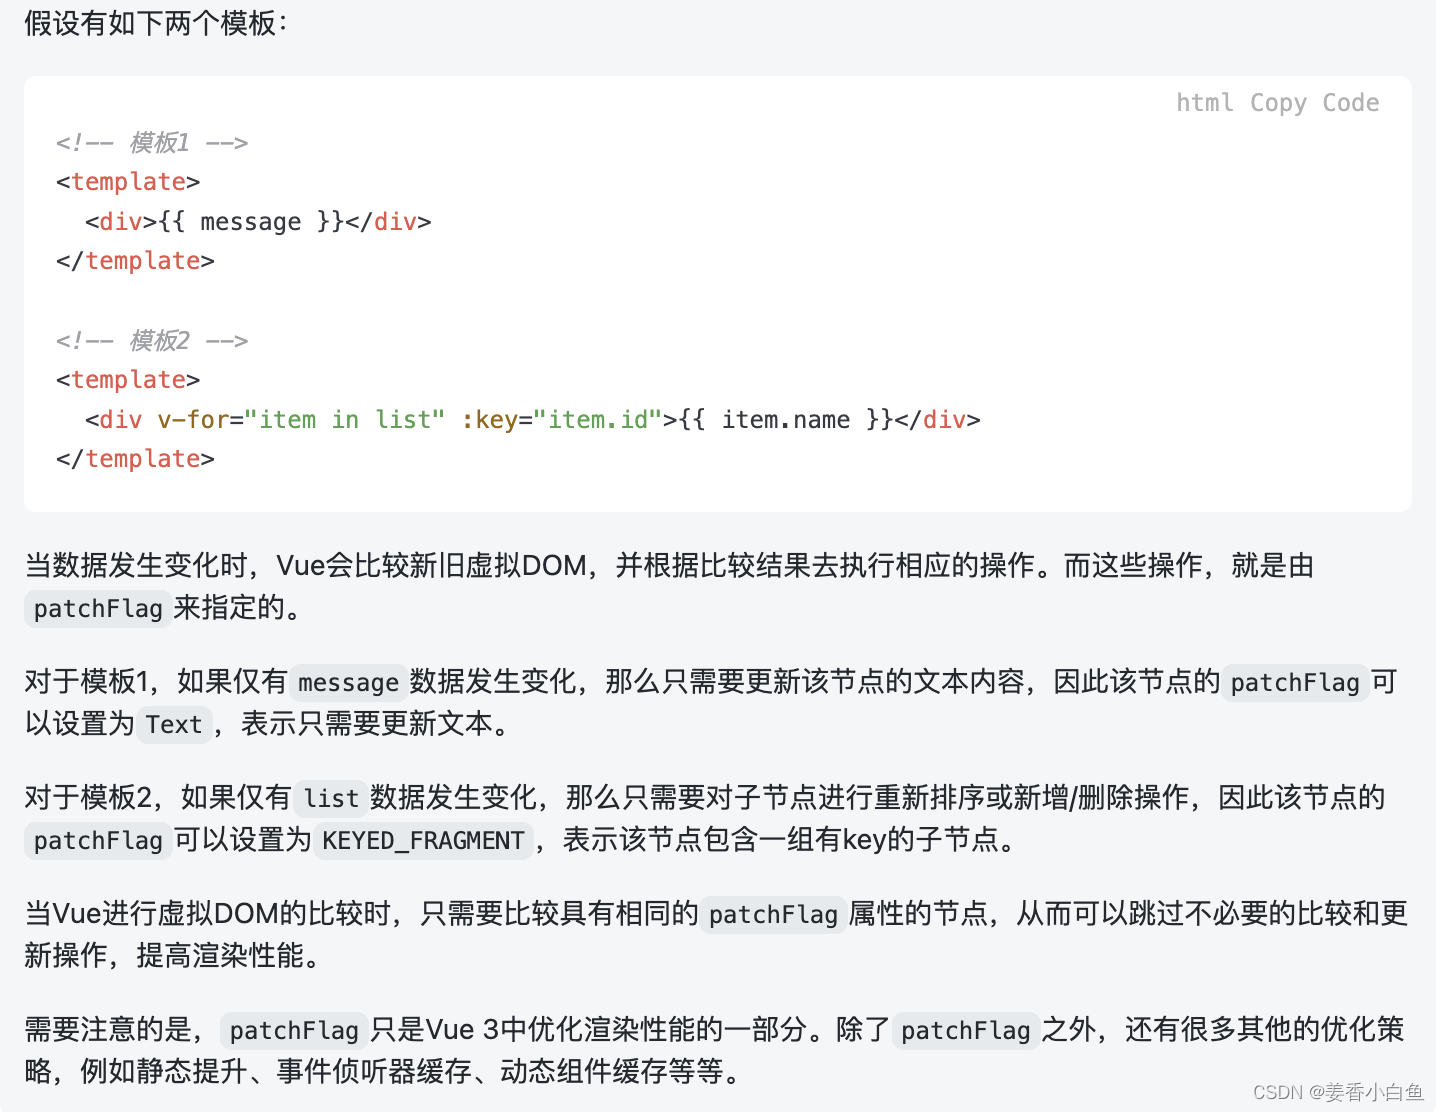
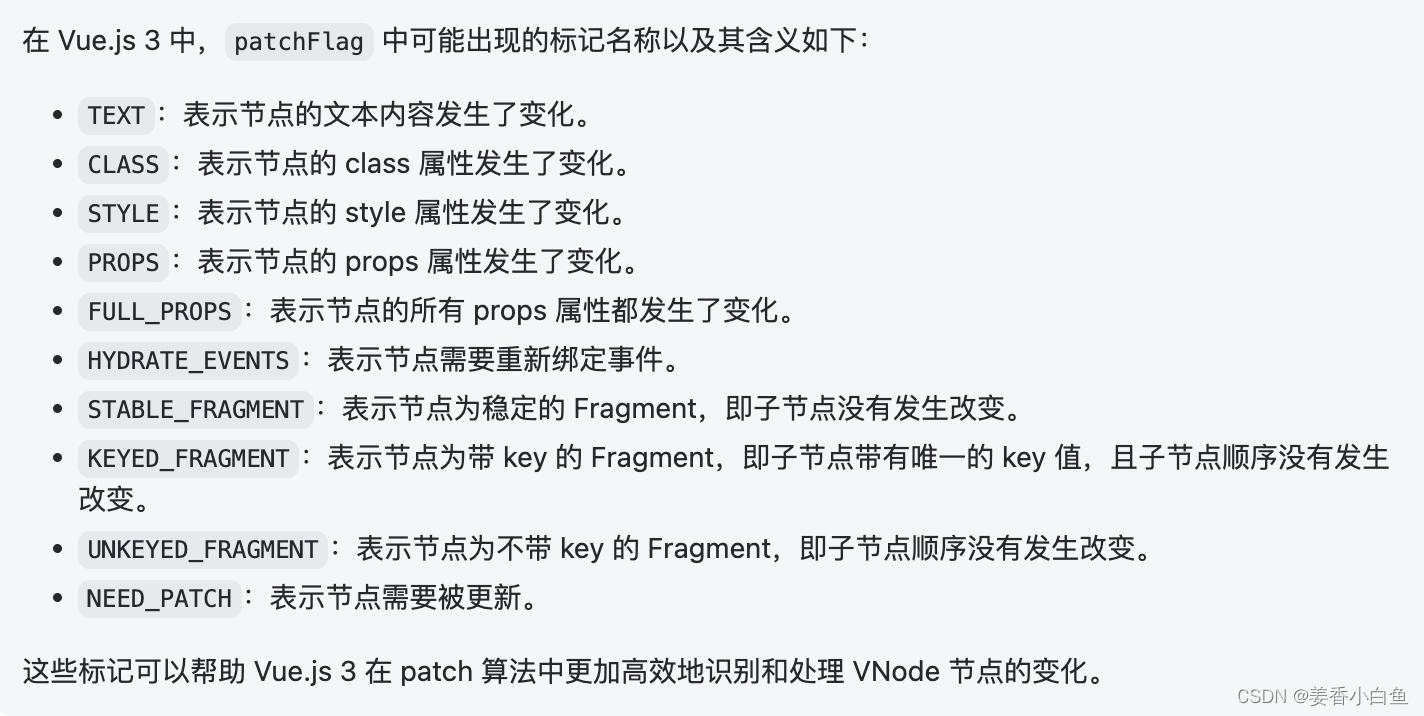
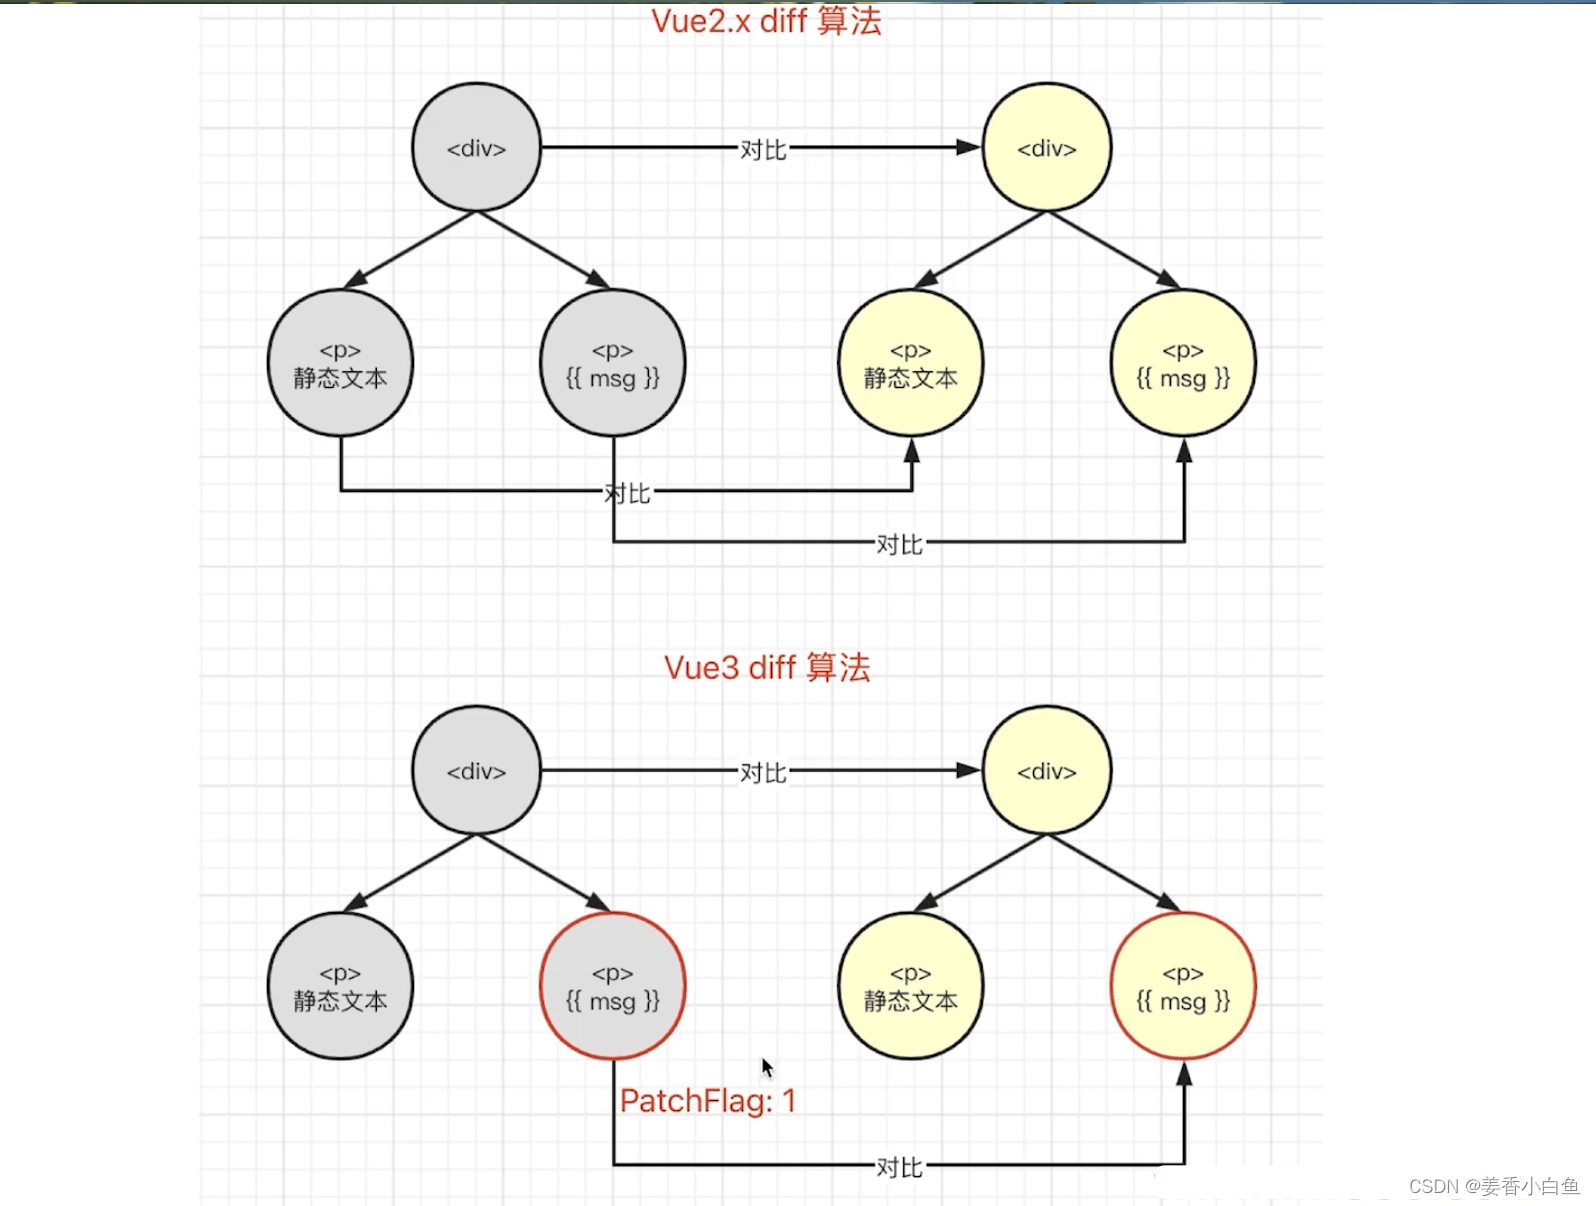
13. VUE3 为何比 VUE2 快? 编译优化如下
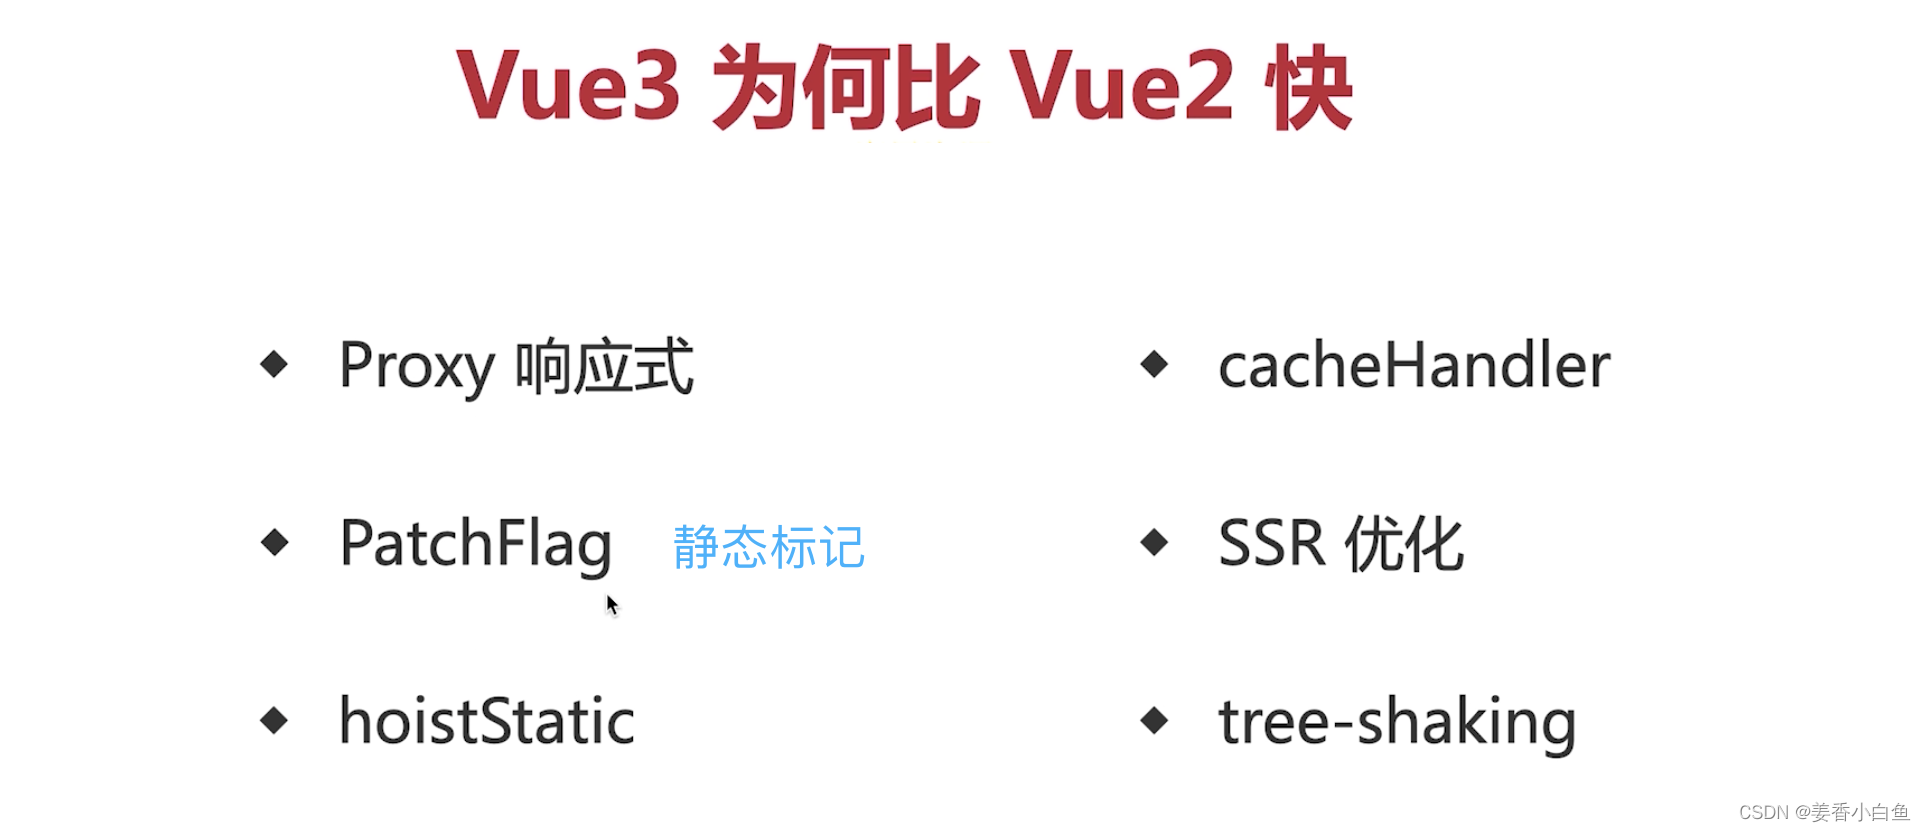
PatchFlag 静态标记
template模版
<div>
  <span>hello vue3</span>
  <span>{

    {

    msg}} 使用TEXT标记</span>
  <span :id="name">使用ClASS标记</span>
  <span :id="name">{

    {

    msg}} 使用TEXT 和 PROPS标记</span>
  <span :id="name" :msg="msg">使用PROPS 放入数组中标记多个</span>
</div>
patchFlag标记后
import {
createElementVNode as _createElementVNode, toDisplayString as _toDisplayString, openBlock as _openBlock, createElementBlock as _createElementBlock } from "vue"
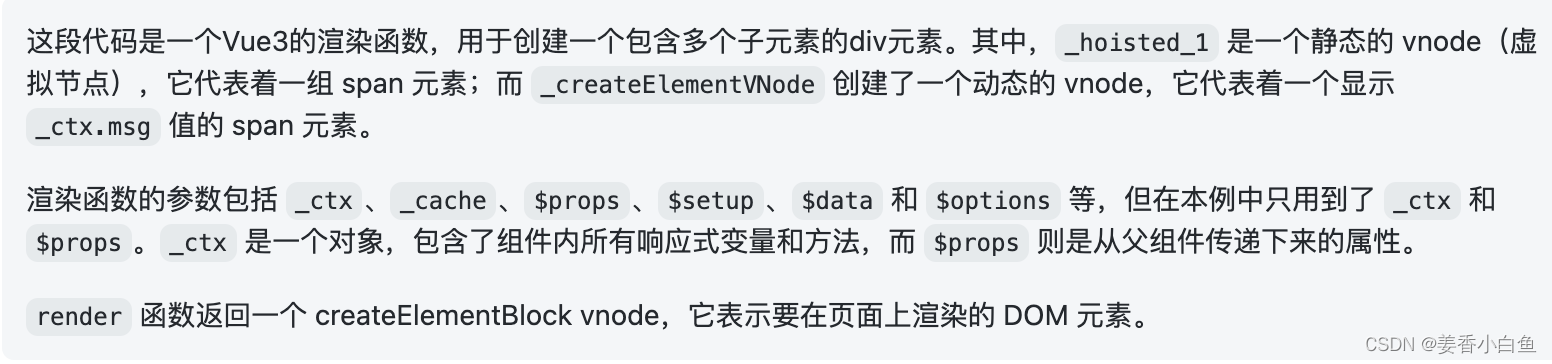
export function render(_ctx, _cache, $props, $setup, $data, $options) {
return (_openBlock(), _createElementBlock("div", null, [
_createElementVNode("span", null, "hello vue3"),
_createElementVNode("span", null, _toDisplayString(_ctx.msg) + " 使用TEXT标记", 1 /* TEXT */),
_createElementVNode("span", {
id: _ctx.name }, "使用ClASS标记", 8 /* PROPS */, ["id"]),
_createElementVNode("span", {
id: _ctx.name }, _toDisplayString(_ctx.msg) + " 使用TEXT 和 PROPS标记", 9 /* TEXT, PROPS */, ["id"]),
_createElementVNode("span", {
id: _ctx.name,
msg: _ctx.msg
}, "使用PROPS 放入数组中标记多个", 8 /* PROPS */, ["id", "msg"])
]))
}
// Check the console for the AST
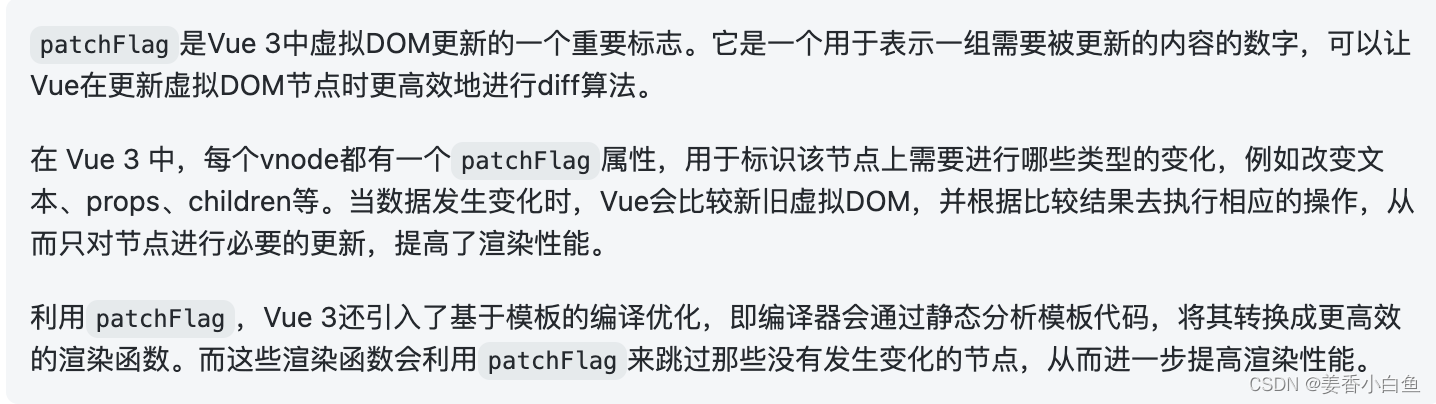
1 就是 TEXT 表示 VNode 的文本内容已经发生了变化,需要更新视图
hositStatic 缓存合并

template模版中
<div>
  <span>hello vue3</span>
  <span>hello vue3</span>
  <span>hello vue3</span>
  <span>{

    {

    msg}}</span>
</div>
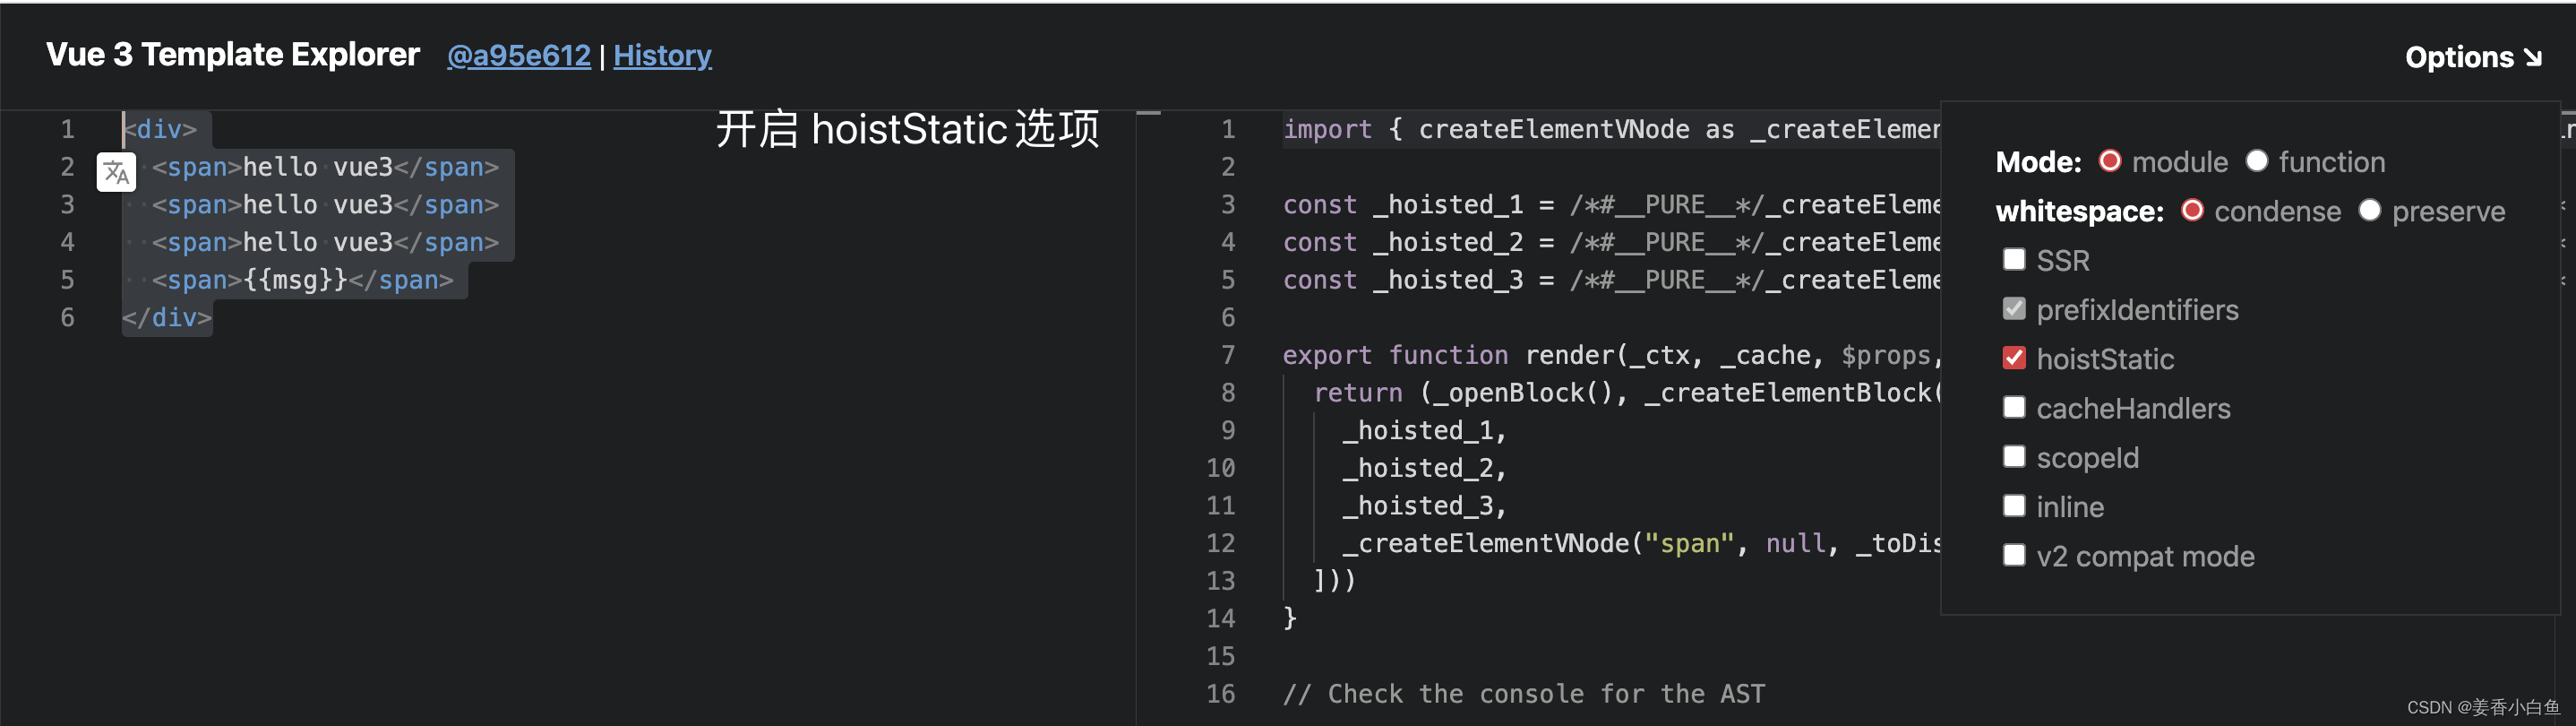
hoistStatic 使用 -1 /* HOISTED */ 就是缓存和提升
import {

     createElementVNode as _createElementVNode, toDisplayString as _toDisplayString, openBlock as _openBlock, createElementBlock as _createElementBlock } from "vue"

const _hoisted_1 = /*#__PURE__*/_createElementVNode("span", null, "hello vue3", -1 /* HOISTED */)
const _hoisted_2 = /*#__PURE__*/_createElementVNode("span", null, "hello vue3", -1 /* HOISTED */)
const _hoisted_3 = /*#__PURE__*/_createElementVNode("span", null, "hello vue3", -1 /* HOISTED */)

export function render(_ctx, _cache, $props, $setup, $data, $options) {


  return (_openBlock(), _createElementBlock("div", null, [
    _hoisted_1,
    _hoisted_2,
    _hoisted_3,
    _createElementVNode("span", null, _toDisplayString(_ctx.msg), 1 /* TEXT */)
  ]))
}

// Check the console for the AST
如果相邻节点 >= 10,会合并为一个节点
import {

     createElementVNode as _createElementVNode, toDisplayString as _toDisplayString, createStaticVNode as _createStaticVNode, openBlock as _openBlock, createElementBlock as _createElementBlock } from "vue"

const _hoisted_1 = /*#__PURE__*/_createStaticVNode("<span>hello vue3</span><span>hello vue3</span><span>hello vue3</span><span>hello vue3</span><span>hello vue3</span><span>hello vue3</span><span>hello vue3</span><span>hello vue3</span><span>hello vue3</span><span>hello vue3</span>", 10)

export function render(_ctx, _cache, $props, $setup, $data, $options) {


  return (_openBlock(), _createElementBlock("div", null, [
    _hoisted_1,
    _createElementVNode("span", null, _toDisplayString(_ctx.msg), 1 /* TEXT */)
  ]))
}

// Check the console for the AST
cacheHandler 缓存事件
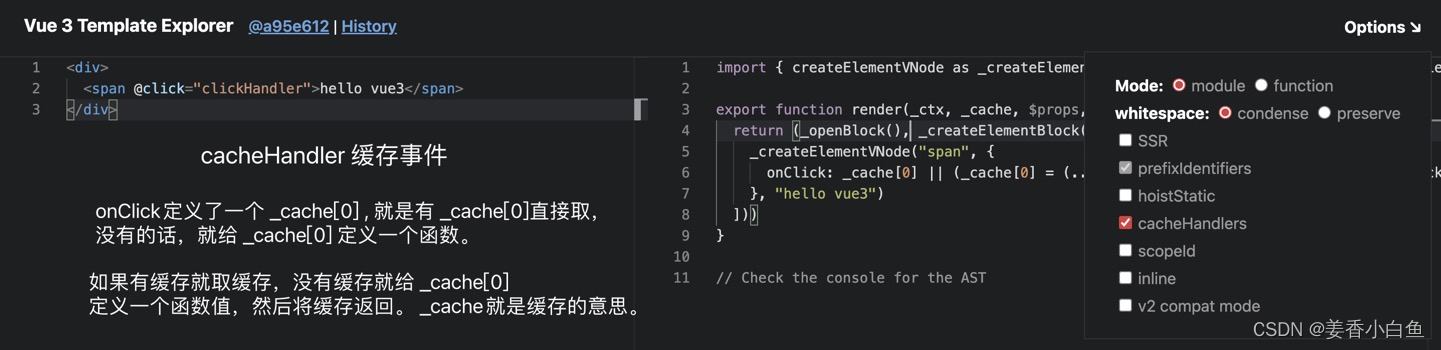
import {

     createElementVNode as _createElementVNode, openBlock as _openBlock, createElementBlock as _createElementBlock } from "vue"

export function render(_ctx, _cache, $props, $setup, $data, $options) {


  return (_openBlock(), _createElementBlock("div", null, [
    _createElementVNode("span", {


      onClick: _cache[0] || (_cache[0] = (...args) => (_ctx.clickHandler && _ctx.clickHandler(...args)))
    }, "hello vue3")
  ]))
}

// Check the console for the AST
SSR 优化
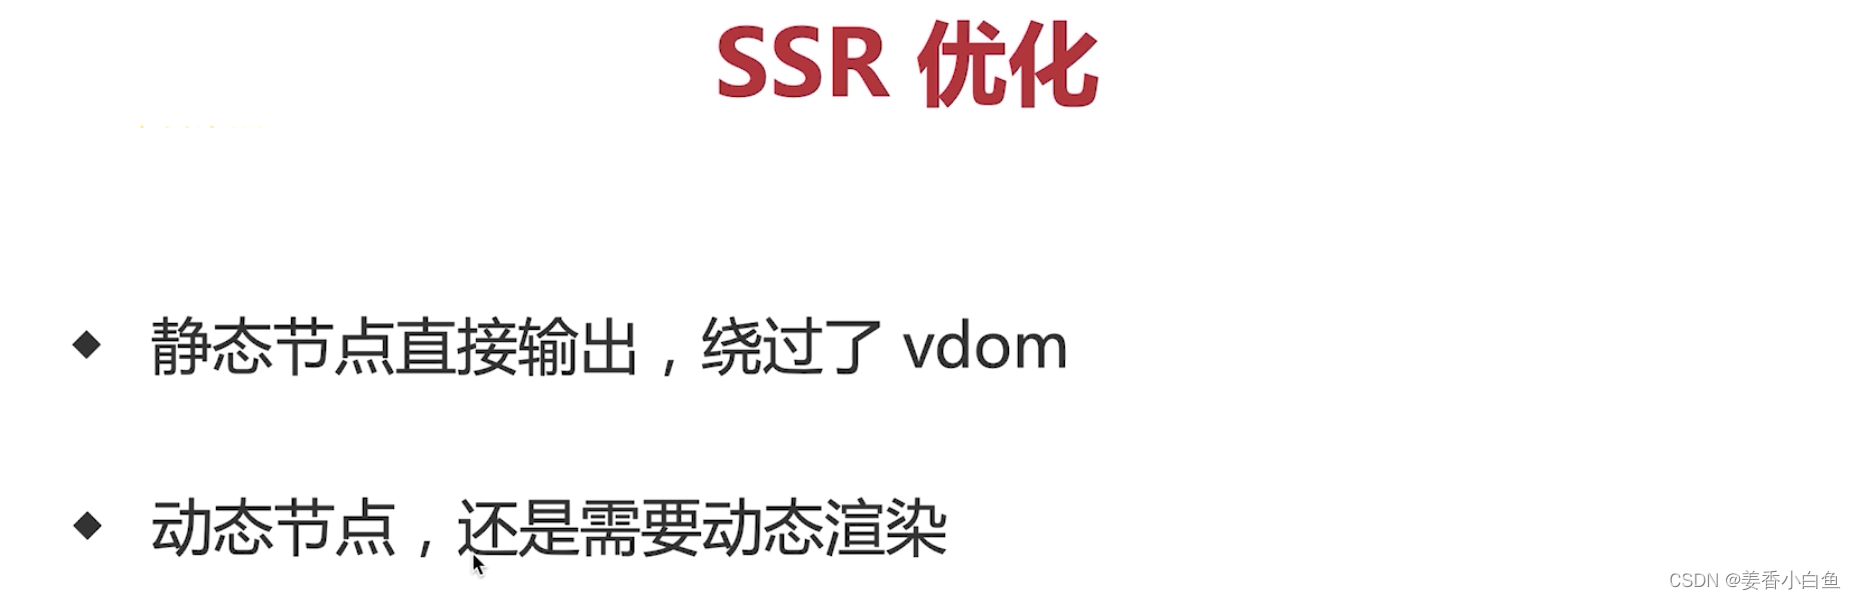
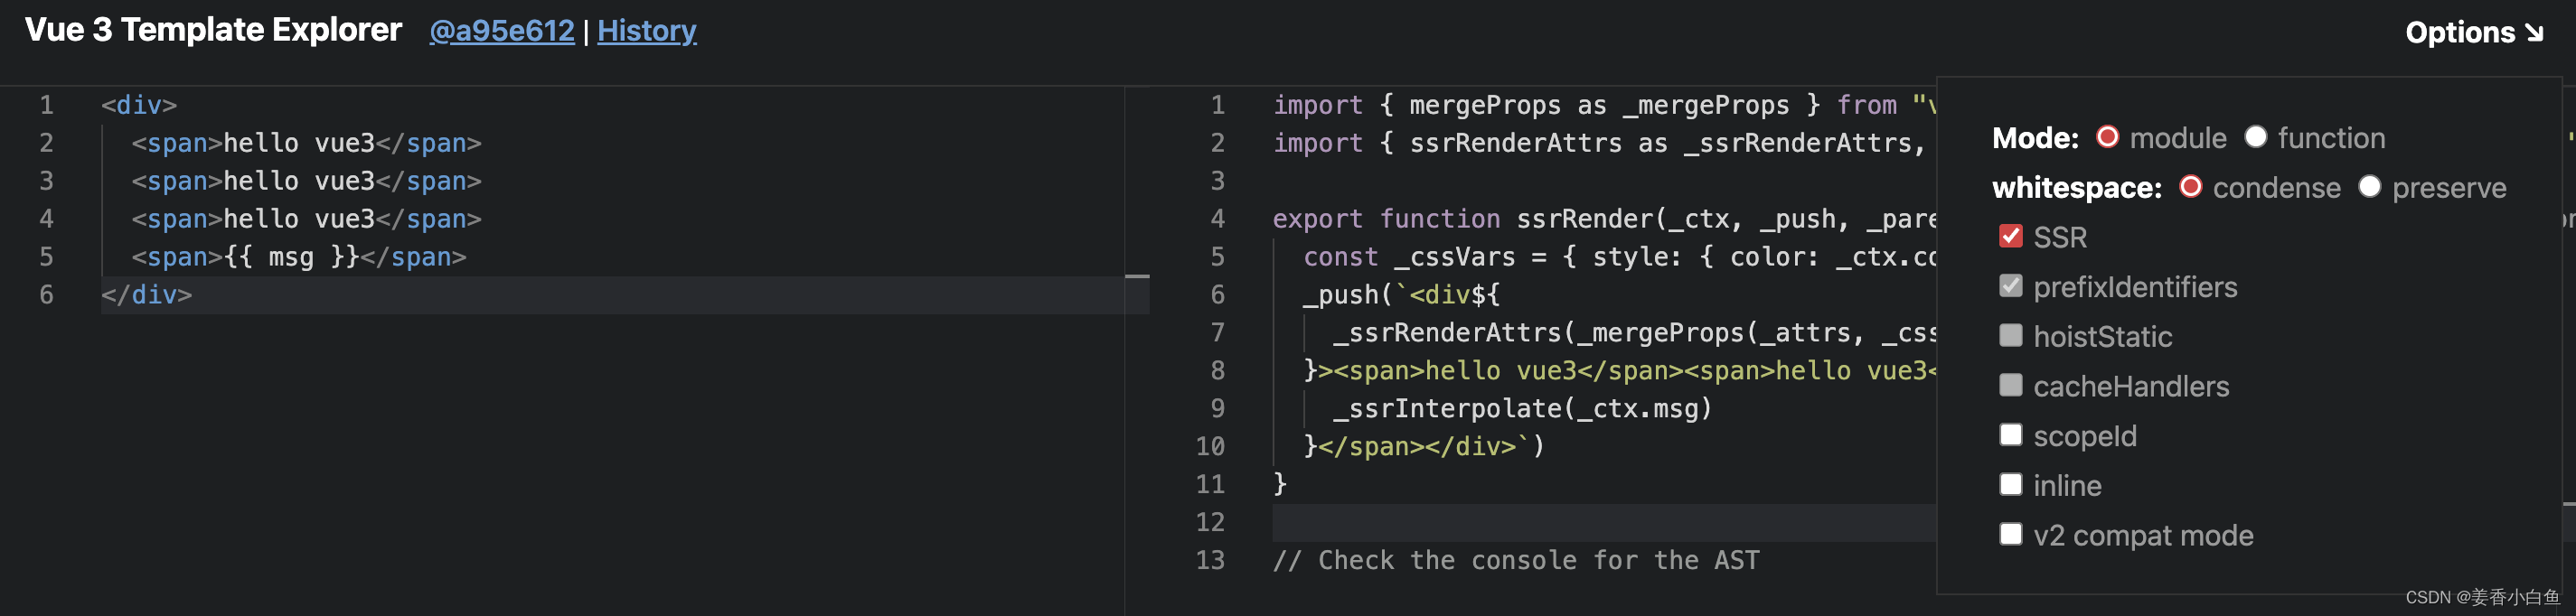
勾选 SSR 后,它在渲染的时候,渲染出了字符串,它没有经过vdom转换就可以了
<div>
  <span>hello vue3</span>
  <span>hello vue3</span>
  <span>hello vue3</span>
  <span>{

    {

     msg }}</span>
</div>
import {

     mergeProps as _mergeProps } from "vue"
import {

     ssrRenderAttrs as _ssrRenderAttrs, ssrInterpolate as _ssrInterpolate } from "vue/server-renderer"

export function ssrRender(_ctx, _push, _parent, _attrs, $props, $setup, $data, $options) {


  const _cssVars = {

     style: {

     color: _ctx.color }}
  _push(`<div${


    _ssrRenderAttrs(_mergeProps(_attrs, _cssVars))
  }><span>hello vue3</span><span>hello vue3</span><span>hello vue3</span><span>${


    _ssrInterpolate(_ctx.msg)
  }</span></div>`)
}

// Check the console for the AST
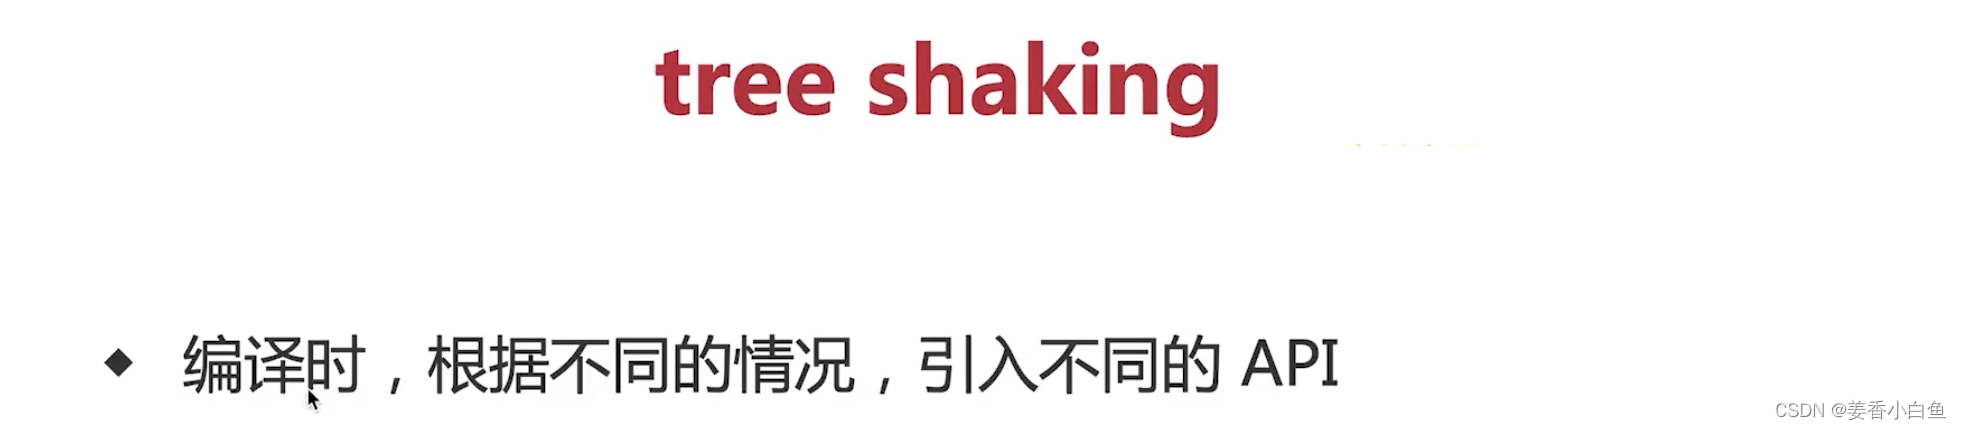
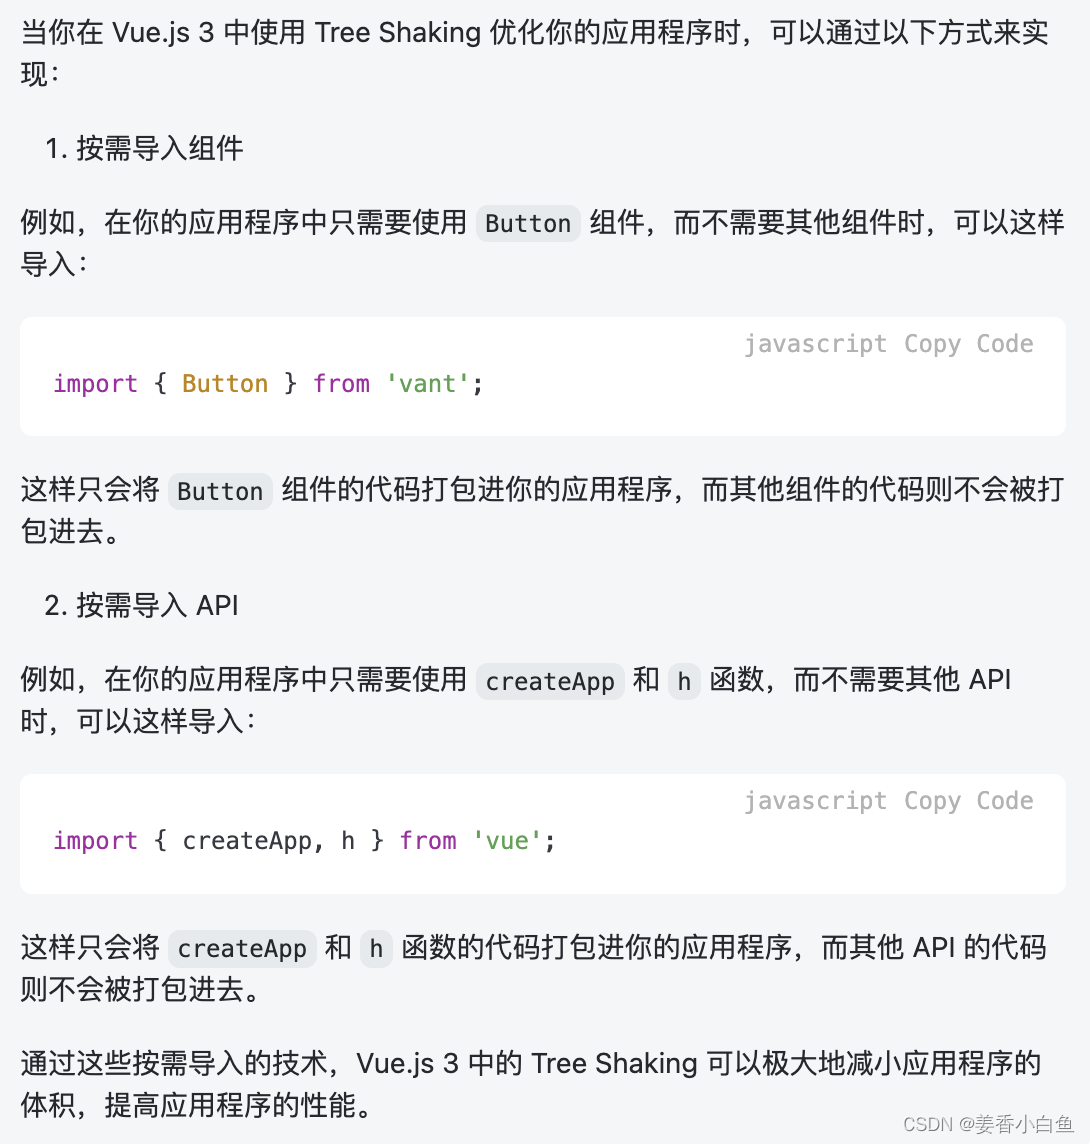
tree shaking
编译时,根据不同的情况,引入不同的API。它不会全部引入,而是按需引入。
- 根据上面 SSR 的代码,需要什么就 import什么
- 动态去 import 引入,不需要的就不去import
总结