官方指导文档:https://docs.konghq.com/gateway/latest/get-started/key-authentication/
一、新建一个用户
这里我们新建一个username=luka的用户
[root@min ~]# curl -i -X POST http://localhost:8001/consumers/ \
>   --data username=luka
HTTP/1.1 201 Created
Date: Tue, 30 May 2023 14:16:56 GMT
Content-Type: application/json; charset=utf-8
Connection: keep-alive
Access-Control-Allow-Origin: http://localhost:8002
X-Kong-Admin-Request-ID: bDQSAZLydiS5oRKeaELyg1ul17eAC7Fo
vary: Origin
Access-Control-Allow-Credentials: true
vary: Origin
Content-Length: 173
X-Kong-Admin-Latency: 18
Server: kong/3.3.0.0-enterprise-edition

{"created_at":1685456216,"custom_id":null,"username":"luka","tags":null,"type":0,"id":"2385bb30-9c0b-4aae-9dc8-34c3b0191589","username_lower":"luka","updated_at":1685456216}[root@min ~]#
二、为用户luka分配一个key
[root@min ~]# curl -i -X POST http://localhost:8001/consumers/luka/key-auth
HTTP/1.1 201 Created
Date: Tue, 30 May 2023 14:20:24 GMT
Content-Type: application/json; charset=utf-8
Connection: keep-alive
Access-Control-Allow-Origin: http://localhost:8002
X-Kong-Admin-Request-ID: f7kYQ2qPNXyVM1sWh3OwLeDNIHDV77I2
vary: Origin
Access-Control-Allow-Credentials: true
Content-Length: 190
X-Kong-Admin-Latency: 10
Server: kong/3.3.0.0-enterprise-edition

{"created_at":1685456424,"id":"796e126a-5e61-41ad-a4ba-404a71feb3bd","ttl":null,"tags":null,"key":"mZiuw2s2mJvFTbwhVx1zpYzFGaUbS2t1","consumer":{"id":"2385bb30-9c0b-4aae-9dc8-34c3b0191589"}}
这一步我们看到kong给我们分配一个key:mZiuw2s2mJvFTbwhVx1zpYzFGaUbS2t1
三、开启全局的key-auth
1、启用key-auth插件
[root@min ~]# curl -X POST http://localhost:8001/plugins/ \
>     --data "name=key-auth"  \
>     --data "config.key_names=apikey"
{"created_at":1685456863,"consumer":null,"protocols":["grpc","grpcs","http","https","ws","wss"],"updated_at":1685456863,"ordering":null,"enabled":true,"instance_name":null,"id":"b123cd0a-2410-4fb5-8cd1-3953ed095d4f","service":null,"name":"key-auth","tags":null,"config":{"hide_credentials":false,"key_in_body":false,"key_in_query":true,"key_in_header":true,"run_on_preflight":true,"key_names":["apikey"],"anonymous":null},"route":null}
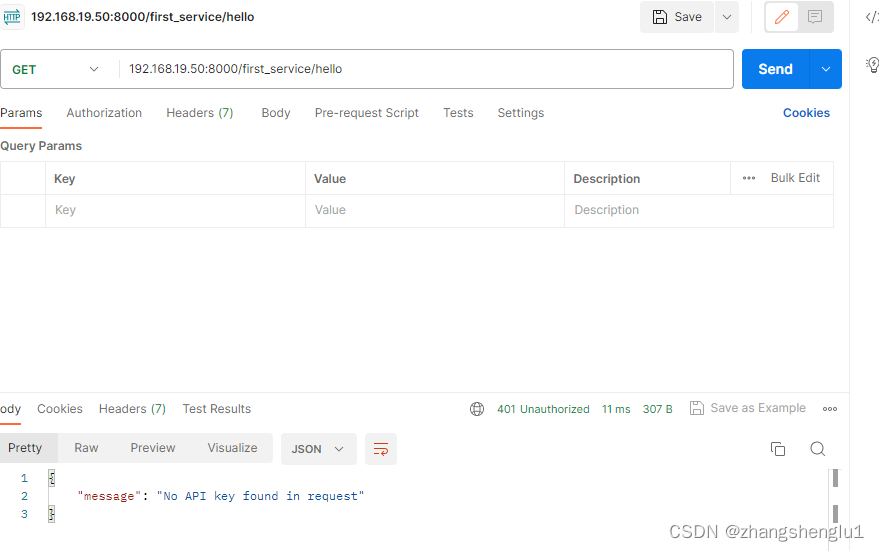
2、不带key进行请求
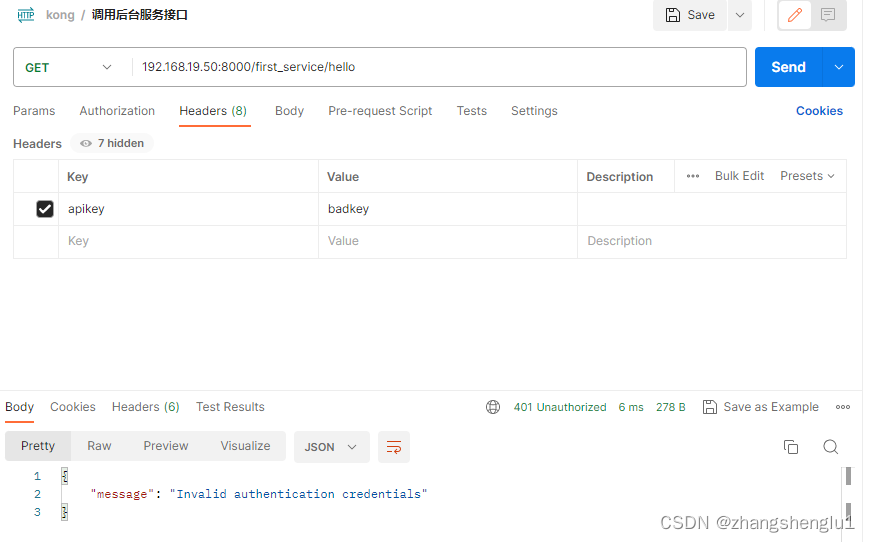
3、携带错误的key进行请求
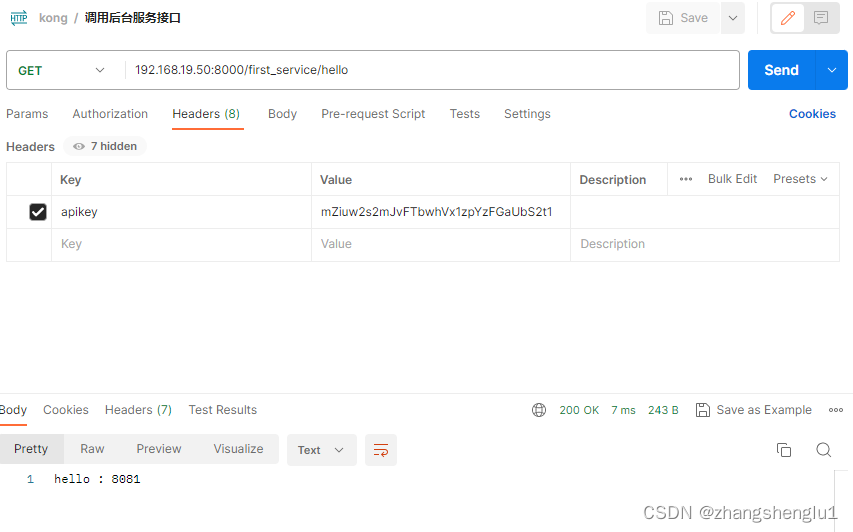
4、使用正确的key进行请求
四、查看当前的已经有的插件,并且取消对应插件
1、查看当前已经有的插件
[root@min ~]# curl -X GET http://192.168.19.50:8001/plugins
{

    "data":[{

    "created_at":1685456863,"consumer":null,"protocols":["grpc","grpcs","http","https","ws","wss"],"updated_at":1685456863,"ordering":null,"enabled":true,"instance_name":null,"id":"b123cd0a-2410-4fb5-8cd1-3953ed095d4f","service":null,"name":"key-auth","tags":null,"config":{

    "hide_credentials":false,"key_in_body":false,"key_in_query":true,"key_in_header":true,"run_on_preflight":true,"key_names":["apikey"],"anonymous":null},"route":null}],"next":null}
2、禁用插件
使用api: http://192.168.19.50:8001/plugins/{plugin_id}来进行禁用
[root@min ~]# curl -X PATCH  http://192.168.19.50:8001/plugins/b123cd0a-2410-4fb5-8cd1-3953ed095d4f --data enabled=false
{

    "created_at":1685456863,"consumer":null,"protocols":["grpc","grpcs","http","https","ws","wss"],"updated_at":1685458558,"ordering":null,"enabled":false,"instance_name":null,"id":"b123cd0a-2410-4fb5-8cd1-3953ed095d4f","service":null,"name":"key-auth","tags":null,"config":{

    "hide_credentials":false,"key_in_body":false,"key_in_query":true,"key_in_header":true,"run_on_preflight":true,"key_names":["apikey"],"anonymous":null},"route":null}
# 3、测试禁用后不携带apikey能够正常访问