0x00 前言
之前我们学过的知识。
0x01 知识点
1.什么是Fragment
Fragment是一种嵌入在活动当中的UI片段。
2.如何创建简单的Fragment
1.创建Fragment布局
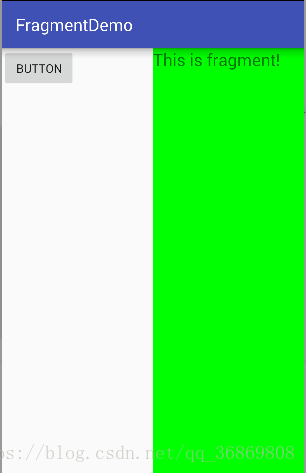
左边
<?xml version="1.0" encoding="utf-8"?>
<LinearLayout xmlns:android="http://schemas.android.com/apk/res/android"
    android:layout_width="match_parent"
    android:layout_height="match_parent"
   >
<Button
    android:id="@+id/button"
    android:layout_gravity="center_horizontal"
    android:layout_width="wrap_content"
    android:layout_height="wrap_content"
    android:text="Button"/>
</LinearLayout>
右边
<?xml version="1.0" encoding="utf-8"?>
<LinearLayout xmlns:android="http://schemas.android.com/apk/res/android"
    android:layout_width="match_parent"
    android:layout_height="match_parent"
    android:background="#00ff00">
    <TextView
        android:layout_width="wrap_content"
        android:layout_height="wrap_content"
        android:textSize="20sp"
        android:text="This is fragment!"
        android:layout_gravity="center_horizontal"/>

</LinearLayout>
2.创建fragment
左边
public class LeftFragment extends Fragment {
    @Nullable
    @Override
    public View onCreateView(LayoutInflater inflater, @Nullable ViewGroup container, @Nullable Bundle savedInstanceState) {
        View view=inflater.inflate(R.layout.left_fragment,container,false);
        return view;
    }
}
右边
public class RightFragment extends Fragment {
    @Nullable
    @Override
    public View onCreateView(LayoutInflater inflater, @Nullable ViewGroup container, Bundle savedInstanceState) {
        View view=inflater.inflate(R.layout.right_fragment,container,false);
        return view;
    }
}
3.布局添加
<?xml version="1.0" encoding="utf-8"?>
<LinearLayout xmlns:android="http://schemas.android.com/apk/res/android"
    xmlns:app="http://schemas.android.com/apk/res-auto"
    xmlns:tools="http://schemas.android.com/tools"
    android:layout_width="match_parent"
    android:layout_height="match_parent"
    tools:context="com.example.hanlei.fragmentdemo.MainActivity">

    <fragment
        android:layout_width="0dp"
        android:layout_height="match_parent"
        android:id="@+id/left"
        android:name="com.example.hanlei.fragmentdemo.LeftFragment"
        android:layout_weight="1"></fragment>
    <fragment
        android:layout_width="0dp"
        android:layout_height="match_parent"
        android:id="@+id/right"
        android:name="com.example.hanlei.fragmentdemo.RightFragment"
        android:layout_weight="1"></fragment>
</LinearLayout>
4.效果展示
3.动态添加Fragment
3.1.创建碎片实例
界面布局
<?xml version="1.0" encoding="utf-8"?>
<LinearLayout xmlns:android="http://schemas.android.com/apk/res/android"
    android:layout_width="match_parent"
    android:layout_height="match_parent"
    android:background="#ffff00"
    android:orientation="vertical"
    >
<TextView
    android:layout_width="wrap_content"
    android:layout_height="wrap_content"
    android:layout_gravity="center_horizontal"
    android:textSize="20sp"
    android:text="This is another right fragment"
    />
</LinearLayout>
fragment实例
public class AnotherRightFragment extends Fragment {
    @Nullable
    @Override
    public View onCreateView(LayoutInflater inflater, @Nullable ViewGroup container, @Nullable Bundle savedInstanceState) {
        View view=inflater.inflate(R.layout.another_right_fragment,container,false);
        return view;
    }
}
3.2.获取FragmentManager
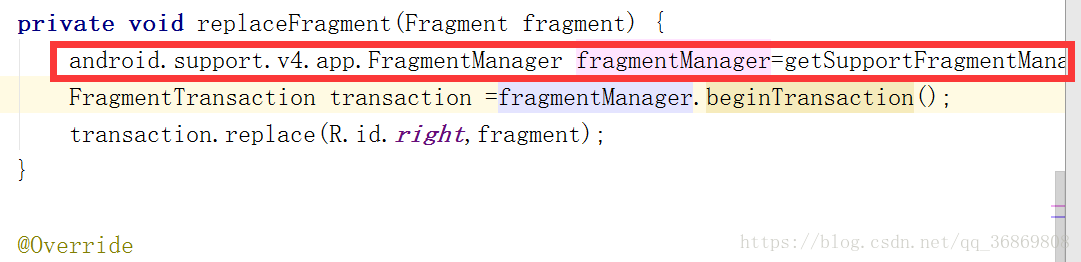
3.3 开启一个事物,用beginTransaction()方法开启
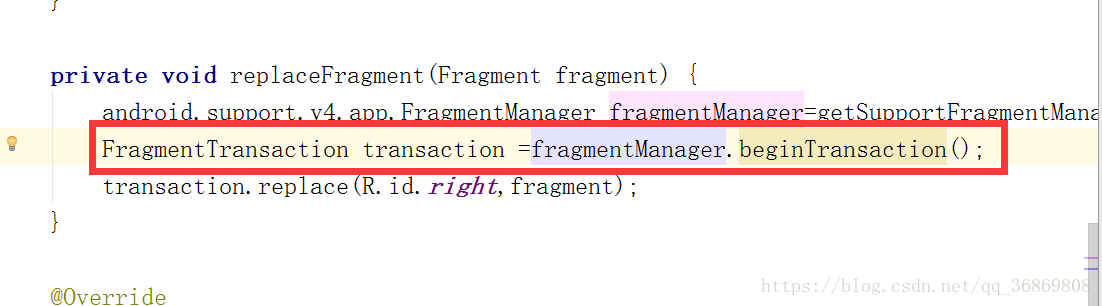
3.4 向容器内添加或替换碎片,用replace()方法实现
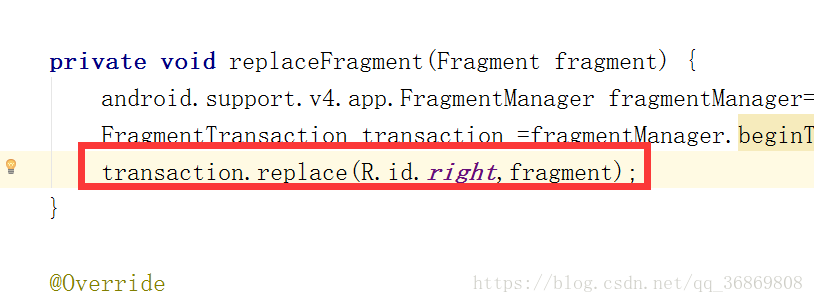
3.5提交事务,用commit()方法完成
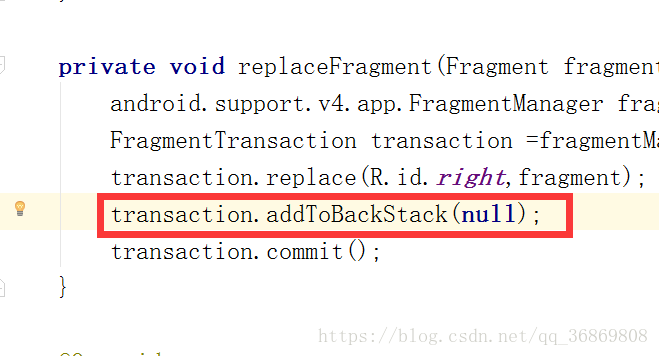
4.在碎片中模拟返回栈
addTobackStack(null);