1、computed函数使用
1.1、computed
在前面我们讲解过计算属性computed:当我们的某些属性是依赖其他状态时,我们可以使用计算属性来处理
- 在前面的Options API中,我们是使用computed选项来完成的;
- 在Composition API中,我们可以在 setup 函数中使用 computed 方法来编写一个计算属性;
如何使用computed呢?
- 方式一:接收一个getter函数,并为 getter 函数返回的值,返回一个不变的 ref 对象;
- 方式二:接收一个具有 get 和 set 的对象,返回一个可变的(可读写)ref 对象;


1.2、示例
App.vue
<template>
  <h2>{

   { fullname }}</h2>
  <button @click="setFullname">设置fullname</button>
  <h2>{

   { scoreLevel }}</h2>
</template>

<script>
  import {reactive, computed, ref} from 'vue'

  export default {
    setup() {
      // 1.定义数据
      const names = reactive({
        firstName: "kobe",
        lastName: "bryant"
      })

      // const fullname = computed(() => {
      //   return names.firstName + " " + names.lastName
      // })
      const fullname = computed({
        set: function (newValue) {
          const tempNames = newValue.split(" ")
          names.firstName = tempNames[0]
          names.lastName = tempNames[1]
        },
        get: function () {
          return names.firstName + " " + names.lastName
        }
      })

      console.log(fullname)  // 是一个ref对象

      function setFullname() {
        fullname.value = "coder why"
        console.log(names)
      }


      // 2.定义score
      const score = ref(89)
      const scoreLevel = computed(() => {
        return score.value >= 60 ? "及格" : "不及格"
      })

      return {
        names,
        fullname,
        setFullname,
        scoreLevel
      }
    }
  }
</script>

<style scoped>
</style>
2、setup中使用ref
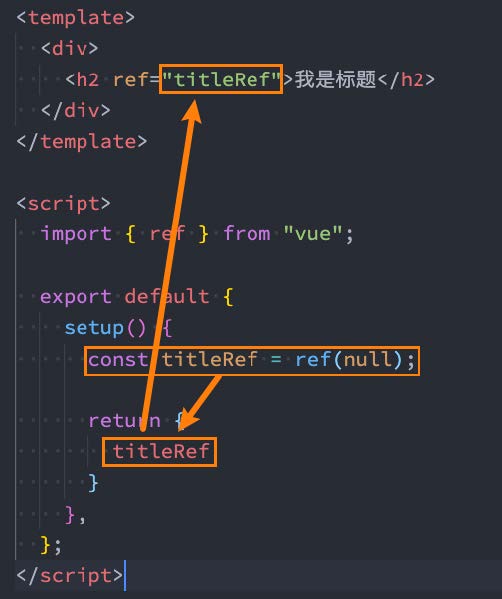
在setup中如何使用ref获取元素或者组件?
- 其实非常简单,我们只需要定义一个ref对象,绑定到元素或者组件的ref属性上即可;
示例:
ShowInfo.vue
<template>
  <div>ShowInfo</div>
</template>

<script>
  export default {
    // methods: {
    //   showInfoFoo() {
    //     console.log("showInfo foo function")
    //   }
    // }
    setup() {
      function showInfoFoo() {
        console.log("showInfo foo function")
      }

      return {
        showInfoFoo
      }
    }
  }
</script>

<style scoped>
</style>
App.vue
<template>
  <!-- 1.获取元素 -->
  <h2 ref="titleRef">我是标题</h2>
  <button ref="btnRef">按钮</button>

  <!-- 2.获取组件实例 -->
  <show-info ref="showInfoRef"></show-info>

  <button @click="getElements">获取元素</button>
</template>

<script>
  import { ref, onMounted } from 'vue'
  import ShowInfo from './ShowInfo.vue'

  export default {
    components: {
      ShowInfo
    },
    setup() {
      const titleRef = ref()
      const btnRef = ref()
      const showInfoRef = ref()

      // mounted的生命周期函数
      onMounted(() => {
        console.log(titleRef.value)
        console.log(btnRef.value)
        console.log(showInfoRef.value)

        showInfoRef.value.showInfoFoo()
      })

      function getElements() {
        console.log(titleRef.value)
      }

      return {
        titleRef,
        btnRef,
        showInfoRef,
        getElements
      }
    }
  }
</script>

<style scoped>
</style>
3、组件的生命周期函数
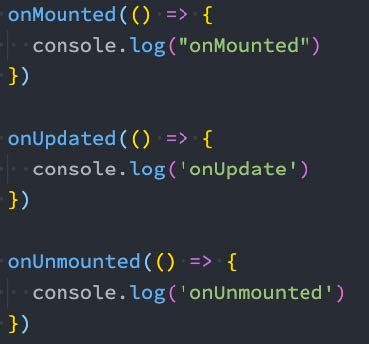
3.1、生命周期钩子
- 我们前面说过 setup 可以用来替代 data 、 methods 、 computed 等等这些选项,也可以替代 生命周期钩子。
- 那么setup中如何使用生命周期函数呢?
- 可以使用直接导入的 onX 函数注册生命周期钩子;
| 选项式 API |
Hook inside setup |
| beforecreate |
无 |
| created |
无 |
| beforeMount |
onBeforeMount |
| mounted |
onMounted |
| beforeupdate |
onBeforeupdate |
| updated |
onUpdated |
| beforeUnmount |
onBeforeUnmount |
| unmounted |
onUnmounted |
| activated |
onActivated |
| deactivated |
onDeactivated |
Tip:因为 setup 是围绕 beforeCreate 和 created 生命周期钩子运行的,所以不需要显式地定义它们。换句话说,在这些钩子中缩写的任何代码都应该直接在 setup 函数中编写。
3.2、示例
App.vue
<template>
  <div>AppContent</div>
</template>

<script>
  import {onMounted, onUpdated, onUnmounted} from 'vue'

  export default {
    beforeCreate() {

    },
    // created() {

    // },
    // beforeMount() {

    // },
    // mounted() {

    // },
    // beforeUpdate() {

    // },
    // updated() {

    // }
    setup() {
      // 在执行setup函数的过程中, 你需要注册别的生命周期函数
      onMounted(() => {
        console.log("onmounted")
      })
    }
  }
</script>

<style scoped>
</style>
4、Provide/Inject使用
4.1、Provide函数
- 事实上我们之前还学习过Provide和Inject,Composition API也可以替代之前的 Provide 和 Inject 的选项。
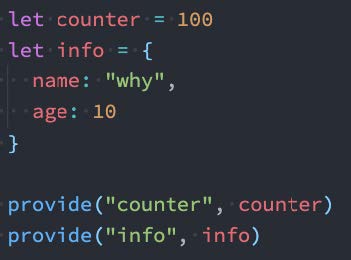
- 我们可以通过 provide来提供数据:
- 可以通过 provide 方法来定义每个 Property;
- provide可以传入两个参数:
- name:提供的属性名称;
- value:提供的属性值;
4.2、Inject函数
- 在 后代组件 中可以通过 inject 来注入需要的属性和对应的值:
- 可以通过 inject 来注入需要的内容;
- inject可以传入两个参数:
- 要 inject 的 property 的 name;
- 默认值;

4.3、数据的响应式
为了增加 provide 值和 inject 值之间的响应性,我们可以在 provide 值时使用 ref 和 reactive。

4.4、示例
ShowInfo.vue
<template>
  <div>ShowInfo: {

   { name }}-{

   { age }}-{

   { height }}</div>
</template>

<script>
  import {inject} from 'vue'

  export default {
    // inject的options api注入, 那么依然需要手动来解包
    // inject: ["name", "age"],
    setup() {
      const name = inject("name")
      const age = inject("age")
      const height = inject("height", 1.88)

      return {
        name,
        age,
        height
      }
    }
  }
</script>

<style scoped>
</style>
App.vue
<template>
  <div>AppContent: {

   { name }}</div>
  <button @click="name = 'kobe'">app btn</button>
  <show-info></show-info>
</template>

<script>
  import { provide, ref } from 'vue'
  import ShowInfo from './ShowInfo.vue'

  export default {
    components: {
      ShowInfo
    },
    setup() {
      const name = ref("why")

      provide("name", name)
      provide("age", 18)

      return {
        name
      }
    }
  }
</script>

<style scoped>
</style>
5、watch/watchEffect
5.1、侦听数据的变化
- 在前面的Options API中,我们可以通过watch选项来侦听data或者props的数据变化,当数据变化时执行某一些操作。
- 在Composition API中,我们可以使用watchEffect和watch来完成响应式数据的侦听;
- watchEffect:用于自动收集响应式数据的依赖;
- watch:需要手动指定侦听的数据源;
5.2、Watch的使用
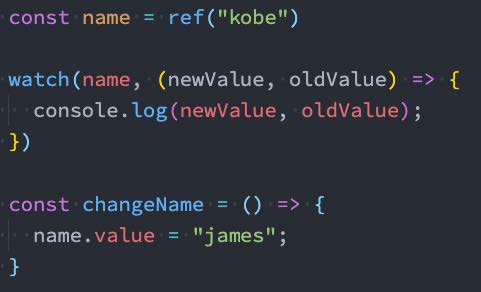
watch的API完全等同于组件watch选项的Property:
- watch需要侦听特定的数据源,并且执行其回调函数;
- 默认情况下它是惰性的,只有当被侦听的源发生变化时才会执行回调;
5.3、侦听多个数据源
侦听器还可以使用数组同时侦听多个源:

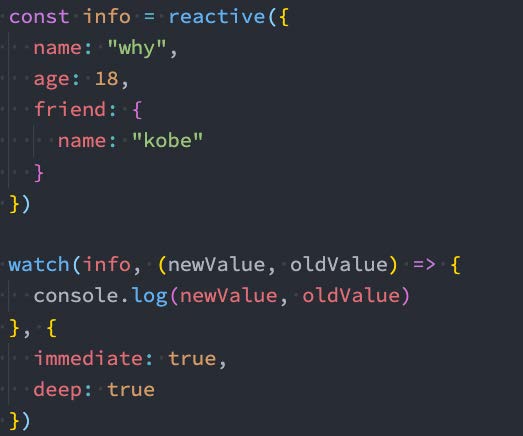
5.4、watch的选项
如果我们希望侦听一个深层的侦听,那么依然需要设置 deep 为true:也可以传入 immediate 立即执行;
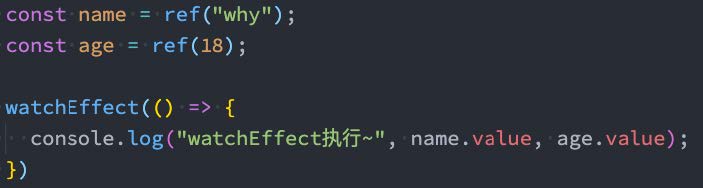
5.5、watchEffect
- 当侦听到某些响应式数据变化时,我们希望执行某些操作,这个时候可以使用 watchEffect。
- 我们来看一个案例:
- 首先,watchEffect传入的函数会被立即执行一次,并且在执行的过程中会收集依赖;
- 其次,只有收集的依赖发生变化时,watchEffect传入的函数才会再次执行;
5.6、watchEffect的停止侦听
- 如果在发生某些情况下,我们希望停止侦听,这个时候我们可以获取watchEffect的返回值函数,调用该函数即可。
- 比如在上面的案例中,我们age达到20的时候就停止侦听:

5.7、示例
App-watch.vue
<template>
  <div>AppContent</div>
  <button @click="message = '你好啊,李银河!'">修改message</button>
  <button @click="info.friend.name = 'james'">修改info</button>
</template>

<script>
  import {reactive, ref, watch} from 'vue'

  export default {
    setup() {
      // 1.定义数据
      const message = ref("Hello World")
      const info = reactive({
        name: "why",
        age: 18,
        friend: {
          name: "kobe"
        }
      })

      // 2.侦听数据的变化
      watch(message, (newValue, oldValue) => {
        console.log(newValue, oldValue)
      })

      watch(info, (newValue, oldValue) => {
        console.log(newValue, oldValue)
        console.log(newValue === oldValue) // true,两者为同一个对象(浅拷贝)
      }, {
        // 这个属性作用就是,加载后默认就会执行一次这个console.log回调方法
        immediate: true
      })


      // 3.监听reactive数据变化后, 获取普通对象
      watch(() => ({...info}), (newValue, oldValue) => {
        console.log(newValue, oldValue)
      }, {
        immediate: true,
        deep: true
      })

      return {
        message,
        info
      }
    }
  }
</script>

<style scoped>
</style>
App.vue
<template>
  <div>
    <h2>当前计数: {

   { counter }}</h2>
    <button @click="counter++">+1</button>
    <button @click="name = 'kobe'">修改name</button>
  </div>
</template>

<script>
  import { watchEffect, watch, ref } from 'vue'

  export default {
    setup() {
      const counter = ref(0)
      const name = ref("why")

      // watch(counter, (newValue, oldValue) => {})

      // 1.watchEffect传入的函数默认会直接被执行
      // 2.在执行的过程中, 会自动的收集依赖(依赖哪些响应式的数据)
      const stopWatch = watchEffect(() => {
        console.log("-------", counter.value, name.value)

        // 判断counter.value > 10
        if (counter.value >= 10) {
          // 停止监听
          stopWatch()
        }
      })

      return {
        counter,
        name
      }
    }
  }
</script>

<style scoped>
</style>
6、script setup语法糖
6.1、script setup语法
- <script setup> 是在单文件组件 (SFC) 中使用组合式 API 的编译时语法糖,当同时使用 SFC 与组合式 API 时则推荐该语法。
- 更少的样板内容,更简洁的代码;
- 能够使用纯 Typescript 声明 prop 和抛出事件;
- 更好的运行时性能 ;
- 更好的 IDE 类型推断性能 ;
- 使用这个语法,需要将 setup attribute 添加到 <script> 代码块上:

- 里面的代码会被编译成组件 setup() 函数的内容:
- 这意味着与普通的 <script> 只在组件被首次引入的时候执行一次不同;
- <script setup> 中的代码会在每次组件实例被创建的时候执行。
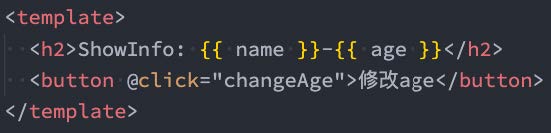
6.2、顶层的绑定会被暴露给模板
当使用 <script setup> 的时候,任何在 <script setup> 声明的顶层的绑定 (包括变量,函数声明,以及 import 引入的内容)都能在模板中直接使用:
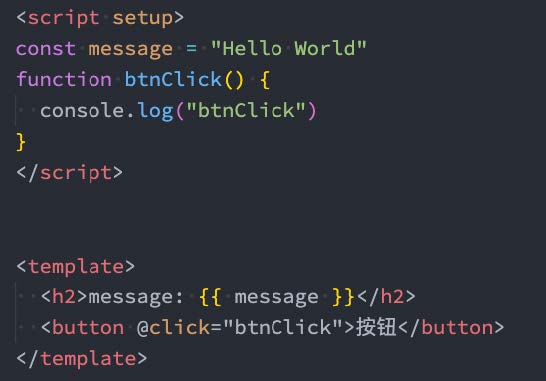
响应式数据需要通过ref、reactive来创建。
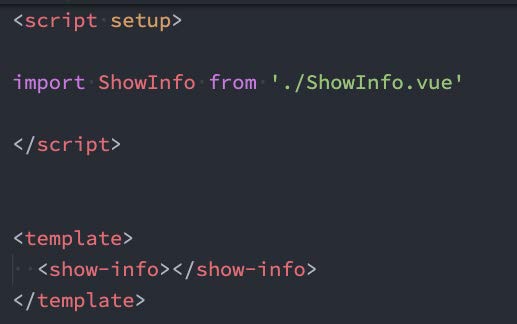
6.3、导入的组件直接使用
<script setup> 范围里的值也能被直接作为自定义组件的标签名使用:
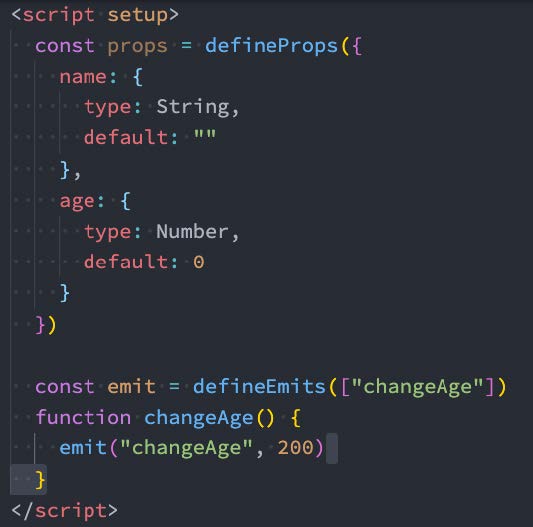
6.4、defineProps() 和 defineEmits()
为了在声明 props 和 emits 选项时获得完整的类型推断支持,我们可以使用 defineProps 和 defineEmits API,它们将自动地在 <script setup> 中可用:
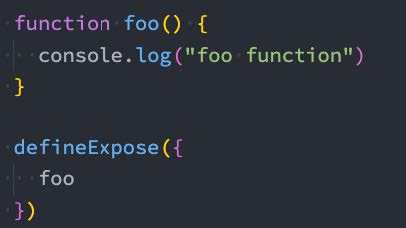
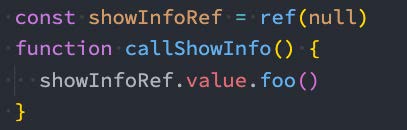
6.5、defineExpose()
- 使用 <script setup> 的组件是默认关闭的:
- 通过模板 ref 或者 $parent 链获取到的组件的公开实例,不会暴露任何在 <script setup> 中声明的绑定;
- 通过 defineExpose 编译器宏来显式指定在 <script setup> 组件中要暴露出去的 property:
6.6、示例
ShowInfo.vue
<template>
  <div>ShowInfo: {

   { name }}-{

   { age }}</div>
  <button @click="showInfoBtnClick">showInfoButton</button>
</template>

<script setup>

  // 定义props
  const props = defineProps({
    name: {
      type: String,
      default: "默认值"
    },
    age: {
      type: Number,
      default: 0
    }
  })

  // 绑定函数, 并且发出事件
  const emits = defineEmits(["infoBtnClick"])

  function showInfoBtnClick() {
    emits("infoBtnClick", "showInfo内部发生了点击")
  }

  // 定义foo的函数
  function foo() {
    console.log("foo function")
  }

  // 暴露实例
  defineExpose({
    foo
  })

</script>

<style scoped>
</style>
App.vue
<template>
  <div>AppContent: {

   { message }}</div>
  <button @click="changeMessage">修改message</button>
  <show-info name="why"
             :age="18"
             @info-btn-click="infoBtnClick"
             ref="showInfoRef">
  </show-info>
  <show-info></show-info>
  <show-info></show-info>
</template>

<script setup>
  // 1.所有编写在顶层中的代码, 都是默认暴露给template可以使用
  import {ref, onMounted} from 'vue'

  // 组件不在需要注册,直接导入使用即可
  import ShowInfo from './ShowInfo.vue'

  // 2.定义响应式数据
  const message = ref("Hello World")
  console.log(message.value)

  // 3.定义绑定的函数
  function changeMessage() {
    message.value = "你好啊, 李银河!"
  }

  function infoBtnClick(payload) {
    console.log("监听到showInfo内部的点击:", payload)
  }

  // 4.获取组件实例
  const showInfoRef = ref()
  onMounted(() => {
    showInfoRef.value.foo()
  })

</script>

<style scoped>
</style>
7、自定义Hook练习
useCounter.js
import { ref, onMounted } from 'vue'

export default function useCounter() {
  const counter = ref(0)
  function increment() {
    counter.value++
  }
  function decrement() {
    counter.value--
  }
  onMounted(() => {
    setTimeout(() => {
      counter.value = 989
    }, 1000);
  })

  return {
    counter,
    increment,
    decrement
  }
}
useScrollPosition.js
import { reactive } from 'vue'

export default function useScrollPosition() {
  // 1.使用reative记录位置
  const scrollPosition = reactive({
    x: 0,
    y: 0
  })

  // 2.监听滚动
  document.addEventListener("scroll", () => {
    scrollPosition.x = window.scrollX
    scrollPosition.y = window.scrollY
  })


  return {
    scrollPosition
  }
}
useTitle.js
import { ref, watch } from "vue";

export default function useTitle(titleValue) {
  // document.title = title

  // 定义ref的引入数据
  const title = ref(titleValue)

  // 监听title的改变
  watch(title, (newValue) => {
    document.title = newValue
  }, {
    immediate: true
  })

  // 返回ref值
  return {
    title
  }
}
About.vue
<template>
  <h2>About计数: {

   { counter }}</h2>
  <button @click="increment">+1</button>
  <button @clcik="decrement">-1</button>
</template>

<script>
  import { onActivated } from 'vue'
  import useCounter from '../hooks/useCounter'
  import useTitle from '../hooks/useTitle'

  export default {
    setup() {

      // 切换标题
      useTitle("关于")

      return {
        ...useCounter()
      }
    }
  }
</script>

<style scoped>
</style>
Home.vue
<template>
  <h2>Home计数: {

   { counter }}</h2>
  <button @click="increment">+1</button>
  <button @click="decrement">-1</button>

  <button @click="popularClick">首页-流行</button>
  <button @click="hotClick">首页-热门</button>
  <button @click="songClick">首页-歌单</button>

  <div class="scroll">
    <h2>x: {

   { scrollPosition.x }}</h2>
    <h2>y: {

   { scrollPosition.y }}</h2>
  </div>
</template>

<script>
  import { onMounted, ref } from 'vue'
  import useCounter from '../hooks/useCounter'
  import useTitle from '../hooks/useTitle'
  import useScrollPosition from '../hooks/useScrollPosition'

  export default {
    setup() {
      // 1.counter逻辑
      const { counter, increment, decrement } = useCounter()

      // 2.修改标题
      const { title } = useTitle("首页")

      // 3.监听按钮的点击
      function popularClick() {
        title.value = "首页-流行"
      }
      function hotClick() {
        title.value = "首页-热门"
      }
      function songClick() {
        title.value = "首页-歌单"
      }

      // 4.获取滚动位置
      const { scrollPosition } = useScrollPosition()
      console.log(scrollPosition)

      return {
        counter,
        increment,
        decrement,
        popularClick,
        hotClick,
        songClick,
        scrollPosition
      }
    }
  }
</script>

<style scoped>
</style>
App.vue
<template>
  <div>AppContent</div>
  <button @click="changeTitle">修改title</button>

  <!-- 1.计数器 -->
  <!-- <hr>
  <home></home>
  <hr>
  <about></about> -->

  <!-- 2.home和about页面的切换 -->
  <button @click="currentPage = 'home'">home</button>
  <button @click="currentPage = 'about'">about</button>

  <component :is="currentPage"></component>

  <div class="content"></div>

  <br><br><br><br><br><br>
  <br><br><br><br><br><br>
  <br><br><br><br><br><br>
  <br><br><br><br><br><br>
  <br><br><br><br><br><br>
  <br><br><br><br><br><br>
  <br><br><br><br><br><br>
  <br><br><br><br><br><br>
  <br><br><br><br><br><br>
  <br><br><br><br><br><br>
  <br><br><br><br><br><br>
</template>

<script>
  import { ref } from 'vue'
  import Home from './views/Home.vue'
  import About from './views/About.vue'

  import useTitle from './hooks/useTitle'

  export default {
    components: {
      Home,
      About
    },
    setup() {
      const currentPage = ref("home")

      function changeTitle() {
        useTitle("app title")
      }

      return {
        changeTitle,
        currentPage
      }
    }
  }
</script>

<style scoped>
  .content {
    width: 3000px;
    height: 100px;
    background-color: orange;
  }
</style>
注意:这个案例只是展示了setup中其他函数的搭配使用方式。