正式开发环境中,我们一般不是使用remix去编译和部署合约,而是使用goland调用web3进行开发。
Web3工作模式:
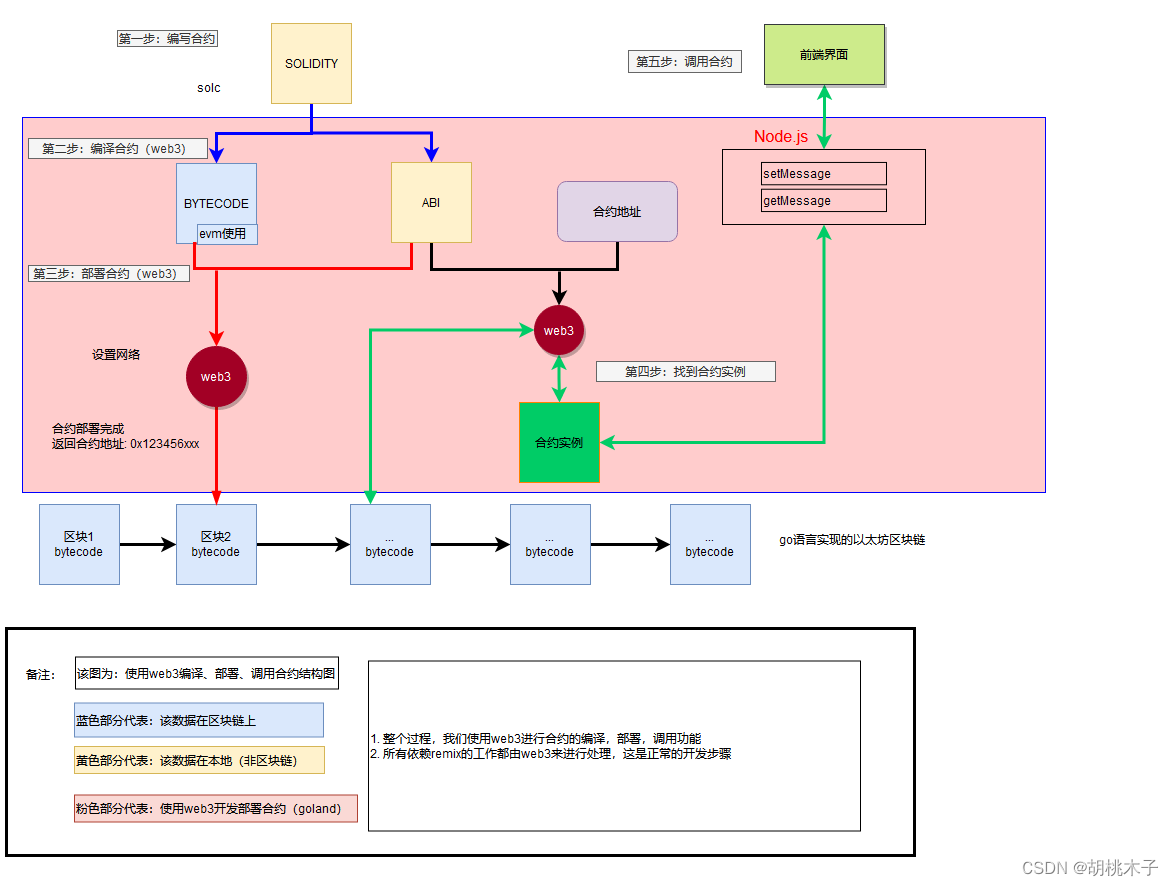
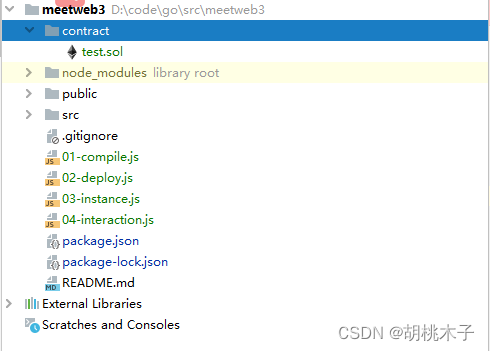
一、开发环境
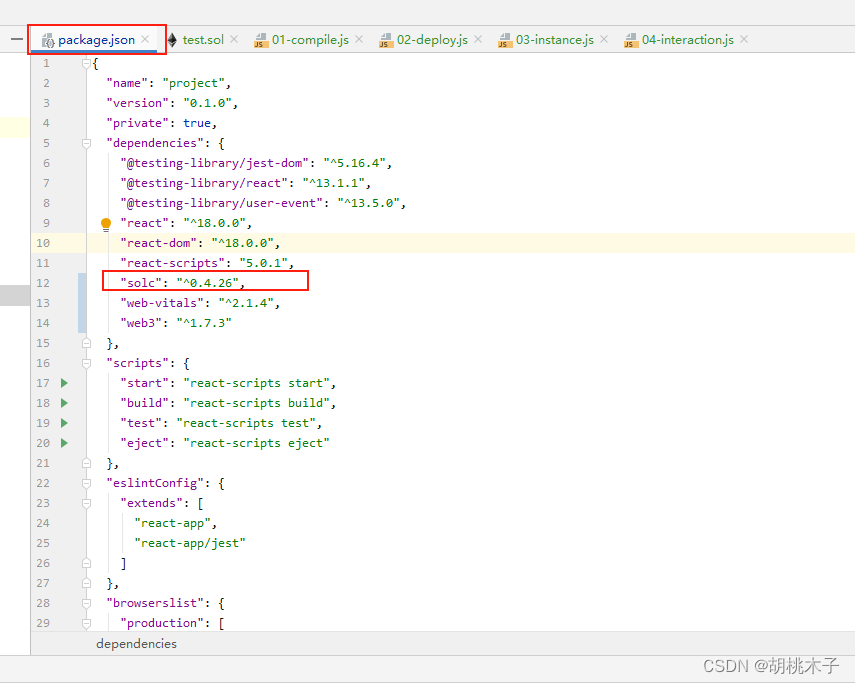
使用脚锁架创建一个react项目,初始化NPM项目,执行下面命令,创建package.json,描述当前模块属性的⽂件。
npm init
一路yes下来即可。
项目的目录结构如下:
二、web3编译合约
2.1 安装编译器
npm install --save solc
会在package.json内添加依赖
2.2 编写合约test.sol
pragma solidity ^0.4.0;
contract TestCon{


    string str;
    constructor(string _str) public{


        str=_str;
    }
    function setValue(string _str)public{


        str=_str;
    }
    function getValue() public view returns(string){


        return str;
    }
}
2.3 编译文件01-compile.js
//导入solc编译器
let solc = require('solc') //0.4.25

let fs = require('fs')

//读取合约
let sourceCode = fs.readFileSync('./contracts/SimpleStorage.sol', 'utf-8')

// Setting 1 as second paramateractivates the optimiser
let output = solc.compile(sourceCode, 1)

 // console.log('output :', output)
//{age : 17, name : 'lily', address : 'sz'}
module.exports = output['contracts'][':SimpleStorage']
2.3 编译合约
执行命令
node 01-compile.js
三、web3部署合约
let {

    bytecode, interface} = require('./01-compile')

// console.log(bytecode)
// console.log(interface)

//1. 引入web3

let Web3 = require('web3')
//2. new 一个web3实例
let web3 = new Web3()
//3. 设置网络

web3.setProvider('http://localhost:7545')

const account = '0xd5957914c31E1d785cCC58237d065Dd25C61c4D0'

console.log('version :', web3.version)
// console.log(web3.currentProvider)

//1. 拼接合约数据 interface
let contract = new web3.eth.Contract(JSON.parse(interface))

//2. 拼接bytecode
contract.deploy({


    data: bytecode, //合约的bytecode
    arguments: ['HelloWorld'] //给构造函数传递参数,使用数组
}).send({


    from: account,
    gas: '3000000',
    //gasPrice: '1',
}).then(instance => {


    console.log('address :', instance.options.address)
})
四、获取合约实例
//获取合约实例,导出去

//let {bytecode, interface} = require('./01-compile')

//1. 引入web3

let Web3 = require('web3')
//2. new 一个web3实例
let web3 = new Web3()
//3. 设置网络

web3.setProvider('http://localhost:7545')

let abi = [{

    "constant":true,"inputs":[],"name":"getValue","outputs":[{

    "name":"","type":"string"}],"payable":false,"stateMutability":"view","type":"function"},{

    "constant":false,"inputs":[{

    "name":"_str","type":"string"}],"name":"setValue","outputs":[],"payable":false,"stateMutability":"nonpayable","type":"function"},{

    "inputs":[{

    "name":"_str","type":"string"}],"payable":false,"stateMutability":"nonpayable","type":"constructor"}]
let address = '0x0FE5006b70A0D58AD3c4d4BC9DAC02C970510Cf6'


//此处abi已经json对象,不需要进行parse动作
let contractInstance = new web3.eth.Contract(abi, address)

console.log('address :', contractInstance.options.address)

module.exports = contractInstance
五、调用合约
//1. 导入合约实例

//2. 读取数据

//3. 写入数据

//4. 读取数据


let instance = require('./03-instance')
const from = '0xd5957914c31E1d785cCC58237d065Dd25C61c4D0'

//异步调用,返回值是一个promise
//2. 读取数据
instance.methods.getValue().call().then(data => {


    console.log('data:', data)

    //3. 写入数据
    instance.methods.setValue('Hello HangTou').send({


        from: from,
        value: 0,
    }).then(res => {


        console.log('res : ', res)

        //4. 读取数据
        instance.methods.getValue().call().then(data => {


            console.log('data2:', data)
        })
    })
})
六、使用promise改写
//web3与区块链交互的返回值都是promise,可以直接使用async/await

let test = async () => {


    try {


        let v1 = await instance.methods.getValue().call()
        console.log('v1:', v1)

        let res = await  instance.methods.setValue('Hello HangTou').send({


            from: from,
            value: 0,
        })

        console.log('res:', res)

        let v2 = await instance.methods.getValue().call()

        console.log('v2:', v2)
    } catch (e) {


        console.log(e)
    }
}

test()