论文
Faster ILOD: Incremental learning for object detectors based on faster RCNN 2020
论文:https://arxiv.org/abs/2003.03901
代码:https://github.com/CanPeng123/Faster-ILOD
代码
一、Requirements:
-
PyTorch 1.0 from a nightly release. It will not work with 1.0 nor
1.0.1. Installation instructions can be found in https://pytorch.org/get-started/locally/ -
torchvision from master
-
cocoapi
-
yacs
-
matplotlib
-
GCC >= 4.9
-
OpenCV
-
CUDA >= 9.0
二、安装 Step-by-step installation
# first, make sure that your conda is setup properly with the right environment
# for that, check that `which conda`, `which pip` and `which python` points to the
# right path. From a clean conda env, this is what you need to do

conda create --name maskrcnn_benchmark -y
conda activate maskrcnn_benchmark

# this installs the right pip and dependencies for the fresh python
conda install ipython pip

# maskrcnn_benchmark and coco api dependencies
pip install ninja yacs cython matplotlib tqdm opencv-python

# follow PyTorch installation in https://pytorch.org/get-started/locally/
# we give the instructions for CUDA 9.0
conda install -c pytorch pytorch-nightly torchvision cudatoolkit=9.0

export INSTALL_DIR=$PWD

# install pycocotools
cd $INSTALL_DIR
git clone https://github.com/cocodataset/cocoapi.git
cd cocoapi/PythonAPI
python setup.py build_ext install

# install cityscapesScripts
cd $INSTALL_DIR
git clone https://github.com/mcordts/cityscapesScripts.git
cd cityscapesScripts/
python setup.py build_ext install

# install apex
cd $INSTALL_DIR
git clone https://github.com/NVIDIA/apex.git
cd apex
python setup.py install --cuda_ext --cpp_ext

# install PyTorch Detection
cd $INSTALL_DIR
git clone https://github.com/facebookresearch/maskrcnn-benchmark.git
cd maskrcnn-benchmark

# the following will install the lib with
# symbolic links, so that you can modify
# the files if you want and won't need to
# re-build it
python setup.py build develop


unset INSTALL_DIR

# or if you are on macOS
# MACOSX_DEPLOYMENT_TARGET=10.9 CC=clang CXX=clang++ python setup.py build develop
三、Faster-ILOD
将maskrcnn环境装好后,将Faster-ILOD 相关代码覆盖到maskrcnn相关文件夹中 ,运行 python setup.py build develop 重新编译 或者直接下载Faster-ILOD代码。
四、运行Faster-ILOD
以15+5为例:
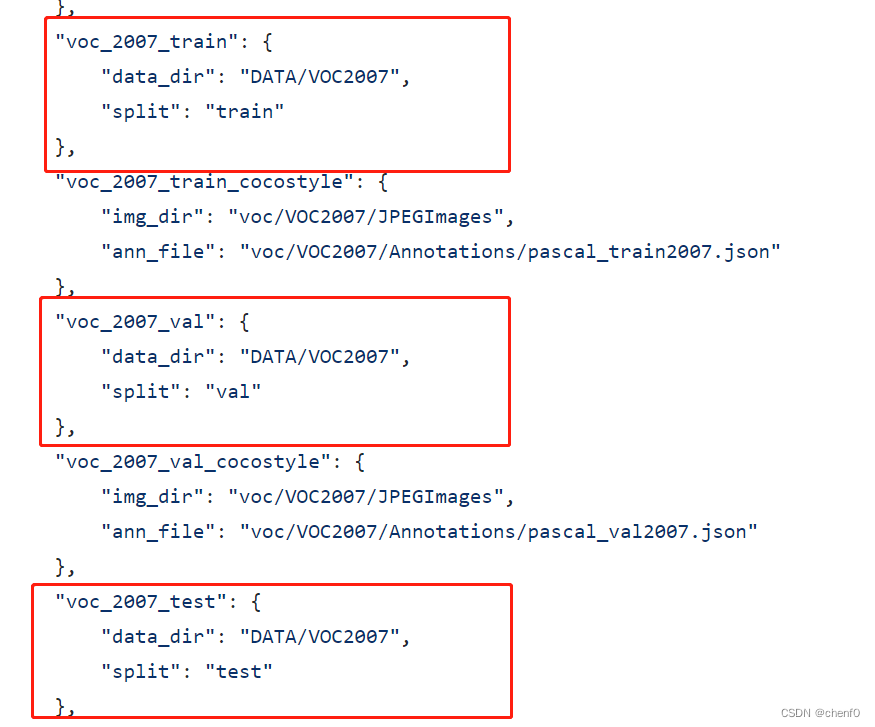
1.修改数据集路径
修改Faster-ILOD/maskrcnn_benchmark/config/paths_catalog.py 找到voc对应的路径修改为自己的。
2.修改配置文件
/configs/e2e_faster_rcnn_R_50_C4_1x.yaml
可根据需求修改各项参数,此文件暂不做修改。

3.训练基础网络
运行python tools/train_first_step.py --config-file="./configs/e2e_faster_rcnn_R_50_C4_1x.yaml"
运行成功后可在 /home/incremental_learning_ResNet50_C4/RPN_15_classes_40k_steps中查看训练的输出内容。
4.增量训练
(1)修改e2e_faster_rcnn_R_50_C4_1x_Source_model.yaml和e2e_faster_rcnn_R_50_C4_1x_Target_model.yaml,将文件中类别、新类别、旧类别,上阶段中训练完成的最终模型所在路径以及输出路径进行相应修改。运行python tools/train_incremental.py在对应输出文件中得到最终训练结果。
- e2e_faster_rcnn_R_50_C4_1x_Source_model.yaml

- e2e_faster_rcnn_R_50_C4_1x_Target_model.yaml

- tools/train_incremental.py
source_model_config_file = "/home/chenfang/maskrcnn-benchmark/configs/e2e_faster_rcnn_R_50_C4_1x_Source_model.yaml"
target_model_config_file = "/home/chenfang/maskrcnn-benchmark/configs/e2e_faster_rcnn_R_50_C4_1x_Target_model.yaml"
五、遇到问题
1.git clone因为网络问题下载不下来
文件可以下载到本地,上传到服务器;
安装包也可以下载到本地,上传到服务器,pip install 文件路径 进行安装
2.RuntimeError: Error compiling objects for extension
pytorch版本不合适
本人cuda10.1 pytorch1.7,1
看解决方案后,将pytorch版本降为1.5 成功
CUDA 10.1
Pytorch 1.4.0
torchvision 0.5.0
更多解决方案可参考https://github.com/facebookresearch/maskrcnn-benchmark/issues/1236
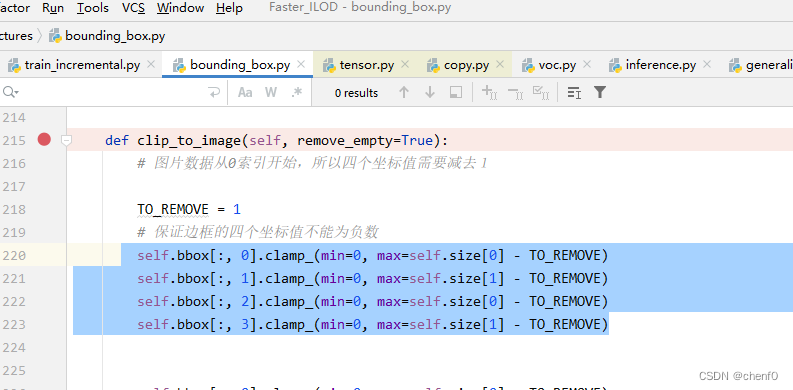
3.RuntimeError: Output 0 of UnbindBackward is a view and its base or another view of its base has been modified inplace.
RuntimeError: Output 0 of UnbindBackward is a view and its base or another view of its base has been modified inplace. This view is the output of a function that returns multiple views. Such functions do not allow the output views to be modified inplace. You should replace the inplace operation by an out-of-place one.
参考: https://blog.csdn.net/Ginomica_xyx/article/details/120491859
知道问题原因是对self.bbox多次修改 ,第二次修改时,python不清楚是操作原始的self.bbox 还是修改之后的self.bbox。
知道问题所在,尝试解决问题:修改代码 将self.bbox 拷贝给一个参数 再对此参数进行操作(不可以);进行深拷贝 也不可以 。
查看相关问题,归根结底是pytorch1.7.0的bug。
将pytorch版本降为1.6.0 此问题解决
4.unable to execute ‘usr/local/cuda-10.0/bin/nvcc‘: No such file or directory
https://blog.csdn.net/qq_41251963/article/details/110120386
https://blog.csdn.net/tailonh/article/details/120322932
https://blog.csdn.net/G_inkk/article/details/124584873
5. error: cannot call member function ‘void std::basic_string<_CharT, _Traits, _Alloc>::
python setup.py build develop 重新编译是报错
RuntimeError: Error compiling objects for extension,往上查看错误原因是
/usr/include/c++/7/bits/basic_string.tcc:1067:16: error: cannot call member function ‘void std::basic_string<_CharT, _Traits, _Alloc>::_Rep
解决方法
参考:https://blog.csdn.net/weixin_45328592/article/details/114646355
https://blog.csdn.net/qq_29695701/article/details/118548238
sudo gedit /usr/include/c++/7/bits/basic_string.tcc
将
__p->_M_set_sharable()
改为
(*__p)._M_set_sharable()
即可。
若修改文件遇到问题:
‘readonly’ option is set (add ! to override)
当前用户没有权限,先sudo -i切换到root权限再进行修改 直接使用sudo vim 打开文件进行修改
参考
https://blog.csdn.net/cheng_feng_xiao_zhan/article/details/53391474
RuntimeError: Error compiling objects for extension
还有可能是下面的原因:
解决:报错的路径里面多了一个冒号,说明是环境变量的设置有问题
sudo vim ~/.bashrc
export CUDA_HOME=$CUDA_HOME:/usr/local/cuda
改为
export CUDA_HOME=/usr/local/cuda
source ~/.bashrc
参考:
https://blog.csdn.net/loovelj/article/details/110490986
https://www.codeleading.com/article/95735054818/
https://blog.csdn.net/zt1091574181/article/details/113611468
6.AsstributeError:‘tuple’ object has no attribute ‘values’
将loss_dict改为loss_dict[0]
7.RuntimeError: The size of tensor a (16) must match the size of tensor b (21) at non-singleton dimension 0
增量学习报错,问题应该出现在加载基础训练数据时,将optimizer值改为None即可
checkpointer_target = DetectronCheckpointer(
cfg_target, model_target, optimizer=None, scheduler=scheduler,
save_dir=output_dir_target,save_to_disk=save_to_disk, logger=logger_target)
8.增量学习时没有进行训练,直接测试
应该是基础模型时已经跑了40000, arguments_target[“iteration”] 直接为40000,我们增量训练时设置依旧为40000,认为已经跑完了,就直接训练了,可以将e2e_faster_rcnn_R_50_C4_1x_Target_model.yaml中MAX_ITER: 80000 # number of iteration改为80000 就可以了
ps:多cuda版本间的切换
在/usr/local/目录下查看自己安装的cuda版本
cd /usr/local
ls
bin  cuda       cuda-10.2  etc    include  man   share
cud  cuda-10.1  cuda-11.0  games  lib      sbin  src
查看当前cuda版本
nvcc -V
或者使用stat cuda查看当前cuda软连接
  File: cuda -> /usr/local/cuda-10.1
  Size: 20              Blocks: 0          IO Block: 4096   symbolic link
Device: 812h/2066d      Inode: 2757665     Links: 1
Access: (0777/lrwxrwxrwx)  Uid: (    0/    root)   Gid: (    0/    root)
Access: 2022-06-06 21:34:32.342489356 +0800
Modify: 2022-05-22 15:11:26.498549390 +0800
Change: 2022-05-22 15:11:26.498549390 +0800
 Birth: -
若想修改为10.2版本,需要先删除当前链接,再重新设置为10.2,仅需两行代码即可
sudo rm -rf cuda
sudo ln -s /usr/local/cuda-10.2  /usr/local/cuda
此时查看一下cuda版本
nvcc -V
可以看到版本已切换
nvcc: NVIDIA (R) Cuda compiler driver
Copyright (c) 2005-2019 NVIDIA Corporation
Built on Wed_Oct_23_19:24:38_PDT_2019
Cuda compilation tools, release 10.2, V10.2.89