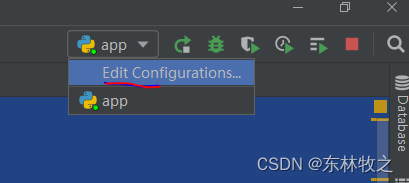
使用pycharm启动flask项目有坑,先修改pycharm设置
1、点击Edit Confiturations
2、配置启动方式
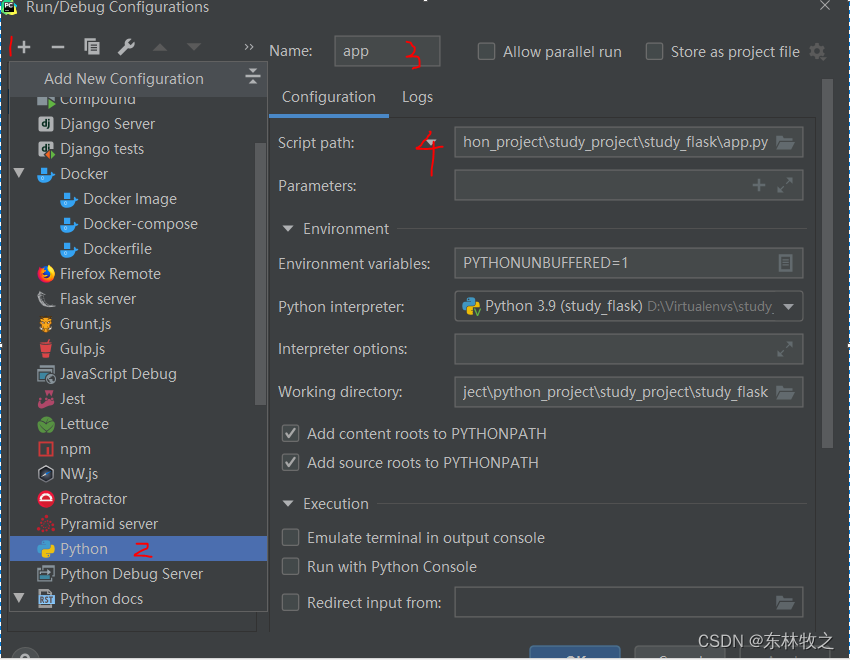
1 新增启动配置
2 选择使用python命令执行
3 给配置设置一个名字
4 设置要启动的模块的位置,flask基本都是app.py 模块最后别忘记:点击右侧的apply
一、flask
1.1、flask框架配置支持websocket
依赖包:
pip install gevent-websocket==0.10.1
pip install gevent==21.1.2
pip install flask==1.1.2
1、配置方式一:使用到gevent-websocket 和gevent 共同实现
import time
from gevent.pywsgi import WSGIServer
from geventwebsocket.handler import WebSocketHandler
from flask import Flask, request

app = Flask(__name__)

@app.route('/ws')
def ws():
    socke = request.environ.get('wsgi.websocket')
    while True:
        msg = socke.receive()
        print('客户端发送的信息:', msg)
        if msg == None:
            print('客户端结束websocket连接')
            break
        socke.send(f'接收到的时间:{time.strftime("%Y-%m-%d %H:%M:%S")}')
    return 'ok'

if __name__ == '__main__':
    # 使用WSGIServer使用项目支持sse,支持websocket
    ser = WSGIServer(('0.0.0.0', 8888), app, handler_class=WebSocketHandler)
    ser.serve_forever()
2、配置二:只使用gevent-websocket包
import time
from geventwebsocket.handler import WebSocketHandler
from geventwebsocket.server import WSGIServer
from geventwebsocket.websocket import WebSocket #语法提示
from flask import Flask
from flask import request
import time
print('flask启动...')
app = Flask(__name__)

@app.route('/ws')
def ws():
    sock = request.environ.get('wsgi.websocket')
    print(sock)
    while True:
        msg = sock.receive()
        print(msg,'接收到的数据')
        if msg==None:
            break
        sock.send(f'收到数据的时间:{time.strftime("%Y-%m-%d %H:%M:%S")}')
    return 'ok'

if __name__ == '__main__':
    #使用WSGIServer使用项目支持sse,支持websocket
    ser = WSGIServer(('0.0.0.0',8888),app,handler_class=WebSocketHandler)
    ser.serve_forever()
1.2、通过python脚本发起websocket
依赖包:
pip3 install websocket-client
当nginx配置了证书,走https协议时,使用 wss://域名:443/api/ws
from websocket import create_connection
import websocket

def main():
    #ambulance.thearay.net:443
    url = 'wss://ambulance.jinho.net:443/api/websocket/ws'
    ws = create_connection(url)
    print("获取连接状态:", ws.connected)
    while True:
        send_data = input('>>>>>>>>')
        print(f'send >>> {send_data}')
        ws.send(f"{send_data.strip()}")
        response = ws.recv()
        print("recv >>> ", response)
        if response =='close':
            break
    ws.close()

if __name__ == '__main__':
    main()
当nginx没有配置证书,走http协议时,使用ws://域名:80/api/ws
from websocket import create_connection
def main():
    url = 'ws:/ambulance.jinho.net:80/api/ws'
    ws = create_connection(url)
    print("获取连接状态:", ws.connected)
    while True:
        data = input('发送数据>>>>')
        ws.send(data)
        response = ws.recv()
        print("接收数据>>>>", response)
        if response=='close':
            ws.close()
if __name__ == '__main__':
    main()
二、nginx
最主要就是在代理flask请求的配置中,配置下面三个
location /api/{
proxy_pass http://127.0.0.1:8888/api/;
proxy_http_version 1.1;
proxy_set_header Upgrade $http_upgrade;
proxy_set_header Connection "upgrade";}
https配置
 server {
    	listen 443 ssl;
	    server_name 127.0.0.1;
    	ssl_certificate cert/8386707_ambulance.jinho.net.pem;
    	ssl_certificate_key cert/8386707_ambulance.jinho.net.key;
   	    ssl_session_timeout 5m;
    	ssl_ciphers ECDHE-RSA-AES128-GCM-SHA256:ECDHE:ECDH:AES:HIGH:!NULL:!aNULL:!MD5:!ADH:!RC4;
    	ssl_protocols TLSv1 TLSv1.1 TLSv1.2;
    	ssl_prefer_server_ciphers on;
    	client_max_body_size 10m;


	    location  /static  {
		    alias  C:/5G/5GApi/static;
		}

	    location / {
		    root   C:\\5G\\nginx-1.17.8\\dist; #默认访问目录
            index  index.html;
		    # try_files $uri $uri/ /index.html;
		}

	    location /api/ {
		       #后端

		       proxy_pass http://127.0.0.1:8888/;
		       proxy_buffering off; #nginx实现sse的功能,不配置就无法实现sse功能

		       #nginx配置支持websocket,下面三条
    	       proxy_http_version 1.1;
    	       proxy_set_header Upgrade $http_upgrade;
   	 	       proxy_set_header Connection "upgrade";

               #websocket的超时处理
		       proxy_read_timeout 600s;
               proxy_connect_timeout 30s;
               proxy_send_timeout 60s;
		  }

#server的括号
    }
走http协议
 server {
    	listen 80;
	    server_name 127.0.0.1;
    	client_max_body_size 10m;
        root html;
        index index.html index.htm;

	    location  /static  {
		    alias  C:/5G/5GApi/static;
		}

	    location / {
		    root   C:\\5G\\nginx-1.17.8\\dist; #默认访问目录
            index  index.html;
		    # try_files $uri $uri/ /index.html;
		}

	    location /api/ {
		       #后端

		       proxy_pass http://127.0.0.1:8888/;
		       proxy_buffering off; #nginx实现sse的功能,不配置就无法实现sse功能

		       #nginx配置支持websocket,下面三条
    	       proxy_http_version 1.1;
    	       proxy_set_header Upgrade $http_upgrade;
   	 	       proxy_set_header Connection "upgrade";

               #websocket的超时处理
		       proxy_read_timeout 600s; #两次请求之前不能超过600s,自动关闭连接的元凶
               proxy_connect_timeout 30s; #创建连接时60s超时
               proxy_send_timeout 60s;    #服务的发送数据时,60s超时

		  }

    }