目录
一、maven-assembly-plugin插件的简单使用
背景:之前项目上已经使用了assembly对多个boot项目分别打zip包且分别部署,这次资源瘦身,某些用户需要将他们打成war包,都放在一个web容器中运行。
本篇文章涉及如下三点内容:
- maven-assembly-plugin插件的简单使用
- 使用assembly插件根据参数打不同的部署包
- boot项目如何转成war包部署到web容器
一、maven-assembly-plugin插件的简单使用
1、什么是assembly?
简单的说,maven-assembly-plugin 就是用来帮助打包用的,比如说打出一个什么类型的包,包里包括哪些内容等等。
2. 常见的maven插件
maven插件是在生命周期中某些阶段执行的任务。一个插件完成一项功能。以下介绍几种常见的插件。
如对于打包来说,有多种插件选择。最常见的有以下3个:
| plugin | function |
|---|---|
maven-jar-plugin |
maven 默认打包插件,用来创建 project jar |
maven-shade-plugin |
用来打可执行包,executable(fat) jar |
maven-assembly-plugin |
支持定制化打包方式,例如 apache 项目的打包方式 |
3、如何使用?
使用assembly,需要在pom.xml文件中添加如下配置:
<plugin>
                <groupId>org.apache.maven.plugins</groupId>
                <artifactId>maven-assembly-plugin</artifactId>
                <version>2.2-beta-5</version>
                <configuration>
                    <!--包的名称-->
                    <finalName>BootDemo</finalName>
                    <!--打包的名称是否拼接assembly.id-->
                    <appendAssemblyId>true</appendAssemblyId>
                    <descriptors>
                        <descriptor>src/main/assembly/assembly.xml</descriptor>
                    </descriptors>
                </configuration>
                <!-- 添加此项后,可直接使用mvn package | mvn install -->
                <!-- 不添加此项,需使用mvn package assembly:single|mvn package assembly:assembly -->
                <executions>
                    <execution>
                        <!--名字任意 -->
                        <id>make-assembly</id>
                        <!-- 绑定到package生命周期阶段上 -->
                        <phase>package</phase>
                        <goals>
                            <!-- 只运行一次 -->
                            <goal>single</goal>
                        </goals>
                    </execution>
                </executions>
            </plugin>
接着在对应的路径下添加assembly.xml文件,内容如下:
<?xml version="1.0" encoding="UTF-8" ?>
<assembly>
<!--id 标识符,添加到生成文件名称的后缀符-->
<id>assembly_id</id>
<!--支持的打包格式有zip、tar、tar.gz (or tgz)、tar.bz2 (or tbz2)、jar、dir、war,可以同时指定多个打包格式-->
<formats>
<format>zip</format>
</formats>
<!--默认为true。指定打的包是否包含打包层目录(比如finalName是prefix,当值为true,所有文件被放在包内的prefix目录下,否则直接放在包的根目录下-->
<includeBaseDirectory>true</includeBaseDirectory>
<!--定制工程依赖 jar 包的打包方式-->
<dependencySets>
<dependencySet>
<!--指定包依赖目录,该目录是相对于根目录-->
<outputDirectory>lib</outputDirectory>
<scope>runtime</scope>
</dependencySet>
</dependencySets>
<!--定制工程下其它文件的打包方式-->
<fileSets>
<fileSet>
<!--原文件目录-->
<directory>src/main/bin</directory>
<!--打包的目录-->
<outputDirectory>/bin</outputDirectory>
<includes>
<include>*.sh</include>
</includes>
<!--打包文件权限-->
<fileMode>0755</fileMode>
</fileSet>
<fileSet>
<directory>src/main/resources</directory>
<outputDirectory>/conf</outputDirectory>
<fileMode>0755</fileMode>
</fileSet>
</fileSets>
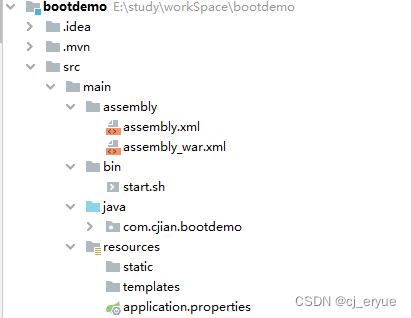
</assembly>测试用的过程结构:
经过以上配置,我们就可以通过
mvn package assembly:assembly 或 mvn clean install 命令打出一个zip包了
二、如何通过assembly打不同的包
其实就是通过添加多个assemblyy.xmll来实现的,具体修改如下:
pom.xml文件添加如下配置:
<!--配置不同的打包配置,如果不指定参数。默认一最后的profile配置为准,即,如下配置,默认打zip-->
    <profiles>
        <!--打war包的配置-->
        <profile>
            <id>war</id>
            <activation>
                <activeByDefault>true</activeByDefault>
                <property>
                    <name>type</name>
                    <value>war</value>
                </property>
            </activation>
            <properties>
                <type>war</type>
            </properties>

            <build>
                <plugins>
                    <plugin>
                        <artifactId>maven-assembly-plugin</artifactId>
                        <configuration>
                            <descriptors>src/main/assembly/assembly_war.xml</descriptors>
                        </configuration>
                    </plugin>
                </plugins>
            </build>
        </profile>

        <!--打zip包的配置-->
        <profile>
            <id>zip</id>
            <activation>
                <activeByDefault>true</activeByDefault>
                <property>
                    <name>type</name>
                    <value>zip</value>
                </property>
            </activation>
            <properties>
                <type>zip</type>
            </properties>

            <build>
                <plugins>
                    <plugin>
                        <artifactId>maven-assembly-plugin</artifactId>
                        <configuration>
                            <descriptors>src/main/assembly/assembly.xml</descriptors>
                        </configuration>
                    </plugin>
                </plugins>
            </build>
        </profile>
    </profiles>
再添加一个assembly_war.xml
<?xml version="1.0" encoding="UTF-8" ?>
<assembly>
    <id>assembly</id>
    <formats>
        <format>war</format>
    </formats>
    <includeBaseDirectory>false</includeBaseDirectory>
    <fileSets>
        <fileSet>
            <directory>{basedir}/target/classes</directory>
            <fileMode>0755</fileMode>
            <outputDirectory>WEB-INF/classes</outputDirectory>
        </fileSet>

    </fileSets>
    <dependencySets>
        <dependencySet>
            <outputDirectory>WEB-INF/lib</outputDirectory>
            <useProjectArtifact>false</useProjectArtifact>
        </dependencySet>
    </dependencySets>
</assembly>
这样我们就可以通过mvn clean install -P war|zip来打不同的包了
三、boot项目如何转成war包部署
我们知道boot的项目会自动生成一个启动类,并通过该启动类启动
@SpringBootApplication
public class BootdemoApplication {

    public static void main(String[] args) {
        SpringApplication.run(BootdemoApplication.class, args);
    }

}跟踪SpringApplication.run方法发现,核心方法为:org.springframework.boot.SpringApplication#run(java.lang.String...)
public ConfigurableApplicationContext run(String... args) {
        long startTime = System.nanoTime();
        DefaultBootstrapContext bootstrapContext = this.createBootstrapContext();
        ConfigurableApplicationContext context = null;
        this.configureHeadlessProperty();
        SpringApplicationRunListeners listeners = this.getRunListeners(args);
        listeners.starting(bootstrapContext, this.mainApplicationClass);

        try {
            ApplicationArguments applicationArguments = new DefaultApplicationArguments(args);
            //创建并配置当前SpringBoot应用将要使用的Environment(包括配置要使用的PropertySource以及Profile),
            //并遍历调用所有的SpringApplicationRunListener的environmentPrepared()方法,广播Environment准备完毕。
            ConfigurableEnvironment environment = this.prepareEnvironment(listeners, bootstrapContext, applicationArguments);
            this.configureIgnoreBeanInfo(environment);
            Banner printedBanner = this.printBanner(environment);
            //根据webEnvironment的值来决定创建何种类型的ApplicationContext对象
            //如果是web环境,则创建org.springframework.boot.context.embedded.AnnotationConfigEmbeddedWebApplicationContext
            //否则创建org.springframework.context.annotation.AnnotationConfigApplicationContext
            context = this.createApplicationContext();
            context.setApplicationStartup(this.applicationStartup);
            //主要是调用所有初始化类的 initialize 方法
            this.prepareContext(bootstrapContext, context, environment, listeners, applicationArguments, printedBanner);
            //初始化 Spring 容器
            this.refreshContext(context);
            this.afterRefresh(context, applicationArguments);
            Duration timeTakenToStartup = Duration.ofNanos(System.nanoTime() - startTime);
            if (this.logStartupInfo) {
                (new StartupInfoLogger(this.mainApplicationClass)).logStarted(this.getApplicationLog(), timeTakenToStartup);
            }

            listeners.started(context, timeTakenToStartup);
            //调用 ApplicationRunner 或者 CommandLineRunner 的运行方法
            this.callRunners(context, applicationArguments);
        } catch (Throwable var12) {
            this.handleRunFailure(context, var12, listeners);
            throw new IllegalStateException(var12);
        }

        try {
            Duration timeTakenToReady = Duration.ofNanos(System.nanoTime() - startTime);
            listeners.ready(context, timeTakenToReady);
            return context;
        } catch (Throwable var11) {
            this.handleRunFailure(context, var11, (SpringApplicationRunListeners)null);
            throw new IllegalStateException(var11);
        }
    }
那么问题来了,转成war部署后,如何由web容器拉起这个过程呢? 其实boot已经给我们考虑过了
,boot提供了一个SpringBootServletInitializer类,修改如下:
@SpringBootApplication
    public class BootdemoApplication extends SpringBootServletInitializer {

    public static void main(String[] args) {
        SpringApplication.run(BootdemoApplication.class, args);
    }

    @Override
    protected SpringApplicationBuilder configure(SpringApplicationBuilder application) {
        return application.sources(BootdemoApplication.class);
    }

}
如果启动类无法继承(如启动类已经有了父类),可以新建一个类继承SpringBootServletInitializer,并重写configure即可:
    public class ProjectServletInitializer extends SpringBootServletInitializer {

     @Override
    protected SpringApplicationBuilder configure(SpringApplicationBuilder application) {
        return application.sources(BootdemoApplication.class);
    }

}跟踪源码发现,最终还是在web容器启动的时候调用到了org.springframework.boot.SpringApplication#run(java.lang.String...)
大致原理如下:
1、spring-boot的SpringBootServletInitializer类实现了spring-web的 WebApplicationInitializer接口
public interface WebApplicationInitializer {
    void onStartup(ServletContext servletContext) throws ServletException;
}
public abstract class SpringBootServletInitializer implements WebApplicationInitializer {
protected Log logger;
private boolean registerErrorPageFilter = true;
public SpringBootServletInitializer() {
}
protected final void setRegisterErrorPageFilter(boolean registerErrorPageFilter) {
this.registerErrorPageFilter = registerErrorPageFilter;
}
public void onStartup(ServletContext servletContext) throws ServletException {
servletContext.setAttribute("logging.register-shutdown-hook", false);
this.logger = LogFactory.getLog(this.getClass());
//重点方法,这里最终会调用到SpringApplication#run
WebApplicationContext rootApplicationContext = this.createRootApplicationContext(servletContext);
if (rootApplicationContext != null) {
servletContext.addListener(new SpringBootServletInitializer.SpringBootContextLoaderListener(rootApplicationContext, servletContext));
} else {
this.logger.debug("No ContextLoaderListener registered, as createRootApplicationContext() did not return an application context");
}
}
//...
}2、和WebApplicationInitializer类同一目录下有一个SpringServletContainerInitializer类,该类实现了javax.servlet-api的ServletContainerInitializer接口,并将WebApplicationInitializer类通过注解@HandlesTypes传递给了onStartup方法的第一个参数
@HandlesTypes({WebApplicationInitializer.class})
public class SpringServletContainerInitializer implements ServletContainerInitializer {
    public SpringServletContainerInitializer() {
    }

    public void onStartup(@Nullable Set<Class<?>> webAppInitializerClasses, ServletContext servletContext) throws ServletException {
        List<WebApplicationInitializer> initializers = Collections.emptyList();
        Iterator var4;
        if (webAppInitializerClasses != null) {
            initializers = new ArrayList(webAppInitializerClasses.size());
            var4 = webAppInitializerClasses.iterator();

            while(var4.hasNext()) {
                Class<?> waiClass = (Class)var4.next();
                if (!waiClass.isInterface() && !Modifier.isAbstract(waiClass.getModifiers()) && WebApplicationInitializer.class.isAssignableFrom(waiClass)) {
                    try {
                        ((List)initializers).add((WebApplicationInitializer)ReflectionUtils.accessibleConstructor(waiClass, new Class[0]).newInstance());
                    } catch (Throwable var7) {
                        throw new ServletException("Failed to instantiate WebApplicationInitializer class", var7);
                    }
                }
            }
        }

        if (((List)initializers).isEmpty()) {
            servletContext.log("No Spring WebApplicationInitializer types detected on classpath");
        } else {
            servletContext.log(((List)initializers).size() + " Spring WebApplicationInitializers detected on classpath");
            AnnotationAwareOrderComparator.sort((List)initializers);
            var4 = ((List)initializers).iterator();

            while(var4.hasNext()) {
                WebApplicationInitializer initializer = (WebApplicationInitializer)var4.next();
                //重点
                initializer.onStartup(servletContext);
            }

        }
    }
}
ServletContainerInitializer 是 Servlet 3.0 新增的一个接口,主要用于在web容器启动时为提供给第三方组件机会做一些初始化的工作,例如注册servlet或者filtes等。
每个框架要使用ServletContainerInitializer就必须在对应的jar包的META-INF/services 目录创建一个名为javax.servlet.ServletContainerInitializer的文件,文件内容指定具体的ServletContainerInitializer实现类(即SPI机制),那么,当web容器启动时就会运行这个初始化器做一些组件内的初始化工作。

这样,就可以将boot项目通过assembly插件打成war包并部署到web容器了~