简介
函数式编程核心:以处理数据的方式处理代码。
相比较命令式编程的优点:
1. 代码更加简洁优雅,效率更高
2. 避免了对变量的显式修改和赋值
3. 函数式风格的代码可以轻松的实现并行化
4. 代码表达性更强,更直观
函数式接口
理解FunctionalInterface(函数式接口)是学习Java8 Lamd表达式的关键所在。
函数式接口:只定义了单一抽象方法的接口,用作Lamda表达式的类型。
注意:函数式接口只能有一个抽象方法,而不是只能有一个方法。
例子:Runnable接口
@FunctionalInterface
public interface Runnable {

    public abstract void run();
}
Lamda表达式
Lamda表达式是函数式编程的核心
定义:Lamda表达式即匿名函数,它是一段没有函数名的函数体,可以作为参数直接传递给相关调用者。
Lamda表达式的语法:
(Type1 param1, Type2 param2, ..., TypeN paramN) -> {
statment1;
statment2;
return statmentM;
}
几种情形时的简洁写法:
1、Lamda表达式没有参数,使用空括号()表示没有参数。
() -> {
2、Lamda表达式只有一个参数,可省略参数括号和参数类型,Javac能够根据上下文推断出参数类型。
param1 -> {
statment1;
statment2;
return statmentM;
}
3、当Lamda表达式只包含一条语句时,可以省略大括号{}。
param1 -> statment
4、绝大多数情况下,参数类型可以省略,编译器都可以从上下文环境中推断出参数类型。
(param1,param2, ..., paramN) -> {
statment1;
statment2;
return statmentM;
}
最简单的例子:
public interface Hunman {
void say(String str);
}
Hunman h = str -> System.out.println(str);
h.say("Hello World");
方法引用
方法引用是Java8用来简化Lamda表达式的一种手段,它通过类名和方法名来定位一个静态方法或者实例方法。
语法:方法引用使用“::“定义,“::“前半部分是类名或者实例名,后半部分表示方法名,如果是构造函数方法名则使用new表示。
1、静态方法引用*:ClassName::methodName
List<String> strs = Arrays.asList("aa","bb","cc");
strs.forEach(System.out::println);
2、实例方法引用:instanceReference:methodName
class Printer {
void print(){
System.out.println("instanceRefence::methodName");
}
private void printInfo(){
new Thread(this::print);
}
}
private void test() {
Printer p = new Printer();
p.print();
}
- 1
- 2
- 3
- 4
- 5
- 6
- 7
- 8
- 9
- 10
- 11
- 12
- 13
- 14
- 15
- 16
- 17
- 18
- 19
3、构造方法引用:Class::new
public class Test {
class User {
String username;
User(String username){
this.username = username;
}
public String getUsername(){
return username;
}
}
@FunctionalInterface
interface UserFactory<T extends User> {
T create(String username);
}
public static void main(String[] args) {
Test t = new Test();
t.test();
}
private void test() {
UserFactory<User> uf = User::new;
List<User> users = new ArrayList<>();
for (int i = 0; i < 5; ++i) {
users.add(uf.create("user"+i));
}
users.stream().map(User::getUsername).forEach(System.out::println);
}
}
- 1
- 2
- 3
- 4
- 5
- 6
- 7
- 8
- 9
- 10
- 11
- 12
- 13
- 14
- 15
- 16
- 17
- 18
- 19
- 20
- 21
- 22
- 23
- 24
- 25
- 26
- 27
- 28
- 29
- 30
- 31
- 32
- 33
- 34
- 35
- 36
- 37
- 38
- 39
Lamda表达式在集合中的运用:流Stream
改进集合的迭代方式
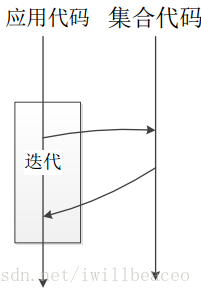
集合的迭代:外部迭代、内部迭代。
外部迭代:在使用Java集合时,通用模式是在集合上进行迭代,然后处理返回的每一个元素。每次迭代集合类时,需要写很多样板代码。将for循环改成并行的方式也很麻烦。
图解:
代码示例:
public void test() {
List<Student> students = init();
for (Student stu : students) {
System.out.println(stu.getStuName());
}
}
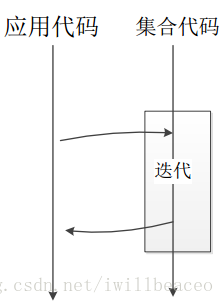
内部迭代:使用流Stream,是函数式编程方式在集合类上进行复杂操作的工具。
图解:
代码示例:
private void test() {
    List<Student> students = init();
    students.stream().forEach(student -> System.out.println(student.getStuName()));
}
Stream方法介绍
1)collect
collect(toList())方法由Stream里的值生成一个列表。
Stream的of方法使用一组初始值生成新的Steam。
代码示例:
private void test() {
    List<String> strs = Stream.of("a","b","c").collect(Collectors.toList());
    print(strs);
}
2)map
将一种类型的值转换成另外一种类型,将一个流中的值转换成一个新的流。
对于Stream中包含的元素使用给定的转换函数进行转换操作,新生>成的Stream只包含转换生成的元素。
代码示例:
private void test() {
List<String> strs = Stream.of("a","b","c")
.map(str->str.toUpperCase())
.collect(Collectors.toList());
print(strs);
}
3)filter
对于Stream中包含的元素使用给定的过滤函数进行过滤操作,新生>成的Stream只包含符合条件的元素。
代码示例:
private void test() {
System.out.println("使用filter:");
List<Integer> numbers = Stream.of(5,10,15).collect(Collectors.toList());
numbers.stream().filter(x -> x > 10).forEach(System.out::println);
}
4)flatMap
和map类似,不同的是其每个元素转换得到的是Stream对象,会把>子Stream中的元素压缩到父集合中;
代码示例:
private void test() {
List<Integer> nums = Stream.of(Arrays.asList(1, 2, 3), Arrays.asList(4, 5))
.flatMap(numList -> numList.stream())
.collect(Collectors.toList());
nums.forEach(num -> System.out.println(num));
}
5)reduce
reduce操作可以从一组值中生成一个值。
代码示例:
public Integer useReduceToSum(){
int number= Stream.of(1,2,3).reduce(0,(sum,y)->sum+y);
return number;
}
public Integer useReduceToMultiply(){
int number= Stream.of(2,4,8).reduce(1,(multiply,y)->multiply*y);
return number;
}
- 1
- 2
- 3
- 4
- 5
- 6
- 7
- 8
- 9
- 10
- 11
- 12
- 13
- 14
- 15
- 16
- 17
- 18
- 19
并行化流parallelStream
Java8中可以在接口不变的情况下,将流改为并行流,这样很自然地使用多线程进行集合中的数据处理。并行化操作流只需要改变一个方法调用,如果已经是一个Stream对象,调用它的parallel方法就能让其拥有并行操作的能力;如果想从一个集合类创建一个流,调用parallelStream就能立即获得一个拥有并行能力的流。
代码示例:
public static boolean isPrime(int number) {
if (number < 2) {
return false;
}
for (int i = 2; i <= Math.sqrt(number); ++i) {
if (number % i == 0) {
return false;
}
}
return true;
}
public void bingxingCount() {
long startTime = System.currentTimeMillis();
long count = IntStream.range(1, 1000000).filter(ParallelStream::isPrime).count();
long endTime = System.currentTimeMillis();
System.out.println("1000000以内质数的个数:" + count + "\t" + "消耗时间:" + (endTime - startTime));
}
public void chuanxingCount() {
long startTime = System.currentTimeMillis();
long count = IntStream.range(1, 1000000).parallel().filter(ParallelStream::isPrime).count();
long endTime = System.currentTimeMillis();
System.out.println("1000000以内质数的个数:" + count + "\t" + "消耗时间:" + (endTime - startTime));
}
public void sortArray() {
int[] arr = getNumbers();
long start = System.currentTimeMillis();
Arrays.sort(arr);
System.out.println("串行排序时间:"+(System.currentTimeMillis() - start) + " ms" );
arr = getNumbers();
start = System.currentTimeMillis();
Arrays.parallelSort(arr);
System.out.println("并行排序时间:"+(System.currentTimeMillis() - start) + " ms" );
}
private int[] getNumbers() {
int[] arr = new int[5000000];
Random r = new Random();
for (int i = 0; i < 5000000; ++i) {
arr[i] = r.nextInt(1000) + 1;
}
return arr;
}
- 1
- 2
- 3
- 4
- 5
- 6
- 7
- 8
- 9
- 10
- 11
- 12
- 13
- 14
- 15
- 16
- 17
- 18
- 19
- 20
- 21
- 22
- 23
- 24
- 25
- 26
- 27
- 28
- 29
- 30
- 31
- 32
- 33
- 34
- 35
- 36
- 37
- 38
- 39
- 40
- 41
- 42
- 43
- 44
- 45
- 46
- 47
- 48
- 49
- 50
- 51
- 52
输出结果:采用并行流操作方式时间是串行操作的时间一半不到。
增强的Future
1)CompletableFuture
CompletableFuture是Java8新增的一个超大型工具类,它实现了Future接口,CompletionStage接口。通过CompletionStage提供的接口,可以在一个执行结果上进行多次流式调用,以此得到最终结果。
CompletableFuture和Future一样,可以作为函数调用的契约。向CompletableFuture请求一个数据,如果数据还没有准备好,请求线程就会等待。
代码示例:
CompletableFuture<Integer> cf = null;
public CompetableFuture(CompletableFuture<Integer> cf) {
this.cf = cf;
}
@Override
public void run() {
int tmp = 0;
try {
tmp = cf.get() * cf.get();
} catch (Exception e) {
e.printStackTrace();
}
System.out.println(tmp);
}
public static void printResult() {
final CompletableFuture<Integer> future = new CompletableFuture<>();
new Thread(new CompetableFuture(future)).start();
try {
Thread.sleep(1000);
} catch (InterruptedException ie) {
ie.printStackTrace();
}
future.complete(100);
}
public static void caculateResult() {
final CompletableFuture<Integer> future =
CompletableFuture.supplyAsync(() -> calculate(100));
try {
System.out.println(future.get());
} catch (Exception e) {
e.printStackTrace();
}
System.out.println("exit");
}
private static int calculate(int x) {
int res = 0;
try {
Thread.sleep(1000);
res = x * x * x;
} catch (InterruptedException ie) {
ie.printStackTrace();
}
return res;
}
- 1
- 2
- 3
- 4
- 5
- 6
- 7
- 8
- 9
- 10
- 11
- 12
- 13
- 14
- 15
- 16
- 17
- 18
- 19
- 20
- 21
- 22
- 23
- 24
- 25
- 26
- 27
- 28
- 29
- 30
- 31
- 32
- 33
- 34
- 35
- 36
- 37
- 38
- 39
- 40
- 41
- 42
- 43
- 44
- 45
- 46
- 47
- 48
- 49
- 50
- 51
- 52
- 53
- 54
- 55
- 56
- 57
- 58
- 59
- 60
2)CompletionStage流式调用
CompletionStage有约40个方法是为函数式编程做准备的,通过CompletionStage提供的接口,可以在一个执行结果上进行多次流式调用,以此得到最终结果。
代码示例:
public static void printResult() {
final int num = 100;
final CompletableFuture<Void> future =
CompletableFuture.supplyAsync(() -> calculate(num))
.thenApply(x -> Integer.toString(x))
.thenApply((str) -> num + "的平方: " + str)
.thenAccept(System.out::println);
try {
future.get();
} catch (Exception e) {
e.printStackTrace();
}
System.out.println("exit");
}
private static int calculate(int x) {
int res = 0;
try {
Thread.sleep(1000);
res = x * x;
} catch (InterruptedException ie) {
ie.printStackTrace();
}
return res;
}
- 1
- 2
- 3
- 4
- 5
- 6
- 7
- 8
- 9
- 10
- 11
- 12
- 13
- 14
- 15
- 16
- 17
- 18
- 19
- 20
- 21
- 22
- 23
- 24
- 25
- 26
- 27
- 28
- 29
3)组合多个CompletableFuture
方法1:使用thenCompose(),一个CompletableFuture可以在执行完成后,将执行结果通过Function传递给下一个ComposeStage进行处理。
代码示例:
public static void printResult() {
final int num = 100;
final CompletableFuture<Void> future =
CompletableFuture.supplyAsync(()->calculate(num))
.thenCompose((i) -> CompletableFuture.supplyAsync(()->divi(i)))
.thenApply((str) -> num + "的平方除以2: " + str)
.thenAccept(System.out::println);
try {
future.get();
}catch (Exception e) {
e.printStackTrace();
}
System.out.println("exit");
}
private static int calculate(int x) {
int res = 0;
try {
Thread.sleep(1000);
res = x * x;
} catch (InterruptedException ie) {
ie.printStackTrace();
}
return res;
}
private static int divi(int i){
return i/2;
}
- 1
- 2
- 3
- 4
- 5
- 6
- 7
- 8
- 9
- 10
- 11
- 12
- 13
- 14
- 15
- 16
- 17
- 18
- 19
- 20
- 21
- 22
- 23
- 24
- 25
- 26
- 27
- 28
- 29
- 30
- 31
方法2:使用thenCombine()
代码示例:
public static void printResult() {
CompletableFuture<Integer> future1= CompletableFuture.supplyAsync(()->calculate(10));
CompletableFuture<Integer> future2= CompletableFuture.supplyAsync(()->divi(50));
CompletableFuture<Void> cf = future1.thenCombine(future2,(x,y) -> (x + y))
.thenAccept(System.out::println);
try {
cf.get();
}catch (Exception e) {
e.printStackTrace();
}
System.out.println("exit");
}
private static int calculate(int x) {
int res = 0;
try {
Thread.sleep(1000);
res = x * x;
} catch (InterruptedException ie) {
ie.printStackTrace();
}
return res;
}
private static int divi(int i){
return i/2;
}
- 1
- 2
- 3
- 4
- 5
- 6
- 7
- 8
- 9
- 10
- 11
- 12
- 13
- 14
- 15
- 16
- 17
- 18
- 19
- 20
- 21
- 22
- 23
- 24
- 25
- 26
- 27
- 28
- 29
- 30
- 31
- 32
- 33
- 34
Lamda表达式的测试和在Junit5中的使用
1)lambda表达式没有名字,无法直接在测试代码中调用。应该讲重点放在方法的行为上。
代码示例:
@Test
public void TestLamda() throws Exception{
    List<String> wordsOne = Arrays.asList("a","b","c");
    List<String> res = allToUpperCase(wordsOne);

    List<String> wordsTwo = Arrays.asList("A","B","C");
    Assert.assertEquals(wordsTwo,res);
}

public List<String> allToUpperCase(List<String> words) {
    return words.stream()
            .map(word->word.toUpperCase())
            .collect(Collectors.toList());
}
- 1
- 2
- 3
- 4
- 5
- 6
- 7
- 8
- 9
- 10
- 11
- 12
- 13
- 14
2)Junit5和Lamda
JUnit 5完全使用当前的Java 8重写了所有代码,因此JUnit 5的运行条件是Java 8环境。
JUnit 5允许在断言中使用Lambda表达式,这个特性可以从开源的断言库AssertJ中可以看到。
JUnit 5的测试看上去与JUnit 4相同:同样是创建类,添加测试方法,使用@Test注释。但是,JUnit 5还提供了全新的一套注释集合,而且断言方法从JUnit 4的org.junit.Assert包移到了JUnit 5的org.junit.gen5.api.Assertions包。
JUnit 5的断言方法与JUnit 4相似,断言类提供了assertTrue、assertEquals、assertNull、assertSame以及相反的断言方法。不同之处在于JUnit 5的断言方法支持Lambda表达式。而且还有一个名为分组断言(Grouped Assertions)的新特性。分组断言允许执行一组断言,且会一起报告。
代码示例:
public class Junit5AndLamda {
@Test
public void lambdaExpressions() {
assertTrue(() -> "".isEmpty(), "string should be empty");
assertEquals("foo", "foo", () -> "message is lazily evaluated");
}
@Test
public void groupedAssertions() {
Dimension dim = new Dimension(100, 60);
assertAll("dimension",
() -> assertTrue(dim.getWidth() == 100, "width"),
() -> assertTrue(dim.getHeight() == 60, "height"));
}
@Test
public void exceptions() {
assertThrows(RuntimeException.class, () -> {
throw new NullPointerException();
});
Throwable exception = expectThrows(RuntimeException.class, () -> {
throw new NullPointerException("should not be null");
});
assertEquals("should not be null", exception.getMessage());
}
}
- 1
- 2
- 3
- 4
- 5
- 6
- 7
- 8
- 9
- 10
- 11
- 12
- 13
- 14
- 15
- 16
- 17
- 18
- 19
- 20
- 21
- 22
- 23
- 24
- 25
- 26
- 27
- 28
- 29
- 30
使用Lamda重构面向对象的设计模式
1)命令者模式
2)策略模式
3)观察者模式
4)模板方法模式