
使用Kotlin 进行 Android 开发(2)
14.2.3 实现后端 API 的接入
在本节中我们将实现后端 API 的接入及其数据展示的逻辑。
新建领域对象类 Movie
data class Movie(val id: String, val title: String, val overview: String, val posterPath: String) {
    override fun toString(): String {
        return "Movie(id='$id', title='$title', overview='$overview', posterPath='$posterPath')"
    }
}
复制
API 返回的数据结构与解析
我们调用的 API 是
val VOTE_AVERAGE_API = "http://api.themoviedb.org//3/discover/movie?certification_country=US&certification=R&sort_by=vote_average.desc&api_key=7e55a88ece9f03408b895a96c1487979"
复制
它的数据返回是
{
  "page": 1,
  "total_results": 10350,
  "total_pages": 518,
  "results": [
    {
      "vote_count": 28,
      "id": 138878,
      "video": false,
      "vote_average": 10,
      "title": "Fatal Mission",
      "popularity": 3.721883,
      "poster_path": "/u351Rsqu5nd36ZpbWxIpd3CpbJW.jpg",
      "original_language": "en",
      "original_title": "Fatal Mission",
      "genre_ids": [
        10752,
        28,
        12
      ],
      "backdrop_path": "/wNq5uqVDT7a5G1b97ffYf4hxzYz.jpg",
      "adult": false,
      "overview": "A CIA Agent must rely on reluctant help from a female spy in the North Vietnam jungle in order to pass through enemy lines.",
      "release_date": "1990-07-25"
    },
    ...
    ]
}
复制
我们使用 fastjson 来解析这个数据。在 app 下面的 build.gradle中添加依赖
dependencies {
    ...

    // https://mvnrepository.com/artifact/com.alibaba/fastjson
    compile group: 'com.alibaba', name: 'fastjson', version: '1.2.39'
}
复制
解析代码如下
val jsonstr = URL(VOTE_AVERAGE_API).readText(Charset.defaultCharset())
try {
    val obj = JSON.parse(jsonstr) as Map<*, *>
    val dataArray = obj.get("results") as JSONArray
    }

} catch (ex: Exception) {

}
复制
然后我们把这个 dataArray 放到我们的 MovieContent 对象中
dataArray.forEachIndexed { index, it ->
        val title = (it as Map<*, *>).get("title") as String
        val overview = it.get("overview") as String
        val poster_path = it.get("poster_path") as String
        addMovie(Movie(index.toString(), title, overview, getPosterUrl(poster_path)))
}
复制
其中,addMovie 的代码是
object MovieContent {

val MOVIES: MutableList<Movie> = ArrayList()
val MOVIE_MAP: MutableMap<String, Movie> = HashMap()
...
private fun addMovie(movie: Movie) {
    MOVIES.add(movie)
    MOVIE_MAP.put(movie.id, movie)
}
}
复制
然后,我们再新建 MovieDetailActivity、MovieDetailFragment、MovieListActivity 以及 activity_movie_list.xml、activity_movie_detail.xml 、 movie_detail.xml、movie_list.xml、movie_list_content.xml ,它们的代码分别介绍如下。
电影列表页面
MovieListActivity 是电影列表页面的 Activity,代码如下
package com.easy.kotlin

import android.content.Intent
import android.os.Bundle
import android.support.v7.app.AppCompatActivity
import android.support.v7.widget.RecyclerView
import android.view.LayoutInflater
import android.view.View
import android.view.ViewGroup
import android.widget.ImageView
import android.widget.TextView
import com.easy.kotlin.bean.MovieContent
import com.easy.kotlin.util.HttpUtil
import kotlinx.android.synthetic.main.activity_movie_detail.*
import kotlinx.android.synthetic.main.activity_movie_list.*
import kotlinx.android.synthetic.main.movie_list.*
import kotlinx.android.synthetic.main.movie_list_content.view.*


class MovieListActivity : AppCompatActivity() {

    private var mTwoPane: Boolean = false

    override fun onCreate(savedInstanceState: Bundle?) {
        super.onCreate(savedInstanceState)
        setContentView(R.layout.activity_movie_list)

        setSupportActionBar(toolbar)
        toolbar.title = title

        if (movie_detail_container != null) {
            mTwoPane = true
        }

        setupRecyclerView(movie_list)
    }

    private fun setupRecyclerView(recyclerView: RecyclerView) {
        recyclerView.adapter = SimpleItemRecyclerViewAdapter(this, MovieContent.MOVIES, mTwoPane)
    }

    class SimpleItemRecyclerViewAdapter(private val mParentActivity: MovieListActivity,
                                        private val mValues: List<MovieContent.Movie>,
                                        private val mTwoPane: Boolean) : RecyclerView.Adapter<SimpleItemRecyclerViewAdapter.ViewHolder>() {

        private val mOnClickListener: View.OnClickListener

        init {
            mOnClickListener = View.OnClickListener { v ->
                val item = v.tag as MovieContent.Movie
                if (mTwoPane) {
                    val fragment = MovieDetailFragment().apply {
                        arguments = Bundle()
                        arguments.putString(MovieDetailFragment.ARG_MOVIE_ID, item.id)
                    }
                    mParentActivity.supportFragmentManager
                            .beginTransaction()
                            .replace(R.id.movie_detail_container, fragment)
                            .commit()
                } else {
                    val intent = Intent(v.context, MovieDetailActivity::class.java).apply {
                        putExtra(MovieDetailFragment.ARG_MOVIE_ID, item.id)
                    }
                    v.context.startActivity(intent)
                }
            }
        }

        override fun onCreateViewHolder(parent: ViewGroup, viewType: Int): ViewHolder {
            val view =
                    LayoutInflater
                            .from(parent.context)
                            .inflate(R.layout.movie_list_content, parent, false)
            return ViewHolder(view)
        }

        override fun onBindViewHolder(holder: ViewHolder, position: Int) {
            val item = mValues[position]
            holder.mIdView.text = item.id
            holder.mTitle.text = item.title
            holder.mMoviePosterImageView.setImageBitmap(HttpUtil.getBitmapFromURL(item.posterPath))

            with(holder.itemView) {
                tag = item
                setOnClickListener(mOnClickListener)
            }
        }

        override fun getItemCount(): Int {
            return mValues.size
        }

        inner class ViewHolder(mView: View) : RecyclerView.ViewHolder(mView) {
            val mIdView: TextView = mView.id_text
            val mTitle: TextView = mView.title
            val mMoviePosterImageView: ImageView = mView.movie_poster_image

        }
    }
}
复制
对应的布局文件如下
activity_movie_list.xml
<?xml version="1.0" encoding="utf-8"?>
<android.support.design.widget.CoordinatorLayout xmlns:android="http://schemas.android.com/apk/res/android"
    xmlns:app="http://schemas.android.com/apk/res-auto"
    xmlns:tools="http://schemas.android.com/tools"
    android:layout_width="match_parent"
    android:layout_height="match_parent"
    android:fitsSystemWindows="true"
    tools:context="com.easy.kotlin.MovieListActivity">

    <android.support.design.widget.AppBarLayout
        android:id="@+id/app_bar"
        android:layout_width="match_parent"
        android:layout_height="wrap_content"
        android:theme="@style/AppTheme.AppBarOverlay">

        <android.support.v7.widget.Toolbar
            android:id="@+id/toolbar"
            android:layout_width="match_parent"
            android:layout_height="?attr/actionBarSize"
            app:popupTheme="@style/AppTheme.PopupOverlay" />

    </android.support.design.widget.AppBarLayout>

    <FrameLayout
        android:id="@+id/frameLayout"
        android:layout_width="match_parent"
        android:layout_height="match_parent"
        app:layout_behavior="@string/appbar_scrolling_view_behavior">

        <include layout="@layout/movie_list" />
    </FrameLayout>

</android.support.design.widget.CoordinatorLayout>
复制
movie_list.xml
<?xml version="1.0" encoding="utf-8"?>
<android.support.v7.widget.RecyclerView xmlns:android="http://schemas.android.com/apk/res/android"
    xmlns:app="http://schemas.android.com/apk/res-auto"
    xmlns:tools="http://schemas.android.com/tools"
    android:id="@+id/movie_list"
    android:name="com.easy.kotlin.MovieListFragment"
    android:layout_width="match_parent"
    android:layout_height="match_parent"
    android:layout_marginLeft="16dp"
    android:layout_marginRight="16dp"
    app:layoutManager="LinearLayoutManager"
    tools:context="com.easy.kotlin.MovieListActivity"
    tools:listitem="@layout/movie_list_content" />
复制
movie_list_content.xml
<?xml version="1.0" encoding="utf-8"?>
<FrameLayout xmlns:android="http://schemas.android.com/apk/res/android"
    android:layout_width="match_parent"
    android:layout_height="320dp"
    android:layout_gravity="center"
    android:layout_margin="0dp"
    android:clickable="true"
    android:foreground="?attr/selectableItemBackground"
    android:orientation="horizontal">

    <TextView
        android:id="@+id/id_text"
        android:layout_width="wrap_content"
        android:layout_height="wrap_content"
        android:layout_margin="@dimen/text_margin"
        android:textAppearance="?attr/textAppearanceListItem" />

    <ImageView
        android:id="@+id/movie_poster_image"
        android:layout_width="match_parent"
        android:layout_height="match_parent"
        android:scaleType="centerCrop" />

    <View
        android:id="@+id/title_background"
        android:layout_width="match_parent"
        android:layout_height="48dp"
        android:layout_gravity="bottom"
        android:alpha="0.8"
        android:background="@color/colorPrimaryDark"
        android:gravity="center" />

    <TextView
        android:id="@+id/title"
        android:layout_width="match_parent"
        android:layout_height="48dp"
        android:layout_gravity="bottom"
        android:gravity="center"
        android:paddingLeft="@dimen/activity_horizontal_margin"
        android:paddingRight="@dimen/activity_horizontal_margin"
        android:textColor="@android:color/white"
        android:textSize="12sp" />

</FrameLayout>
复制
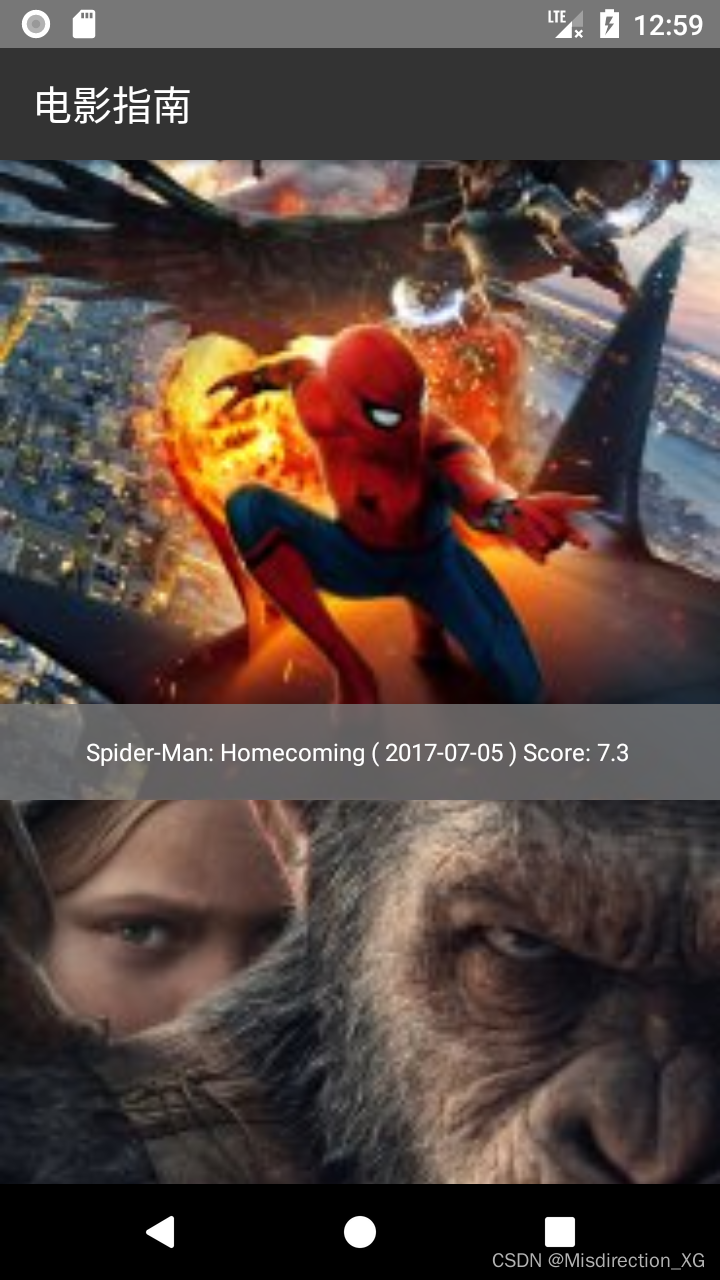
电影列表的整体布局的 UI 如下图所示
电影列表的整体布局的 UI
视图数据适配器 ViewAdapter
我们在创建 MovieListActivity 过程中需要展示响应的数据,这些数据由 ViewAdapter 来承载,对应的代码如下
    override fun onCreate(savedInstanceState: Bundle?) {
        super.onCreate(savedInstanceState)
        setContentView(R.layout.activity_movie_list)

        setSupportActionBar(toolbar)
        toolbar.title = title

        if (movie_detail_container != null) {
            mTwoPane = true
        }

        setupRecyclerView(movie_list)
    }

    private fun setupRecyclerView(recyclerView: RecyclerView) {
        recyclerView.adapter = SimpleItemRecyclerViewAdapter(this, MovieContent.MOVIES, mTwoPane)
    }
复制
在上面代码中,我们定义了一个继承 RecyclerView.Adapter 的 SimpleItemRecyclerViewAdapter 类来装载 View 中要显示的数据,实现数据与视图的解耦。View 要显示的数据从Adapter里面获取并展现出来。Adapter负责把真实的数据是配成一个个View,也就是说View要显示什么数据取决于Adapter里面的数据。
视图中图像的展示
其中,在函数 SimpleItemRecyclerViewAdapter.onBindViewHolder 中,我们设置 View 组件与Model 数据的绑定。其中的电影海报是图片,所以我们的布局文件中使用了 ImageView,对应的布局文件是 movie_list_content.xml ,代码如下
<?xml version="1.0" encoding="utf-8"?>
<FrameLayout xmlns:android="http://schemas.android.com/apk/res/android"
    android:layout_width="match_parent"
    android:layout_height="320dp"
    android:layout_gravity="center"
    android:layout_margin="0dp"
    android:clickable="true"
    android:foreground="?attr/selectableItemBackground"
    android:orientation="horizontal">

    <TextView
        android:id="@+id/id_text"
        android:layout_width="wrap_content"
        android:layout_height="wrap_content"
        android:layout_margin="@dimen/text_margin"
        android:textAppearance="?attr/textAppearanceListItem" />

    <ImageView
        android:id="@+id/movie_poster_image"
        android:layout_width="match_parent"
        android:layout_height="match_parent"
        android:scaleType="centerCrop" />

    <View
        android:id="@+id/title_background"
        android:layout_width="match_parent"
        android:layout_height="48dp"
        android:layout_gravity="bottom"
        android:alpha="0.8"
        android:background="@color/colorPrimaryDark"
        android:gravity="center" />

    <TextView
        android:id="@+id/title"
        android:layout_width="match_parent"
        android:layout_height="48dp"
        android:layout_gravity="bottom"
        android:gravity="center"
        android:paddingLeft="@dimen/activity_horizontal_margin"
        android:paddingRight="@dimen/activity_horizontal_margin"
        android:textColor="@android:color/white"
        android:textSize="12sp" />


</FrameLayout>
复制
UI 设计效果图
MovieListActivity 布局 UI
列表中图片的展示
关于图片的视图组件是 ImageView
    <ImageView
        android:id="@+id/movie_poster_image"
        android:layout_width="match_parent"
        android:layout_height="match_parent"
        android:scaleType="centerCrop" />
复制
我们这里是根据图片的 URL 来展示图片,ImageView 类有个setImageBitmap 方法,可以直接设置 Bitmap 图片数据
holder.mMoviePosterImageView.setImageBitmap(HttpUtil.getBitmapFromURL(item.posterPath))
复制
而通过 url 获取Bitmap 图片数据的代码是
object HttpUtil {
    fun getBitmapFromURL(src: String): Bitmap? {
        try {
            val url = URL(src)
            val input = url.openStream()
            val myBitmap = BitmapFactory.decodeStream(input)
            return myBitmap
        } catch (e: Exception) {
            e.printStackTrace()
            return null
        }
    }
}
复制
电影详情页面
MovieDetailActivity 是电影详情页面,代码如下
package com.easy.kotlin

import android.content.Intent
import android.os.Bundle
import android.support.design.widget.Snackbar
import android.support.v7.app.AppCompatActivity
import android.view.MenuItem
import kotlinx.android.synthetic.main.activity_movie_detail.*

class MovieDetailActivity : AppCompatActivity() {

    override fun onCreate(savedInstanceState: Bundle?) {
        super.onCreate(savedInstanceState)
        setContentView(R.layout.activity_movie_detail)
        setSupportActionBar(detail_toolbar)

        fab.setOnClickListener { view ->
            Snackbar.make(view, "Replace with your own detail action", Snackbar.LENGTH_LONG)
                    .setAction("Action", null).show()
        }

        supportActionBar?.setDisplayHomeAsUpEnabled(true)
        if (savedInstanceState == null) {
            val arguments = Bundle()
            arguments.putString(MovieDetailFragment.ARG_MOVIE_ID,
                    intent.getStringExtra(MovieDetailFragment.ARG_MOVIE_ID))
            val fragment = MovieDetailFragment()
            fragment.arguments = arguments
            supportFragmentManager.beginTransaction()
                    .add(R.id.movie_detail_container, fragment)
                    .commit()
        }
    }

    override fun onOptionsItemSelected(item: MenuItem) =
            when (item.itemId) {
                android.R.id.home -> {
                    navigateUpTo(Intent(this, MovieListActivity::class.java))
                    true
                }
                else -> super.onOptionsItemSelected(item)
            }
}
复制
其中的详情页的布局 XML 文件是activity_item_detail.xml, 代码如下
<android.support.design.widget.CoordinatorLayout xmlns:android="http://schemas.android.com/apk/res/android"
    xmlns:app="http://schemas.android.com/apk/res-auto"
    xmlns:tools="http://schemas.android.com/tools"
    android:layout_width="match_parent"
    android:layout_height="match_parent"
    android:fitsSystemWindows="true"
    tools:context="com.easy.kotlin.ItemDetailActivity"
    tools:ignore="MergeRootFrame">

    <android.support.design.widget.AppBarLayout
        android:id="@+id/app_bar"
        android:layout_width="match_parent"
        android:layout_height="@dimen/app_bar_height"
        android:fitsSystemWindows="true"
        android:theme="@style/ThemeOverlay.AppCompat.Dark.ActionBar">

        <android.support.design.widget.CollapsingToolbarLayout
            android:id="@+id/toolbar_layout"
            android:layout_width="match_parent"
            android:layout_height="match_parent"
            android:fitsSystemWindows="true"
            app:contentScrim="?attr/colorPrimary"
            app:layout_scrollFlags="scroll|exitUntilCollapsed"
            app:toolbarId="@+id/toolbar">

            <android.support.v7.widget.Toolbar
                android:id="@+id/detail_toolbar"
                android:layout_width="match_parent"
                android:layout_height="?attr/actionBarSize"
                app:layout_collapseMode="pin"
                app:popupTheme="@style/ThemeOverlay.AppCompat.Light" />

        </android.support.design.widget.CollapsingToolbarLayout>

    </android.support.design.widget.AppBarLayout>

    <android.support.v4.widget.NestedScrollView
        android:id="@+id/item_detail_container"
        android:layout_width="match_parent"
        android:layout_height="match_parent"
        app:layout_behavior="@string/appbar_scrolling_view_behavior" />

    <android.support.design.widget.FloatingActionButton
        android:id="@+id/fab"
        android:layout_width="wrap_content"
        android:layout_height="wrap_content"
        android:layout_gravity="center_vertical|start"
        android:layout_margin="@dimen/fab_margin"
        app:layout_anchor="@+id/item_detail_container"
        app:layout_anchorGravity="top|end"
        app:srcCompat="@android:drawable/stat_notify_chat" />

</android.support.design.widget.CoordinatorLayout>
复制
我们把电影详情的 Fragment 的展示放到 NestedScrollView 中
    <android.support.v4.widget.NestedScrollView
        android:id="@+id/movie_detail_container"
        android:layout_width="match_parent"
        android:layout_height="match_parent"
        android:fitsSystemWindows="true"
        app:layout_behavior="@string/appbar_scrolling_view_behavior" />
复制
电影详情的 Fragment 代码是 MovieDetailFragment
package com.easy.kotlin

import android.os.Bundle
import android.support.v4.app.Fragment
import android.view.LayoutInflater
import android.view.View
import android.view.ViewGroup
import com.easy.kotlin.bean.MovieContent
import com.easy.kotlin.util.HttpUtil
import kotlinx.android.synthetic.main.activity_movie_detail.*
import kotlinx.android.synthetic.main.movie_detail.view.*

class MovieDetailFragment : Fragment() {
    private var mItem: MovieContent.Movie? = null

    override fun onCreate(savedInstanceState: Bundle?) {
        super.onCreate(savedInstanceState)

        if (arguments.containsKey(ARG_MOVIE_ID)) {

            mItem = MovieContent.MOVIE_MAP[arguments.getString(ARG_MOVIE_ID)]
            mItem?.let {
                activity.toolbar_layout?.title = it.title
            }
        }
    }

    override fun onCreateView(inflater: LayoutInflater, container: ViewGroup?,
                              savedInstanceState: Bundle?): View? {
        // 绑定 movieDetailView
        val movieDetailView = inflater.inflate(R.layout.movie_detail, container, false)
        mItem?.let {
            movieDetailView.movie_poster_image.setImageBitmap(HttpUtil.getBitmapFromURL(it.posterPath))
            movieDetailView.movie_overview.text = "影片简介: ${it.overview}"
            movieDetailView.movie_vote_count.text = "打分次数:${it.vote_count}"
            movieDetailView.movie_vote_average.text = "评分:${it.vote_average}"
            movieDetailView.movie_release_date.text = "发行日期:${it.release_date}"
        }

        return movieDetailView
    }

    companion object {
        const val ARG_MOVIE_ID = "movie_id"
    }
}
复制
其中的 R.layout.movie_detail 布局文件 movie_detail.xml 如下
<?xml version="1.0" encoding="utf-8"?>
<LinearLayout xmlns:android="http://schemas.android.com/apk/res/android"
    xmlns:tools="http://schemas.android.com/tools"
    android:layout_width="match_parent"
    android:layout_height="match_parent"
    android:layout_gravity="center"
    android:layout_margin="0dp"
    android:clickable="true"
    android:foreground="?attr/selectableItemBackground"
    android:orientation="vertical">


    <TextView
        android:id="@+id/movie_release_date"
        android:layout_width="match_parent"
        android:layout_height="match_parent"
        android:padding="16dp"
        android:textIsSelectable="true"
        android:textSize="18sp"
        tools:context="com.easy.kotlin.MovieDetailFragment" />

    <ImageView
        android:id="@+id/movie_poster_image"
        android:layout_width="match_parent"
        android:layout_height="match_parent"
        android:layout_centerVertical="true"
        android:fitsSystemWindows="true"
        android:scaleType="fitCenter" />


    <TextView
        android:id="@+id/movie_overview"
        android:layout_width="match_parent"
        android:layout_height="match_parent"
        android:padding="16dp"
        android:textIsSelectable="true"
        android:textSize="18sp"
        tools:context="com.easy.kotlin.MovieDetailFragment" />


    <TextView
        android:id="@+id/movie_vote_average"
        android:layout_width="match_parent"
        android:layout_height="match_parent"
        android:padding="16dp"
        android:textIsSelectable="true"
        android:textSize="18sp"
        tools:context="com.easy.kotlin.MovieDetailFragment" />

    <TextView
        android:id="@+id/movie_vote_count"
        android:layout_width="match_parent"
        android:layout_height="match_parent"
        android:padding="16dp"
        android:textIsSelectable="true"
        android:textSize="18sp"
        tools:context="com.easy.kotlin.MovieDetailFragment" />


</LinearLayout>
复制
电影源数据的获取
我们定义了一个 MovieContent 对象类来存储从 API 获取到的数据,代码如下
package com.easy.kotlin.bean

import android.os.StrictMode
import com.alibaba.fastjson.JSON
import com.alibaba.fastjson.JSONArray
import java.net.URL
import java.nio.charset.Charset
import java.util.*


object MovieContent {

    val MOVIES: MutableList<Movie> = ArrayList()
    val MOVIE_MAP: MutableMap<String, Movie> = HashMap()

    val VOTE_AVERAGE_API = "http://api.themoviedb.org//3/discover/movie?sort_by=popularity.desc&api_key=7e55a88ece9f03408b895a96c1487979&page=1"

    init {
        val policy = StrictMode.ThreadPolicy.Builder().permitAll().build()
        StrictMode.setThreadPolicy(policy)
        initMovieListData()
    }

    private fun initMovieListData() {

        val jsonstr = URL(VOTE_AVERAGE_API).readText(Charset.defaultCharset())
        try {
            val obj = JSON.parse(jsonstr) as Map<*, *>
            val dataArray = obj.get("results") as JSONArray

            dataArray.forEachIndexed { index, it ->
                val title = (it as Map<*, *>).get("title") as String
                val overview = it.get("overview") as String
                val poster_path = it.get("poster_path") as String
                val vote_count = it.get("vote_count").toString()
                val vote_average = it.get("vote_average").toString()
                val release_date = it.get("release_date").toString()
                addMovie(Movie(id = index.toString(),
                        title = title,
                        overview = overview,
                        vote_count = vote_count,
                        vote_average = vote_average,
                        release_date = release_date,
                        posterPath = getPosterUrl(poster_path)))
            }

        } catch (ex: Exception) {
            ex.printStackTrace()
        }

    }

    private fun addMovie(movie: Movie) {
        MOVIES.add(movie)
        MOVIE_MAP.put(movie.id, movie)
    }


    fun getPosterUrl(posterPath: String): String {
        return "https://image.tmdb.org/t/p/w185_and_h278_bestv2$posterPath"
    }

    data class Movie(val id: String,
                     val title: String,
                     val overview: String,
                     val vote_count: String,
                     val vote_average: String,
                     val release_date: String,
                     val posterPath: String)


}
复制
在 Android 4.0 之后默认的线程模式是不允许在主线程中访问网络。为了演示效果,我们在访问网络的代码前,把 ThreadPolicy 设置为允许运行访问网络
val policy = StrictMode.ThreadPolicy.Builder().permitAll().build()
StrictMode.setThreadPolicy(policy)
复制
我们使用了一个 data class Movie 来存储电影对象数据
    data class Movie(val id: String,
                     val title: String,
                     val overview: String,
                     val vote_count: String,
                     val vote_average: String,
                     val release_date: String,
                     val posterPath: String)
复制
配置 AndroidManifest.xml
最后,我们配置 AndroidManifest.xml文件内容如下
<?xml version="1.0" encoding="utf-8"?>
<manifest xmlns:android="http://schemas.android.com/apk/res/android"
    package="com.easy.kotlin">

    <application
        android:allowBackup="true"
        android:icon="@mipmap/ic_launcher"
        android:label="@string/app_name"
        android:roundIcon="@mipmap/ic_launcher_round"
        android:supportsRtl="true"
        android:theme="@style/AppTheme">
        ...
        <activity
            android:name=".MovieListActivity"
            android:label="@string/app_name"
            android:theme="@style/AppTheme.NoActionBar">
            <intent-filter>
                <action android:name="android.intent.action.MAIN" />

                <category android:name="android.intent.category.LAUNCHER" />
            </intent-filter>
        </activity>
        <activity
            android:name=".MovieDetailActivity"
            android:label="@string/title_movie_detail"
            android:parentActivityName=".MovieListActivity"
            android:theme="@style/AppTheme.NoActionBar">
            <meta-data
                android:name="android.support.PARENT_ACTIVITY"
                android:value="com.easy.kotlin.MovieListActivity" />
        </activity>
    </application>

    <uses-permission android:name="android.permission.INTERNET" />

</manifest>
因为我们要访问网络,所以需要添加该行配置
<uses-permission android:name="android.permission.INTERNET" />
复制
再次打包安装运行,效果图如下
电影列表页面
电影列表页面
点击进入电影详情页
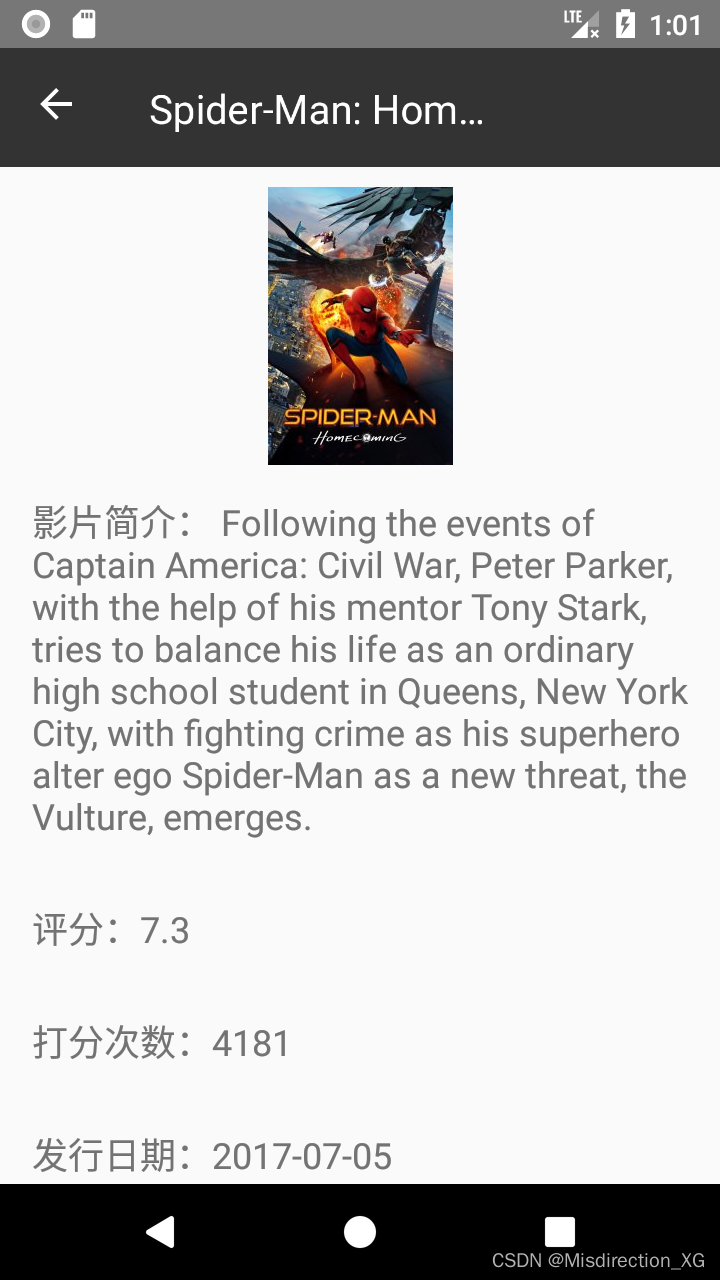
电影详情页
本章小结
Android 中经常出现的空引用、API的冗余样板式代码等都是是驱动我们转向 Kotlin 语言的动力。另外,Kotlin 的 Android 视图 DSL Anko 可以我们从繁杂的 XML 视图配置文件中解放出来。我们可以像在 Java 中一样方便的使用 Android 开发的流行的库诸如 Butter Knife、Realm、RecyclerView等。当然,我们使用 Kotlin 集成这些库来进行 Andorid 开发,既能够直接使用我们之前的开发库,又能够从 Java 语言、Android API 的限制中出来。这不得不说是一件好事。
最后
更多Kotlin的学习资料可以扫描免费领取!

《高级Kotlin强化实战 》
第一章 Kotlin 入门教程
● Kotlin 概述
● Kotlin 与 Java 比较
● 巧用 Android Studio
● 认识 Kotlin 基本类型
● 走进 Kotlin 的数组
● 走进 Kotlin 的集合
● 完整代码
● 基础语法
第二章 Kotlin 实战避坑指南
● 方法入参是常量,不可修改
● 不要 Companion、INSTANCE?
● Java 重载,在 Kotlin 中怎么巧妙过渡一下?
● Kotlin 中的判空姿势
● Kotlin 复写 Java 父类中的方法
● Kotlin “狠”起来,连TODO都不放过!
● is、as` 中的坑
● Kotlin 中的 Property 的理解
● also 关键字
● takeIf 关键字
● 单例模式的写法
第三章 项目实战《Kotlin Jetpack 实战》
● 从一个膜拜大神的 Demo 开始
● Kotlin 写 Gradle 脚本是一种什么体验?
● Kotlin 编程的三重境界
● Kotlin 高阶函数
● Kotlin 泛型
● Kotlin 扩展
● Kotlin 委托
● 协程“不为人知”的调试技巧
● 图解协程:suspend
《史上最详Android版kotlin协程入门进阶实战 》
第一章 Kotlin协程的基础介绍
● 协程是什么
● 什么是Job 、Deferred 、协程作用域
● Kotlin协程的基础用法
第二章 kotlin协程的关键知识点初步讲解
● 协程调度器
● 协程上下文
● 协程启动模式
● 协程作用域
● 挂起函数
第三章 kotlin协程的异常处理
● 协程异常的产生流程
● 协程的异常处理
第四章 kotlin协程在Android中的基础应用
● Android使用kotlin协程
● 在Activity与Framgent中使用协程
● ViewModel中使用协程
● 其他环境下使用协程