文章目录
提示:以下是本篇文章正文内容,来源于黑马案例
一、短信模板(阿里)
1. maven坐标
	   <dependency>
            <groupId>com.aliyun</groupId>
            <artifactId>aliyun-java-sdk-core</artifactId>
            <version>4.5.3</version>
        </dependency>

        <dependency>
            <groupId>com.aliyun</groupId>
            <artifactId>dysmsapi20170525</artifactId>
            <version>2.0.1</version>
        </dependency>
2. application.yml
  #阿里短信
  sms:
    signName: 改成自己的
    templateCode: 改成自己的
    accessKey: 改成自己的
    secret: 改成自己的
3. SmsProperties
import lombok.Data;
import org.springframework.boot.context.properties.ConfigurationProperties;

@Data
@ConfigurationProperties(prefix = "sms")
public class SmsProperties {


    private String signName;
    private String templateCode;
    private String accessKey;
    private String secret;
}
4. SmsTemplate
import com.aliyun.dysmsapi20170525.models.SendSmsRequest;
import com.aliyun.dysmsapi20170525.models.SendSmsResponse;
import com.aliyun.dysmsapi20170525.models.SendSmsResponseBody;
import com.aliyun.teaopenapi.models.Config;
import com.tanhua.autoconfig.properties.SmsProperties;

public class SmsTemplate {


    private SmsProperties properties;

    public SmsTemplate(SmsProperties properties) {


        this.properties = properties;
    }

    public void sendSms(String mobile,String code) {


        try {


            //配置阿里云
            Config config = new Config()
                    // 您的AccessKey ID
                    .setAccessKeyId(properties.getAccessKey())
                    // 您的AccessKey Secret
                    .setAccessKeySecret(properties.getSecret());
            // 访问的域名
            config.endpoint = "dysmsapi.aliyuncs.com";
            com.aliyun.dysmsapi20170525.Client client =  new com.aliyun.dysmsapi20170525.Client(config);

            SendSmsRequest sendSmsRequest = new SendSmsRequest()
                    .setPhoneNumbers(mobile)
                    .setSignName(properties.getSignName())
                    .setTemplateCode(properties.getTemplateCode())
                    .setTemplateParam("{\"code\":\""+code+"\"}");
            // 复制代码运行请自行打印 API 的返回值
            SendSmsResponse response = client.sendSms(sendSmsRequest);
            SendSmsResponseBody body = response.getBody();
            System.out.println(body.getMessage());

        }catch (Exception e) {


            e.printStackTrace();
        }
    }
}
5. AutoConfiguration
import org.springframework.boot.context.properties.EnableConfigurationProperties;
import org.springframework.context.annotation.Bean;

@EnableConfigurationProperties({


        SmsProperties.class
})
public class AutoConfiguration {


    //阿里云短信
    @Bean
    public SmsTemplate smsTemplate(SmsProperties properties) {


        return new SmsTemplate(properties);
    }
}
6. 测试
@RunWith(SpringRunner.class)
@SpringBootTest(classes = AppServerApplication.class)
public class SmsTemplateTest {


    //注入
    @Autowired
    private SmsTemplate smsTemplate;

    //测试
    @Test
    public void testSendSms() {


        smsTemplate.sendSms("1845645592","4567");
    }
}
二、人脸识别(百度)
1. maven坐标
  		<!--百度人脸识别API-->
        <dependency>
            <groupId>com.baidu.aip</groupId>
            <artifactId>java-sdk</artifactId>
            <version>4.8.0</version>
        </dependency>
2. application.yml
  #百度人脸别
  aip:
    appId: 改成你自己的
    apiKey: 改成你自己的
    secretKey: 改成你自己的
3. AipFaceProperties
import com.baidu.aip.face.AipFace;
import lombok.Data;
import org.springframework.boot.context.properties.ConfigurationProperties;
import org.springframework.context.annotation.Bean;

@Data
@ConfigurationProperties(prefix = "aip")
public class AipFaceProperties {


    private String appId;
    private String apiKey;
    private String secretKey;

    @Bean
    public AipFace aipFace() {


        AipFace client = new AipFace(appId, apiKey, secretKey);
        // 可选:设置网络连接参数
        client.setConnectionTimeoutInMillis(2000);
        client.setSocketTimeoutInMillis(60000);
        return client;
    }
}
4. AipFaceTemplate
import com.baidu.aip.face.AipFace;
import org.json.JSONObject;
import org.springframework.beans.factory.annotation.Autowired;
import java.util.HashMap;
public class AipFaceTemplate {
@Autowired
private AipFace client;
/**
* 检测图片中是否包含人脸
* true:包含
* false:不包含
*/
public boolean detect(String imageUrl) {
// 调用接口
String imageType = "URL";
HashMap<String, String> options = new HashMap<String, String>();
options.put("face_field", "age");
options.put("max_face_num", "2");
options.put("face_type", "LIVE");
options.put("liveness_control", "LOW");
// 人脸检测
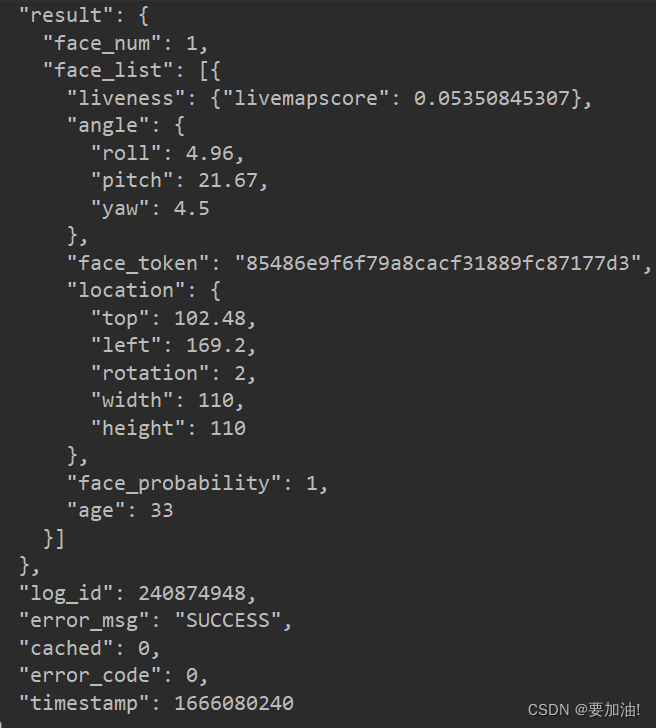
JSONObject res = client.detect(imageUrl, imageType, options);
System.out.println(res.toString(2));
Integer error_code = (Integer) res.get("error_code");
return error_code == 0;
}
}
5. AutoConfiguration
import org.springframework.boot.context.properties.EnableConfigurationProperties;
import org.springframework.context.annotation.Bean;

@EnableConfigurationProperties({


        AipFaceProperties.class
})
public class TanhuaAutoConfiguration {


    //百度人脸识别
    @Bean
    public AipFaceTemplate aipFaceTemplate() {


        return new AipFaceTemplate();
    }
}
6. 测试
@RunWith(SpringRunner.class)
@SpringBootTest(classes = AppServerApplication.class)
public class FaceTest {


    @Autowired
    AipFaceTemplate aipFaceTemplate;

    @Test
    public void aipFaceTemplateTest(){


        boolean detect = aipFaceTemplate.detect("https://tanhua001.oss-cn-beijing.aliyuncs.com/2021/04/19/a3824a45-70e3-4655-8106-a1e1be009a5e.jpg");
        System.out.println(detect);
    }

}
三、即时通讯(环信)
1. maven坐标
		<!--环信即时通讯-->
        <dependency>
            <groupId>com.easemob.im</groupId>
            <artifactId>im-sdk-core</artifactId>
            <version>0.2.5</version>
        </dependency>
2. application.yml
  #环信即时通信
  huanxin:
    appkey: 改成自己的
    clientId: 改成自己的
    clientSecret: 改成自己的
3. HuanXinProperties
import lombok.Data;
import org.springframework.boot.context.properties.ConfigurationProperties;

@Data
@ConfigurationProperties(prefix = "huanxin")
public class HuanXinProperties {


    private String  appkey;
    private String  clientId;
    private String  clientSecret;

}
4. HunaXinTemplate
import cn.hutool.core.collection.CollUtil;
import com.easemob.im.server.EMProperties;
import com.easemob.im.server.EMService;
import com.easemob.im.server.model.EMTextMessage;
import lombok.extern.slf4j.Slf4j;

import java.util.Set;

public class HunaXinTemplate {


    private EMService emService;

    public HunaXinTemplate(HuanXinProperties huanXinProperties) {


        EMProperties properties = EMProperties.builder()
                .setAppkey(huanXinProperties.getAppkey())
                .setClientId(huanXinProperties.getClientId())
                .setClientSecret(huanXinProperties.getClientSecret())
                .build();

        emService = new EMService(properties);
    }

    /**
     * 创建环信用户
     *
     * @param username
     * @param password
     * @return
     */
    public Boolean createUser(String username, String password) {


        try {


            //创建环信用户
            emService.user().create(username.toLowerCase(), password)
                    .block(); // .block()如果不需要等待响应,不需要阻塞  则使用.block()
            return true;
        } catch (Exception e) {


            e.printStackTrace();
            log.error("创建环信用户失败~");
        }
        return false;
    }

    /**
     * 添加联系人
     *
     * @param username1
     * @param username2
     * @return
     */
    public Boolean addContact(String username1, String username2) {


        try {


            //创建环信用户
            emService.contact().add(username1, username2)
                    .block();
            return true;
        } catch (Exception e) {


            log.error("添加联系人失败~");
        }
        return false;
    }

    /**
     * 删除联系人
     *
     * @param username1
     * @param username2
     * @return
     */
    public Boolean deleteContact(String username1, String username2) {


        try {


            //删除环信用户
            emService.contact().remove(username1, username2)
                    .block();
            return true;
        } catch (Exception e) {


            log.error("删除联系人失败~");
        }
        return false;
    }

    /**
     * 发送消息
     *
     * @param username
     * @param content
     * @return
     */
    public Boolean sendMsg(String username, String content) {


        try {


            //接收人用户列表
            Set<String> set = CollUtil.newHashSet(username);
            //文本消息
            EMTextMessage message = new EMTextMessage().text(content);
            //发送消息  from:admin是管理员发送
            emService.message().send("admin", "users",
                    set, message, null).block();
            return true;
        } catch (Exception e) {


            log.error("删除联系人失败~");
        }
        return false;
    }
}
5. AutoConfiguration
import org.springframework.boot.context.properties.EnableConfigurationProperties;
import org.springframework.context.annotation.Bean;

@EnableConfigurationProperties({


        HuanXinProperties.class
})
public class AutoConfiguration {


    //环信即时通讯
    @Bean
    public HunaXinTemplate hunaXinTemplate(HuanXinProperties huanXinProperties) {


        return new HunaXinTemplate(huanXinProperties);
    }

}
6. 测试
@RunWith(SpringRunner.class)
@SpringBootTest(classes = AppServerApplication.class)
public class HuanXinTest {


    @Autowired
    private HunaXinTemplate hunaXinTemplate;

    /**
     * 保存用户
     */
    @Test
    public void saveUser() {


        Boolean b = hunaXinTemplate.createUser("hx1", "123456");
         hunaXinTemplate.createUser("hx106", "123456");
        System.out.println(b);
    }

    /**
     * 添加联系人
     */
    @Test
    public void addContact() {


        Boolean aBoolean = hunaXinTemplate.addContact("hx1", "hx106");
        System.out.println(aBoolean);
    }

    /**
     * 删除联系人
     */
    @Test
    public void delContact() {


        Boolean aBoolean = hunaXinTemplate.deleteContact("hx1", "hx106");
        System.out.println(aBoolean);
    }


    /**
     * 发消息
     */
    @Test
    public void sendMsg() {


        Map<String, Object> msgMap = new HashMap<>();
        msgMap.put("name", "沧海");
        msgMap.put("age", 18);
        String message = JSON.toJSONString(msgMap);
        Boolean msgB = hunaXinTemplate.sendMsg("hx1", message);
        System.out.println(msgB);
    }
}
四、文件上传
application.yml
spring:
  servlet:
    multipart:
      max-file-size: 30MB
      max-request-size: 30MB
1. 方法1
1. controller
@PostMapping("/fileUpLoad")
    public Result fileUpLoad(MultipartFile imageContent[]) {


        userService.fileUpLoad(imageContent);
        return Result .ok(""); //正常返回状态码200
    }
2. service
@Override
public void fileUpLoad(MultipartFile[] imageContent) {


        //将图片上传
        int length = imageContent.length;
        if (length > 0) {


            for (MultipartFile file : imageContent) {


                //将用户头像上传到服务器
                String filename = file.getOriginalFilename();
//                String prefix = filename.substring(0, filename.lastIndexOf("."));
                String prefix = "D:\\images\\";
//                String suffix = filename.substring(filename.lastIndexOf(".") + 1);
                try {


//                    File f = File.createTempFile("YY" + prefix, suffix + ".");
                    //上传
                    file.transferTo(new File(prefix + filename));
                    //将临时文件删除
//                    f.delete();
                } catch (IOException e) {


                    e.printStackTrace();
                }
            }
        }
    }
2. 方法2
@PostMapping("/fileUpLoad")
public void fileupLoad(HttpServletRequest request) {


        //获取运行环境
        String osName = System.getProperties().getProperty("os.name").toLowerCase();
        boolean isLinux = "linux".equals(osName);
        //将上下文初始化给多部份解析器
        CommonsMultipartResolver multipartResolver = new CommonsMultipartResolver(request.getSession().getServletContext());
        //检查form中是否有(multipart/form-data)
        if (multipartResolver.isMultipart(request)) {


            //将Request变成多部份Request
            MultipartHttpServletRequest multipartRequest = (MultipartHttpServletRequest) request;

            //获取所有文件名
            Iterator<String> iter = multipartRequest.getFileNames();
            while (iter.hasNext()) {


                MultiValueMap<String, MultipartFile> multiFileMap = multipartRequest.getMultiFileMap();
                List<MultipartFile> multipartFileList = multiFileMap.get(iter.next().toString());
                for (MultipartFile multipartFile : multipartFileList) {


                    try {


                        if (null != multipartFile) {


                            String originalFilename = multipartFile.getOriginalFilename();
                            String fileName = originalFilename.substring(originalFilename.lastIndexOf("/") + 1);
                            if (isLinux) {


                                //linux环境  进行SFTP上传
                            } else {


//                                String prefix = originalFilename.substring(0, originalFilename.lastIndexOf("."));
                                String prefix = "D:\\images\\";
//                                String suffix = originalFilename.substring(originalFilename.lastIndexOf("."));

                                //创建临时文件
//                                File file = File.createTempFile("YY" + prefix, "." + suffix);
                                //上传
                                multipartFile.transferTo(new File(prefix + fileName));
                                //将临时文件删除
//                                file.delete();
                            }
                        }
                    } catch (Exception e) {


                        e.printStackTrace();
                    }
                }
            }
        }
    }
五、FastDFS(文件系统)
1. maven坐标
	<!--fastdfs文件存储-->
        <dependency>
            <groupId>com.github.tobato</groupId>
            <artifactId>fastdfs-client</artifactId>
            <version>1.26.7</version>
            <exclusions>
                <exclusion>
                    <groupId>ch.qos.logback</groupId>
                    <artifactId>logback-classic</artifactId>
                </exclusion>
            </exclusions>
        </dependency>
2. application.yml
fdfs:
  so-timeout: 1500 #读取超时时间
  connect-timeout: 600 #连接超时时间
  thumb-image: #缩略图参数
    width: 150
    height: 150
  tracker-list: 192.0.0.166:22122 #tracker服务器地址 可配置多个
  web-server-url: http://192.0.0.166:8888 #访问路径 storage中nginx地址
3. 测试
@RunWith(SpringRunner.class)
@SpringBootTest(classes = AppServerApplication.class)
public class FastDFSTest {


    @Autowired
    protected FastFileStorageClient storageClient;
    @Autowired
    private FdfsWebServer fdfsWebServer;

    @Test
    public void testUpload() {


        String path = "E:\\Download\\GoogleDownload\\123.jpg";
        File file = new File(path);
        try {


            //上传图片
            StorePath storePath = this.storageClient.uploadFile(FileUtils.openInputStream(file), file.length(), "jpg", null);
            //拼接路径   可通过该路径访问上传的照片  http://192.0.0.166:8888/group1/M00/00/00/wKiIoGMB7PmAUPZZAAHMYGEwMhg147.jpg
            String url = fdfsWebServer.getWebServerUrl() + "/" + storePath.getFullPath();
            System.out.println(url);
        } catch (IOException e) {


            e.printStackTrace();
        }
    }
}
六、地理位置搜索附近(MONGO)
了解:
地理位置查询,必须创建索引才可以能查询
地理位置查询,必须创建索引才可以能查询
地理位置查询,必须创建索引才可以能查询
目前有两种索引:
2d :
使用2d index 能够将数据作为二维平面上的点存储起来,在MongoDB 2.4以前使用2。
2dsphere(使用的多):
2dsphere索引支持查询在一个类地球的球面上进行几何计算,以GeoJSON对象或者普通坐标对的方式存储数据。
MongoDB内部支持多种GeoJson对象类型:
Point
{ type: “Point”, coordinates: [ 40, 5 ] }
LineString
{ type: “LineString”, coordinates: [ [ 40, 5 ], [ 41, 6 ] ] }
Polygon
{
type: “Polygon”,
coordinates: [ [ [ 0 , 0 ] , [ 3 , 6 ] , [ 6 , 1 ] , [ 0 , 0 ] ] ]
}
1. maven坐标
        <dependency>
            <groupId>org.springframework.boot</groupId>
            <artifactId>spring-boot-starter-data-mongodb</artifactId>
             <version>2.3.9.RELEASE</version>
        </dependency>
2. application.yml
spring:
  data:
    mongodb:
      uri: mongodb://192.156.136.168:27017/testdb
      username: root
      password: 123456
3. 实体类
@Data
@NoArgsConstructor
@AllArgsConstructor
@Document(collection = " geographical_location")
//地理位置查询,必须创建索引才可以能查询  为location字段建立2dsphere索引  索引名为location_index
@CompoundIndex(name = "location_index", def = "{'location': '2dsphere'}")
public class GeographicalLocation implements java.io.Serializable{


    @Id
    private ObjectId id;
    @Indexed
    private Long userId; //用户id
    private GeoJsonPoint location; //x:经度 y:纬度
    private String address; //位置描述
    private Long created; //创建时间
    private Long updated; //更新时间
    private Long lastUpdated; //上次更新时间
}
4.测试
@RunWith(SpringRunner.class)
@SpringBootTest(classes = MongoApplication.class)
public class MongoTest {


    @Autowired
    private MongoTemplate mongoTemplate;

    /**
     * 查询附近
     */
    @Test
    public void testNear() {


        //构造坐标点
        GeoJsonPoint point = new GeoJsonPoint(116.404, 39.915);
        //构造半径  1:半径长度  Metrics.KILOMETERS:单位 km
        Distance distanceObj = new Distance(1, Metrics.KILOMETERS);
        //画了一个圆圈
        Circle circle = new Circle(point, distanceObj);
        //构造query对象
        Query query = Query.query(Criteria.where("location").withinSphere(circle));
        //省略其他内容
        List<GeographicalLocation> list = mongoTemplate.find(query, GeographicalLocation.class);
        list.forEach(System.out::println);
    }

    /**
     * 查询附近且获取间距
     */
    @Test
    public void testNear1() {


        //1、构造中心点(圆点)
        GeoJsonPoint point = new GeoJsonPoint(116.404, 39.915);
        //2、构建NearQuery对象
        NearQuery query = NearQuery.near(point, Metrics.KILOMETERS).maxDistance(1, Metrics.KILOMETERS);
        //3、调用mongoTemplate的geoNear方法查询
        GeoResults<GeographicalLocation> results = mongoTemplate.geoNear(query, GeographicalLocation.class);
        //4、解析GeoResult对象,获取距离和数据
        for (GeoResult<GeographicalLocation> result : results) {


            GeographicalLocation places = result.getContent();
            double value = result.getDistance().getValue();
            System.out.println(places + "---距离:" + value + "km");
        }
    }

}
七、全局异常处理
1. 响应状态码
public enum ResponseStatusCode {


    SUCCESS_CODE(200, "执行成功"),
    FAIL_CODE(201, "执行失败"),

    CHECK_CODE_ERROR(2001, "验证码对比错误"),
    PHONE_ERROR(2002, "手机号对比错误"),
    CONTEXT_EMPTY(2003, "内容不允许为空"),


    ;

    private Integer code;
    private String msg;

    public Integer getCode() {


        return code;
    }


    public String getMsg() {


        return msg;
    }

    ResponseStatusCode(Integer code, String msg) {


        this.code = code;
        this.msg = msg;
    }
}
2. 自定义异常
public class CustomException extends RuntimeException {


    private Integer code;
    private String message;


    public CustomException(Integer code, String message) {


        super(message);
        this.message = message;
        this.code = code;
    }


    public CustomException( String message) {


        super(message);
        this.message = message;
    }


    @Override
    public String getMessage() {


        return message;
    }

    public void setMessage(String message) {


        this.message = message;
    }

    public Integer getCode() {


        return code;
    }

    public void setCode(Integer code) {


        this.code = code;
    }
}
3. 全局异常处理
@ControllerAdvice //只要是添加了@Controller的类,产生的异常都会在这边处理
@ResponseBody
public class GlobalExceptionHandler {


    /**
     * 处理自定义异常
     *
     * @param c
     * @return
     */
    @ExceptionHandler(value = CustomException.class)
    public ResponseEntity customException(CustomException c) {


        c.printStackTrace();
        return ResponseEntity.status(c.getCode()).body(c.getMessage());
    }

    @ExceptionHandler(value = Exception.class)
    public ResponseEntity error(Exception e) {


        e.printStackTrace();
        return ResponseEntity.status(HttpStatus.INTERNAL_SERVER_ERROR).body(e.getMessage());
    }
}
4. 测试
public void exceptionTest(String context){


        if(StringUtils.isEmpty(context)){


            throw new CustomException(ResponseStatusCode.CONTEXT_EMPTY.getCode(),ResponseStatusCode.CONTEXT_EMPTY.getMsg());
        }
        System.out.println(true);
    }
八、自定义响应结果类
/**
 * 响应状态码
 */
public enum ResponseStatusCode {


    SUCCESS_CODE(200, "执行成功"),
    FAIL_CODE(201, "执行失败"),


    ;

    private Integer code;
    private String msg;

    public Integer getCode() {


        return code;
    }


    public String getMsg() {


        return msg;
    }

    ResponseStatusCode(Integer code, String msg) {


        this.code = code;
        this.msg = msg;
    }

    /**
     * 根据状态码获取信息
     *
     * @param code
     * @return
     */
    public static String getMsgByCode(Integer code) {


        for (ResponseStatusCode response : ResponseStatusCode.values()) {


            if(code == response.getCode()){


                return response.getMsg();
            }
        }
        return "未知消息";
    }

}
import java.io.Serializable;

/**
 * 自定义响应结果集
 */
public class Result implements Serializable {


    /**
     * 成功--不携带数据
     *
     * @return
     */
    public static Result success() {


        return new Result(ResponseStatusCode.SUCCESS_CODE.getCode(), ResponseStatusCode.SUCCESS_CODE.getMsg());
    }

    /**
     * 成功--携带数据
     *
     * @param data
     * @return
     */
    public static Result success(Object data) {


        return new Result(ResponseStatusCode.SUCCESS_CODE.getCode(), ResponseStatusCode.SUCCESS_CODE.getMsg(), data);
    }

    /**
     * 失败  -- 根据状态码返回错误信息
     *
     * @param code
     * @return
     */
    public static Result fail(Integer code) {


        return new Result(code, ResponseStatusCode.getMsgByCode(code));
    }

    /**
     * 失败-- 固定状态码  自定义返回信息
     *
     * @param msg
     * @return
     */
    public static Result fail(String msg) {


        return new Result(ResponseStatusCode.FAIL_CODE.getCode(), msg);
    }


    private Integer code;  //状态码
    private String msg;  //消息
    private Object data; //数据

    public Result() {


    }

    public Result(Integer code, String msg) {


        this.code = code;
        this.msg = msg;
    }

    public Result(Integer code, String msg, Object data) {


        this.code = code;
        this.msg = msg;
        this.data = data;
    }

    public Integer getCode() {


        return code;
    }

    public void setCode(Integer code) {


        this.code = code;
    }

    public String getMsg() {


        return msg;
    }

    public void setMsg(String msg) {


        this.msg = msg;
    }

    public Object getData() {


        return data;
    }

    public void setData(Object data) {


        this.data = data;
    }
}
九、mybatis-plus分页配置
十、对数组进行分页
    @Test
    public void pageTest() {


        int page = 1, pagesize = 3;
        String str = "1,2,3,4,5,6,7,8";
        String[] array = str.split(",");
        /**
         * 对数组进行分页
         */
        if ((page - 1) * pagesize < array.length) {


            List<Long> pidList = Arrays.stream(array).skip((page - 1) * pagesize).limit(pagesize)
                    .map(item -> Convert.toLong(item)).collect(Collectors.toList());

            System.out.println(pidList.toString());
        }
        //获取总页数
         int totalPage= PageUtil.totalPage(array .length,pagesize);
         System.out.println(totalPage);
    }
十一、搭建网关(gateway)
- maven坐标
        <dependency>
            <groupId>org.springframework.cloud</groupId>
            <artifactId>spring-cloud-starter-gateway</artifactId>
        </dependency>
        <dependency>
            <groupId>com.alibaba.cloud</groupId>
            <artifactId>spring-cloud-starter-alibaba-nacos-discovery</artifactId>
        </dependency>
        <!-- 监控检查-->
        <dependency>
            <groupId>org.springframework.boot</groupId>
            <artifactId>spring-boot-starter-actuator</artifactId>
        </dependency>
        <dependency>
            <groupId>com.itheima</groupId>
            <artifactId>tanhua-commons</artifactId>
            <version>1.0-SNAPSHOT</version>
        </dependency>
- application.yml
server:
  port: 8888
spring:
  profiles:
    active: prod
  application:
    name: tanhua-gateway
  cloud:
    nacos:
      discovery:
        server-addr: 192.168.136.160:8848
    gateway:
      #支持跨域
      globalcors:
        add-to-simple-url-handler-mapping: true
        corsConfigurations:
          '[/**]':
            allowedHeaders: "*"
            allowedOrigins: "*"
            allowedMethods:
              - GET
              - POST
              - DELETE
              - PUT
              - OPTION
      #路由
      routes:
        # 前台系统
        - id: tanhua-app-server
          #转到tanhua-app-server系统, 在nacos服务列表中copy服务名称   要与服务名称一致
          uri: lb://tanhua-app-server
          #当请求以app开头时 会将请求转到tanhua-app-server系统
          predicates:
            - Path=/app/**
          #过滤掉前缀app  因为controller中并没有app
          filters:
            - StripPrefix= 1
        # 后台系统
        - id: tanhua-admin
          uri: lb://tanhua-admin
          predicates:
            - Path=/admin/**
          filters:
            - StripPrefix= 1
#自定义配置   excludedUrls中的请求不用鉴权
gateway:
  # 当以,分割时,会自动解析为数组
  excludedUrls: /user/login,/user/loginVerification,/system/users/verification,/system/users/login
- 配置鉴权管理器
import com.fasterxml.jackson.core.JsonProcessingException;
import com.fasterxml.jackson.databind.ObjectMapper;
import com.tanhua.commons.utils.JwtUtils;
import org.apache.commons.lang3.StringUtils;
import org.springframework.beans.factory.annotation.Value;
import org.springframework.cloud.gateway.filter.GatewayFilterChain;
import org.springframework.cloud.gateway.filter.GlobalFilter;
import org.springframework.core.Ordered;
import org.springframework.core.io.buffer.DataBuffer;
import org.springframework.http.HttpStatus;
import org.springframework.http.server.reactive.ServerHttpResponse;
import org.springframework.stereotype.Component;
import org.springframework.web.server.ServerWebExchange;
import reactor.core.publisher.Mono;

import java.util.HashMap;
import java.util.List;
import java.util.Map;

@Component
public class AuthFilter implements GlobalFilter, Ordered {


    //排除的链接  解析为数组
    @Value("${gateway.excludedUrls}")
    private List<String> excludedUrls;

    @Override
    public Mono<Void> filter(ServerWebExchange exchange, GatewayFilterChain chain) {


        String url = exchange.getRequest().getURI().getPath();

        System.out.println( "url:"+ url);
        //排除特殊接口 不校验
        if(excludedUrls.contains(url)){


            return chain.filter(exchange);
        }
        String token = exchange.getRequest().getHeaders().getFirst("Authorization");
        if(!StringUtils.isEmpty(token)){


            token = token.replace("Bearer ", "");
        }
        ServerHttpResponse response = exchange.getResponse();

        //2、使用工具类,判断token是否有效
        boolean verifyToken = JwtUtils.verifyToken(token);
        //3、如果token失效,返回状态码401,拦截
        if(!verifyToken) {


            Map<String, Object> responseData = new HashMap<>();
            responseData.put("errCode", 401);
            responseData.put("errMessage", "用户未登录");
            return responseError(response,responseData);
        }
        return chain.filter(exchange);
    }

    //响应错误数据
    private Mono<Void> responseError(ServerHttpResponse response,Map<String, Object> responseData){


        // 将信息转换为 JSON
        ObjectMapper objectMapper = new ObjectMapper();
        byte[] data = new byte[0];
        try {


            data = objectMapper.writeValueAsBytes(responseData);
        } catch (JsonProcessingException e) {


            e.printStackTrace();
        }
        // 输出错误信息到页面
        DataBuffer buffer = response.bufferFactory().wrap(data);
        response.setStatusCode(HttpStatus.UNAUTHORIZED);
        response.getHeaders().add("Content-Type", "application/json;charset=UTF-8");
        return response.writeWith(Mono.just(buffer));
    }

    /**
     * 设置过滤器的执行顺序
     */
    @Override
    public int getOrder() {


        return Ordered.LOWEST_PRECEDENCE;
    }
}
- 解决跨域
import org.springframework.context.annotation.Bean;
import org.springframework.context.annotation.Configuration;
import org.springframework.web.cors.CorsConfiguration;
import org.springframework.web.cors.reactive.CorsWebFilter;
import org.springframework.web.cors.reactive.UrlBasedCorsConfigurationSource;
import org.springframework.web.util.pattern.PathPatternParser;
/**
 * 跨域支持
 */
@Configuration
public class CorsConfig {


    @Bean
    public CorsWebFilter corsFilter() {


        CorsConfiguration config = new CorsConfiguration();
        config.addAllowedMethod("*");
        config.addAllowedOrigin("*");
        config.addAllowedHeader("*");
        UrlBasedCorsConfigurationSource source =
                new UrlBasedCorsConfigurationSource(new PathPatternParser());
        source.registerCorsConfiguration("/**", config);
        return new CorsWebFilter(source);
    }
}
- 启动类
@SpringBootApplication
public class GatewayApplication {


    public static void main(String[] args) {


        SpringApplication.run(GatewayApplication.class, args);
    }
}
十二、Nacos配置中心集中管理配置文件
- maven坐标
        <!-- nacos配置中心依赖支持 -->
        <dependency>
            <groupId>com.alibaba.cloud</groupId>
            <artifactId>spring-cloud-starter-alibaba-nacos-config</artifactId>
        </dependency>

        <!-- Spring Boot 2.4版本开始,需要加入下面的配置,不然读取不到nacos 配置 -->
		<dependency>
            <groupId>org.springframework.cloud</groupId>
            <artifactId>spring-cloud-starter-bootstrap</artifactId>
            <version>3.0.3</version>
        </dependency>
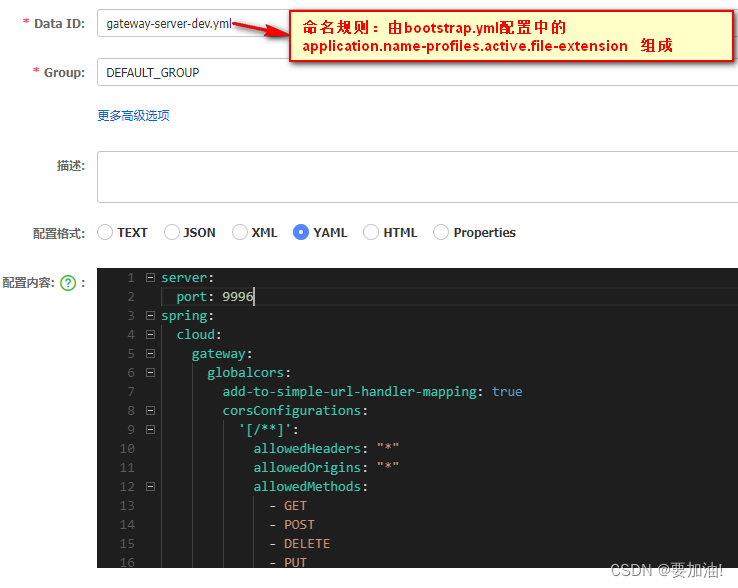
- bootstrap.yml 配置
spring:
  profiles:
    # dev:开发环境 test:测试环境  prod: 生产环境
    active: dev
  application:
    name: gateway-server
  cloud:
    nacos:
      discovery:
        server-addr: XXX.XXX.XXX.XXX:8848
      config:
        server-addr: XXX.XXX.XXX.XXX:8848
        file-extension: yml
- Nacos配置文件
十三、Spring重试功能
- maven坐标
<!--Spring重试模块-->
<dependency>
    <groupId>org.springframework.retry</groupId>
    <artifactId>spring-retry</artifactId>
</dependency>
<dependency>
    <groupId>org.aspectj</groupId>
    <artifactId>aspectjweaver</artifactId>
</dependency>
- 启动类中添加@EnableRetry注解来激活重试功能
import org.springframework.boot.autoconfigure.SpringBootApplication;
import org.springframework.retry.annotation.EnableRetry;

@SpringBootApplication
@EnableRetry //开启重试
public class Application {


    public static void main(String[] args) {


        SpringApplication.run(Application.class, args);
    }
}
- 在需要支持重试操作的Service方法中添加@Retryable注解
import cn.hutool.core.util.RandomUtil;
import org.springframework.retry.annotation.Backoff;
import org.springframework.retry.annotation.Recover;
import org.springframework.retry.annotation.Retryable;
import org.springframework.stereotype.Service;

@Service
public class RetryService {


	/**
	 * @Retryable参数说明:
	 *		value:抛出指定异常才会重试
	 *		maxAttempts:最大重试次数,默认3次
	 *		backoff:重试等待策略,默认使用@Backoff
	 *		@Backoff 的value默认为1000L,我们设置为2000L;
	 *		multiplier(指定延迟倍数)默认为0,表示固定暂停1秒后进行重试,如果把multiplier设置为2,
	 *		                                  则第一次重试为2秒,第二次为4秒,第三次为6秒。
	**/

    @Retryable(value = RuntimeException.class, maxAttempts = 3, backoff = @Backoff(delay = 2000L, multiplier = 2))
    public int execute(int max) {


        int data = RandomUtil.randomInt(1, 99);
        System.out.println("生成:" + data);
        if (data < max) {


            throw new RuntimeException();
        }
        return data;
    }

	/**
	 * @Recover标注的方法,是在所有的重试都失败的情况下,最后执行该方法,该方法有2个要求
	 *	1. 方法的第一个参数必须是 Throwable 类型,最好与 @Retryable 中的 value一致
	 *	2. 方法的返回值必须与@Retryable的方法返回值一致,否则该方法不能被执行。
	**/
    @Recover //全部重试失败后执行
    public int recover(Exception e) {


        System.out.println("全部重试完成。。。。。");
        return 88; //返回默认
    }
}