目录
一,项目模式
电商模式:市面上有5种常见的电商模式,B2B、B2C、 C2B、 C2C、O2O; 1、B2B模式 B2B (Business to Business),是指 商家与商家建立的商业关系。如:阿里巴巴 2、B2C 模式 B2C (Business to Consumer), 就是我们经常看到的供应商直接把商品卖给用户,即“商对客” 模式,也就是通常说的商业零售,直接面向消费者销售产品和服务。如:苏宁易购、京东、 天猫、小米商城 3、C2B模式 C2B(CustomertoBusiness),即消费者对企业。先有消费者需求产生而后有企业生产,即先 有消费者提出需求,后有生产企业按需求组织生产 4、C2C模式 C2C (Customer to Consumer),客户之间自己把东西放上网去卖,如:淘宝,闲鱼 5、O2O模式 O2O即Online To Ofline,也即将线下商务的机会与互联网结合在了一起,让互联网成为线 下交易的前台。线上快速支付,线下优质服务。如:饿了么,美团,淘票票,京东到家
技术栈
前端 html css js jquery freemarker vue
基础 javaSE javaEE
框架 spring springMVC springBoot mybatis mybatis-plus
安全 shiro(spring security)
微服务 springCloud springCloud alibaba
数据库 mysql
测试 junit jmeter
二,项目架构图
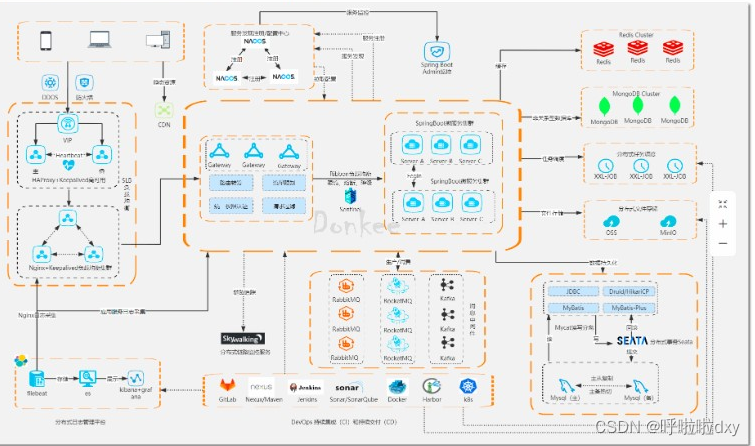
简单介绍:
上图分为含有手机端和电脑端以及台式机端,(DDOS与防火墙是一个概念,因为有些系统只能在内网访问)。
往下走就有个主备模式,HAProoxy+Keepalived:属于一个中间件,作用是保存连接,维持Nginx集群,nginx收到请求就发送到网关。
当网关接收到Nginx反向代理的请求(为什么反向代理,隔离外界网络和内部网络),网关是保护外部请求与微服务之间的调用关系。
在我们调用微服务是是通过微服务的名称进行调用(这时网关就会找到微服务的配置中心处,找到是否存有你所需要的微服务名称,有就拉取资源)
RabbitMQ做异步处理。
三,案例演示
项目分为主模块(不需要存储数据,创建时选择maven项目即可)与其余子模块(由于需要访问数创建时需选择Springboot项目)
主模块
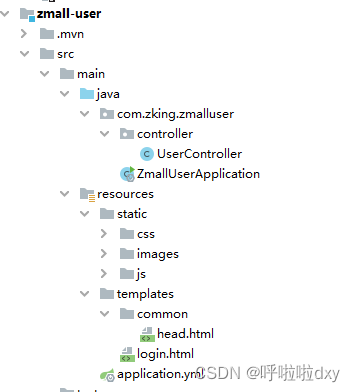
1.在idea中基于maven方式创建主模块zmall,创建成功之后删除src目录即可。
目录结构如图
配置主模块pom.xml
<!--依赖版本的锁定-->
    <properties>
        <java.version>1.8</java.version>
        <project.build.sourceEncoding>UTF-8</project.build.sourceEncoding>
        <project.reporting.outputEncoding>UTF-8</project.reporting.outputEncoding>
        <spring-boot.version>2.3.2.RELEASE</spring-boot.version>
        <spring-cloud.version>Hoxton.SR9</spring-cloud.version>
        <spring-cloud-alibaba.version>2.2.6.RELEASE</spring-cloud-alibaba.version>
    </properties>
dependencyManagement配置
<dependencyManagement>
	<dependencies>
        <!-- SpringBoot 依赖配置 -->
        <dependency>
            <groupId>org.springframework.boot</groupId>
            <artifactId>spring-boot-dependencies</artifactId>
            <version>${spring-boot.version}</version>
            <type>pom</type>
            <scope>import</scope>
        </dependency>
    	<!--spring-cloud依赖配置-->
        <dependency>
            <groupId>org.springframework.cloud</groupId>
            <artifactId>spring-cloud-dependencies</artifactId>
            <version>${spring-cloud.version}</version>
            <type>pom</type>
            <scope>import</scope>
        </dependency>
        <!--spring-cloud-alibaba依赖配置-->
        <dependency>
            <groupId>com.alibaba.cloud</groupId>
            <artifactId>spring-cloud-alibaba-dependencies</artifactId>
            <version>${spring-cloud-alibaba.version}</version>
            <type>pom</type>
            <scope>import</scope>
        </dependency>
    </dependencies>
</dependencyManagement>
子模块定义
(当创建了子模块后需将定义子模块)如:
<modules>
    <module>zmall-common</module>
    <module>zmall-user</module>
</modules>
设置maven编译版本
<plugin>
    <groupId>org.apache.maven.plugins</groupId>
    <artifactId>maven-compiler-plugin</artifactId>
    <configuration>
        <source>1.8</source>
        <target>1.8</target>
    </configuration>
</plugin>
公共子模块
1.基于maven方式创建zmall-common公共子模块。注:zmall-common公共模块只为其他模块提供依赖支持。
配置pom.xml
<dependencies>
        <!-- mybatis plus依赖 -->
        <dependency>
            <groupId>com.baomidou</groupId>
            <artifactId>mybatis-plus-boot-starter</artifactId>
            <version>3.4.0</version>
        </dependency>
        <dependency>
            <groupId>mysql</groupId>
            <artifactId>mysql-connector-java</artifactId>
            <version>5.1.44</version>
            <scope>runtime</scope>
        </dependency>
        <dependency>
            <groupId>com.alibaba</groupId>
            <artifactId>fastjson</artifactId>
            <version>1.2.56</version>
        </dependency>
        <dependency>
            <groupId>org.projectlombok</groupId>
            <artifactId>lombok</artifactId>
        </dependency>
        <dependency>
            <groupId>org.springframework.boot</groupId>
            <artifactId>spring-boot-starter-web</artifactId>
        </dependency>
        <dependency>
            <groupId>org.springframework.boot</groupId>
            <artifactId>spring-boot-starter-freemarker</artifactId>
        </dependency>
</dependencies>
子模块
-
基于Spring Initialzr方式创建zmall-user用户模块。
-
配置pom.xml。设置父模块,并添加zmall-common公共模块的依赖支持。
<!-- 父模块 -->
<parent>
    <groupId>com.zking.zmall</groupId>
    <artifactId>zmall</artifactId>
    <version>1.0-SNAPSHOT</version>
</parent>
<dependencies>
    <dependency>
        <groupId>com.zking.zmall</groupId>
        <artifactId>zmall-common</artifactId>
        <version>1.0-SNAPSHOT</version>
    </dependency>
</dependencies>
<!-- 父模块 -->
<parent>
<groupId>com.zking.zmall</groupId>
<artifactId>zmall</artifactId>
<version>1.0-SNAPSHOT</version>
</parent>
<dependencies>
<dependency>
<groupId>com.zking.zmall</groupId>
<artifactId>zmall-common</artifactId>
<version>1.0-SNAPSHOT</version>
</dependency>
</dependencies>配置application.yml
server:
  port: 8010
spring:
  application:
    name: zmall-user
  datasource:
    #type连接池类型 DBCP,C3P0,Hikari,Druid,默认为Hikari,HikariDataSource属于Mybatisplus依赖
    type: com.zaxxer.hikari.HikariDataSource
    driver-class-name: com.mysql.jdbc.Driver
    url: jdbc:mysql://localhost:3306/zmall?useUnicode=true&characterEncoding=UTF-8&useSSL=false
    username: root
    password: 123456
  freemarker:
    suffix: .html
    template-loader-path: classpath:/templates/
  mvc:
    static-path-pattern: /static/**
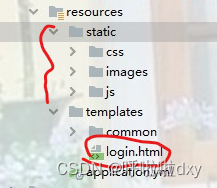
添加页面公共资源
1)将资料目录中的《易买网网页素材.zip》解压后,将其中Login.html和js/css/images等等添加到项目的templates和static目录下,最好请将Login.html重命名为login.html
2)导入资料目录中的common目录到项目的templates目录下
3)在login.html页面中的头部申明<!DOCTYPE html ....>修改成<!DOCTYPE html>(支持H5风格)
4)在login.html页面中通过<#include>指令引入common目录中的head.html
<#include 'common/head.html'>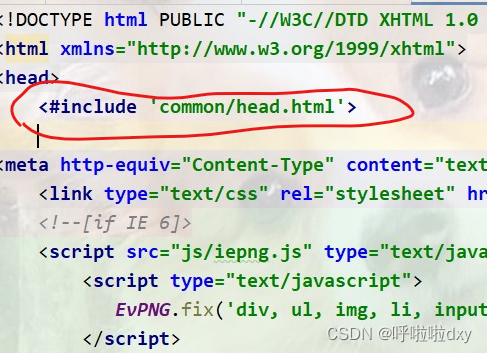
5)创建UserController并定义login.html页面跳转方式
代码演示
package com.zking.zmall.controller;

import org.springframework.stereotype.Controller;
import org.springframework.web.bind.annotation.RequestMapping;

@Controller
public class UserController {

    @RequestMapping("/login.html")
    public String login(){
        return "login";
    }
}
最后访问页面
