前言
大家都知道多线程在我们实际编码过程中运用很多,很多情况我们需要靠多线程来提升系统性能。但是有些时候我们需要阻塞一部分线程,让这部分线程等待其他线程的执行完成获取结果。比如:数据统计、等待其他任务完成、死锁检查等等。为了应对这些场景,我们JUC提供了CountDownLatch类,这个类可以帮助我们在多线程的使用中让一个或多个线程等待其他线程执行完成。
核心原理
CountDownLatch内部维护了计数器和阻塞队列,计数器缓存count值,也是有多个需要先执行的线程数目;阻塞队列缓存的是调用了await()方法的线程,表示加入阻塞队列。当CountDownLatch初始化的时候会传入业务需要先执行的线程数目count值,后续线程调用await()方法则加入阻塞队列等待其他线程执行完成。countDown()方法则是在某个线程业务完成后将计数器count值减一,表示这个线程已经执行。如果所有先行线程执行完成,最终count值等于0,此时CountDownLatch就会唤醒阻塞队列中的线程继续执行。
源码解析
同步源码分析
CountDownLatch依赖关系图
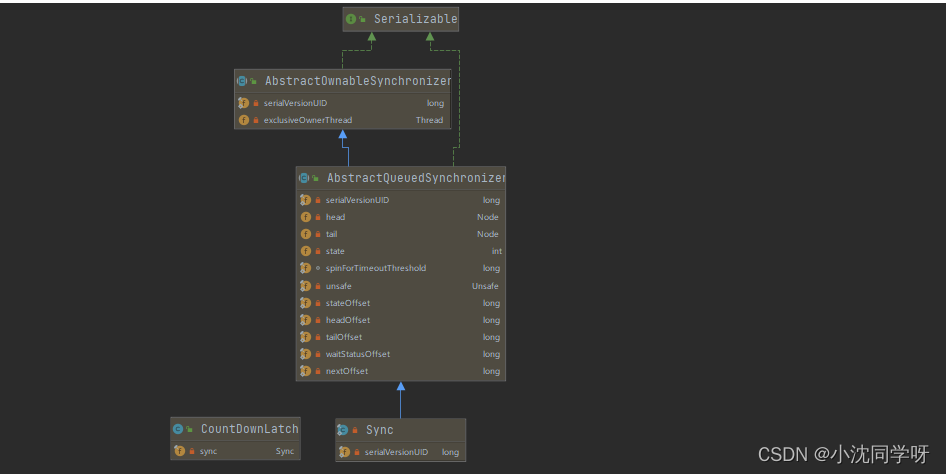
进入JUC下CountDownLatch类,发现其内部类Sync集成AbstractQueuedSynchronizer抽象阻塞队列:
//内部类sync集成AQS
private static final class Sync extends AbstractQueuedSynchronizer {


    private static final long serialVersionUID = 4982264981922014374L;

    Sync(int count) {


        setState(count);
    }

    int getCount() {


        return getState();
    }

    protected int tryAcquireShared(int acquires) {


        return (getState() == 0) ? 1 : -1;
    }

    protected boolean tryReleaseShared(int releases) {


        // Decrement count; signal when transition to zero
        for (;;) {


            int c = getState();
            if (c == 0)
                return false;
            int nextc = c-1;
            if (compareAndSetState(c, nextc))
                return nextc == 0;
        }
    }
}

private final Sync sync;
继续查看源码:
//有参数的构造方法
public CountDownLatch(int count) {


    if (count < 0) throw new IllegalArgumentException("count < 0");
    this.sync = new Sync(count);
}


//线程加入阻塞队列方法
public void await() throws InterruptedException {


    sync.acquireSharedInterruptibly(1);
}


//线程执行完成计数器减少方法
public void countDown() {


    sync.releaseShared(1);
}
如上源码所示,我们发现CountDownLatch的主要方法await()、countDown()、构造方法都是调用Syn内部类中的方法。然而Sync内部类继承了AQS,所以本质上我们CountDownLatch是通过AQS来实现同步的。
AQS原理的内部通过state状态和阻塞队列实现的,当 state == 0 唤醒阻塞队列中线程,对AQS还不是很了解的同学可以参考我的博客:并发基础之抽象同步队列AQS
await源码分析
上面我们分析了CountDownLatch同步是通过AQS实现的,现在我们详细分析下CountDownLatch的核心方法await()方法。
查询await()方法源码,发现CountDownLatch提供了两个让线程加入阻塞队列的方法,一个直接中断加入阻塞,另一个带有阻塞超时时间加入阻塞队列。
/**
 * 当前线程中断执行,加入阻塞队列
ublic void await() throws InterruptedException {


    sync.acquireSharedInterruptibly(1);
}

/**
 * 当前多线程中断加入阻塞队列,加入了阻塞超时时间
 */
public boolean await(long timeout, TimeUnit unit)
    throws InterruptedException {


    return sync.tryAcquireSharedNanos(1, unit.toNanos(timeout));
}
继续查看源码:
//AQS执行中断加入阻塞前验证
public final void acquireSharedInterruptibly(int arg)
        throws InterruptedException {


    if (Thread.interrupted())
        throw new InterruptedException();
    if (tryAcquireShared(arg) < 0)
        doAcquireSharedInterruptibly(arg);
}
//AQS执行中断加入阻塞队列
private void doAcquireSharedInterruptibly(int arg)
    throws InterruptedException {


    final Node node = addWaiter(Node.SHARED);
    boolean failed = true;
    try {


        for (;;) {


            final Node p = node.predecessor();
            if (p == head) {


                //获取状态值
                int r = tryAcquireShared(arg);
                if (r >= 0) {


                    //直接作为队列头
                    setHeadAndPropagate(node, r);
                    p.next = null; // help GC
                    failed = false;
                    return;
                }
            }
            //放入阻塞队列尾部
            if (shouldParkAfterFailedAcquire(p, node) &&
                parkAndCheckInterrupt())
                throw new InterruptedException();
        }
    } finally {


        if (failed)
            cancelAcquire(node);
    }
}
如上源码所示,CountDownLatch的await()方法本质是调用AQS中的阻塞方法。内部先验证阻塞队里是否有线程,如果没有则作为阻塞队列头部,倘若存在阻塞线程则加入到阻塞队列尾部。
countDown源码分析
上面分析了await()方法内部是调用AQS阻塞逻辑,不出意外countDown()方法应该也是调用的AQS处理释放线程锁的方法。
我们查询countDown源码:
//countDownLatch释放共享锁
public void countDown() {


    sync.releaseShared(1);
}
//AQS释放共享锁验证
public final boolean releaseShared(int arg) {


    if (tryReleaseShared(arg)) {


        //释放共享锁验证通过
        doReleaseShared();
        return true;
    }
    return false;
}

//countdownlatch内部类sync 覆写tryReleaseShared 方法
protected boolean tryReleaseShared(int releases) {


    // Decrement count; signal when transition to zero
    for (;;) {


        int c = getState();
        if (c == 0)
            return false;
        int nextc = c-1;
        if (compareAndSetState(c, nextc))
            //只有state == 0 时候会释放共享锁
            return nextc == 0;
    }
}
如上源码所示,countDown()方法内部调用AQS的releaseShared()释放共享锁方法。在释放锁之前会验证是否满足释放条件,此时调用的是我们sync 覆写的tryReleaseShared()方法,这个方法逻辑是获取当前state值并用CAS修改state减一。然后判断state是否等于0,不等于0则不通过释放共享锁验证,等于0则通过验证。
我们继续查释放共享锁源:
//释放共享锁具体逻辑
private void doReleaseShared() {


    /*
     * Ensure that a release propagates, even if there are other
     * in-progress acquires/releases.  This proceeds in the usual
     * way of trying to unparkSuccessor of head if it needs
     * signal. But if it does not, status is set to PROPAGATE to
     * ensure that upon release, propagation continues.
     * Additionally, we must loop in case a new node is added
     * while we are doing this. Also, unlike other uses of
     * unparkSuccessor, we need to know if CAS to reset status
     * fails, if so rechecking.
     */
    for (;;) {


        Node h = head;
        if (h != null && h != tail) {


            int ws = h.waitStatus;
            if (ws == Node.SIGNAL) {


                if (!compareAndSetWaitStatus(h, Node.SIGNAL, 0))
                    continue;            // loop to recheck cases
                //唤醒后续节点
                unparkSuccessor(h);
            }
            //用CAS重新设置state值
            else if (ws == 0 &&
                     !compareAndSetWaitStatus(h, 0, Node.PROPAGATE))
                continue;                // loop on failed CAS
        }
        if (h == head)                   // loop if head changed
            break;
    }
}
/**
 * 唤醒后续阻塞线程方法
 */
private void unparkSuccessor(Node node) {


    /*
     * If status is negative (i.e., possibly needing signal) try
     * to clear in anticipation of signalling.  It is OK if this
     * fails or if status is changed by waiting thread.
     */
    int ws = node.waitStatus;
    if (ws < 0)
        compareAndSetWaitStatus(node, ws, 0);

    /*
     * Thread to unpark is held in successor, which is normally
     * just the next node.  But if cancelled or apparently null,
     * traverse backwards from tail to find the actual
     * non-cancelled successor.
     */
    Node s = node.next;
    if (s == null || s.waitStatus > 0) {


        s = null;
        for (Node t = tail; t != null && t != node; t = t.prev)
            if (t.waitStatus <= 0)
                s = t;
    }
    if (s != null)
        //唤醒线程
        LockSupport.unpark(s.thread);
}
如上源码所示,doReleaseShared()方法释放了共享锁,释放完成发现阻塞队列有阻塞线程会唤醒线程。
实战演示
上面我们讲些了CountCownLatch的同步方式,以及主要方法的源码解析。相信大家对CountDownLatch都有了一定的了解,以下我们让主线程等待5个线程执行完成后再执行实战演示。
1、创建演示代码
/**
 * CountDownLatch运用
 * @author senfel
 * @version 1.0
 * @date 2023/4/20 14:58
 */
public class CountDownDemo {


    public static void actionCountDown() throws Exception{


        //创建一个定长线程池
        ExecutorService executorService = Executors.newFixedThreadPool(10);
        //主线程等待5个线程执行完才执行
        CountDownLatch countDownLatch = new CountDownLatch(5);
        //并发量控制在2个线程
        Semaphore semaphore = new Semaphore(2);
        //创建线程执行数据
        for(int i=0;i<5;i++){


            executorService.execute(new Runnable() {


                @Override
                public void run() {


                    try {


                        semaphore.acquire();
                        System.err.println("线程:"+Thread.currentThread().getName()+"开始执行");
                        Thread.sleep(5000);
                        System.err.println("线程:"+Thread.currentThread().getName()+"执行完成");
                    } catch (InterruptedException e) {


                        e.printStackTrace();
                    }
                    countDownLatch.countDown();
                    semaphore.release();
                }
            });
        }
        countDownLatch.await();
        System.err.println("主线程执行");
    }
}
2、创建测试用例
@SpringBootTest
class DemoApplicationTests {


    /**
     * countDownLatchTest
     * @throws Exception
     */
    @Test
    public void countDownLatchTest() throws Exception{


        CountDownDemo.actionCountDown();
    }
}
3、测试结果演示
线程:pool-1-thread-1开始执行
线程:pool-1-thread-4开始执行
线程:pool-1-thread-1执行完成
线程:pool-1-thread-4执行完成
线程:pool-1-thread-3开始执行
线程:pool-1-thread-2开始执行
线程:pool-1-thread-3执行完成
线程:pool-1-thread-2执行完成
线程:pool-1-thread-5开始执行
线程:pool-1-thread-5执行完成
主线程执行
解释:
countDownLatch 保证主线程最后执行,其他子线程用semaphore 保证并发数目。
写在最后
本文我们讲述了CountDownLatch 是通过AQS抽象阻塞队列实现同步功能的,又说到了awat()方法本质是调用AQS加入阻塞队列的方法,countDown本质是调用AQS释放共享锁的方法。对于最很重要的唤醒阻塞线程逻辑,也是通过CountDownLatch 覆写tryReleaseShared()方法达到满足释放共享锁条件的,在AQS释放共享锁中如果阻塞队列存在阻塞线程会唤醒线程。