基于Vite、Vue3、ESLint、Stylelint、Husky、lint-staged等搭建项目骨架
一、背景
- vscode
- 安装Vue Language Features插件,禁用vue2对应的vuter插件
- 安装Typescript Vue Plugin
- node > 16
- npm > 7
- vite
- Vue3 + TS
- ESLint
- StyleLint (CSS、scss、less规范)
- Husk (git时的一些hook配置,为了提交规范的代码)
二、项目骨架搭建步骤
1、前往vue3官网,创建Vue3项目
$ npm init vue@latest
注意:此时并不代表你选择了npm包管理器,选择具体哪个包管理器,是在首次安装node_modules的时候

本次项目使用pnpm包管理器
$ pnpm i
2、集成ESlint
集成ESLint一般和prettier使用,也可以使用ESLint自带的代码风格规范。本次项目没有使用开发者自定义配置的.eslintrc.js和.prettierrc.js。而是借助第三方插件,该插件内置了ESLint的常用配置项。采用了ESLint的To check syntax, find problems, and enforce code style(检查语法、发现问题并强制执行代码风格)
2.1、 安装VSCode插件
ESLint
2.2、安装ESLint插件
// @antfu/eslint-config 是antfu这个人封装好的一套ESLint插件,内置了"To check syntax, find problems, and enforce code style"。所以不需要再使用.eslintrc.js 和 prettierrc的配置了

// @antfu/eslint-config基于eslint
$ pnpm i eslint @antfu/eslint-config -D
2.3、项目根目录新增.eslintrc
{


  "extends": "@antfu",
  "rules": {


    // 关掉保存文件后, <div class="app">内容</div>  分行显示
    "vue/singleline-html-element-content-newline" : "off"
  }
}
2.4、.vscode目录下,新建settings.json
{


    // 禁用prettier插件
    "prettier.enable": false,
    // 禁用保存文件自动格式化
    "editor.formatOnSave": false,
    "editor.codeActionsOnSave": {


        "source.fixAll":true,
        "source.fixAll.eslint": true,
    },
}
或者在VScode工具中的setting,json添加以上内容
2.5、 在package.json新增eslint启动相关的命名
"lint:eslint": "eslint src/**/*.{ts,tsx,js,jsx,vue} --fix",
3、集成stylelint
3.1、安装相关依赖
$ pnpm add sass postcss postcss-html stylelint stylelint-config-standard stylelint-config-standard-scss stylelint-config-standard-vue stylelint-scss -D
3.2、项目根目录新增.stylelintrc和.stylelintignore
.stylelintrc
{


  "extends": [
    "stylelint-config-standard",
    "stylelint-config-standard-scss",
    "stylelint-config-standard-vue/scss"
  ],
  "plugins": [
    "stylelint-scss"
  ],
  "rules": {


    "selector-class-pattern": [
        "^([a-z][a-z0-9]*)(-[a-z0-9]+)*$",
        {


            "message": "Expected class selector to be kebab-case"
        }
    ],
    "declaration-empty-line-before": null,
    "no-descending-specificity": true,
    "color-hex-length": [
      "long",
      "short"
    ],
    "at-rule-no-unknown": null
  }
}
.stylelintignore
dist/
node_modules/
3.3、在setting.json中新增配置
{


    "editor.codeActionsOnSave": {


        "source.fixAll.stylelint": true
    },
    // 配置stylelint检查的文件类型范围
    "stylelint.validate": [
        "css",
        "less",
        "postcss",
        "scss",
        "sass",
        "vue"
    ],
   "stylelint.enable": true,
   "css.validate": false,
   "less.validate": false,
   "scss.validate": false,
   "typescript.tsdk": "node_modules\\typescript\\lib"
}
3.4、在package.json 新增stylelint校验命令
"lint:stylelint": "stylelint src/**/*.{css,scss,vue} --fix"
4、集成husky
4.1、安装husky并添加启动命令"prepare": “husky install”
$ npx husky-init '&&' pnpm install
项目根目录下,生成了.husky目录

4.2、安装lint-staged,出发git hook
pnpm i lint-staged -D
4.3、在package.json中添加
"lint-staged": {


   "src/**/*.{ts,tsx,js,jsx,vue}": "eslint --fix",
   "src/**/*.{css,scss,vue}": "stylelint --fix"
},
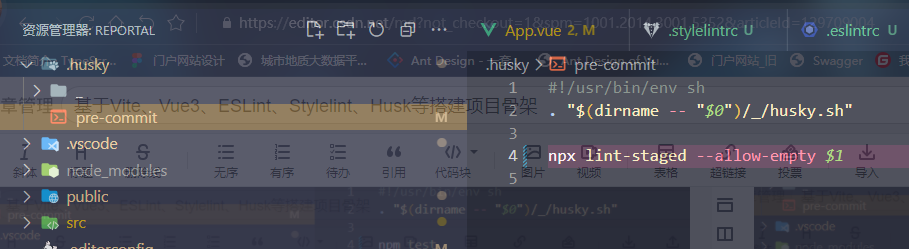
4.4、在pre-commit 文件下更改默认的提交命令 npm test 如下:
npx lint-staged --allow-empty $1
5、补充
5.1、.editorconfig
.editorconfig 为了多人开发时,兼容不同的开发工具
- 安装VScode插件:EditorConfig for VS Code
- 在项目根目录下创建.editorconfig,内容如下
# http://editorconfig.org
root = true
[*]
charset = utf-8
indent_style = space
indent_size = 2
end_of_line = lf
insert_final_newline = true
trim_trailing_whitespace = true
[*.md]
insert_final_newline = false
trim_trailing_whitespace = false
5.2、package.json 补充
{


  "name": "reportal",
  "version": "0.0.0",
  "private": true,
  "engines": {


    "node": ">= 16"
  },
  "scripts": {


    "dev": "vite",
    "build": "run-p type-check build-only",
    "preview": "vite preview",
    "build-only": "vite build",
    // pnpm lint 时,同时run了type-check lint:eslint lint:stylelint三种命令
    "lint": "run-p type-check lint:eslint lint:stylelint",
    "type-check": "vue-tsc --noEmit",
    "lint:eslint": "eslint src/**/*.{ts,tsx,js,jsx,vue} --fix",
    "lint:stylelint": "stylelint src/**/*.{css,scss,vue} --fix",
    // 安装了husky 新增的
    "prepare": "husky install",
    // 项目中只允许使用pnpm
    "preinstall": "npx only-allow pnpm"
  },
  "dependencies": {


    ...
  },
  "devDependencies": {


    ...
  },
  // 为了让lint-staged出发git hook
  "lint-staged": {


    "src/**/*.{ts,tsx,js,jsx,vue}": "eslint --fix",
    "src/**/*.{css,scss,vue}": "stylelint --fix"
 }
}
6、集成element-plus
6.1、安装
$ pnpm i element-plus
6.2、在main.ts中完整引入element-plus
import {

     createApp } from 'vue'
import ElementPlus from 'element-plus'
import App from './App.vue'

import 'element-plus/dist/index.css'
const app = createApp(App)

app.use(ElementPlus)
app.mount('#app')
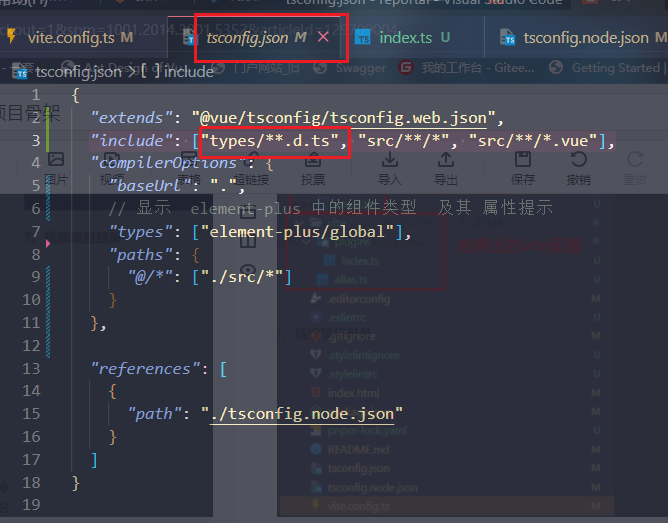
6.3、在tsconfig.json中,添加如下配置
"compilerOptions": {


  // 显示  element-plus 中的组件类型  及其 属性提示
   "types": ["element-plus/global"],
 },
7、搭建项目目录
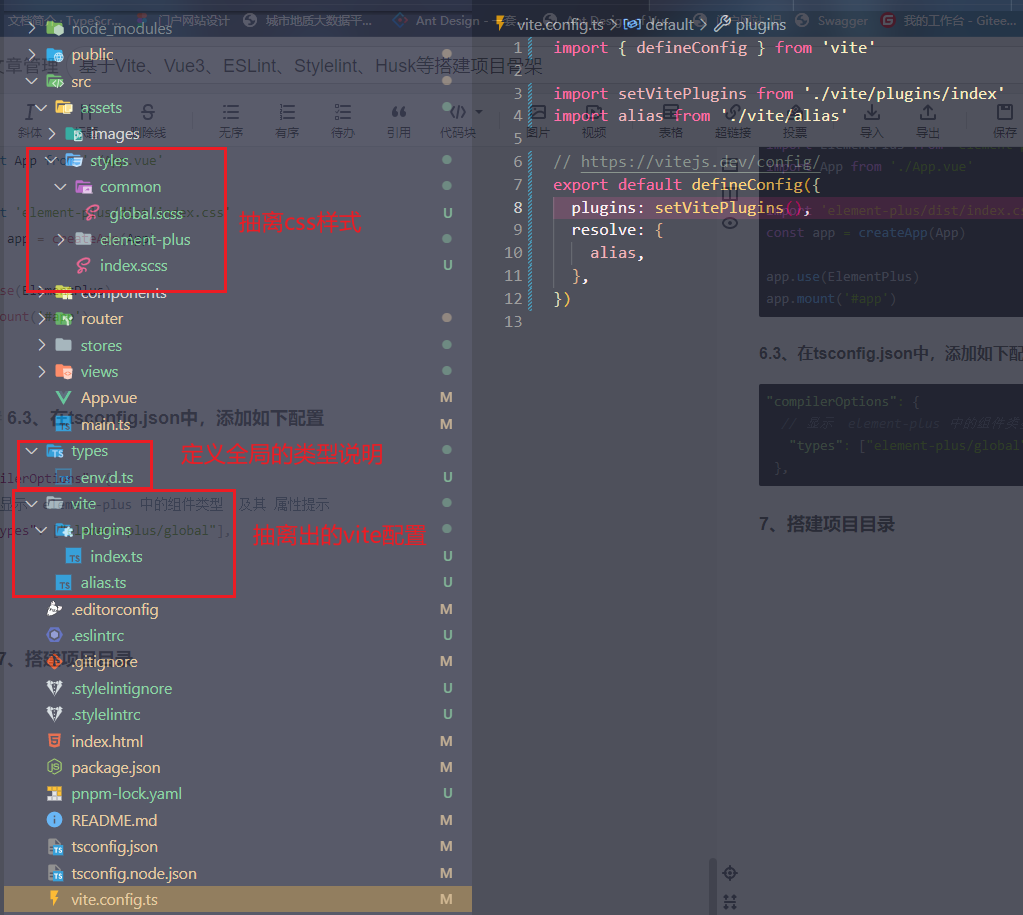
env.d.ts本来在项目目录下,将这个文件如果移到types文件夹下,需要更改tsconfig.json的配置
"include": ["types/**.d.ts", "src/**/*", "src/**/*.vue"],
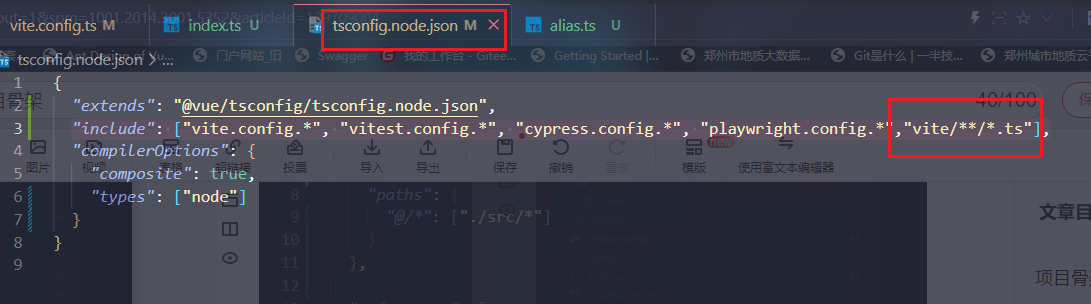
分离vite.config.ts中的配置的时候,需要在tsconfig.node.json文件进行如下说明
"include": ["vite.config.*", "vitest.config.*", "cypress.config.*", "playwright.config.*","vite/**/*.ts"],
8、配置自动引入组件【个人不大喜欢使用】
自动引入组件,即是写上组件名,保存文件,不需要在具体文件上写对应的import语句了
8.1、安装依赖
pnpm install -D unplugin-vue-components unplugin-auto-import
8.2、在vite/plugins文件夹下新建components.ts和auto-import.ts
components.ts
import components from 'unplugin-vue-components/vite'
// 使用src下的components  不用再import
export default function setComponents() {


  return components({


    dirs: ['src/components'],
    include: [/\.vue$/, /\.vue\?vue/, /\.tsx$/],
    dts: 'types/components.d.ts',
  })
}
auto-import.ts
// 找不到模块“unplugin-auto-import”或其相应的类型声明。
// import AutoImport from 'unplugin-auto-import'
// 解决
import AutoImport from 'unplugin-auto-import/vite'
export default function setAutoImport() {


  return AutoImport({


    // 使用'vue', 'vue-router', 'pinia'时,不再需要导入了
    imports: ['vue', 'vue-router', 'pinia'],
    dts: 'types/auto-imports.d.ts',
  })
}
8.3、在vite/plugins/index.ts中引用
import type {

     PluginOption } from 'vite'
import vue from '@vitejs/plugin-vue'
import vueJsx from '@vitejs/plugin-vue-jsx'
import AutoImport from './auto-import'
import components from './components'
export default function setVitePlugins() {


  const plugins: PluginOption[] = [vue(), vueJsx()]
  plugins.push(AutoImport())
  plugins.push(components())
  return plugins
}
9、使用elementui-plus的icon图表
9.1、安装
pnpm install @element-plus/icons-vue
9.2、按需导入
import {

     Share } from '@element-plus/icons-vue'
<template>
  <el-icon><Share /></el-icon>
</template>