- 创建动态web项目并导入相关的jar包 记得点击next去生成web.xml文件
- 配置项目的web.xml文件
<!-- 配置前端控制器 -->
	<servlet>
		<!-- 配置spring,将请求交给springmvc中的DispatcherServlet来处理
		DispatcherServlet用来转发服务 -->
		<servlet-name>springmvc</servlet-name>
		<servlet-class>org.springframework.web.servlet.DispatcherServlet</servlet-class>
		<!-- 指定Spring MVC的核心配置文件
		<init-param>初始化参数
		param-name 参数名:contextConfigLocation上下文配置文件存放的目录
		param-value 参数的值classpath:springmvc.xml classpath:src的目录
		-->
		<init-param>
			<param-name>contextConfigLocation</param-name>
			<param-value>classpath:springmvc.xml</param-value>
		</init-param>
		<!-- 启动即加载 -->
		<load-on-startup>1</load-on-startup>
	</servlet>
	<!-- 服务映射 -->
	<servlet-mapping>
		<servlet-name>springmvc</servlet-name>
		<!-- 拦截所有以do结尾的请求 -->
		<url-pattern>*.do</url-pattern>
	</servlet-mapping>
- 把springmvc.xml 配置文件放到src目录下,注意不要放到包里面去
- 在springmvc.xml中开启 注解扫描功能
<!-- 开启注解扫描功能 -->
	<context:component-scan base-package="com.mhys.demo"></context:component-scan>
- 在springmvc.xml中配置映射器和适配器的声明
<mvc:annotation-driven></mvc:annotation-driven>
或者
	<!-- 配置处理器映射器	 -->
	<bean class="org.springframework.web.servlet.mvc.method.annotation.RequestMappingHandlerMapping"></bean>
	<!-- 配置处理器适配器 -->
	<bean class="org.springframework.web.servlet.mvc.method.annotation.RequestMappingHandlerAdapter"></bean>
- 创建类,并使用注解声明该类为控制器 并将方法与请求做好映射
package com.mhys.demo;

import org.springframework.stereotype.Controller;
import org.springframework.web.bind.annotation.RequestMapping;
/**
 *
 * @author Lvan
 * @Controller注解 声明该类为一个控制器 可以理解为@Webservlet 可以代替路由(请求和服务的对应的关系)
 * @RequestMapping() 请求映射 将对应的请求映射到该方法内
 */
@Controller
public class Test {
	//访问的接口名字 是hello.后缀 比如hello.do接口 就会被转发至sayHello方法
	@RequestMapping("/hello")
	public void sayHello() {
		System.out.println("===========MVC程序的sayHello方法被调用了========");
	}
	//spring mvc 控制器中你的代码变得更加简洁   每个方法可以有对应的接口
}
测试:请求中输入hello.do @RequestMapping("/hello") 标注的方法会被执行 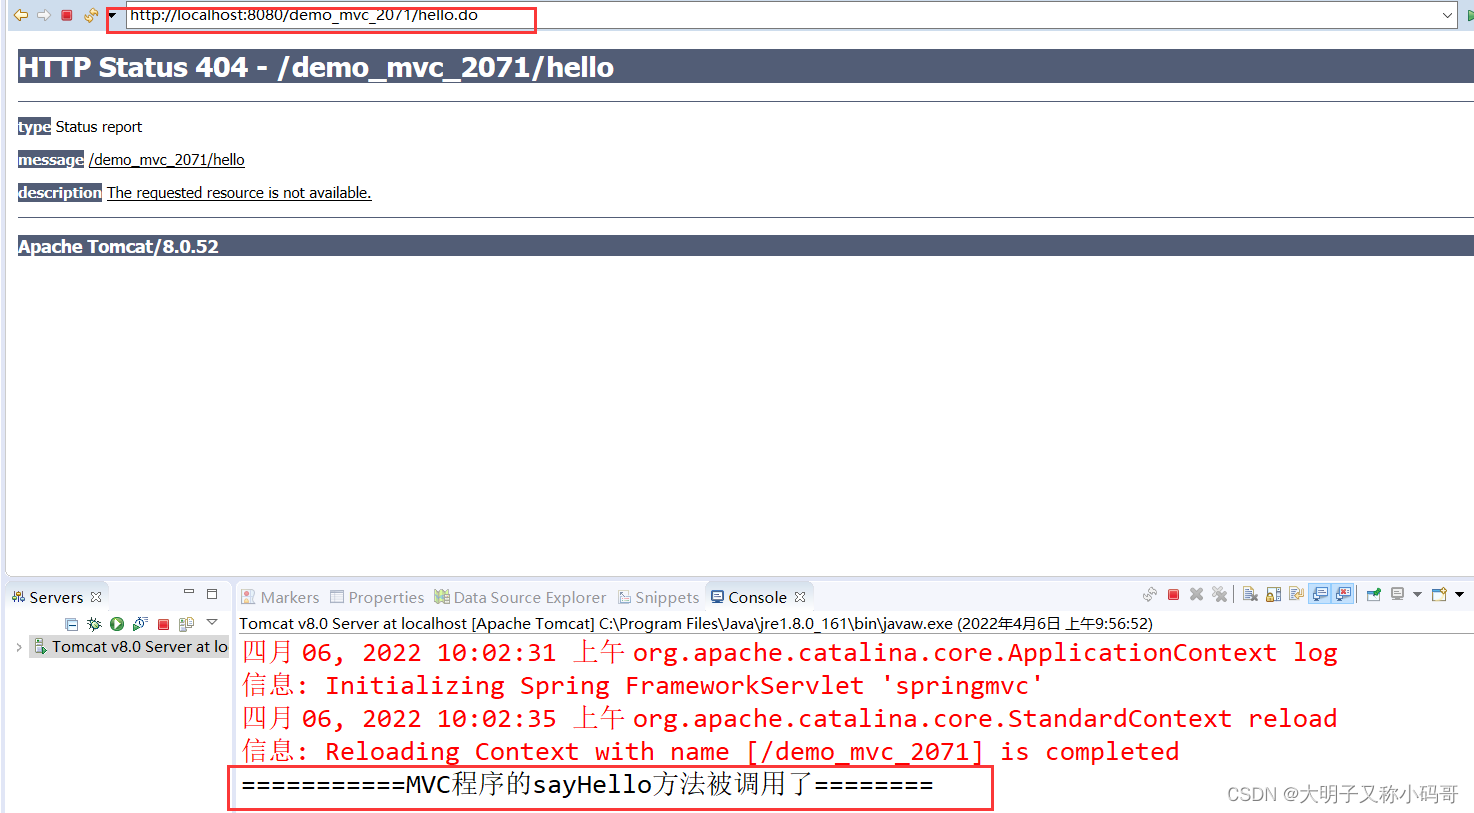
RequestMapping注解
Spring MVC通过@RequestMapping注解将url请求与业务方法进行映射。在Spring MVC框架中,@RequestMapping注解的使用频率很高,它可以添加在处理器类上以及方法上,在类定义处添加@RequestMapping注解,相当于多了一层访问路径。
@RequestMapping注解有三个常用的属性:
value:指定url请求的实际地址,是@RequestMapping的默认值,可省略不写。
method:指定请求的类型,get、post、put和delete等,常用get和post类型请求。
params:指定请求中必须包含某些参数值,否则无法调用该方法。
@Controller
@RequestMapping("/test")
public class Test {
	//访问的接口名字 是hello.后缀 比如hello.do接口 就会被转发至sayHello方法
	@RequestMapping("/hello")
	public void sayHello() {
		System.out.println("===========MVC程序的sayHello方法被调用了========");
	}
}
上述代码中访问的地址就变成了
http://localhost:8080/demo_mvc_2071/test/hello.do
先访问类中声明的地址 再才是方法对应的地址名字
指定方法只能由get请求访问
用 method = RequestMethod.GET
@RequestParam(“id”)String id 表示 请求该方法时必须传递id值,如果不传递,则无法访问该方法
ModelAndView 定义视图,可以将视图返回到浏览器
@RequestMapping(value="/hi",method = RequestMethod.GET)
	public ModelAndView sayHi(@RequestParam("id")String id) {
		ModelAndView view=new ModelAndView("../index.jsp");
		System.out.println("====================Hi=========================");
		return view; //返回一个页面 index.jsp 注意 不是直接通过转发 不是request.getRequestDispatcher().forward()
	}
浏览器直接访问该路径接口 如
http://localhost:8080/demo_mvc_2071/test/hi.do?id=1 //id不能省略 省略了就进不去对应的方法
指定方法只能由post请求访问
method = RequestMethod.POST 指明该方法的请求方式为post 其他请求方式都不能访问
@RequestParam(“id”)String id,@RequestParam(“name”)String name 表示 该方法必须传递对应的两个参数才能正确访问 少了或者参数名错了都不行的。
@RequestMapping(value="/hipost",method = RequestMethod.POST)
	public ModelAndView sayHiPost(@RequestParam("id")String id,@RequestParam("name")String name) {
		ModelAndView view=new ModelAndView("../index.jsp");
		System.out.println("====================HiPost=========================");
		//request.getparamter("id")
		System.out.println(id);
		System.out.println(name);
		return view; //返回一个页面 index.jsp 注意 不是直接通过转发 不是request.getRequestDispatcher().forward()
	}
可以使用post方式或者编写form表单来进行提交测试。
地址如:http://localhost:8080/demo_mvc_2071/test/hipost.do?id=20&name=Lvan4
@RequestMapping 简化了路由配置,可以便捷地指定请求的方式,封装了对请求参数的处理。
 不需要通过request获取请求参数,而是直接通过形参取值
例子:模仿注册
接口编写:
	//例子:模仿注册功能的实现
	@RequestMapping(value="/reg",method=RequestMethod.POST)
	public ModelAndView register(@RequestParam("name")String name,
			@RequestParam("age")String age,
			@RequestParam("gender")String gender) {
		ModelAndView model=new ModelAndView("/reg.jsp");
		System.out.println("注册成功!姓名:"+name+" 年龄:"+age+" 性别:"+gender);
		model.addObject("msg", "注册成功:姓名为:"+name); //往视图里面传值 setAttribute功能类似
		return model;
	}
注册页面
<%@ page language="java" contentType="text/html; charset=utf-8"
    pageEncoding="utf-8"%>
<!DOCTYPE html>
<html>
<head>
<meta charset="utf-8">
<title>Insert title here</title>
</head>
<body>
	<h1>注册账户</h1>
	<form action="http://localhost:8080/demo_mvc_2071/test/reg.do" method="post">
		姓名:<input name="name"/><br>
		年龄:<input name="age"/><br>
		性别:<input name="gender"/><br>
		<input type="submit" value="立即注册"/>
	</form>
	<h3>
		${msg}
	</h3>
</body>
</html>