文章目录
一、配置apache
1、首先在角色中手动定义三个服务角色
[student@server roles]$ ansible-galaxy init apache
- Role apache was created successfully
[student@server roles]$ ansible-galaxy init mysql
- Role mysql was created successfully
[student@server roles]$ ansible-galaxy init php
- Role php was created successfully
[student@server roles]$ cd apache/
//这次服务主要用到的模块
[student@server apache]$ tree
.
├── defaults
│   └── main.yml
├── files       //用于存放软件包和脚本
├── handlers
│   └── main.yml
├── meta
│   └── main.yml
├── README.md
├── tasks     //用于存放play主模块
│   └── main.yml
├── templates   //用于写入启动服务的j2文件
├── tests
│   ├── inventory
│   └── test.yml
└── vars         //用于定义需要下载的服务名
    └── main.yml

8 directories, 8 files
2、定义files中的脚本
首先定义好yum源地址
[student@server files]$ cat yum.sh
#!/bin/bash
/usr/bin/curl -o /etc/yum.repos.d/CentOS-Base.repo https://mirrors.aliyun.com/repo/Centos-vault-8.5.2111.repo
yum reinstall -y https://mirrors.aliyun.com/epel/epel-release-latest-8.noarch.rpm
/usr/bin/sed -i 's|^#baseurl=https://download.example/pub|baseurl=https://mirrors.aliyun.com|' /etc/yum.repos.d/epel*
/usr/bin/sed -i 's|^metalink|#metalink|' /etc/yum.repos.d/epel*
定义预编译程序
预编译三部曲
[student@server files]$ cat apache.sh
#!/bin/bash
cd /opt/apr-1.7.0
sed -i '/$RM "$cfgfile"/d' configure
./configure --prefix=/usr/local/apr
make
make install

cd /opt/apr-util-1.6.1
./configure --prefix=/usr/local/apr-util --with-apr=/usr/local/apr
make
make install

cd /opt/httpd-2.4.54
./configure --prefix=/usr/local/apache \
	--sysconfdir=/etc/httpd24 \
	--enable-so \
	--enable-ssl \
	--enable-cgi \
	--enable-rewrite \
	--with-zlib \
	--with-pcre \
	--with-apr=/usr/local/apr \
	--with-apr-util=/usr/local/apr-util/ \
	--enable-modules=most \
	--enable-mpms-shared=all \
	--with-mpm=prefork
make
make install
定义环境变量
[student@server files]$ cat httpd.sh
echo 'export PATH=/usr/local/apache/bin/:$PATH' > /etc/profile.d/httpd.sh
source /etc/profile.d/httpd.sh
3、定义清单任务模块
[student@server apache]$ cat tasks/main.yml
---
# tasks file for apache
- name stop firewalld     ——关闭防火墙
  service:
    name: firewalld
    state: stopped
    enabled: no

- name: stop selinux    ——永久关闭
  lineinfile:
    path: /etc/selinux/config
    regexp: '^SELINUX='
    line: SELINUX=disabled

- name: stop selinux1    ——关闭防火墙并加载
  shell:
    cmd: setenforce 0

- name: set yum        ——指定file中定义的yum源脚本
  script: yum.sh

- name: install pkgs   ——下载所需的安装环境
  shell:
    cmd: yum -y install bzip2  vim make wget openssl-devel pcre-devel expat-devel libtool gcc gcc-c++ libxml2-devel --allowerasing

- name: unzip       ——解压缩到/opt下
  unarchive:
    src: apr-1.7.0.tar.gz
    dest: /opt/

- name: unzip
  unarchive:
    src: apr-util-1.6.1.tar.gz
    dest: /opt/

- name: unzip
  unarchive:
    src: httpd-2.4.54.tar.gz
    dest: /opt/


- name: cr apache      ——创建系统用户
  user:
    name: apache
    system: yes
    shell: /sbin/nologin
    create_home: no
    state: present

- name: apache.sh      ——执行预编译脚本
  script: apache.sh

- name: httpd.sh      ——环境变量脚本
  script: httpd.sh

- name: cp config     ——调用system服务
  template:
    src: httpd.service.j2
    dest: /usr/lib/systemd/system/httpd.service

- name: apply config   ——重启系统服务
  shell:
    cmd: systemctl daemon-reload

- name: restart httpd    ——开启服务
  service:
    name: httpd
    state: started
    enabled: yes
定义system服务启动
[student@server templates]$ cat httpd.service.j2
[Unit]
Description=httpd server daemon
After=network.target
[Service]
Type=forking
ExecStart=/usr/local/apache/bin/apachectl start
ExecStop=/usr/local/apache/bin/apachectl stop
ExecReload=/bin/kill -HUP $MAINPID
[Install]
WantedBy=multi-user.target
创建用户
[student@server ansible]$ cat apache.yml
---
- name: use apache role
  hosts: node1
  roles:
    - apache
4、执行apache—playbook任务
[student@server ansible]$ ansible-playbook apache.yml

PLAY [use apache role] *********************************************************

TASK [Gathering Facts] *********************************************************
ok: [node1]

TASK [apache : stop firewalld] *************************************************
ok: [node1]

TASK [apache : stop selinux] ***************************************************
ok: [node1]

TASK [apache : set yum] ********************************************************
changed: [node1]

TASK [apache : install pkgs] ***************************************************
changed: [node1]

TASK [apache : unzip] **********************************************************
ok: [node1]

TASK [apache : unzip] **********************************************************
ok: [node1]

TASK [apache : unzip] **********************************************************
changed: [node1]

TASK [cr apache] ***************************************************************
ok: [node1]

TASK [apache.sh] ***************************************************************
changed: [node1]

TASK [apache : httpd.sh] *******************************************************
changed: [node1]

TASK [apache : cp config] ******************************************************
changed: [node1]

TASK [apache : apply config] ***************************************************
changed: [node1]

TASK [apache : restart httpd] **************************************************
ok: [node1]

PLAY RECAP *********************************************************************
node1                      : ok=14   changed=7    unreachable=0    failed=0    skipped=0    rescued=0    ignored=0
查看node1IP地址是否访问成功

二、配置MySQL
1、主任务模块
[student@server mysql]$ cat tasks/main.yml
---
# tasks file for mysql
- name: create user mysql     ——设置用户
  user:
    name: mysql
    system: yes
    shell: /sbin/nologin
    create_home: no
    state: present

- name: install pkgs   ——安装依赖包
  yum:
    name: "libncurses*"
    state: present

- name: unzip
  unarchive:
    src: mysql-5.7.37-linux-glibc2.12-x86_64.tar.gz
    dest: /usr/local/

- name: create link     ——设置软链接
  file:
    src: /usr/local/mysql-5.7.37-linux-glibc2.12-x86_64
    dest: /usr/local/mysql
    owner: mysql
    group: mysql
    state: link

- name: create data ml   ——设置工作目录
  file:
    path: /opt/data
    owner: mysql
    group: mysql
    state: directory

- name: mysql-csh.sh  ——数据库初始化
  script: mysql-csh.sh

- name: cp config   ——数据库服务位置
  template:
    src: my.cnf.j2
    dest: /etc/my.cnf

- name: replace file1     ——使其sql服务访问
  replace:
    path: /usr/local/mysql/support-files/mysql.server
    regexp: "#^(basedir=).*"
    replace: "basedir=/usr/local/mysql"

- name: replace file2
  replace:
    path: /usr/local/mysql/support-files/mysql.server
    regexp: "#^(datadir=).*"
    replace: "datadir=/opt/data"

- name: cp mysqld.service
  template:
    src: mysqld.service.j2
    dest: /usr/lib/systemd/system/mysqld.service

- name: apply config
  shell:
    cmd: systemctl daemon-reload

- name: restart mysqld
  service:
    name: mysqld
    state: started
    enabled: yes

- name: set mysql passwd   ——设置密码
  shell:
    cmd: /usr/local/mysql/bin/mysql -uroot -e "set password=password('$redhat')"

- name: set mysql env      ——环境变量
  script: mysqlbl.sh
2、file脚本环境变量
//软件包
[student@server files]$ ls
mysql-5.7.37-linux-glibc2.12-x86_64.tar.gz
数据库初始化
[student@server files]$ cat mysql-csh.sh
#!/bin/bash
/usr/local/mysql/bin/mysqld --initialize-insecure --user=mysql --datadir=/opt/data/
ln -sv /usr/local/mysql/include/ /usr/local/include/mysql
echo '/usr/local/mysql/lib' > /etc/ld.so.conf.d/mysql.conf
ldconfig
//环境配置
[student@server files]$ cat mysqlbl.sh
echo 'export PATH=/usr/local/mysql/bin:/usr/local/mysql/lib:$PATH' >> /etc/profile.d/mysql.sh
source /etc/profile.d/mysql.sh
3、templates定义模具
定义数据库工作对象
[student@server mysql]$ cat templates/my.cnf.j2
[mysqld]
basedir = /usr/local/mysql
datadir = /opt/data
socket = /tmp/mysql.sock
port = 3306
pid-file = /opt/data/mysql.pid
user = mysql
skip-name-resolve
配置启动服务文件
[student@server mysql]$ cat templates/mysqld.service.j2
[Unit]
Description=mysql server daemon
After=network.targe

[Service]
Type=forking
ExecStart=/usr/local/mysql/support-files/mysql.server start
ExecStop=/usr/local/mysql/support-files/mysql.server stop
ExecReload=/bin/kill -HUP \$MAINPID

[Install]
WantedBy=multi-user.target
4、执行playbook
[student@server ansible]$ ansible-playbook mysql.yml

PLAY [use mysql role] **********************************************************

TASK [Gathering Facts] *********************************************************
ok: [node1]

TASK [create user mysql] *******************************************************
ok: [node1]

TASK [mysql : install pkgs] ****************************************************
ok: [node1]

TASK [mysql : unzip] ***********************************************************
changed: [node1]

TASK [mysql : create link] *****************************************************
ok: [node1]

TASK [mysql : create data ml] **************************************************
ok: [node1]

TASK [mysql-csh.sh] ************************************************************
changed: [node1]

TASK [mysql : cp config] *******************************************************
ok: [node1]

TASK [mysql : replace file1] ***************************************************
ok: [node1]

TASK [mysql : replace file2] ***************************************************
ok: [node1]

TASK [cp mysqld.service] *******************************************************
ok: [node1]

TASK [mysql : apply config] ****************************************************
changed: [node1]

TASK [restart mysqld] **********************************************************
ok: [node1]

TASK [set mysql passwd] ********************************************************
changed: [node1]

TASK [set mysql env] ***********************************************************
changed: [node1]

PLAY RECAP *********************************************************************
node1                      : ok=15   changed=5    unreachable=0    failed=0    skipped=0    rescued=0    ignored=0


[root@node2 php]# ss -antl | grep 3306
LISTEN 0      80                 *:3306            *:*
三、配置PHP
1、主任务的配置
[student@server php]$ cat tasks/main.yml
---
# tasks file for php
- name: install pkgs
  yum:
    name: "{

    { phppkgs }}"
    state: present

- name: unzip
  unarchive:
    src: php-7.1.10.tar.gz
    dest: /opt/

- name: php.sh
  script: php.sh

- name: modify apache config
  replace:
    path: /etc/httpd24/httpd.conf
    regexp: "index.html"
    replace: "index.php index.html"

- name: rm index.html
  shell:
    cmd: rm -rf /usr/local/apache/htdocs/index.html

- name: edit inde.php
  template:
    src: index.php.j2
    dest: /usr/local/apache/htdocs/index.php

- name: restart httpd
  service:
    name: httpd
    state: restarted
    enabled: yes
2、脚本预编译环境
#安装依赖包,安装GD库和GD库关联程序,用来处理和生成图片
[student@server php]$ cat vars/main.yml
---
# vars file for php
phppkgs:
  - libjpeg
  - libjpeg-devel
  - libpng
  - libpng-devel
  - freetype
  - freetype-devel
  - libxml2
  - libxml2-devel
  - zlib
  - zlib-devel
  - curl
  - curl-devel
预编译与环境
[student@server php]$ cat files/php
php-7.1.10.tar.gz php.sh
[student@server php]$ cat files/php.sh
#!/bin/bash
cd /opt/php-7.1.10
./configure \
--prefix=/usr/local/php \ #指定将 PHP 程序的安装路径
--with-apxs2=/usr/local/apache/bin/apxs \ 指定Apache httpd服务提供的apxs 模块支持程序的文件位置
--with-mysqli \ #添加 MySQL 扩展支持 #mysqli扩展技术不仅可以调用MySQL的存储过程、处理MySQL事务,而且还可以使访问数据库工作变得更加稳定
--with-zlib \ #支持zlib功能,提供数据压缩
--with-curl \ #开启curl扩展功能,实现http的get下载和post请求方法
--with-gd \ #激活gd库的支持
--with-jpeg-dir \ #激活jpeg的支持
--with-png-dir \ #激活png的支持
--with-freetype-dir \
--with-openssl \
--enable-mbstring \ #启动多字节字符串功能,以便支持中文等代码
--enable-xml \ #开启扩展性标记语言模块
--enable-session \ #会话
--enable-ftp \ #文本传输协议
--enable-pdo \ #函数库
--enable-tokenizer \ #令牌解释器
--enable-zip #zip压缩格式
make
make install
#测试环境时使用php.ini-development文件,生产环境使用php.ini-production文件
cp php.ini-development /usr/local/php/lib/php.ini
#修改php配置文件,设置时区
sed -i 's/;date.timezone =/date\.timezone = \Asia\/Shanghai/' /usr/local/php/lib/php.ini
#修改httpd服务配置文件,让apache支持php
echo "AddType application/x-httpd-php .php" >> /etc/httpd24/httpd.conf
echo "AddType application/x-httpd-php-source .phps" >> /etc/httpd24/httpd.conf
sed -i '/proxy_module/s/#//g' /etc/httpd24/httpd.conf
sed -i '/proxy_fcgi_module/s/#//g' /etc/httpd24/httpd.conf
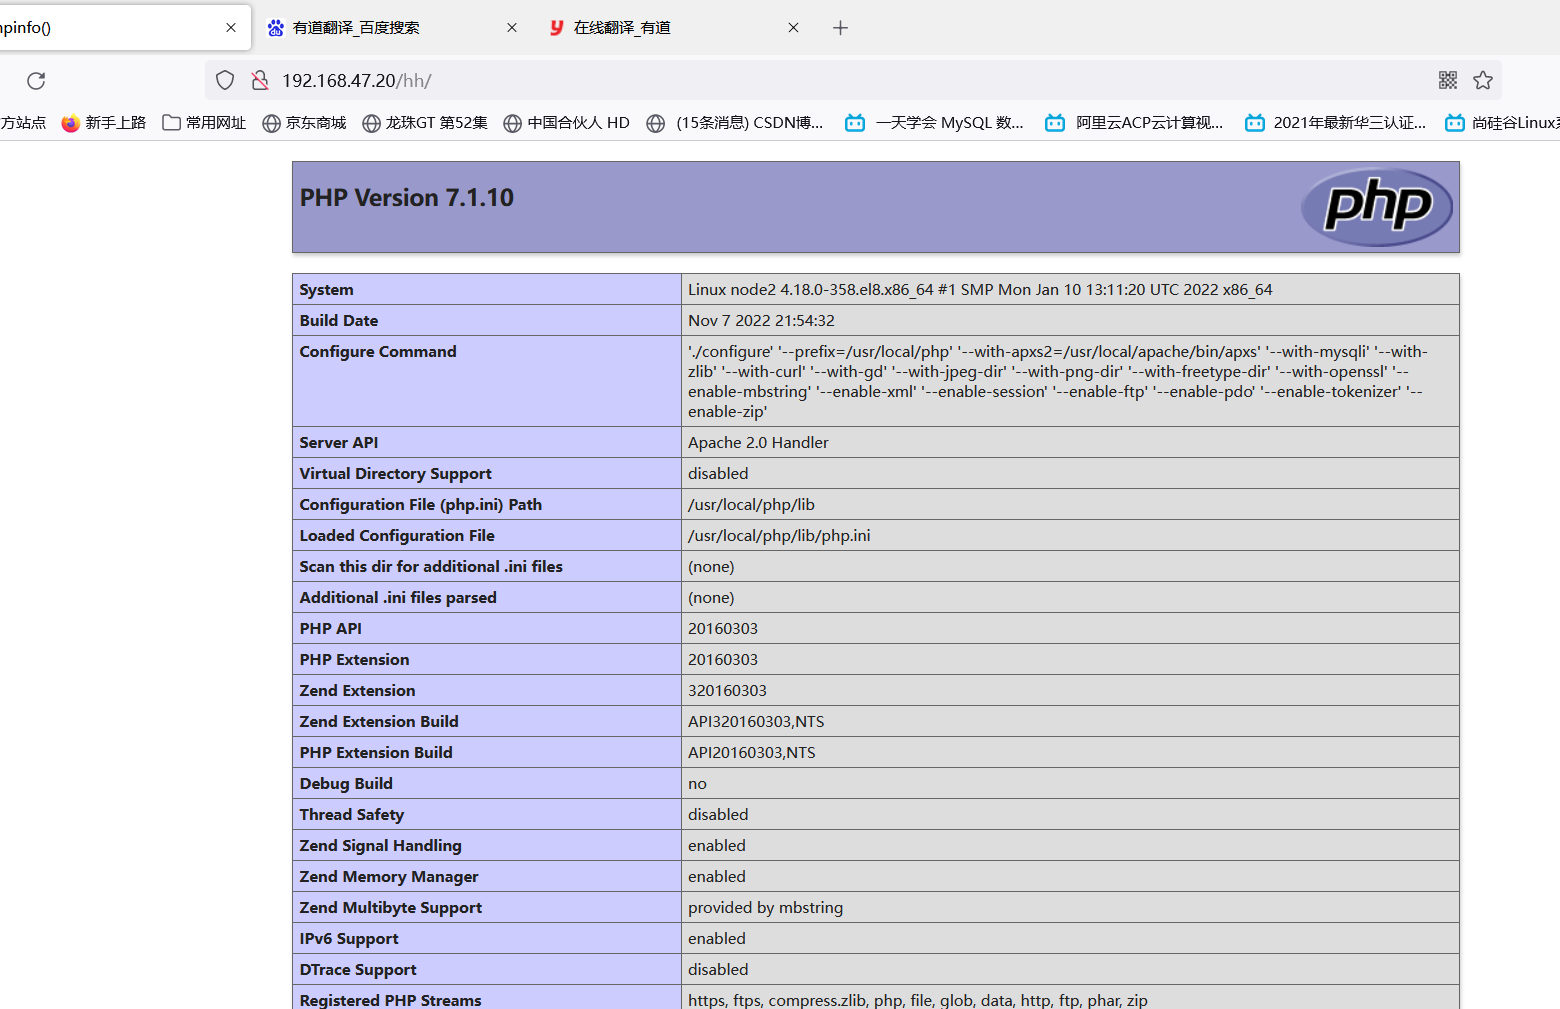
//写入测试页面
[student@server php]$ cat templates/index.php.j2
<?php
phpinfo();
?>
3、执行playbook
[student@server ansible]$ ansible-playbook php.yml

PLAY [php test] ****************************************************************

TASK [Gathering Facts] *********************************************************
ok: [node1]

TASK [php : install pkgs] ******************************************************
ok: [node1]

TASK [php : unzip] *************************************************************
ok: [node1]

TASK [php.sh] ******************************************************************

changed: [node1]

TASK [php : modify apache config] **********************************************
changed: [node1]

TASK [php : rm index.html] *****************************************************
[WARNING]: Consider using the file module with state=absent rather than running
'rm'.  If you need to use command because file is insufficient you can add
'warn: false' to this command task or set 'command_warnings=False' in
ansible.cfg to get rid of this message.
changed: [node1]

TASK [edit inde.php] ***********************************************************
changed: [node1]

TASK [php : restart httpd] *****************************************************
changed: [node1]

PLAY RECAP *********************************************************************
node1                      : ok=8    changed=5    unreachable=0    failed=0    skipped=0    rescued=0    ignored=0
四、访问PHP测试页面