YOLOv5在android端实现目标检测+跟踪+越界识别并报警
想要获取源码和相关资料说明的可以关注我的微信公众号:雨中算法屋, 后台回复越界识别即可获取,有问题也可以关注公众号加我微信联系我,相互交流学习。
算法功能:
判断划定的区域内,在某个时间内,是否有⼈体闯⼊,涉及到了⼈体检测+⼈体追踪+业务功能(区域监测)多个模型串联的功能。
所需设备:
android系统的手机/平板一部,下载手机Aidlux的APP软件(打开安卓手机的应用商城,搜索Aidlux即可
下载安装)AIdlux主打的是基于ARM架构的跨生态(Android/鸿蒙+Linux)一站式AIOT应用开发平台。
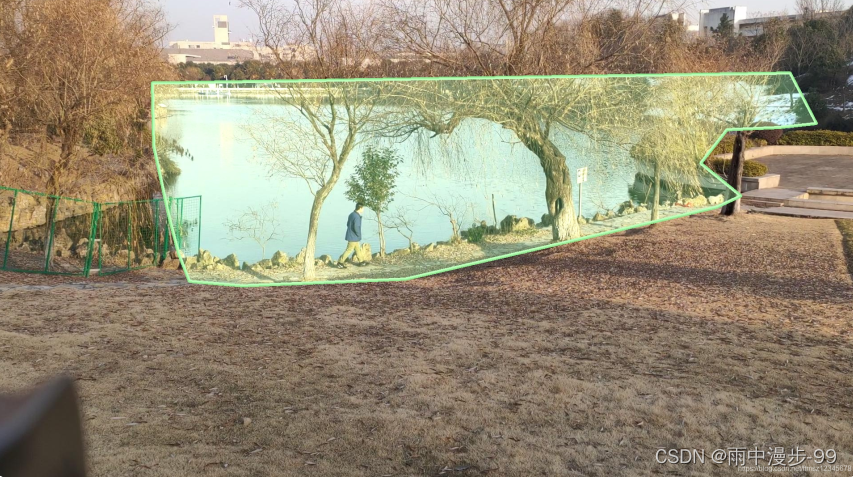
具体实现功能
以越界识别为例,主要是设置⼀个感兴趣区域。⽐如在⼀个湖⾯上,设置⼀个感兴趣区域。当晚上深夜时间,在感兴趣ROI区域内识别到⼈体的时候,就要重点关注,是否有跳⽔的⻛险或者异常情况。
实现人流数量统计功能视频:
越界识别
当有一个人通过视频中的那条蓝色警戒线,左上角person_count数量就会增1,最后人数统计完后,会通过喵提醒功能,将统计人数发送到手机微信端:

总体的业务流程可以细分为如下几个步骤:
(1)⼈流统计越界线段绘制
for t in online_targets:
            # 目标的检测框信息
            tlwh = t.tlwh
            # 目标的track_id信息
            tid = t.track_id
            online_tlwhs.append(tlwh)
            online_ids.append(tid)
            online_scores.append(t.score)
            # 针对目标绘制追踪相关信息
            res_img = plot_tracking(res_img, online_tlwhs, online_ids, 0,0)
			##绘制统计人流线
            lines = [[186,249],[1200,366]]
            cv2.line(res_img,(186,249),(1200,366),(255,0,0),2)
(2)⼈体检测统计点调整
            # 2.计算得到人体下方中心点的位置(人体检测监测点调整)
            pt = [tlwh[0]+1/2*tlwh[2],tlwh[1]+tlwh[3]]
(3)⼈体和线段的位置状态判断
def is_passing_line(point, polyline):
    # 在直线下方,status =-1
    # 在直线上方,status =1
    status = 1
    # 点映射在直线的高度
    poly_y = ((polyline[1][1] - polyline[0][1]) * (point[0] - polyline[0][0])) / (polyline[1][0] - polyline[0][0]) + \
              polyline[0][1]
    if point[1] > poly_y:
        status = -1
    return status

# 3. 人体和违规区域的判断(人体状态追踪判断)
track_info = is_passing_line(pt, lines)
if tid not in track_id_status.keys():
    track_id_status.update( {

    tid:[track_info]})
else:
    if track_info != track_id_status[tid][-1]:
        track_id_status[tid].append(track_info)
(4)⼈流统计分析判断
# 4. 判断是否有track_id越界,有的话保存成图片
# 当某个track_id的状态,上一帧是-1,但是这一帧是1时,说明越界了
if track_id_status[tid][-1] == 1 and len(track_id_status[tid]) >1:
   # 判断上一个状态是否是-1,是否的话说明越界,为了防止继续判别,随机的赋了一个3的值
   	if  track_id_status[tid][-2] == -1:
       	track_id_status[tid].append(3)
       # cv2.imwrite("overstep.jpg",res_img)
       	count_person +=1
cv2.putText(res_img,"-1 to 1 person_count:"+ str(count_person),(50,50),cv2.FONT_HERSHEY_SIMPLEX,1,(255,0,255),2)
cvs.imshow(res_img)
(5)喵提醒发送
    if frame is None:
        ####相机采集结束
        print("camera is over!")
        # 统计打印人流数量
        # 填写对应的喵码
        id = '######'
        # 填写喵提醒中,发送的消息,这里放上前面提到的图片外链
        text = "人流统计数:"+str(count_person)
        ts = str(time.time())  # 时间戳
        type = 'json'  # 返回内容格式
        request_url = "http://miaotixing.com/trigger?"
        headers = {

    'User-Agent': 'Mozilla/5.0 (Windows NT 10.0; Win64; x64) AppleWebKit/537.36 (KHTML, like Gecko) Chrome/87.0.4280.67 Safari/537.36 Edg/87.0.664.47'}
        result = requests.post(request_url + "id=" + id + "&text=" + text + "&ts=" + ts + "&type=" + type,headers=headers)
        break
总体代码实现:
yolov5_overstep.py
# aidlux相关
from cvs import *
import aidlite_gpu
# from utils import detect_postprocess, preprocess_img, draw_detect_res, scale_coords, process_points, isInsidePolygon, is_in_poly
from utils import detect_postprocess, preprocess_img, draw_detect_res, is_passing_line
import cv2
# bytetrack
from track.tracker.byte_tracker import BYTETracker
from track.utils.visualize import plot_tracking
import requests
import time


# 加载模型
model_path = '/home/lesson4_codes/aidlux/yolov5n_best-fp16.tflite'
in_shape = [1 * 640 * 640 * 3 * 4]
out_shape = [1 * 25200 * 6 * 4]

# 载入模型
aidlite = aidlite_gpu.aidlite()
# 载入yolov5检测模型
aidlite.ANNModel(model_path, in_shape, out_shape, 4, 0)

tracker = BYTETracker(frame_rate=30)
track_id_status = {

    }
cap = cvs.VideoCapture("/home/lesson4_codes/aidlux/video.mp4")
frame_id = 0
count_person = 0
while True:
    frame = cap.read()
    if frame is None:
        ####相机采集结束
        print("camera is over!")
        # 统计打印人流数量
        # 填写对应的喵码
        id = '######'    ####此处改为自己的喵码
        # 填写喵提醒中,发送的消息,这里放上前面提到的图片外链
        text = "人流统计数:"+str(count_person)
        ts = str(time.time())  # 时间戳
        type = 'json'  # 返回内容格式
        request_url = "http://miaotixing.com/trigger?"
        headers = {

    'User-Agent': 'Mozilla/5.0 (Windows NT 10.0; Win64; x64) AppleWebKit/537.36 (KHTML, like Gecko) Chrome/87.0.4280.67 Safari/537.36 Edg/87.0.664.47'}
        result = requests.post(request_url + "id=" + id + "&text=" + text + "&ts=" + ts + "&type=" + type,headers=headers)
        break

     # 预处理
    img = preprocess_img(frame, target_shape=(640, 640), div_num=255, means=None, stds=None)
    # 数据转换:因为setTensor_Fp32()需要的是float32类型的数据,所以送入的input的数据需为float32,大多数的开发者都会忘记将图像的数据类型转换为float32
    aidlite.setInput_Float32(img, 640, 640)
    # 模型推理API
    aidlite.invoke()
    # 读取返回的结果
    pred = aidlite.getOutput_Float32(0)
    # 数据维度转换
    pred = pred.reshape(1, 25200, 6)[0]
    # 模型推理后处理
    pred = detect_postprocess(pred, frame.shape, [640, 640, 3], conf_thres=0.4, iou_thres=0.45)
    # 绘制推理结果
    res_img = draw_detect_res(frame, pred)

    # 目标追踪相关功能
    det = []
    # Process predictions
    for box in pred[0]:  # per image
        box[2] += box[0]
        box[3] += box[1]
        det.append(box)
    if len(det):
        # Rescale boxes from img_size to im0 size
        online_targets = tracker.update(det, [frame.shape[0], frame.shape[1]])
        online_tlwhs = []
        online_ids = []
        online_scores = []
        # 取出每个目标的追踪信息
        for t in online_targets:
            # 目标的检测框信息
            tlwh = t.tlwh
            # 目标的track_id信息
            tid = t.track_id
            online_tlwhs.append(tlwh)
            online_ids.append(tid)
            online_scores.append(t.score)
            # 针对目标绘制追踪相关信息
            res_img = plot_tracking(res_img, online_tlwhs, online_ids, 0,0)


            ### 越界识别功能实现 ###
            # 1.绘制越界监测区域
            ##绘制统计人流线
            lines = [[186,249],[1200,366]]
            cv2.line(res_img,(186,249),(1200,366),(255,0,0),2)

            # 2.计算得到人体下方中心点的位置(人体检测监测点调整)
            pt = [tlwh[0]+1/2*tlwh[2],tlwh[1]+tlwh[3]]

            # 3. 人体和违规区域的判断(人体状态追踪判断)
            # track_info = is_in_poly(pt, points)
            track_info = is_passing_line(pt, lines)
            if tid not in track_id_status.keys():
                track_id_status.update( {

    tid:[track_info]})
            else:
                if track_info != track_id_status[tid][-1]:
                    track_id_status[tid].append(track_info)

            # 4. 判断是否有track_id越界,有的话保存成图片
            # 当某个track_id的状态,上一帧是-1,但是这一帧是1时,说明越界了
            if track_id_status[tid][-1] == 1 and len(track_id_status[tid]) >1:
                # 判断上一个状态是否是-1,是否的话说明越界,为了防止继续判别,随机的赋了一个3的值
                if  track_id_status[tid][-2] == -1:
                    track_id_status[tid].append(3)
                    # cv2.imwrite("overstep.jpg",res_img)
                    count_person +=1
    cv2.putText(res_img,"-1 to 1 person_count:"+ str(count_person),(50,50),cv2.FONT_HERSHEY_SIMPLEX,1,(255,0,255),2)
    cvs.imshow(res_img)
**
学习心得
**
本次跟随大白老师的训练营首次学习到了将深度学习算法部署实现到安卓设备上的一系列流程,大白老师介绍的很详细,从项目的背景到具体代码的实现以及各自的原理都讲解的非常清楚,遇到bug时很多小伙伴也热心解答,深刻学习到了深度学习算法从训练到部署的流程,并且学习了目标检测+跟踪+越界识别并报警等多功能的串联实现,是一次很好的项目实操的经历,学习到了很多知识。