文章目录
元素偏移量 offset 系列
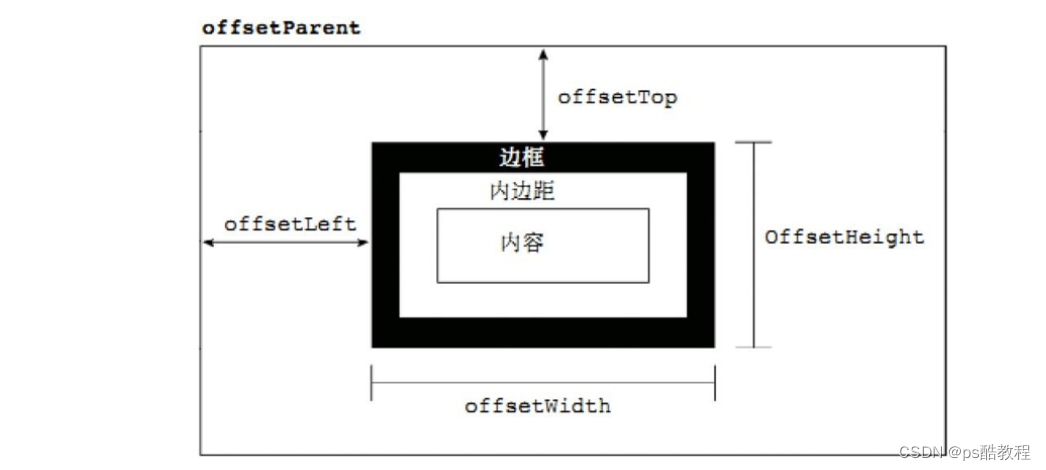
offset 翻译过来就是偏移量, 我们使用 offset 系列相关属性可以动态的得到该元素的位置(偏移)、大小等。
- 获得元素距离带有定位父元素的位置
- 获得元素自身的大小(宽度高度)
注意: 返回的数值都不带单位,并且只有上,左,没有右下
offset 系列常用属性
| offset系列属性 | 作用 |
|---|---|
| element.offsetParent | 返回作为该元素带有定位的父级元素。如果父级都没有定位,则返回body |
| element.offsetTop | 返回元素相对带有定位父元素上方的偏移 |
| element.offsetLeft | 返回元素相对带有定位父元素左边框的偏移 |
| element.offsetWidth | 返回自身包括padding、边框、内容区的宽度, 返回数值不带单位 |
| element.offsetHeight | 返回自身包括padding、边框、内容区的高度,返回数值不带单位 |
一定不要忘记加单位

<!DOCTYPE html>
<html lang="en">

    <head>
        <meta charset="UTF-8">
        <meta name="viewport" content="width=device-width, initial-scale=1.0">
        <meta http-equiv="X-UA-Compatible" content="ie=edge">
        <title>Document</title>
        <style>
            * {


                margin: 0;
                padding: 0;
            }

            .father {


                position: relative;
                width: 200px;
                height: 200px;
                background-color: pink;
                margin: 150px;
            }

            .son {


                width: 100px;
                height: 100px;
                background-color: purple;
                margin-left: 45px;
            }

            .w {


                height: 200px;
                background-color: skyblue;
                margin: 0 auto 200px;
                padding: 10px;
                border: 15px solid red;
            }
        </style>
    </head>

    <body>
        <div class="father">
            <div class="son"></div>
        </div>
        <div class="w"></div>
        <script>
            // offset 系列
            var father = document.querySelector('.father');
            var son = document.querySelector('.son');

            // 1.可以得到元素的偏移 位置 返回的不带单位的数值
            console.log(father.offsetTop); // 150
            console.log(father.offsetLeft);// 150

            // 它以带有定位的父亲为准  如果么有父亲或者父亲没有定位 则以 body 为准
            console.log(son.offsetLeft);   // 45

            var w = document.querySelector('.w');
            // 2.可以得到元素的大小 宽度和高度 是包含padding + border + width
            console.log(w.offsetWidth);    // 1519
            console.log(w.offsetHeight);   // 250

            // 3. 返回带有定位的父亲 否则返回的是body
            console.log(son.offsetParent); // 返回带有定位的父亲 否则返回的是body
            console.log(son.parentNode);   // 返回父亲 是最近一级的父亲 亲爸爸 不管父亲有没有定位
        </script>
    </body>

</html>
offset 与 style 区别
offset
- offset 可以得到任意样式表中的样式值
- offset 系列获得的数值是没有单位的
- offsetWidth 包含padding+border+width
- offsetWidth 等属性是只读属性,只能获取不能赋值
- 所以,我们想要获取元素大小位置,用offset更合适
style
- style 只能得到行内样式表中的样式值
- style.width 获得的是带有单位的字符串
- style.width 获得不包含padding和border 的值
- style.width 是可读写属性,可以获取也可以赋值
- 所以,我们想要给元素更改值,则需要用style改变
获取鼠标在盒子内的坐标
<!DOCTYPE html>
<html lang="en">
<head>
<meta charset="UTF-8">
<meta name="viewport" content="width=device-width, initial-scale=1.0">
<meta http-equiv="X-UA-Compatible" content="ie=edge">
<title>Document</title>
<style>
.box {
width: 300px;
height: 300px;
background-color: pink;
margin: 200px;
}
</style>
</head>
<body>
<div class="box"></div>
<script>
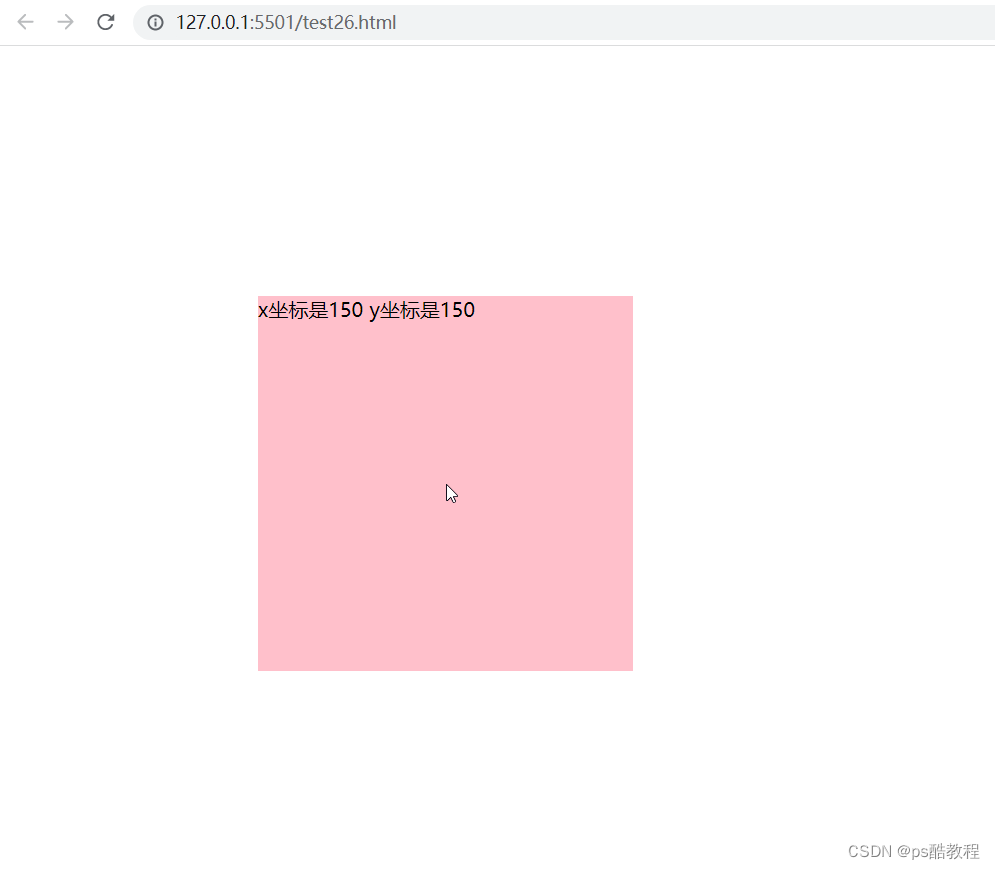
// 我们在盒子内点击, 想要得到鼠标距离盒子左右的距离。
// 首先得到鼠标在页面中的坐标( e.pageX, e.pageY)
// 其次得到盒子在页面中的距离(box.offsetLeft, box.offsetTop)
// 用鼠标距离页面的坐标减去盒子在页面中的距离, 得到 鼠标在盒子内的坐标
var box = document.querySelector('.box');
box.addEventListener('mousemove', function(e) {
// console.log(e.pageX);
// console.log(e.pageY);
// console.log(box.offsetLeft);
var x = e.pageX - this.offsetLeft;
var y = e.pageY - this.offsetTop;
this.innerHTML = 'x坐标是' + x + ' y坐标是' + y;
})
</script>
</body>
</html>
模态框

<!DOCTYPE html>
<html>

    <head lang="en">
        <meta charset="UTF-8">
        <title></title>
        <style>
            .login-header {


                width: 100%;
                text-align: center;
                height: 30px;
                font-size: 24px;
                line-height: 30px;
            }

            ul,
            li,
            ol,
            dl,
            dt,
            dd,
            div,
            p,
            span,
            h1,
            h2,
            h3,
            h4,
            h5,
            h6,
            a {


                padding: 0px;
                margin: 0px;
            }

            .login {


                display: none;
                width: 512px;
                height: 280px;
                position: fixed;
                border: #ebebeb solid 1px;
                left: 50%;
                top: 50%;
                background: #ffffff;
                box-shadow: 0px 0px 20px #ddd;
                z-index: 9999;
                transform: translate(-50%, -50%);
            }

            .login-title {


                width: 100%;
                margin: 10px 0px 0px 0px;
                text-align: center;
                line-height: 40px;
                height: 40px;
                font-size: 18px;
                position: relative;
                cursor: move;
            }

            .login-input-content {


                margin-top: 20px;
            }

            .login-button {


                width: 50%;
                margin: 30px auto 0px auto;
                line-height: 40px;
                font-size: 14px;
                border: #ebebeb 1px solid;
                text-align: center;
            }

            .login-bg {


                display: none;
                width: 100%;
                height: 100%;
                position: fixed;
                top: 0px;
                left: 0px;
                background: rgba(0, 0, 0, .3);
            }

            a {


                text-decoration: none;
                color: #000000;
            }

            .login-button a {


                display: block;
            }

            .login-input input.list-input {


                float: left;
                line-height: 35px;
                height: 35px;
                width: 350px;
                border: #ebebeb 1px solid;
                text-indent: 5px;
            }

            .login-input {


                overflow: hidden;
                margin: 0px 0px 20px 0px;
            }

            .login-input label {


                float: left;
                width: 90px;
                padding-right: 10px;
                text-align: right;
                line-height: 35px;
                height: 35px;
                font-size: 14px;
            }

            .login-title span {


                position: absolute;
                font-size: 12px;
                right: -20px;
                top: -30px;
                background: #ffffff;
                border: #ebebeb solid 1px;
                width: 40px;
                height: 40px;
                border-radius: 20px;
            }
        </style>
    </head>

    <body>
        <div class="login-header"><a id="link" href="javascript:;">点击,弹出登录框</a></div>
        <div id="login" class="login">
            <div id="title" class="login-title">登录会员
                <span><a id="closeBtn" href="javascript:void(0);" class="close-login">关闭</a></span>
            </div>
            <div class="login-input-content">
                <div class="login-input">
                    <label>用户名:</label>
                    <input type="text" placeholder="请输入用户名"  id="username" class="list-input">
                </div>
                <div class="login-input">
                    <label>登录密码:</label>
                    <input type="password" placeholder="请输入登录密码" id="password" class="list-input">
                </div>
            </div>
            <div id="loginBtn" class="login-button">
                <a href="javascript:void(0);" id="login-button-submit">登录会员</a>
            </div>
        </div>
        <!-- 遮盖层 -->
        <div id="bg" class="login-bg"></div>
        <script>
            // 1. 获取元素
            var login = document.querySelector('.login');
            var mask = document.querySelector('.login-bg');
            var link = document.querySelector('#link');
            var closeBtn = document.querySelector('#closeBtn');
            var title = document.querySelector('#title');
            // 2. 点击弹出层这个链接 link  让mask 和login 显示出来
            link.addEventListener('click', function () {


                mask.style.display = 'block';
                login.style.display = 'block';
            })
            // 3. 点击 closeBtn 就隐藏 mask 和 login
            closeBtn.addEventListener('click', function () {


                mask.style.display = 'none';
                login.style.display = 'none';
            })
            // 4. 开始拖拽
            // (1) 当我们鼠标按下, 就获得鼠标在盒子内的坐标
            title.addEventListener('mousedown', function (e) {


                var x = e.pageX - login.offsetLeft;
                var y = e.pageY - login.offsetTop;
                // (2) 鼠标移动的时候,把鼠标在页面中的坐标,减去 鼠标在盒子内的坐标就是模态框的left和top值
                document.addEventListener('mousemove', move)

                function move(e) {


                    login.style.left = e.pageX - x + 'px';
                    login.style.top = e.pageY - y + 'px';
                }

                // (3) 鼠标弹起,就让鼠标移动事件移除
                document.addEventListener('mouseup', function () {


                    document.removeEventListener('mousemove', move);
                })
            })
        </script>
    </body>

</html>
放大镜效果

<!DOCTYPE html>
<html lang="en">
    <head>
        <meta charset="UTF-8">
        <title>Title</title>
        <style>

            * {


                box-sizing: border-box;
                margin: 0;
            }

            .box {


                position: relative;
                border: 1px solid #ccc;
                width: 400px;
                height: 400px;
                margin: 100px auto 0 50px;
            }

            .mask {


                display: none;
                position: absolute;
                top: 0;
                left: 0;
                background-color: yellow;
                opacity: .3;
                width: 200px;
                height: 200px;
                border: 1px solid #a2996a;
            }

            .big-box {


                overflow: hidden;
                /*display: none;*/
                width: 600px;
                height: 600px;
                position: absolute;
                top: -1px;
                left: 398px;
                border: 1px solid #ccc;
            }

            .big-img {


                position: absolute;
                /*width: 600px;*/
                /*height: 600px;*/
            }


        </style>
        <script>
            window.onload = function () {


                var box = document.querySelector('.box');
                var mask = document.querySelector('.mask');
                var bigBox = document.querySelector('.big-box');
                var bigImg = document.querySelector('.big-img');
                box.addEventListener('mouseover', function (e) {


                    mask.style.display = 'block'
                    bigBox.style.display = 'block'


                    box.addEventListener('mousemove', function (e) {


                        // 限定top和left的值
                        var left = e.pageX - box.offsetLeft - mask.offsetWidth / 2
                        if (left < 0) {


                            left = 0;
                        }else if (left > box.offsetWidth - mask.offsetWidth) {


                            left = box.offsetWidth - mask.offsetWidth
                        }
                        mask.style.left = left + 'px';

                        var top = e.pageY - box.offsetTop - mask.offsetHeight / 2
                        if (top < 0) {


                            top = 0
                        } else if (top > box.offsetHeight - mask.offsetHeight) {


                            top = box.offsetHeight - mask.offsetHeight
                        }
                        mask.style.top =  top + 'px';

                        // 下面写死200 主要是因为大图的比例和小图比例不一致
                        // 大图片的移动距离 = 遮挡层移动距离 * 大图片最大移动距离 / 遮挡层的最大移动距离
                        var imgLeft = - left/(box.offsetWidth-mask.offsetWidth) * 200 + 'px'
                        var imgTop = - top/(box.offsetHeight-mask.offsetHeight) * 200 +'px'

                        bigImg.style.top = imgTop
                        bigImg.style.left = imgLeft
                    })

                })
                box.addEventListener('mouseout', function (e) {


                    mask.style.display = 'none'
                    bigBox.style.display = 'none'
                })

            }
        </script>
    </head>
    <body>

        <div class="box">
            <img src="upload/s3.png" alt="xx">
            <div class="mask"></div>
            <div class="big-box">
                <img src="upload/big.jpg" alt="xx" class="big-img">
            </div>
        </div>

    </body>
</html>
元素client 系列
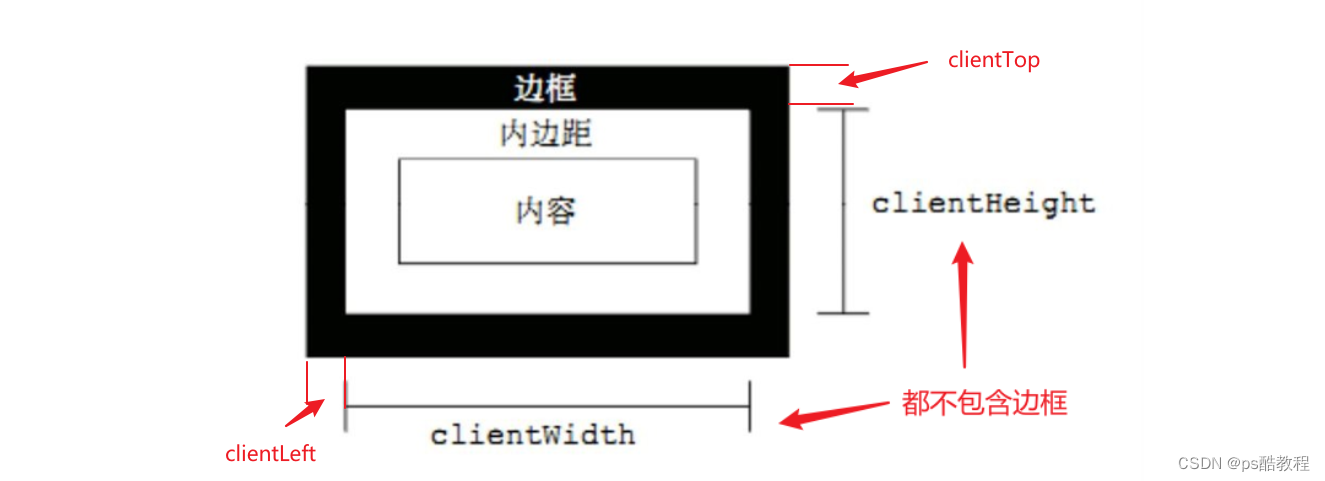
client 翻译过来就是客户端,我们使用 client 系列的相关属性来获取元素可视区的相关信息。通过 client 系列 的相关属性可以动态的得到该元素的边框大小、元素大小等。
元素client系列属性
| client系列属性 | 作用 |
|---|---|
| element.clientTop | 返回元素上边框的大小 |
| element.clientLeft | 返回元素左边框的大小 |
| element.clientWidth | 返回自身包括padding、内容区的宽度,不含边框,返回数值不带单位 |
| element.clientHeight | 返回自身包括padding、内容区的高度,不含边框,返回数值不带单位 |
元素滚动 scroll 系列
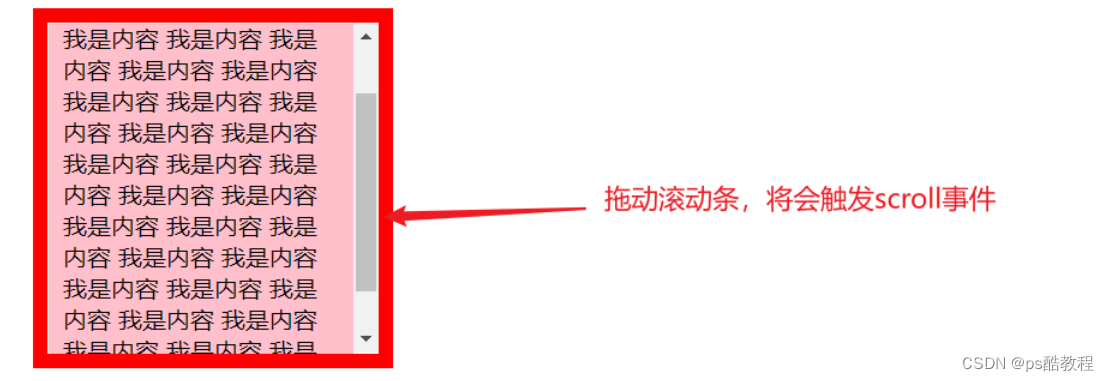
scroll 翻译过来就是滚动的,我们使用 scroll 系列的相关属性可以动态的得到该元素的大小、滚动距离等。
元素 scroll 系列属性
| scroll系列属性 | scroll系列属性 |
|---|---|
| element.scrollTop | 返回被卷去的上侧距离,返回数值不带单位 |
| element.scrollLeft | 返回被卷去的左侧距离,返回数值不带单位 |
| element.scrollWidth | 返回自身实际的宽度,不含边框,返回数值不带单位 |
| element.scrollHeight | 返回自身实际的高度,不含边框,返回数值不带单位 |

页面被卷去的头部兼容性解决方案
需要注意的是,页面被卷去的头部,有兼容性问题,因此被卷去的头部通常有如下几种写法:
-
声明了 DTD,使用 document.documentElement.scrollTop(DTD即头部声明的<!DOCTYPE html>)
-
未声明 DTD,使用 document.body.scrollTop
-
新方法 window.pageYOffset 和 window.pageXOffset,IE9 开始支持
// 使用的时候getScroll().left
function getScroll() {


    return {


        left: window.pageXOffset || document.documentElement.scrollLeft || document.body.scrollLeft||0,
        top: window.pageYOffset || document.documentElement.scrollTop || document.body.scrollTop || 0
    };
}
监听滚动效果
<!DOCTYPE html>
<html lang="en">

    <head>
        <meta charset="UTF-8">
        <meta name="viewport" content="width=device-width, initial-scale=1.0">
        <meta http-equiv="X-UA-Compatible" content="ie=edge">
        <title>Document</title>
        <style>
            div {


                width: 200px;
                height: 200px;
                background-color: pink;
                border: 10px solid red;
                padding: 10px;
                overflow: auto;
            }
        </style>
    </head>

    <body>
        <div>
            我是内容 我是内容 我是内容 我是内容 我是内容 我是内容 我是内容 我是内容 我是内容 我是内容 我是内容 我是内容 我是内容 我是内容 我是内容 我是内容 我是内容 我是内容 我是内容 我是内容 我是内容 我是内容 我是内容 我是内容 我是内容 我是内容 我是内容 我是内容 我是内容 我是内容 我是内容 我是内容 我是内容 我是内容
        </div>
        <script>

            // scroll 系列
            var div = document.querySelector('div');

            // 如果内容超出了div的大小,那么scroll还会加上被卷进去的内容高度,如果没超出,那么就是div的高度
            console.log(div.scrollHeight);

            // 不包含边框, 相比于scrollHeight,不会计算卷进去的内容高度
            console.log(div.clientHeight);

            // scroll滚动事件当我们滚动条发生变化会触发的事件
            div.addEventListener('scroll', function() {


                console.log(div.scrollTop);
            })

        </script>
    </body>

</html>
仿淘宝固定侧边栏

<!DOCTYPE html>
<html lang="en">

    <head>
        <meta charset="UTF-8">
        <meta name="viewport" content="width=device-width, initial-scale=1.0">
        <meta http-equiv="X-UA-Compatible" content="ie=edge">
        <title>Document</title>
        <style>
            .slider-bar {


                position: absolute;
                left: 50%;
                top: 300px;
                margin-left: 600px;
                width: 45px;
                height: 130px;
                background-color: pink;
            }

            .w {


                width: 1200px;
                margin: 10px auto;
            }

            .header {


                height: 150px;
                background-color: purple;
            }

            .banner {


                height: 250px;
                background-color: skyblue;
            }

            .main {


                height: 1000px;
                background-color: yellowgreen;
            }

            span {


                display: none;
                position: absolute;
                bottom: 0;
            }
        </style>
    </head>

    <body>
        <div class="slider-bar">
            <span class="goBack">返回顶部</span>
        </div>
        <div class="header w">头部区域</div>
        <div class="banner w">banner区域</div>
        <div class="main w">主体部分</div>
        <script>

            //1. 获取元素
            var sliderbar = document.querySelector('.slider-bar');
            var banner = document.querySelector('.banner');

            // banner.offestTop 就是被卷去头部的大小 一定要写到滚动的外面
            var bannerTop = banner.offsetTop

            // 当我们侧边栏固定定位之后应该变化的数值
            var sliderbarTop = sliderbar.offsetTop - bannerTop;

            // 获取main 主体元素
            var main = document.querySelector('.main');
            var goBack = document.querySelector('.goBack');
            var mainTop = main.offsetTop;

            // 2. 页面滚动事件 scroll
            document.addEventListener('scroll', function() {


                // 页面被卷去的头部:可以通过window.pageYOffset  获得	如果是被卷去的左侧 window.pageXOffset
                // 注意,元素被卷去的头部是element.scrollTop  , 如果是页面被卷去的头部则是window.pageYOffset
                // window.pageYOffset 页面被卷去的头部,注意这里不是元素的scrollTop
                // console.log(window.pageYOffset);


                // 3 .当我们页面被卷去的头部大于等于 指定的值时, 此时 侧边栏就要改为固定定位
                if (window.pageYOffset >= bannerTop) {


                    sliderbar.style.position = 'fixed';
                    sliderbar.style.top = sliderbarTop + 'px';
                } else {


                    sliderbar.style.position = 'absolute';
                    sliderbar.style.top = '300px';
                }

                // 4. 当我们页面滚动到main盒子,就显示 goback模块
                if (window.pageYOffset >= mainTop) {


                    goBack.style.display = 'block';
                } else {


                    goBack.style.display = 'none';
                }

            })
        </script>
    </body>

</html>
缓动动画

<!DOCTYPE html>
<html lang="en">

    <head>
        <meta charset="UTF-8">
        <meta name="viewport" content="width=device-width, initial-scale=1.0">
        <meta http-equiv="X-UA-Compatible" content="ie=edge">
        <title>Document</title>
        <style>
            * {


              margin: 0;
            }
            div {


                position: absolute;
                left: 0;
                width: 100px;
                height: 100px;
                background-color: pink;
            }

            span {


                position: absolute;
                left: 0;
                top: 100px;
                display: block;
                width: 150px;
                height: 150px;
                background-color: purple;
            }

            .left-reference{


              position: absolute;
              width: 1px;
              height: 50px;
              top: 50px;
              left: 100px;
              background-color: red;
            }
            .right-reference {


              position: absolute;
              width: 1px;
              height: 50px;
              top: 50px;
              left: 1150px;
              background-color: red;
            }
        </style>
    </head>

    <body>
      <div class="left-reference"></div>
      <div class="right-reference"></div>

        <button class="btn100">点击夏雨荷到100</button>
        <button class="btn1000">点击夏雨荷到1000</button>
        <span>夏雨荷</span>
        <script>
            // 缓动动画函数封装obj目标对象 target 目标位置
            // 思路:
            // 1. 让盒子每次移动的距离慢慢变小, 速度就会慢慢落下来。
            // 2. 核心算法:(目标值 - 现在的位置) / 10 做为每次移动的距离 步长
            // 3. 停止的条件是: 让当前盒子位置等于目标位置就停止定时器
            function animate(obj, target, callback) {


                // 先清除以前的定时器,只保留当前的一个定时器执行
                clearInterval(obj.timer);
                obj.timer = setInterval(function() {


                    // 步长值写到定时器的里面
                    // 把我们步长值改为整数 不要出现小数的问题
                    // var step = Math.ceil((target - obj.offsetLeft) / 10);
                    var step = (target - obj.offsetLeft) / 10;
                    step = step > 0 ? Math.ceil(step) : Math.floor(step);

                    if (obj.offsetLeft == target) {


                        // 停止动画 本质是停止定时器
                        clearInterval(obj.timer);
                        // 回调函数写到定时器结束里面
                        callback && callback();
                    }

                    // 把每次加1 这个步长值改为一个慢慢变小的值  步长公式:(目标值 - 现在的位置) / 10
                    obj.style.left = obj.offsetLeft + step + 'px';

                }, 15);
            }
            var span = document.querySelector('span');
            var btn100 = document.querySelector('.btn100');
            var btn1000 = document.querySelector('.btn1000');

            btn100.addEventListener('click', function() {


                // 调用函数
                animate(span, 100);
            })
            btn1000.addEventListener('click', function() {


                // 调用函数
                animate(span, 1000);
            })
            // 匀速动画 就是 盒子是当前的位置 +  固定的值 10
            // 缓动动画就是  盒子当前的位置 + 变化的值(目标值 - 现在的位置) / 10)
        </script>
    </body>

</html>
筋斗云案例

<!DOCTYPE html>
<html lang="en">
<head>
    <meta charset="UTF-8">
    <title>Title</title>
    <style>
        * {


            box-sizing: border-box;
            margin: 0;
            padding: 0;
        }
        body {


            background-color: black;
        }
        li {


            list-style-type: none;
        }

        a {


            color: #000;
            text-decoration: none;

        }

        .c-nav {


            position: relative;
            width: 1000px;
            height: 42px;
            border: 1px solid #ccc;
            margin: 100px auto;
            border-radius: 8px;
            background-color: #ffffff;
            padding: 0 5px;
        }

        .c-nav ul li {


            float: left;
            line-height: 42px;
            padding: 0 15px;
            position: relative;
        }

        .c-nav::after {


            content: '';
            position: absolute;
            width: 32px;
            height: 32px;
            right: 3px;
            top: 3px;
            background:url("images/rss.png");
        }

        .c-nav ul li::after {


            content: '';
            position: absolute;
            top: 8px;
            right: 0px;
            width: 1px;
            height: 25px;
            background-color: #000;
            opacity: .3;
        }

        .cloud {


            position: absolute;
            background: url("images/cloud.gif") no-repeat;
            background-size: auto 40px;
            width: 83px;
            height: 42px;
            top: 0px;
            left: 0;
        }

    </style>
    <script src="animate.js"></script>
    <script>
        window.onload = function () {


            var cloud = document.querySelector('.cloud');
            var lis = document.querySelectorAll('ul li');
            var nav = document.querySelector('.c_nav');
            var ul = document.querySelector('ul');

            var prevLi = lis[0]

            for (let i = 0; i < lis.length; i++) {


            	/* 当鼠标进入的时候,将cloud移动到当前li的位置 */
                lis[i].addEventListener('mouseenter',function () {


                    // cloud.style.left = this.offsetLeft + 'px' // 直接修改,不用动画效果做法,注意要带单位
                    animate(cloud,this.offsetLeft)               // 引入animate.js,加入缓动效果
                })
                /* 当鼠标离开当前li的时候,将cloud复原到先前所在的位置 */
                lis[i].addEventListener('mouseleave',function () {


                    // cloud.style.left = prevLi.offsetLeft + 'px'
                    animate(cloud,prevLi.offsetLeft)
                })
                /* 当鼠标点击某个li的时候,将cloud指定为 所点击的li的所在位置 */
                lis[i].addEventListener('click',function () {


                    // cloud.style.left = this.offsetLeft + 'px'
                    animate(cloud,this.offsetLeft)
                    prevLi = lis[i]

                })
            }

        }
    </script>
</head>
<body>
    <div id="c_nav" class="c-nav">
        <span class="cloud"></span>
        <ul>
            <li><a href="#">首页新闻</a></li>
            <li><a href="#">师资力量</a></li>
            <li><a href="#">活动策划</a></li>
            <li><a href="#">企业文化</a></li>
            <li><a href="#">招聘信息</a></li>
            <li><a href="#">公司简介</a></li>
            <li><a href="#">我是佩奇</a></li>
            <li><a href="#">啥是佩奇</a></li>
        </ul>
    </div>
</body>

</html>
window.scroll(…)
window.scroll(x, y)
滚动窗口至文档中的特定位置。注意,里面的x和y 不跟单位,直接写数字
平滑滚动到顶部案例
关键点有两个:
1、这个算法,算法通过定时器不断的获取当前值,根据目标值计算出到步长值,让当前值加上步长值,向目标值靠近,并且越来越靠近,最终相等。
2、使用了window.scroll(x,y),注意不要带单位。

<!DOCTYPE html>
<html lang="en">

    <head>
        <meta charset="UTF-8">
        <meta name="viewport" content="width=device-width, initial-scale=1.0">
        <meta http-equiv="X-UA-Compatible" content="ie=edge">
        <title>Document</title>
        <style>
            .slider-bar {


                position: absolute;
                left: 50%;
                top: 300px;
                margin-left: 600px;
                width: 45px;
                height: 130px;
                background-color: pink;
            }

            .w {


                width: 1200px;
                margin: 10px auto;
            }

            .header {


                height: 150px;
                background-color: purple;
            }

            .banner {


                height: 250px;
                background-color: skyblue;
            }

            .main {


                height: 1000px;
                background-color: yellowgreen;
            }

            span {


                display: none;
                position: absolute;
                bottom: 0;
            }
        </style>
    </head>

    <body>
        <div class="slider-bar">
            <span class="goBack">返回顶部</span>
        </div>
        <div class="header w">头部区域</div>
        <div class="banner w">banner区域</div>
        <div class="main w">主体部分</div>
        <script>
            //1. 获取元素
            var sliderbar = document.querySelector('.slider-bar');
            var banner = document.querySelector('.banner');
            // banner.offestTop 就是被卷去头部的大小 一定要写到滚动的外面
            var bannerTop = banner.offsetTop
            // 当我们侧边栏固定定位之后应该变化的数值
            var sliderbarTop = sliderbar.offsetTop - bannerTop;
            // 获取main 主体元素
            var main = document.querySelector('.main');
            var goBack = document.querySelector('.goBack');
            var mainTop = main.offsetTop;
            // 2. 页面滚动事件 scroll
            document.addEventListener('scroll', function() {


                // console.log(11);
                // window.pageYOffset 页面被卷去的头部
                // console.log(window.pageYOffset);
                // 3 .当我们页面被卷去的头部大于等于了 172 此时 侧边栏就要改为固定定位
                if (window.pageYOffset >= bannerTop) {


                    sliderbar.style.position = 'fixed';
                    sliderbar.style.top = sliderbarTop + 'px';
                } else {


                    sliderbar.style.position = 'absolute';
                    sliderbar.style.top = '300px';
                }
                // 4. 当我们页面滚动到main盒子,就显示 goback模块
                if (window.pageYOffset >= mainTop) {


                    goBack.style.display = 'block';
                } else {


                    goBack.style.display = 'none';
                }

            })
            // 3. 当我们点击了返回顶部模块,就让窗口滚动的页面的最上方
            goBack.addEventListener('click', function() {


                // 里面的x和y 不跟单位的 直接写数字即可
                // window.scroll(0, 0);
                // 因为是窗口滚动 所以对象是window
                animate(window, 0);
            });
            // 动画函数
            function animate(obj, target, callback) {


                // console.log(callback);  callback = function() {}  调用的时候 callback()

                // 先清除以前的定时器,只保留当前的一个定时器执行
                clearInterval(obj.timer);
                obj.timer = setInterval(function() {


                    // 步长值写到定时器的里面
                    // 把我们步长值改为整数 不要出现小数的问题
                    // var step = Math.ceil((target - obj.offsetLeft) / 10);
                    var step = (target - window.pageYOffset) / 10;
                    step = step > 0 ? Math.ceil(step) : Math.floor(step);
                    if (window.pageYOffset == target) {


                        // 停止动画 本质是停止定时器
                        clearInterval(obj.timer);
                        // 回调函数写到定时器结束里面
                        // if (callback) {


                        //     // 调用函数
                        //     callback();
                        // }
                        callback && callback();
                    }
                    // 把每次加1 这个步长值改为一个慢慢变小的值  步长公式:(目标值 - 现在的位置) / 10
                    // obj.style.left = windowa.pageYOffset + step + 'px';
                    window.scroll(0, window.pageYOffset + step);
                }, 15);
            }
        </script>
    </body>

</html>
window.scroll({})
非常简单,平滑滚动
window.scroll({


    top: 0, // top: 表示移动到距离顶部的位置大小
    behavior: 'smooth'
})
window.scroll({


    top: document.documentElement.clientHeight, // 滚动一个屏幕距离
    behavior: 'smooth'
})
this.$nextTick(() => {


    let scrollTop = document.documentElement.scrollHeight - document.documentElement.clientHeight
    console.log(scrollTop);

    // 自动滚动到最下面
    window.scroll({


        top: scrollTop, // top: 表示移动到距离顶部的位置大小
        behavior: 'smooth'
    })
})
window.getComputedStyle
获取元素的当前显示的样式,语法:元素.currentStyle.样式名
它可以用来读取当前元素正在显示的样式,如果当前元素没有设置该样式,则获取它的默认值
alert(box1.currentStyle.height); // 100px
box1.style.height = "200px";
alert(box1.currentStyle.height); // 200px
不过currentstyle只有 IE 浏览器支持,其他的浏览器都不支持。我们在 IE 中测试是可行的,在 Chrome 或 Edge 中报错的:UncaughtTypeError: Cannot read property 'height' of undefined
不过,在其他浏览器中可以使用getComputedStyle(),这个方法来获取元素当前的样式
这个方法是window的方法,可以直接使用,需要两个参数
- 第一个:要获取样式的元素
- 第二个:可以传递一个伪元素,一般都传
null
该方法会返回一个对象,对象中封装了当前元素对应的样式
可以通过对象.样式名来读取样式,如果获取的样式没有设置,则会获取到真实的值,而不是默认值
比如:没有设置 width,它不会获取到 auto,而是一个长度
但是该方法不支持IE8及以下的浏览器
var obj = getComputedStyle(box1, null); // 只可读,不能改
alert(obj);                             // [object CSSStyleDeclaration]
alert(obj.width);                       // 200px
alert(obj.height);                      // 200px
alert(obj.backgroundColor);             // rgb(2  55, 0, 0)
那么问题来了,如果想要兼容IE8及以下的浏览器,就会陷入一个两难的境地, 该怎么办呢?
通过currentStyle和getComputedStyle()读取到的样式都是只读的,不能修改,如果要修改必须通过style属性
那么我就只能自己写个函数,来兼容所有浏览器
// 自定义兼容所有浏览器获取元素样式的方法
function getStyle(obj, name) {


    // 判断是否有getComputedStyle方法
    if (window.getComputedStyle) {


        // 正常浏览器的方式
        return getComputedStyle(obj, null)[name];
    } else {


        // IE的方式
        return obj.currentStyle[name];
    }
}
ele.getBoundingClientRect()
getBoundingClientRect()用于获得页面中某个元素的左,上,右和下分别相对浏览器视窗的位置。是DOM元素到浏览器可视范围的距离(不包含文档卷起的部分)。
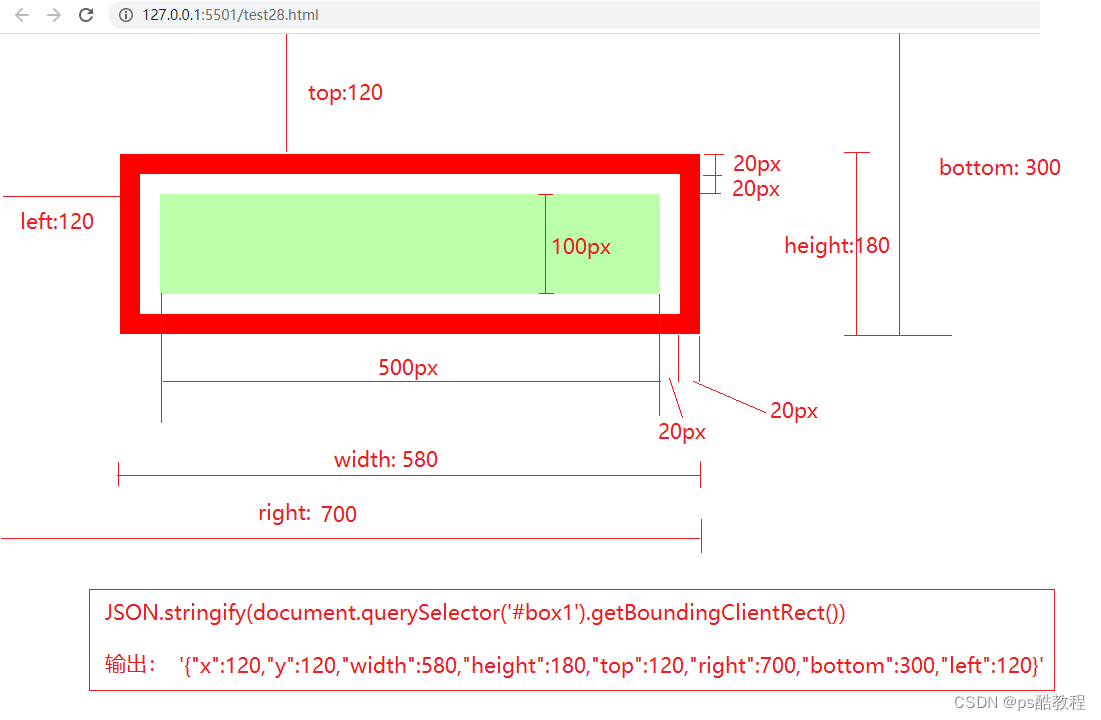
- 只需要比较top和document.documentElement.clientHeight的大小,就可以知道元素是否开始进入浏览器可视区了
鼠标事件相关尺寸
clientX:鼠标到浏览器可视窗口的左侧距离,注意一定是可视窗口,不管是否滚动啥的,没有单位
clientY:鼠标到浏览器可视窗口上侧距离,注意一定是可视窗口,不管是否滚动啥的,没有单位
screenX:鼠标到屏幕左侧的距离,没有单位
screenX:鼠标到屏幕上侧的距离,没有单位
pageX:鼠标到页面左上角的横轴方向的距离,没有单位(ie8不支持)
pageY:鼠标到页面左上角的纵轴方向的距离,没有单位(ie8不支持)
js尺寸
1、获取视口的宽高
①含滚动条
window.innerWidth
window.innerHeight
②不含滚动条
document.documentElement.clientWidth
document.documentElement.clientHeight
2、获取文档的滚动距离
document.documentElement.scrollTop ||  document.body.scrollTop
document.documentElement.scrollLeft || document.body.scrollTop`
3、获取元素的滚动距离
ele.scrollTop
ele.scrollLeft`
4、获取元素的尺寸 ①含边框
ele.offsetWidth
ele.offsetHeight
② 不含边框
ele.clientWidth
ele.clientHeight
5、获取当前元素距离已经定位的父元素的水平/垂直距离
ele.offsetLeft
ele.offsetTop
6、浏览器的大小
 window.outerHeight
 window.outerWidth
7、获取鼠标在视口内的坐标
 event.clientX
 event.clientY
8、获取鼠标在界面内的坐标
 event.pageX
 event.pageY
9、 获取浏览器距离屏幕左顶点的距离
window.screenX
window.screenY
10、获取鼠标距离屏幕左顶点的距离
event.screenX
event.screenY
document.body 是body
document.body.scrollTop
document.body.clientHeight
document.body.scrollHeight 整个文档的高度
document.documentElement 是html
document.documentElement.scrollTop
document.documentElement.clientHeight
document.documentElement.scrollHeight
document.body.scrollTop
window.pageYOffset
window.pageXOffset
window.scrollY
window.scrollX
window.innerHeight 浏览器可视窗口的高度
document.getElementById(‘h28’).scrollIntoView({‘behavior’:‘smooth’}) 将dom平滑滚动到浏览器可视区域