Linux——centos7版本
安装环境配置
-
Nginx是C语言编写的,所以需要配置C语言编译环境(要联网)
-
安装gcc环境
[root@a ~]# yum install gcc-c++ 已加载插件:fastestmirror, langpacks Determining fastest mirrors * base: mirrors.aliyun.com * extras: mirrors.aliyun.com * updates: mirrors.aliyun.com base -
解决安装gcc环境时出现的问题:
Another app is currently holding the yum locak......
出现上述问题是因为 yum 在锁定状态中,强制关掉yum进程就可以了rm -f /var/run/yum.pid
安装Nginx需要安装第三方的开发包
安装Nginx需要安装第三方的开发包,在编译前需要这些包
-
PCRE:nginx中的http模块使用pcre解析正则表达式,所以需要在linux上安装pcre库
[root@a ~]# yum install -y pcre pcre-devel 已加载插件:fastestmirror, langpacks Loading mirror speeds from cached hostfile * base: mirrors.aliyun.com * extras: mirrors.aliyun.com * updates: mirrors.aliyun.com -
zlib:nginx使用zlib对http包的内容进行gzio,所以需要安装此包
[root@a ~]# yum install -y zlib zlib-devel 已加载插件:fastestmirror, langpacks Loading mirror speeds from cached hostfile * base: mirrors.aliyun.com * extras: mirrors.aliyun.com * updates: mirrors.aliyun.com -
openssl:openssl是一个强大的安全套接字层密码库,nginx不仅支持http协议,还支持https,所以需要在linux上安装openssl库
[root@a ~]# yum install -y openssl openssl-devel
已加载插件:fastestmirror, langpacks
Loading mirror speeds from cached hostfile
 * base: mirrors.aliyun.com
 * extras: mirrors.aliyun.com
 * updates: mirrors.aliyun.com
安装Nginx
-
将Nginx源码包上传到Linux
-
解压Nginx :
[root@a ~]# tar -xvf nginx-1.14.2.tar.gz -
创建一个临时目录
mkdir /var/temp/nginx/client -p -
执行命令 configure,生成 Mikefile 文件
./configure \ --prefix=/usr/local/nginx \ --pid-path=/var/run/nginx/nginx.pid \ --lock-path=/var/lock/nginx.lock \ --error-log-path=/var/log/nginx/error.log \ --http-log-path=/var/log/nginx/access.log \ --with-http_gzip_static_module \ --http-client-body-temp-path=/var/temp/nginx/client \ --http-proxy-temp-path=/var/temp/nginx/proxy \ --http-fastcgi-temp-path=/var/temp/nginx/fastcgi \ --http-uwsgi-temp-path=/var/temp/nginx/uwsgi \ --http-scgi-temp-path=/var/temp/nginx/scgi -
执行make命令,进行编译:
make -
安装Nginx:
make install
启动并访问Nginx
-
进入到nginx 安装目录:
[root@a nginx-1.14.2]# cd /usr/local/nginx/ [root@a nginx]# ll 总用量 4 drwxr-xr-x. 2 root root 4096 10月 20 10:50 conf drwxr-xr-x. 2 root root 40 10月 20 08:02 html drwxr-xr-x. 2 root root 6 10月 20 14:57 logs drwxr-xr-x. 2 root root 36 11月 25 02:44 sbin [root@a nginx]# -
进入到 sbin目录,执行 nginx 命令
[root@a nginx]# cd sbin/ [root@a sbin]# ll 总用量 7472 -rwxr-xr-x. 1 root root 3778520 11月 25 02:44 nginx -rwxr-xr-x. 1 root root 3870512 10月 20 08:02 nginx.old [root@a sbin]#./nginx 启动 ./nginx -s stop 关闭 ./nginx -s reload 重启 ps aux | grep nginx 查看进程
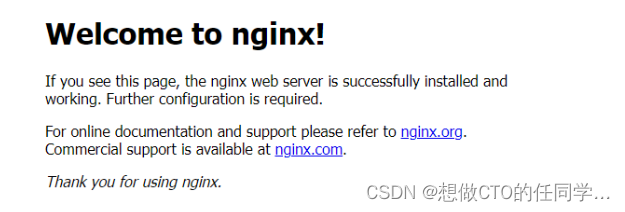
安装完毕
- 打开你的客户机ip地址,出现如下界面表示安装完毕