通过lay-excel插件实现Excel导出,并实现单元格合并,样式设置等功能。
更详细描述,请去lay-excel插件文档查看,地址:http://excel.wj2015.com/_book/docs/%E5%BF%AB%E9%80%9F%E4%B8%8A%E6%89%8B.html
一、安装
这里使用Vue前端框架来演示Excel导出功能,可通过npm进行安装,代码如下:
$ npm i lay-excel二、相关函数
以下只是将这次演示demo中会使用到函数及相关参数进行列举,如果需更深入了解或更复杂功能实现,可去lay-excel的插件文档中查看。
2.1 exportExcel参数配置
用于将 data 数据依次导出,如果需要调整导出后的文件字段顺序或者过滤多余数据,可使用filterExportData()来梳理。另个导出每行数据对应key数量必须一致,否则会出现错位现象。
参数配置:
参数名称 |
描述 |
默认值 |
data |
数据列表(需指定表名) |
必填 |
filename |
文件名称(带后缀) |
必填 |
type |
导出类型,支持 xlsx、csv、ods、xlsb、fods、biff2 |
xlsx |
options |
其他可选配置 |
null |
options支持参数:
参数名称 |
描述 |
默认值 |
Props |
配置文档基础属性,支持Title、Subject、Author、Manager、Company、Category、Keywords、Comments、LastAuthor、CreatedData |
null |
extend |
表格配置参数,支持 !merge (合并单元格信息)、!cols(行数)、!protect(写保护)等,原生配置请参考,其中 !merge 配置支持辅助方法生成,详见 makeMergeConfig(origin)! |
null |
compression |
是否压缩,压缩效果比较明显,建议开启(9列9w行有较多重复的数据,从 30M 缩小到 3M) |
true |
writeOpt |
写入函数的可选项覆盖,一般用默认生成的配置即可,具体请查看 Writing Options |
undefined |
2.2 filterExportData参数配置
辅助方法,梳理导出的数据,包括字段排序和多余数据过滤。
参数名称 |
描述 |
默认值 |
data |
需要梳理的数据 |
必填 |
fields |
支持数组、对象和回调函数,用于映射关系和字段排序 |
必填 |
单元格属性含义:
键名称 |
描述 |
v |
单元格的值 |
w |
格式化文本(如果适用) |
t |
单元格类型: b 布尔值, n 数字, e 错误, s 字符, d 日期 |
f |
单元格公式(如果适用) |
r |
富文本编码(如果适用) |
h |
富文本的HTML呈现(如果适用) |
c |
与单元格相关的注释 |
z |
与单元格关联的数字格式字符串(如果需要) |
l |
单元格超链接对象(目标链接,.tooltip是提示) |
s |
单元格的样式/主题(如果适用) |
样式设置对应参数,可去lay-excel插件文档中查看,地址:http://excel.wj2015.com/_book/docs/%E6%A0%B7%E5%BC%8F%E8%AE%BE%E7%BD%AE%E4%B8%93%E5%8C%BA.html
2.3 makeColConfig参数配置
辅助方法:用于生成合并表格的配置项,注意需要传入到 exportExcel 的 opt.extend['!merge'] 中。
参数名称 |
描述 |
默认值 |
origin |
二维数组 |
undefined |
2.4 makeMergeConfig参数配置
辅助方法:生成列宽配置,返回结果需放置于opt.extend['!cols']中。
参数名称 |
描述 |
默认值 |
data |
一个对象,对象的key代表列(如:ABCDE),value代表宽度 |
null |
defaultNum |
渲染过程中未指定单元格的默认宽度 |
60 |
三、Demo实现
通过lay-excel来实现如下图格局,是非常方便的,只需要传入相应参数即可。
3.1 创建模板页
首先,在src中创建永动默认首页,在页面中添加导出按钮,代码如下:
<template>
    <div class="main-box">
        <el-button size="small" type="primary" @click="exportEvent">导出表格</el-button>
    </div>
</template>

<script>
    export default {
        data(){
            return {

            }
        },
        methods: {
            //导出事件
            exportEvent(){}
        }
    }
</script>
页面效果如下:

3.2 绘制表格框架
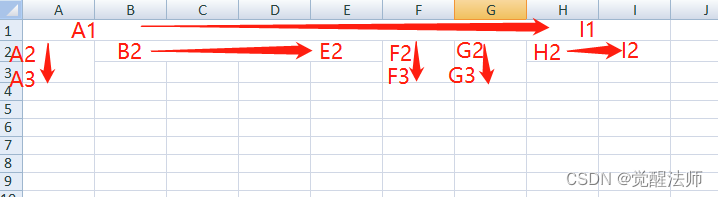
如上图示例,将合并单元格二维数据,放到makeMergeConfig函数中即可,这里合并单元格是从左上角往右边或下面 进行合并的,代码如下:
exportEvent(){
    //合并参数
    let mergeConf = LAY_EXCEL.makeMergeConfig([
        ['A1', 'I1'],
        ['A2', 'A3'],
        ['F2', 'F3'],
        ['G2', 'G3'],
        ['B2', 'E2'],
        ['H2', 'I2']
    ]);

    //导出数据
    LAY_EXCEL.exportExcel([], '导出测试.xlsx', 'xlsx', {
        extend: {
            '!merges': mergeConf,
        }
    });
}
此时点击导出,则可以导出合并后的表格框架。
3.3 导出数据
这里先导出数据,再实现标题数据导出,先将表格对应列和数据中字段关联上。代码如下:
exportEvent(){
var data = [
{name: "李四", age: 72, gender: 1, high: 164, weight: 80, mobile: 15627070182, email: "[email protected]", province: "湖北省", city: "长沙市"},
{name: "张三", age: 60, gender: 1, high: 161, weight: 75, mobile: 15621397301, email: "[email protected]", province: "浙江省", city: "台州市"},
{name: "王五", age: 82, gender: 1, high: 170, weight: 72, mobile: 15684572039, email: "[email protected]", province: "安徽省", city: "六安市"},
{name: "赵六", age: 56, gender: 2, high: 166, weight: 50, mobile: 15694331283, email: "[email protected]", province: "江苏省", city: "苏州市"}
], exportData = [];
//先将标题前三行空出来
exportData.push.apply(exportData, [{}, {}, {}]);
//追加员工数据
exportData.push.apply(exportData, data);
//合并参数
let mergeConf = LAY_EXCEL.makeMergeConfig([
['A1', 'I1'],
['A2', 'A3'],
['F2', 'F3'],
['G2', 'G3'],
['B2', 'E2'],
['H2', 'I2']
]);
//导出数据
LAY_EXCEL.exportExcel(exportData, '导出测试.xlsx', 'xlsx', {
extend: {
'!merges': mergeConf,
}
});
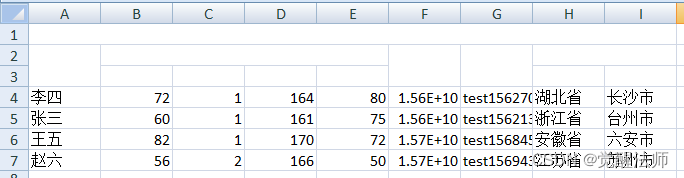
}此时点击导出,则可看到每列对应数据了,如下图:
3.4 添加样式
咱们先定义commonStyle公共样式属性,再定义getCellStyle()函数,用来返回所有对应字段的样式。然后通过lay-excel的filterExportData()辅助函数,来梳理导出的数据,包括字段排序和多余数据过滤。代码如下:
exportEvent(){
    var data = [
        {name: "李四", age: 72, gender: 1, high: 164, weight: 80, mobile: 15627070182, email: "[email protected]", province: "湖北省", city: "长沙市"},
        {name: "张三", age: 60, gender: 1, high: 161, weight: 75, mobile: 15621397301, email: "[email protected]", province: "浙江省", city: "台州市"},
        {name: "王五", age: 82, gender: 1, high: 170, weight: 72, mobile: 15684572039, email: "[email protected]", province: "安徽省", city: "六安市"},
        {name: "赵六", age: 56, gender: 2, high: 166, weight: 50, mobile: 15694331283, email: "[email protected]", province: "江苏省", city: "苏州市"}
    ],
        //公共样式
        commonStyle = {
            font: {    sz: 12 },
            alignment: {
                vertical: "center",
                horizontal: "center"
            },
            border: {
                top: {style: 'thin', color: {rgb: '666666'}},
                bottom: {style: 'thin', color: {rgb: '666666'}},
                left: {style: 'thin', color: {rgb: '666666'}},
                right: {style: 'thin', color: {rgb: '666666'}}
            }
        },
        exportData = [];

    function getCellStyle(styleParam){
        let tmpData = {};
        ['name', 'age', 'gender', 'high', 'weight', 'mobile', 'email', 'province', 'city'].forEach(item => {
            tmpData[item] = function(value, line, data){
                return {
                    v: value,
                    s: {
                        ...commonStyle
                    }
                }
            }
        });
        return tmpData;
    }

    //梳理数据
    let dataList = LAY_EXCEL.filterExportData(data, getCellStyle());

    //先将标题前三行空出来
    exportData.push.apply(exportData, [{}, {}, {}]);
    //追加员工数据
    exportData.push.apply(exportData, dataList);

    //合并参数
    let mergeConf = LAY_EXCEL.makeMergeConfig([
        ['A1', 'I1'],
        ['A2', 'A3'],
        ['F2', 'F3'],
        ['G2', 'G3'],
        ['B2', 'E2'],
        ['H2', 'I2']
    ]);

    //导出数据
    LAY_EXCEL.exportExcel(exportData, '导出测试.xlsx', 'xlsx', {
        extend: {
            '!merges': mergeConf,
        }
    });
}
此时点击导出,则可看到填充数据位置字体居中,并有线框,如下图:
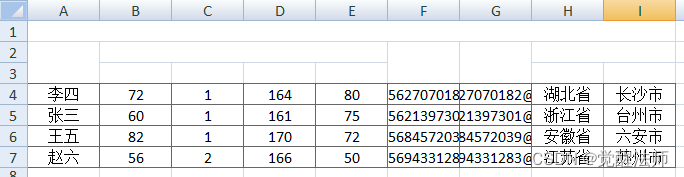
如上图会发现,手机号和邮箱地址的宽度不够,这个简单,使用lay-excel的makeColConfig()辅助函数来调整列宽即可。代码如下:
exportEvent(){
    var data = [
        {name: "李四", age: 72, gender: 1, high: 164, weight: 80, mobile: 15627070182, email: "[email protected]", province: "湖北省", city: "长沙市"},
        {name: "张三", age: 60, gender: 1, high: 161, weight: 75, mobile: 15621397301, email: "[email protected]", province: "浙江省", city: "台州市"},
        {name: "王五", age: 82, gender: 1, high: 170, weight: 72, mobile: 15684572039, email: "[email protected]", province: "安徽省", city: "六安市"},
        {name: "赵六", age: 56, gender: 2, high: 166, weight: 50, mobile: 15694331283, email: "[email protected]", province: "江苏省", city: "苏州市"}
    ],
        //公共样式
        commonStyle = {
            font: {    sz: 12 },
            alignment: {
                vertical: "center",
                horizontal: "center"
            },
            border: {
                top: {style: 'thin', color: {rgb: '666666'}},
                bottom: {style: 'thin', color: {rgb: '666666'}},
                left: {style: 'thin', color: {rgb: '666666'}},
                right: {style: 'thin', color: {rgb: '666666'}}
            }
        },
        exportData = [];

    function getCellStyle(styleParam){
        let tmpData = {};
        ['name', 'age', 'gender', 'high', 'weight', 'mobile', 'email', 'province', 'city'].forEach(item => {
            tmpData[item] = function(value, line, data){
                return {
                    v: value,
                    s: {
                        ...commonStyle
                    }
                }
            }
        });
        return tmpData;
    }

    //梳理数据
    let dataList = LAY_EXCEL.filterExportData(data, getCellStyle());

    //先将标题前三行空出来
    exportData.push.apply(exportData, [{}, {}, {}]);
    //追加员工数据
    exportData.push.apply(exportData, dataList);

    //合并参数
    let mergeConf = LAY_EXCEL.makeMergeConfig([
        ['A1', 'I1'],
        ['A2', 'A3'],
        ['F2', 'F3'],
        ['G2', 'G3'],
        ['B2', 'E2'],
        ['H2', 'I2']
    ]);
    //配置列宽
    let colConf = LAY_EXCEL.makeColConfig({
        F: 100,
        G: 150
    });

    //导出数据
    LAY_EXCEL.exportExcel(exportData, '导出测试.xlsx', 'xlsx', {
        extend: {
            '!merges': mergeConf,
            '!cols': colConf
        }
    });
}
将列F和列G分别设置为100px,150px,此时点击导出表格则非常美观了,效果图下:

3.5 填充标题数据
通过上面数据的渲染后,大家应该了解了表格中每列所对应的JSON数据中的字段了,所以定义标题是,将对应位置数据放到对应字段上即可。因为合并时,是自上往下,自左往右进行合并,除开始位置单元格数据,后面单元格会被覆盖,所以这里姓名,手机号,邮箱需放在第列行数据中。代码如下:
exportEvent(){
var titles = [
{name: "员工信息统计表"},
{name: "姓名", age: "基本信息", mobile: "手机号", email: "邮箱", province: "地址信息"},
{age: "年龄", gender: "性别", high: "身高", weight: "体重", province: "所在省", city: "所在市"}
],
data = [
{name: "李四", age: 72, gender: 1, high: 164, weight: 80, mobile: 15627070182, email: "[email protected]", province: "湖北省", city: "长沙市"},
{name: "张三", age: 60, gender: 1, high: 161, weight: 75, mobile: 15621397301, email: "[email protected]", province: "浙江省", city: "台州市"},
{name: "王五", age: 82, gender: 1, high: 170, weight: 72, mobile: 15684572039, email: "[email protected]", province: "安徽省", city: "六安市"},
{name: "赵六", age: 56, gender: 2, high: 166, weight: 50, mobile: 15694331283, email: "[email protected]", province: "江苏省", city: "苏州市"}
],
//公共样式
commonStyle = {
font: { sz: 12 },
alignment: {
vertical: "center",
horizontal: "center"
},
border: {
top: {style: 'thin', color: {rgb: '666666'}},
bottom: {style: 'thin', color: {rgb: '666666'}},
left: {style: 'thin', color: {rgb: '666666'}},
right: {style: 'thin', color: {rgb: '666666'}}
}
},
exportData = [];
function getCellStyle(styleParam){
let tmpData = {};
['name', 'age', 'gender', 'high', 'weight', 'mobile', 'email', 'province', 'city'].forEach(item => {
tmpData[item] = function(value, line, data){
return {
v: value,
s: {
...commonStyle
}
}
}
});
return tmpData;
}
//梳理数据
let titleList = LAY_EXCEL.filterExportData(titles, getCellStyle());
//梳理数据
let dataList = LAY_EXCEL.filterExportData(data, getCellStyle());
//先将标题前三行空出来
exportData.push.apply(exportData, titleList);
//追加员工数据
exportData.push.apply(exportData, dataList);
//合并参数
let mergeConf = LAY_EXCEL.makeMergeConfig([
['A1', 'I1'],
['A2', 'A3'],
['F2', 'F3'],
['G2', 'G3'],
['B2', 'E2'],
['H2', 'I2']
]);
//配置列宽
let colConf = LAY_EXCEL.makeColConfig({
F: 100,
G: 150
});
//导出数据
LAY_EXCEL.exportExcel(exportData, '导出测试.xlsx', 'xlsx', {
extend: {
'!merges': mergeConf,
'!cols': colConf
}
});
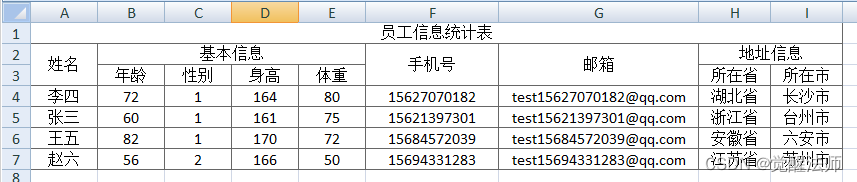
}此时点击导出,则可以看到对应标题了,效果如下:
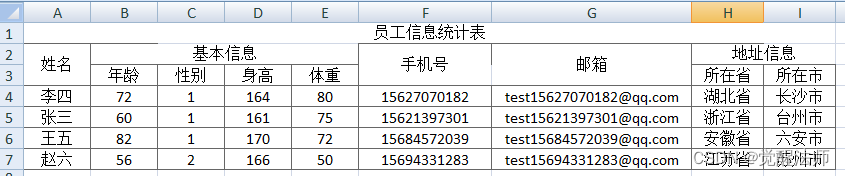
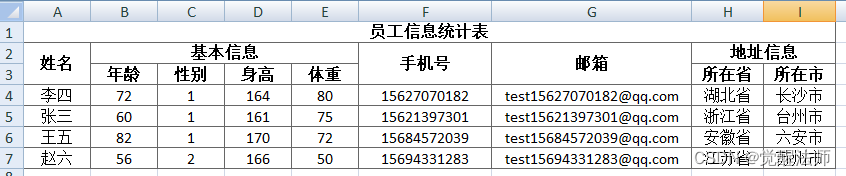
但是大家会发现,上图中线框并未画完整,这是因为每行中字段有缺失,只有从开始合并位置单元格有绘制线条。这问题解决也简单,在梳理标题数据位置,将缺失字段补充上并赋值为空即可。代码如下:
//梳理标题数据
let titleList = LAY_EXCEL.filterExportData((() => {
    let newArr = [];
    titles.forEach(item => {
        let tmpData = {};
        ['name', 'age', 'gender', 'high', 'weight', 'mobile', 'email', 'province', 'city'].forEach(key => {
            //补充缺失字段
            if('undefined'===typeof item[key]){
                tmpData[key] = '';
            }else{
                tmpData[key] = item[key];
            }
        });
        //创建新数据
        newArr.push(tmpData);
    });
    return newArr;
})(), getCellStyle());
在梳理标题数据时,将传入filterExportData()函数中数据通过 匿名函数重新组合,补充缺失部分,最后效果如下:
大家会发现,getCellStyle()函数和梳理标题数据的 匿名函数中,都使用到了所有字段数组,这里可略作修改,以便后期更方便维护,定义一个公共字段数组,代码如下:
exportEvent(){
var titles = [
{name: "员工信息统计表"},
{name: "姓名", age: "基本信息", mobile: "手机号", email: "邮箱", province: "地址信息"},
{age: "年龄", gender: "性别", high: "身高", weight: "体重", province: "所在省", city: "所在市"}
],
data = [
{name: "李四", age: 72, gender: 1, high: 164, weight: 80, mobile: 15627070182, email: "[email protected]", province: "湖北省", city: "长沙市"},
{name: "张三", age: 60, gender: 1, high: 161, weight: 75, mobile: 15621397301, email: "[email protected]", province: "浙江省", city: "台州市"},
{name: "王五", age: 82, gender: 1, high: 170, weight: 72, mobile: 15684572039, email: "[email protected]", province: "安徽省", city: "六安市"},
{name: "赵六", age: 56, gender: 2, high: 166, weight: 50, mobile: 15694331283, email: "[email protected]", province: "江苏省", city: "苏州市"}
],
//公共样式
commonStyle = {
font: { sz: 12 },
alignment: {
vertical: "center",
horizontal: "center"
},
border: {
top: {style: 'thin', color: {rgb: '666666'}},
bottom: {style: 'thin', color: {rgb: '666666'}},
left: {style: 'thin', color: {rgb: '666666'}},
right: {style: 'thin', color: {rgb: '666666'}}
}
},
keys = ['name', 'age', 'gender', 'high', 'weight', 'mobile', 'email', 'province', 'city'],
exportData = [];
function getCellStyle(styleParam){
styleParam = styleParam || {};
let tmpData = {};
keys.forEach(item => {
tmpData[item] = function(value, line, data){
return {
v: value,
s: {
...commonStyle,
...styleParam
}
}
}
});
return tmpData;
}
//梳理标题数据
let titleList = LAY_EXCEL.filterExportData((() => {
let newArr = [];
titles.forEach(item => {
let tmpData = {};
keys.forEach(key => {
//补充缺失字段
if('undefined'===typeof item[key]){
tmpData[key] = '';
}else{
tmpData[key] = item[key];
}
});
//创建新数据
newArr.push(tmpData);
});
return newArr;
})(), getCellStyle({
font: { sz: 12, bold: true }
}));
//梳理数据
let dataList = LAY_EXCEL.filterExportData(data, getCellStyle());
//略...
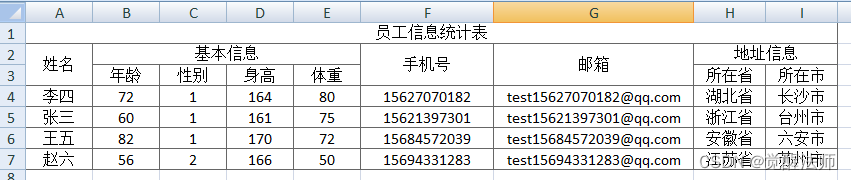
}3.6 修改标题样式
这里我们想给标题进行加粗,要如何实现呢。在前面已定义了getCellStyle()函数,这里我们可以通过传入新新式参数,将公共部分进行替换,代码如下:
exportEvent(){
    //略...

    function getCellStyle(styleParam){
        styleParam = styleParam || {};

        let tmpData = {};
        ['name', 'age', 'gender', 'high', 'weight', 'mobile', 'email', 'province', 'city'].forEach(item => {
            tmpData[item] = function(value, line, data){
                return {
                    v: value,
                    s: {
                        ...commonStyle,
                        ...styleParam
                    }
                }
            }
        });
        return tmpData;
    }

    //梳理标题数据
    let titleList = LAY_EXCEL.filterExportData((() => {
        let newArr = [];
        titles.forEach(item => {
            let tmpData = {};
            ['name', 'age', 'gender', 'high', 'weight', 'mobile', 'email', 'province', 'city'].forEach(key => {
                //补充缺失字段
                if('undefined'===typeof item[key]){
                    tmpData[key] = '';
                }else{
                    tmpData[key] = item[key];
                }
            });
            //创建新数据
            newArr.push(tmpData);
        });
        return newArr;
    })(), getCellStyle({
        font: { sz: 12, bold: true }
    }));
    //梳理数据
    let dataList = LAY_EXCEL.filterExportData(data, getCellStyle());

    //略...
}
效果图下: