目录
(1)使用 Winlogbeat 采集 Windows 事件日志上传 CLS
(2)使用 Filebeat 采集 Windows 文件日志
一、对象存储(COS)
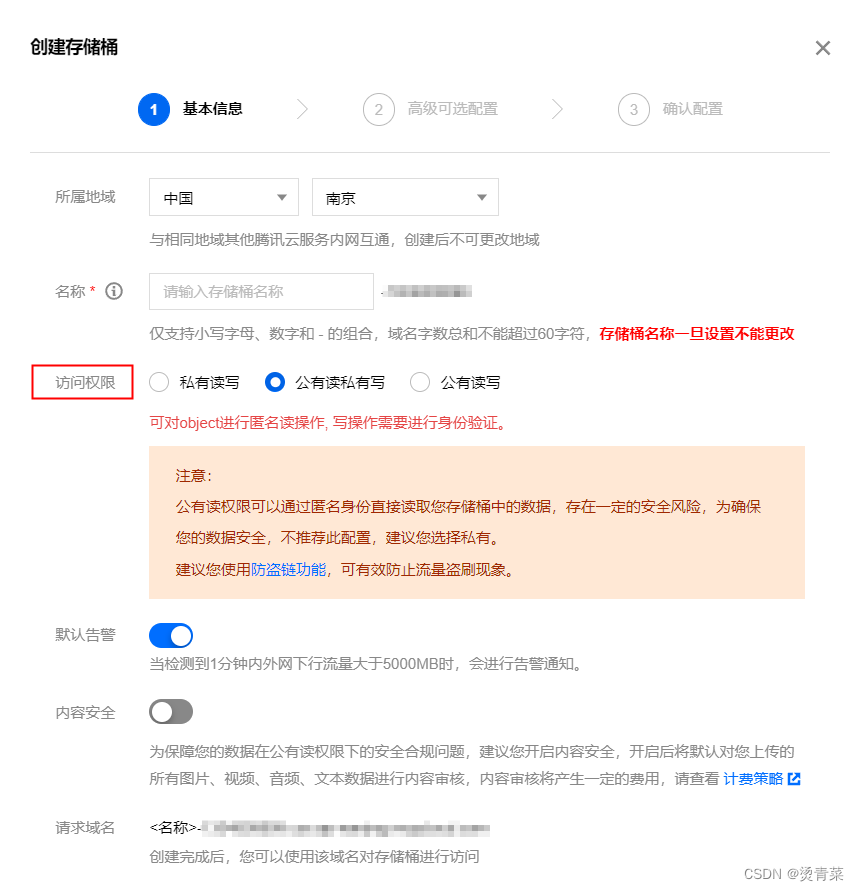
1.创建存储桶
首先需要在存储桶列表页面创建存储桶,需要注意的是所属地域(我选的北京)及访问权限的设置(该项之后可更改),比如我用对象存储是为了保存图片和视频,那么我需要通过图片或视频上传腾讯云后的路径直接来预览或者下载文件,那么此时“私有读写”就满足不了该需求。
(创建存储桶的操作也可通过代码实现)
创建完的存储桶列表:

2.下载并使用SDK
在https://console.cloud.tencent.com/cos/sdk页面下载所需要的sdk(我用的Unity,所以使用的是.NET SDK)。
将COSXMLDemo及QCloudCSharpSDK文件夹导入到Unity中(有报错的话删除COSXMLTests文件夹),COSXMLDemo/Program.cs功能很全面,考虑到上传视频可能会耗时,我使用的是异步的PutObject方法。
(1)异步上传(视频)
secretId及secretKey获取地址:访问密钥 - 控制台 (tencent.com)
region根据自己所属地域设置。
    public void UploadVideoAsync()
    {
       PutObject();
    }

    internal static async Task<String> PutObject()
    {
        string _bucket = "******";//修改项,存储桶名称
        string appid = "******";//修改项,设置腾讯云账户的账户标识 APPID,头像-账号信息中查看
        string key = "videos/test2.mp4";//修改项,对象在存储桶中的位置,即称对象键(个人理解为文件名称,要带后缀)
        string secretId = "******"; //修改项,云 API 密钥 SecretId
        string secretKey = "******"; //修改项,云 API 密钥 SecretKey
        string region = "ap-beijing";//修改项

        CosXmlConfig config = new CosXmlConfig.Builder()
    .SetConnectionTimeoutMs(60000)  //设置连接超时时间,单位毫秒,默认45000ms
    .SetReadWriteTimeoutMs(40000)  //设置读写超时时间,单位毫秒,默认45000ms
    .IsHttps(true)  //设置默认 HTTPS 请求
    .SetAppid(appid)
    .SetRegion(region)
    .Build();

        long durationSecond = 600;          //每次请求签名有效时长,单位为秒
        QCloudCredentialProvider qCloudCredentialProvider = new DefaultQCloudCredentialProvider(secretId,
          secretKey, durationSecond);

        CosXml cosXml = new CosXmlServer(config, qCloudCredentialProvider);

        //.cssg-snippet-body-start:[transfer-upload-file]
        // 初始化 TransferConfig
        TransferConfig transferConfig = new TransferConfig();

        // 初始化 TransferManager
        TransferManager transferManager = new TransferManager(cosXml, transferConfig);

        //对象在存储桶中的位置标识符,即称对象键
        String cosPath = key;
        //本地文件绝对路径
        String srcPath = @"D:\TALgit\UnityProgram\TengxunyunTest\Captures\videos.mp4";//本地文件绝对路径

        // 上传对象
        COSXMLUploadTask uploadTask = new COSXMLUploadTask(_bucket, cosPath);
        uploadTask.SetSrcPath(srcPath);

        uploadTask.progressCallback = delegate (long completed, long total)
        {
            Debug.Log(String.Format("progress = {0:##.##}%", completed * 100.0 / total));
        };

        try
        {
            COSXML.Transfer.COSXMLUploadTask.UploadTaskResult result = await
                transferManager.UploadAsync(uploadTask);
            Debug.Log(result.GetResultInfo());
            string eTag = result.eTag;
        }
        catch (Exception e)
        {
            Debug.Log("CosException: " + e);
        }

        return key;
    }
(2)同步上传(图片)
    public string appid = "";//设置腾讯云账户的账户标识 APPID
    public string bucket = "";//存储桶,格式:BucketName-APPID
    public string key = "";//对象在存储桶中的位置,即称对象键(文件名称,要带后缀)
    public string secretId = ""; //云 API 密钥 SecretId
    public string secretKey = ""; //云 API 密钥 SecretKey
    public string region = "";
    public void UploadObject()
    {
        CosXmlConfig config = new CosXmlConfig.Builder()
      .SetConnectionTimeoutMs(60000)  //设置连接超时时间,单位毫秒,默认45000ms
      .SetReadWriteTimeoutMs(40000)  //设置读写超时时间,单位毫秒,默认45000ms
      .IsHttps(true)  //设置默认 HTTPS 请求
      .SetAppid(appid)
      .SetRegion(region)
      .Build();

        long durationSecond = 600;          //每次请求签名有效时长,单位为秒
        QCloudCredentialProvider qCloudCredentialProvider = new DefaultQCloudCredentialProvider(secretId,
          secretKey, durationSecond);

        CosXml cosXml = new CosXmlServer(config, qCloudCredentialProvider);

        try
        {
            string srcPath = @"C:\Users\meinv\Desktop\testPanda.png";//本地文件绝对路径
            if (!File.Exists(srcPath))
            {
                // 如果不存在目标文件,创建一个临时的测试文件
                //File.WriteAllBytes(srcPath, new byte[1024]);
                Debug.Log("文件不存在");
                return;
            }

            PutObjectRequest request = new PutObjectRequest(bucket, key, srcPath);
            //设置签名有效时长
            request.SetSign(TimeUtils.GetCurrentTime(TimeUnit.Seconds), 600);
            //设置进度回调
            request.SetCosProgressCallback(delegate (long completed, long total)
            {
                Debug.Log(String.Format("progress = {0:##.##}%", completed * 100.0 / total));
            });
            //执行请求
            PutObjectResult result = cosXml.PutObject(request);
            //对象的 eTag
            string eTag = result.eTag;

            Debug.Log(result.GetResultInfo() + "," + result.crc64ecma);
            //url地址
            Debug.Log("https://" + bucket + ".cos." + region + ".myqcloud.com/" + key);
        }
        catch (COSXML.CosException.CosClientException clientEx)
        {
            //请求失败
            Debug.Log("CosClientException: " + clientEx);
        }
        catch (COSXML.CosException.CosServerException serverEx)
        {
            //请求失败
            Debug.Log("CosServerException: " + serverEx.GetInfo());
        }
    }
(3)获取文件在腾讯云的url
"https://" + bucket + ".cos." + region + ".myqcloud.com/" + key二、日志上报(CLS)
日志上报没有.Net的SDK,可通过API和第三方工具两种接入方式。本人尝试通过API接入鉴权一直不过,咨询官方人员,建议使用第三方工具。
我先把API接入需要的文档列出来(可自行尝试):
1.创建日志主题
在日志主题 - 日志服务 - 控制台 (tencent.com)页面创建,没什么注意的。此时我们获得了日志主题ID和日志集ID。
2.使用第三方工具上传日志
官方文档在这里。
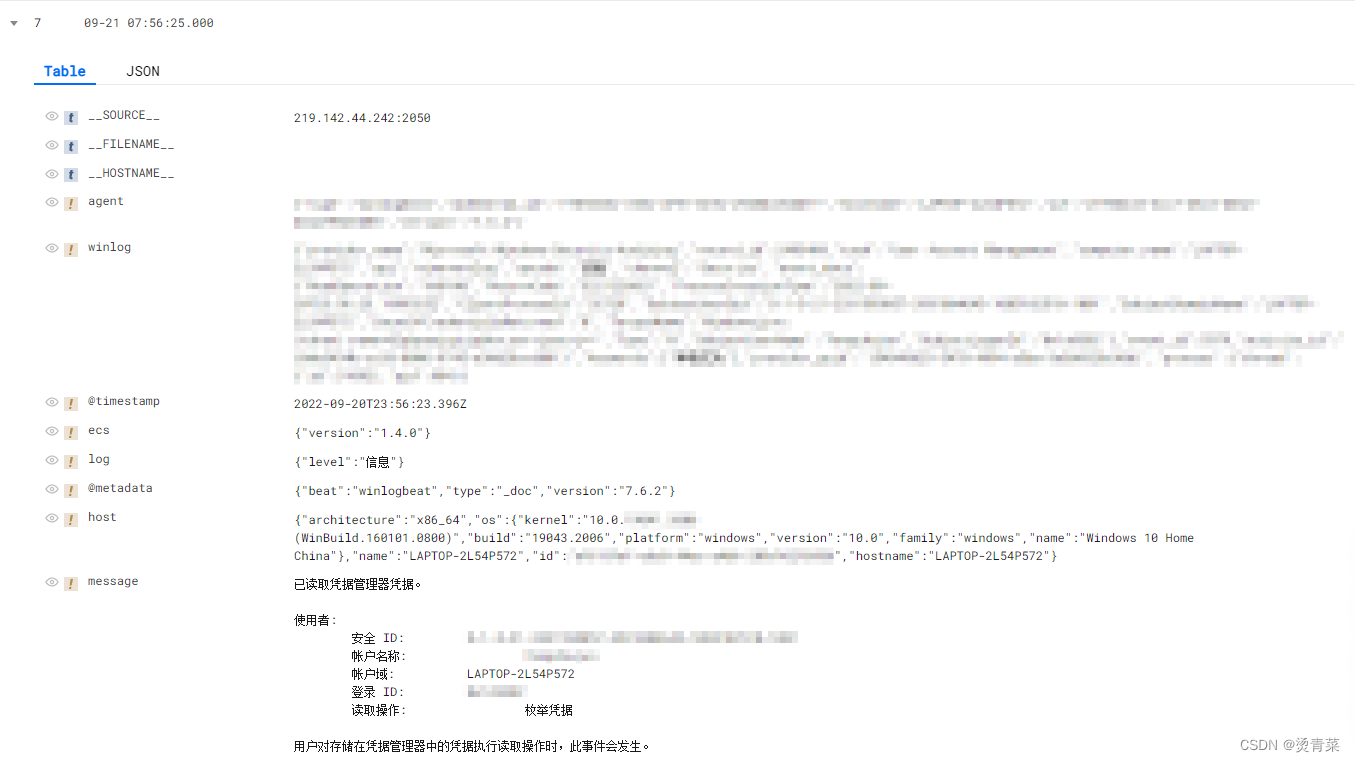
(1)使用 Winlogbeat 采集 Windows 事件日志上传 CLS
先说结论:初步尝试后不提倡运用Winlogbeat,因为它基于事件日志上传,很多我不需要的数据也给我传了上去。
首先我跟着官方文档安装了Winlogbeat,并且修改了winlogbeat.yml,但是我如何上传我需要的数据呢?这就需要使用 Kafka 协议上传日志,文档在这里.代码我也列一下,主要修改了数据上传测试那一部分。
需要用到kafka插件:KafKaForUnity.unitypackage-其它文档类资源-CSDN文库
void kafkaTest()
{
var config = new ProducerConfig
{
BootstrapServers = "bj-producer.cls.tencentcs.com:9096",//域名参考 https://cloud.tencent.com/document/product/614/18940#Kafka 填写,注意内网端口9095,公网端口9096
SaslMechanism = SaslMechanism.Plain,
SaslUsername = "***", // todo topic所属日志集ID
SaslPassword = "***#***", // todo topic所属uin的密钥
SecurityProtocol = SecurityProtocol.SaslPlaintext,
Acks = Acks.None, // todo 根据实际使用场景赋值。可取值: Acks.None、Acks.Leader、Acks.All
MessageMaxBytes = 5242880 // todo 请求消息的最大大小,最大不能超过5M
};
// deliveryHandler
Action<DeliveryReport<string, string>> handler =
r => Debug.Log(!r.Error.IsError ? $"Delivered message to {r.TopicPartitionOffset}" : $"Delivery Error: {r.Error.Reason}");
using (var produce = new ProducerBuilder<string, string>(config).Build())
{
try
{
// todo 测试验证代码
for (var i = 0; i < 3; i++)
{
// todo 替换日志主题ID
produce.Produce("***", new Message<string, string> { Key = "test", Value = "C# demo value" }, handler);
}
produce.Flush(TimeSpan.FromSeconds(10));
}
catch (ProduceException<string, string> pe)
{
Debug.Log($"send message receiver error : {pe.Error.Reason}");
}
}
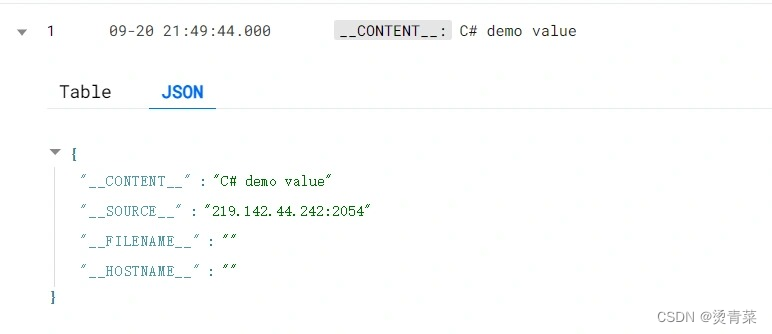
}but!传到腾讯云的结果没有key,只有value,而且我要上传的数据不止这一个,我希望以json的形式上传到腾讯云,但是尝试了一下并不行(也可能是我不行?但我不想承认)。
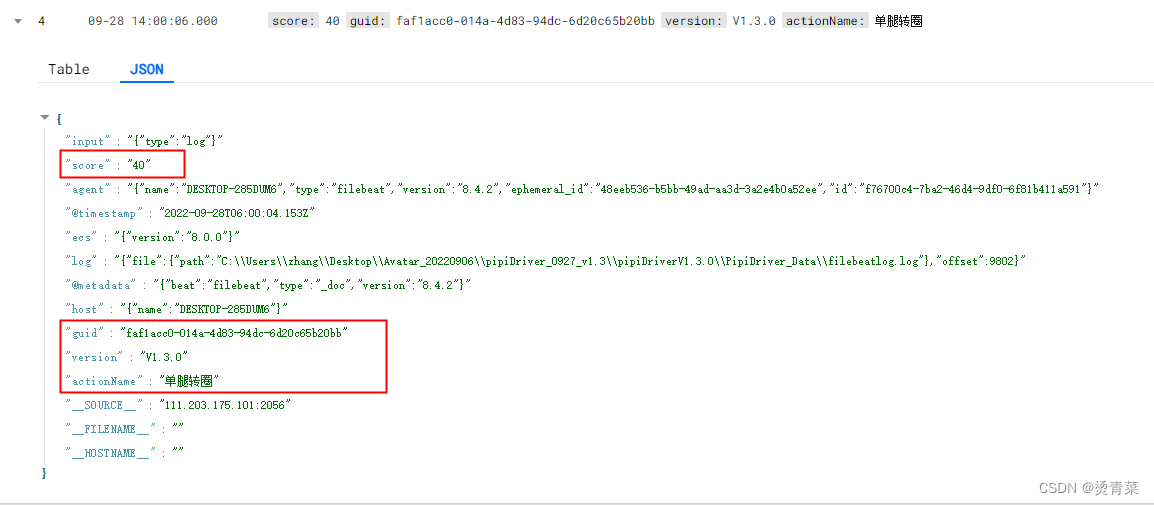
(2)使用 Filebeat 采集 Windows 文件日志
同志们!这个就yyds了!先上结果,红框中的就是我传的数据。
具体操作还是跟着官方文档,下载好filebeat并安装,修改filebeat.yml,因为我是采集文件中的数据,所以我的filebeat.yml是这样写的(可根据自己的需求,参照filebeat.reference.yml文档实现):
# ============================== Filebeat inputs ===============================
filebeat.inputs:
- type: log
  enabled: true
  paths:
    #- /var/log/*.log
    - C:/Users/fengchujun/Desktop/filebeatlog.log   #TODO 日志文件路径
  encoding: utf-8
  json.keys_under_root: true


# ================================== Outputs ===================================
output.kafka:
  enabled: true
  hosts: ["bj-producer.cls.tencentcs.com:9096"] # TODO 服务地址;外网端口9096,内网端口9095
  topic: "***" #  TODO topicID
  version: "0.11.0.2"
  compression: "lz4"   # 配置压缩方式,支持gzip,snappy,lz4;例如"lz4"
  username: "***"
  password: "***#***"


# ================================= Processors =================================
processors:
   - decode_json_fields:
      fields: ["message"]
      process_array: false
      max_depth: 1
      target: "json"
      overwrite_keys: true
注意:
1.json.keys_under_root设置为true后,上传到腾讯云后才能让字段位于根节点。
2.filebeat.yml编写或者修改时,注意字段是有父子层级的,所以有的字段前面要有空格。
3.filebeatlog.log文件日志,以json形式上传时,每一个json字符串为一行之后要换行。

unity往日志文件写json就好弄了:
    public class JsonObj {
        public string actionName;
        public string guid;
        public float score;
        public string version;
    }
    /// <summary>
    /// 上传腾讯云的日志
    /// </summary>
    /// <param name="message"></param>
    public static void WriteIntoQCloudlog(string actionName, string guid, float score)
    {
        JsonObj jsonObj = new JsonObj();
        jsonObj.actionName = actionName;
        jsonObj.guid = guid;
        jsonObj.score = score;
        jsonObj.version = version;
        string message = JsonUtility.ToJson(jsonObj);

        StreamWriter writer;
        FileInfo file = new FileInfo(Application.dataPath + "/filebeatlog.log");


        if (!file.Exists)
        {
            writer = file.CreateText();
        }
        else
        {
            writer = file.AppendText();
        }
        writer.WriteLine(message);
        writer.Flush();
        writer.Dispose();
        writer.Close();
    }
最后再说一个不明觉厉的点:安装好filebeat后,开机会自启动,自动上传日志,所以不用我们每次都手动在windowspowershell中启动服务了~