可在系列教程的基础上继续开发,也可以单独使用
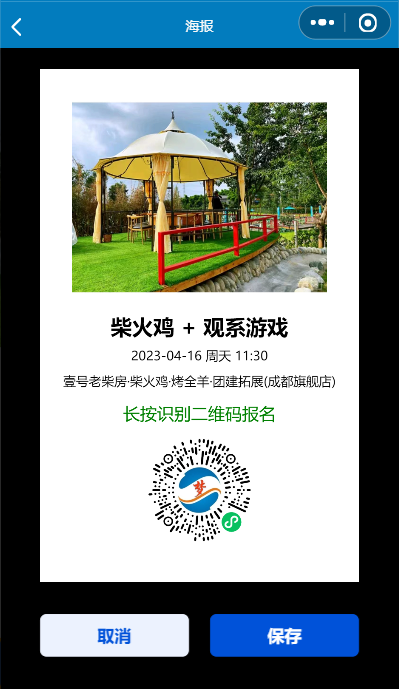
效果预览
代码实现
点击触发生成海报
在活动详情页,指定点击某图标/按钮,触发跳转到生成海报的页面
pages\components\party\detail\index.js
  getPoster() {


    let detail = this.data.detail
    wx.navigateTo({


      url: '/pages/components/poster/index',
      success: function (res) {


        // 跳转页面时,将活动详情传递过去
        res.eventChannel.emit('sendData', {


          data: detail
        })
      }
    })
  },
海报页加载时接收参数,开始生成海报
pages\components\poster\index.js
  onLoad() {


    let that = this
    // 接收列表页传入的复杂数据--对象(详情)
    const eventChannel = this.getOpenerEventChannel()
    eventChannel.on('sendData', function (res) {


      that.setData({


        detail: res.data
      })
      wx.showLoading({


        title: '生成中',
      })
      //开始生成海报
      that.getPoster()
    })
  },
海报的绘制过程
海报通过Canvas进行绘制
1. 获取系统屏幕宽高,确定画布的宽高
  // 生成海报
  getPoster() {


    let that = this
    // 获取屏幕宽高
    wx.getSystemInfo({


      success(res) {


        that.drawCanvas(res.windowWidth, res.windowHeight)
      }
    })
  },
2. 创建Canvas对象,进行绘制,并生成图片
详见代码中的注释
<canvas class="canvasClass" id="mycanvas" type="2d" />
Page {


  background-color: black;
}

.canvasClass {


  width: 80%;
  height: 80vh;
  margin: 40rpx auto
}
  // 绘制海报
  drawCanvas(windowWidth, windowHeight) {


    let that = this;
    let detail = this.data.detail
    // 根据id查找到页面中的 canvas 标签,生成 Canvas 对象
    wx.createSelectorQuery()
    // # 后为页面中的 canvas 标签的 id 属性
      .select('#mycanvas')
      .fields({


        node: true,
        size: true
      })
      .exec(async (res) => {


        // 获取到 Canvas 对象
        const canvas = res[0].node
        // 渲染上下文
        const ctx = canvas.getContext('2d')

        // Canvas 画布的实际绘制宽高
        const width = windowWidth
        const height = windowHeight

        // 获取设备像素比
        const dpr = wx.getWindowInfo().pixelRatio

        // 清空画布
        ctx.clearRect(0, 0, width, height)

        // 初始化画布大小
        canvas.width = width * dpr
        canvas.height = height * dpr
        ctx.scale(dpr, dpr)

        // 绘制画布底色
        ctx.fillStyle = "white";
        ctx.fillRect(0, 0, canvas.width, canvas.height);

        // 解析活动封面图片
        let posterImgURL = detail.poster
        // 获取源图片宽高
        let posterImgInfo = await that.getImgInfo(posterImgURL)
        // 计算源图片的宽高比
        let posterImgRate = posterImgInfo.width / posterImgInfo.height
        // 计算出新的图片宽高(此处以宽为基准,按80%的宽等比例缩放图片)
        let newWidth = 0.8 * width
        let newHeight = 0.8 * width / posterImgRate

        // 绘制文本 -- 水平居中(活动名称)
        let text1 = detail.title;
        ctx.fillStyle = "black";
        ctx.font = "bold 25px 微软雅黑";
        let y1 = width / 10 + newHeight + 50
        ctx.fillText(text1, that.getTextxPosition(ctx, width, text1), y1);

        // 绘制文本 -- 水平居中(活动时间)
        let text2 = detail.date + ' ' + detail.week + ' ' + detail.time
        ctx.font = "15px 微软雅黑";
        let y2 = y1 + 30
        ctx.fillText(text2, that.getTextxPosition(ctx, width, text2), y2);

        // 绘制文本 -- 水平居中(活动地点)
        let text3 = detail.placeMark || detail.placeInfo.title
        ctx.font = "15px 微软雅黑";
        let y3 = y2 + 30
        ctx.fillText(text3, that.getTextxPosition(ctx, width, text3), y3);

        // 绘制文本 -- 水平居中
        let codeTips = "长按识别二维码报名";
        ctx.font = "20px bold";
        ctx.fillStyle = "green";
        let y4 = y3 + 40
        ctx.fillText(codeTips, that.getTextxPosition(ctx, width, codeTips), y4);

        // 绘制图片--活动封面图片
        let posterImg = canvas.createImage()
        posterImg.src = posterImgURL
        posterImg.onload = async () => {


          ctx.drawImage(posterImg, (width - newWidth) / 2, width / 10, newWidth, newHeight)

          // 绘制图片--小程序二维码
          const codeImg = canvas.createImage()
          // 异步生成小程序二维码
          codeImg.src = await that.initCodeImg()
          codeImg.onload = () => {


            let y5 = y4 + 20
            ctx.drawImage(codeImg, width / 3, y5, width / 3, width / 3)

            // 生成图片
            wx.canvasToTempFilePath({


              canvas,
              success: res => {


                wx.hideLoading()
                that.setData({


                  // 生成的图片临时文件路径
                  tempFilePath: res.tempFilePath
                })
              },
            })
          }
        }
      })
  },
技术要点一:画布的最终大小需要按设备像素比进行转换
        // Canvas 画布的实际绘制宽高
        const width = windowWidth
        const height = windowHeight

        // 获取设备像素比
        const dpr = wx.getWindowInfo().pixelRatio

        // 初始化画布大小
        canvas.width = width * dpr
        canvas.height = height * dpr
        ctx.scale(dpr, dpr)
技术要点二:需先清空画布后绘制底色
- 为避免多次渲染导致累积层叠绘制,每次都需清空画布
- 若未绘制底色,则最终保存的海报会是透明的(若想生成背景透明的海报,请删除绘制画布底色的代码)
        // 清空画布
        ctx.clearRect(0, 0, width, height)

        // 绘制画布底色
        ctx.fillStyle = "white";
        ctx.fillRect(0, 0, canvas.width, canvas.height);
技术要点三:保持图片的宽高比
        // 解析活动封面图片
        let posterImgURL = detail.poster
        // 获取源图片宽高
        let posterImgInfo = await that.getImgInfo(posterImgURL)
        // 计算源图片的宽高比
        let posterImgRate = posterImgInfo.width / posterImgInfo.height
        // 计算出新的图片宽高(此处以宽为基准,按80%的宽等比例缩放图片)
        let newWidth = 0.8 * width
        let newHeight = 0.8 * width / posterImgRate
此处需要异步解析图片,获取源图片的宽高,来计算宽高比
  // 获取图片信息
  getImgInfo(imgURL) {


    return new Promise((reslove) => {


      wx.getImageInfo({


        src: imgURL,
        success(res) {


          reslove(res);
        }
      })
    })
  },
通过返回 Promise ,方便借助 async和 await 将异步变同步,避免过多的代码嵌套。
技术要点四:绘制水平居中的文字
        // 绘制文本 -- 水平居中(活动名称)
        let text1 = detail.title;
        ctx.fillStyle = "black";
        ctx.font = "bold 25px 微软雅黑";
        let y1 = width / 10 + newHeight + 50
        ctx.fillText(text1, that.getTextxPosition(ctx, width, text1), y1);
- fillText 的参数依次为:文本内容、文本的 x 坐标,文本的 y 坐标
- 水平居中的 x 坐标计算方法为:
(画布宽度-文本宽度)/ 2
  // 获取居中文本的x坐标
  getTextxPosition(ctx, ctxWidth, text) {


    let textWidth = ctx.measureText(text).width;
    let xPosition = ctxWidth / 2 - textWidth / 2;
    return xPosition
  },
技术要点五:绘制图片
        // 绘制图片--活动封面图片
        let posterImg = canvas.createImage()
        posterImg.src = posterImgURL
        posterImg.onload = () => {


          ctx.drawImage(posterImg, (width - newWidth) / 2, width / 10, newWidth, newHeight)
        }
- 图片若是网络图片,则需等其异步加载完成后再绘制,所以后续生成图片等操作,都需在图片的 onload 函数中执行
技术要点六:生成小程序二维码
  // 生成小程序二维码
  async initCodeImg() {


    let {


      codeImgURL
    } = this.data

    if (!codeImgURL) {


      // 生成小程序二维码
      let codeImgID = await this.getCodeImg()
      // 云存储的图片,需要通过云id去换取外网访问链接
      let result = await wx.cloud.getTempFileURL({


        fileList: [codeImgID]
      })
      codeImgURL = result.fileList[0].tempFileURL
    }

    return codeImgURL
  },
  // 通过云函数,生成小程序二维码
  getCodeImg() {


    let detail = this.data.detail
    let params = detail._id
    return new Promise((resolve) => {


      wx.cloud.callFunction({


        name: 'get_codeImg', // 云函数的名称
        data: {


          // 页面路径
          path: 'pages/components/party/detail/index',
          // 参数
          params: params
        }
      }).then(res => {


        // 从云函数返回的结果中提取出目标数据
        resolve(res.result.fileID);
      })
    })
  },
云函数–生成小程序二维码
此处自定义的云函数名称为 get_codeImg
cloudfunctions\get_codeImg\index.js
// 云函数入口文件
const cloud = require('wx-server-sdk')

cloud.init({


  env: cloud.DYNAMIC_CURRENT_ENV
}) // 使用当前云环境

// 云函数入口函数
exports.main = async (event, context) => {


  const wxacodeResult = await cloud.openapi.wxacode.getUnlimited({


    // 页面路径
    page: event.path,
    // 参数
    scene: event.params,
  })
  let suffix = event.path.replace(/\//g, '_') + '_' + event.params
  // 在云存储生成图片
  const uploadResult = await cloud.uploadFile({


    // 图片存储路径
    cloudPath: `codeImgs/wxacode_${

      suffix}.jpg`,
    fileContent: wxacodeResult.buffer,
  })
  return uploadResult
}
- 此处需注意,因参数通过 scene 场景值传递(且scene限定了长度,刚好和默认的 _id 值等长),在目标页面需添加代码识别该参数
  onLoad(options) {


    // 通过id获取详情(扫描小程序二维码时,id在scene里 )
    let id = options.id || options.scene
    if (id) {


      this.setData({


        id: id
      })
      this.getDetail()
      return
    }
}
技术要点七:将canvas转换为图片
此步可在 canvas 绘制后执行,也可以在点击保存海报时在执行
            // 生成图片
            wx.canvasToTempFilePath({


              canvas,
              success: res => {


                that.setData({


                  // 生成的图片临时文件路径
                  tempFilePath: res.tempFilePath
                })
              },
            })
保存图片到手机
点击保存按钮时执行

<view class="btnBanner">
  <t-button style="margin-right: 40rpx;" block theme="light" capture-bind:tap="cancel" size="medium">取消</t-button>
  <t-button block capture-bind:tap="saveImg" theme="primary" size="medium">保存</t-button>
</view>
.btnBanner {


  padding-top: 20rpx;
  display: flex;
  justify-content: space-evenly;
  margin: 0rpx 10%;
}
  //保存到手机相册
  saveImg() {


    wx.saveImageToPhotosAlbum({


      filePath: this.data.tempFilePath,
      success(res) {


        wx.showToast({


          title: '已保存到相册',
          icon: 'success',
          duration: 3000
        })
      }
    })
  },
  // 取消
  cancel() {


    wx.navigateBack()
  },
注意事项
- 不同的海报,内容和布局不同,需要修改对应的 canvas 绘制代码
更多技巧
canvas 系列教程
微信小程序的 canvas 绘制已与 web 中 canvas 的绘制统一,相关的绘制技术,可参考
-
01——直线、三角形、多边形、矩形、调色板_canvas调色板
https://blog.csdn.net/weixin_41192489/article/details/124333306 -
02——圆、弧线、圆角矩形、曲线(气泡、心形、N叶草)、扇形_canvas 半圆矩形
https://blog.csdn.net/weixin_41192489/article/details/124339528 -
03 —— 线的样式、绘制文本、操作图片(图片的渲染、缩放、裁剪、切割、平铺、特效)、变换元素(平移、缩放、旋转)_canvas putimagedata 缩放
https://blog.csdn.net/weixin_41192489/article/details/124347589 -
04 —— 渐变、阴影、路径、状态、Canvas对象、图形重叠模式_canvas strokerect
https://blog.csdn.net/weixin_41192489/article/details/124375153 -
05 ——交互、动画_canvas 交互
https://blog.csdn.net/weixin_41192489/article/details/124388436 -
06 ——边界检测、碰撞检测_canvas碰撞检测
https://blog.csdn.net/weixin_41192489/article/details/124407221 -
07 ——捕获、拖拽、抛掷、缓动动画、弹性动画_canvas管道动画
https://blog.csdn.net/weixin_41192489/article/details/124415085