特别说明:本次项目整合基于idea进行的,如果使用Eclipse可能操作会略有不同,不过总的来说不影响。
springboot整合mybatis-plus+durid数据库连接池
springboot整合之logback日志配置
springboot整合pagehelper分页
springboot整合本地缓存
springboot整合redis + redisson
springboot整合elasticsearch
springboot整合rabbitMq
springboot整合canal
springboot整合springSecurity(前后端不分离版本)
一、为什么要使用Validated进行参数校验
1.为什么要进行参数校验
在开发中我们为什么要进行参数校验了?作为一个后端开发人员,我觉得我们应该时刻提醒自己所有的前端传进来的参数都有可能是会出错的;所有的调用方传来的参数都有可能会出错的。所以为了保证我们程序运行的健壮性,我们必须对传进来的每一个参数进行合法性的校验。
通过参数合法性的校验我们可以避免很多非法的请求,像之前我在工作的时候会遇到别人恶意攻击我们的网站,就比如一个获取用户基本信息的接口,如果你是通过ID获取,那么别人就会拿着ID进行累加或者使用负数通过缓存穿透来达到攻击的目的,这个时候我们就能够通过进行参数合法性的校验来避免部分的缓存穿透。例如我们的接口是这样的 user/{id},那么按照正常的访问应该是user/1;user/2;这样用户在请求后我们会把用户信息进行缓存下次当再有请求为user/1时,请求就会从缓存中获取而不会再访问数据库了。这样以来我们系统的承载能力就会有所提升。但是如果别人恶意攻击我们的网站他的访问路径为user/-1。那么在这种情况下,如果我们不缓存空值就会造成缓存穿透,如果我们进行了参数校验,就可以在源头上解决这个问题。比如我们经常用到的布隆过滤器其实就类似于参数校验。
还有就是通过参数校验我们可以保证程序的健壮性,比如你接收的是一个集合,如果传来的参数是空,但是你在下面进行了遍历,那这种情况下就会出现NPE(空指针)异常。所以通过参数校验也能很大程度的避免不必要的错误,保证程序运行的健壮性。
2.为什么要使用Validated进行参数校验
至于为什么要使用Validated进行参数校验其实也很简单,给大家看一下我们之前整合时的代码相信大家一眼就能看出来了。为了演示我没有把校验中用到的数字抽取成常量,大家开发中把这些常量定义到常量类就好了。我这里就是为了展示校验的流程。
   /**
     * description: insertUser  插入用户信息<br>
     * @version: 1.0
     * @date: 2022/12/28 0028 下午 2:41
     * @author: William
     * @param user   用户信息
     * @return com.example.springbootdemo.common.response.Result
     */
    @ApiOperation(value = "插入用户信息")
    @PostMapping
    @Transactional(rollbackFor = Exception.class)
    public Result insertUser(@RequestBody User user){
        //参数校验
        if(user == null){
            throw new MyException(ErrorCodeEnum.ILLEGAL_VALUE);
        }
        //判断用户名不能为空且长度不能大于20
        if(StrUtil.isBlank(user.getUserName()) || user.getUserName().length()>20){
            throw new MyException(ErrorCodeEnum.USER_NAME_ILLEGAL);
        }
        //判断密码不能为空且长度在6到20之间
        if(StrUtil.isBlank(user.getPassword()) || user.getPassword().length()>20 || user.getPassword().length()<6){
            throw new MyException(ErrorCodeEnum.PASSWORD_ILLEGAL);
        }
        //其余参数校验。。。。。
        boolean flag = userService.save(user);
        return flag?Result.ok():Result.error(ErrorCodeEnum.OPERATION_FAILED);
    }
可以看到,我们在一个用户插入时判断就占了很多行代码,如果再把手机号,头像一些必须的校验全部进行完估计几十行代码是有了。这里我们肯定会想如果能把校验的代码抽出来不是更优雅吗?对的,确实会优雅很多,而且我们工作中也经常这么做。在工作中我们通常会定义一个类作为插入信息的接收对象,然后把这个参数校验的方法直接写到参数校验的类里面就好了。这样调用起来也很优雅,而且维护起来也很方便。我个人也比较推荐这种方式。不过相比于我们的Validated进行参数校验还是不够优雅,如果使用Validated进行参数校验,我们只需要使用几个注解就能完成任务,相比于写方法会来的更加的优雅。接下来我们就来一步一步看一下怎么样来实现更加优雅的参数校验吧。
二、pom文件依赖引入
因为这个参数校验spring-boot-dependencies已经帮我们做了版本管理了,因为官方整合的进过测试还是不错的一个选择,所以我们不需要再进行版本设置了,具体依赖坐标如下。大家直接引入就行了。
<!-- 参数校验 -->
<dependency>
   <groupId>org.springframework.boot</groupId>
   <artifactId>spring-boot-starter-validation</artifactId>
</dependency>
三、常用注解说明
在开始使用之前我们先了解一下常用的注解,这些注解在开发中经常会用到,不熟悉的小伙伴可以收藏一下,这样不用每次用到都搜索一下了。这些也都比较简单,用上一段时间也就熟悉了。如果说下面的这些注解还不能够满足的话,那还可以通过正则表达式来取实现特殊的校验功能。
| 注解 | 说明 |
| @Null | 被注解的元素只允许为null |
| @NotNull | 被注解的元素不能为null,但可以为empty |
| @NotBlank | 被注解的字符串不为null,且字符串.trim()以后长度必须要大于0【相比于NotNull这个更常用】 |
| @NotEmpty | 限制集合对象的元素不为0,即集合不为空 |
| @Min | 被注解的元素必须是数字且必须小于等于指定值 |
| @Max | 被注解的元素必须是数字且必须大于等于指定值 |
| @Length | 被注解的元素必须在指定的范围内 |
| @Range | 被注解的元素可以是数字或者是数字的字符串必须在指定的范围内 |
| @Pattern(value) | 被注解的元素必须符合指定的正则表达式 |
| @size(max,min) | 被注解的元素字符长度必须在min到max之间 |
| @Past | 被注解的元素与当前日期相比必须是一个过去的日期 |
| @Future | 被注解的元素与当前日期相比必须是一个将来的日期 |
| @AssertFalse | 被注解的元素必须为false |
| @AssertTrue | 被注解的元素必须为true |
| @Digits(integer,fraction) | 被注解的元素必须为一个小数,且整数部分位数不能超过integer,小数部分的位数不能超过fraction |
| @DecimalMax(value) | 被注解的元素必须为一个不大于指定值的数字 |
| @DecimalMin(value) | 被注解的元素必须为一个不小于指定值的数字 |
| 被注解的元素必须是email地址 | |
| @URL | 被注解的元素必须是一个URL |
四、如何使用
1.controller接受数据时增加@Validated注解
这里是在原来的插入方法上进行的修改,只要在原来的接收参数前面新增@Validated注解就可以了,具体如下:
/**
     * description: insertUser  插入用户信息<br>
     * @version: 1.0
     * @date: 2022/12/28 0028 下午 2:41
     * @author: William
     * @param user   用户信息
     * @return com.example.springbootdemo.common.response.Result
     */
    @ApiOperation(value = "插入用户信息")
    @PostMapping
    @Transactional(rollbackFor = Exception.class)
    public Result insertUser(@Validated @RequestBody UserSaveVo user){
        User saveUser = new User();
        BeanUtil.copyProperties(user,saveUser);
        boolean flag = userService.save(saveUser);
        return flag?Result.ok():Result.error(ErrorCodeEnum.OPERATION_FAILED);
    }
2.实体类参数校验
因为之前是直接使用用户实体类不太好,所以新增了一个用户保存类。用于接收用户新增和修改的信息。
package com.example.springbootdemo.vo;

import io.swagger.annotations.ApiModelProperty;
import lombok.Data;

import javax.validation.constraints.*;
import java.io.Serializable;

/**
 * @description: UserSaveVo <br>
 * @date: 2023/1/3 0003 上午 10:24 <br>
 * @author: William <br>
 * @version: 1.0 <br>
 */
@Data
public class UserSaveVo implements Serializable {

    @ApiModelProperty(value = "用户ID")
    private Long id;

    @ApiModelProperty(value = "用户名")
    @NotBlank(message = "用户名不能为空")
    @Size(max = 20,message = "用户名长度不能超过20")
    private String userName;

    @ApiModelProperty(value = "密码")
    @NotBlank(message = "密码不能为空")
    @Size(min = 6,max = 20,message = "密码长度必须在6到20位之间")
    private String password;


    @ApiModelProperty(value = "性别")
    @NotNull(message = "性别非法")
    @Max(value = 2,message = "性别非法")
    @Min(value = 0,message = "性别非法")
    private Integer sex;


    @ApiModelProperty(value = "手机号")
    @Pattern(regexp = "^((13[0-9])|(14[5|7])|(15([0-3]|[5-9]))|(17[013678])|(18[0,5-9]))\\d{8}$",message = "手机号码不合法")
    private String phone;
}
好了,这两步完成以后我们的参数校验就修改好了,首先@Validated会告知系统当前参数要进行校验,被拦截后会根据校验对象里面每个属性的校验注解进行逐一的校验,如果不合法就会抛出import org.springframework.web.bind.MethodArgumentNotValidExceptio异常。
五、新增用户测试
到了这里我们就可以启动进行新增用户的测试了。

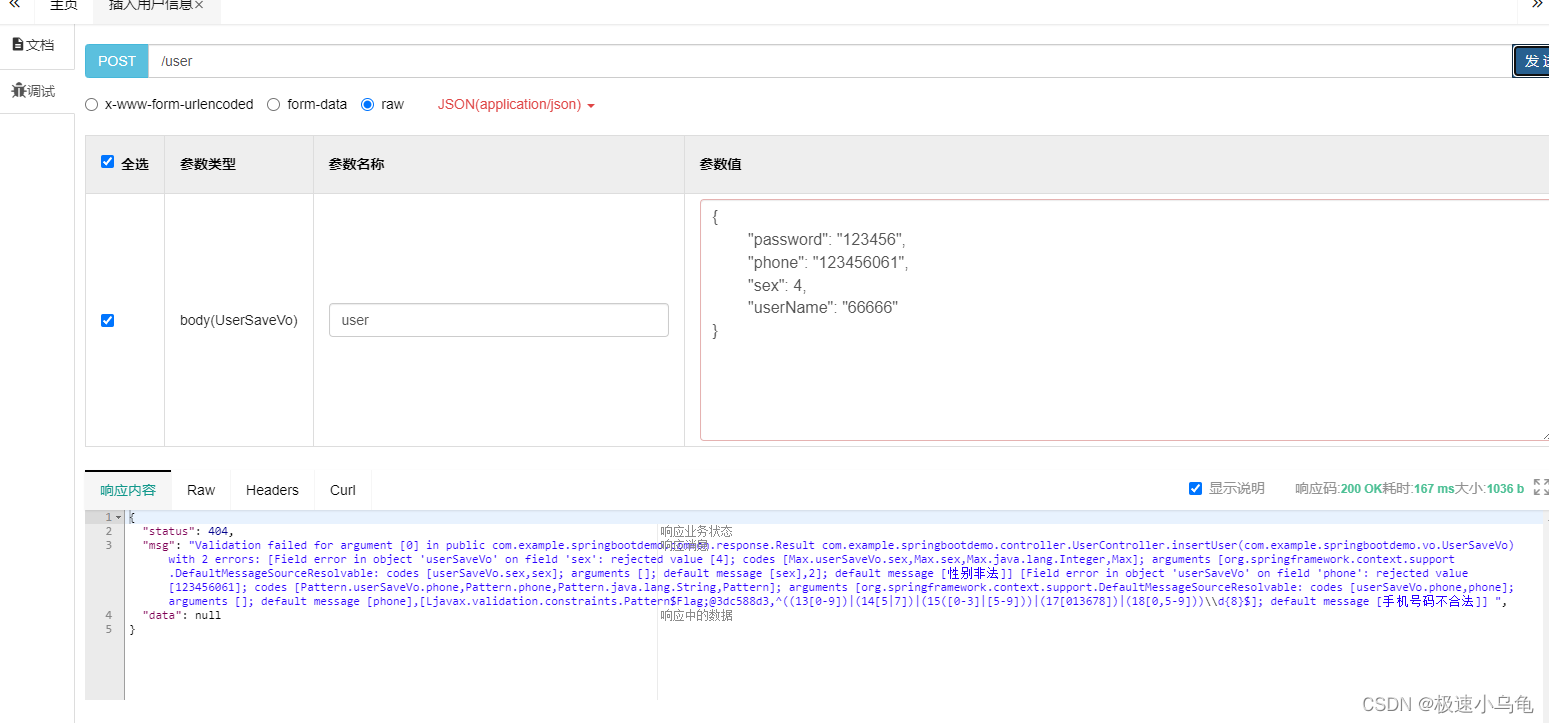
成功启动,然后我们访问用户新增接口进行测试

可以看到出现了如下错误信息:
{
  "status": 404,
  "msg": "Validation failed for argument [0] in public com.example.springbootdemo.common.response.Result com.example.springbootdemo.controller.UserController.insertUser(com.example.springbootdemo.vo.UserSaveVo) with 2 errors: [Field error in object 'userSaveVo' on field 'sex': rejected value [4]; codes [Max.userSaveVo.sex,Max.sex,Max.java.lang.Integer,Max]; arguments [org.springframework.context.support.DefaultMessageSourceResolvable: codes [userSaveVo.sex,sex]; arguments []; default message [sex],2]; default message [性别非法]] [Field error in object 'userSaveVo' on field 'phone': rejected value [123456061]; codes [Pattern.userSaveVo.phone,Pattern.phone,Pattern.java.lang.String,Pattern]; arguments [org.springframework.context.support.DefaultMessageSourceResolvable: codes [userSaveVo.phone,phone]; arguments []; default message [phone],[Ljavax.validation.constraints.Pattern$Flag;@3dc588d3,^((13[0-9])|(14[5|7])|(15([0-3]|[5-9]))|(17[013678])|(18[0,5-9]))\\d{8}$]; default message [手机号码不合法]] ",
  "data": null
}
可以看到不合法的参数都被拦截并且进行了提示。不过 这个信息对接口调用方来说确实不太友好。所以我们需要在全局统一异常处理类里面进行统一的拦截处理,使错误信息能够有好的返回给接口调用方。
六、使用全局统一异常处理参数校验异常
如果想要拦截处理异常,按照我们之前的逻辑,我们必须知道当前的异常属于哪一种异常。通过上面的报错信息我们可以看出,当校验参数不合法时会抛出org.springframework.web.bind.MethodArgumentNotValidException异常,所以我们只要对其进行拦截处理就好了。
package com.example.springbootdemo.common.advice;

import com.example.springbootdemo.common.enums.ErrorCodeEnum;
import com.example.springbootdemo.common.exception.MyException;
import com.example.springbootdemo.common.response.Result;
import lombok.extern.slf4j.Slf4j;
import org.springframework.context.support.DefaultMessageSourceResolvable;
import org.springframework.validation.BindingResult;
import org.springframework.web.bind.MethodArgumentNotValidException;
import org.springframework.web.bind.annotation.ControllerAdvice;
import org.springframework.web.bind.annotation.ExceptionHandler;
import org.springframework.web.bind.annotation.ResponseBody;


import java.util.stream.Collectors;


/**
 * description: BasicExceptionHandler 对系统报错进行统一处理。<br>
 * @date: 2022/12/27 0027 下午 3:27 <br>
 * @author: William <br>
 * @version: 1.0 <br>
 */
@Slf4j
@ControllerAdvice
public class BasicExceptionHandler {


    /**
     * description: errorHandler 处理算数运算异常<br>
     * @version: 1.0
     * @date: 2022/12/27 0027 下午 4:44
     * @author: William
     * @param exception 异常
     * @return com.example.springbootdemo.common.response.Result
     */
    @ResponseBody
    @ExceptionHandler(value = ArithmeticException.class)
    public Result errorHandler(ArithmeticException exception) {
        return Result.build(ErrorCodeEnum.OPERATION_FAILED.getValue(), "算数运算异常");
    }

    /**
     * description: errorHandler 处理自定义异常<br>
     * @version: 1.0
     * @date: 2022/12/27 0027 下午 3:32
     * @author: William
     * @param exception  自定义异常
     * @return java.util.Map<java.lang.String,java.lang.Object>
     */
    @ResponseBody
    @ExceptionHandler(value = MyException.class)
    public Result errorHandler(MyException exception) {
        return Result.error(exception.getErrorCodeEnum());
    }


    /**
     * description: errorHandler 参数校验异常处理<br>
     * @version: 1.0
     * @date: 2023/1/3 0003 上午 10:42
     * @author: William
     * @param exception  异常信息
     * @return com.example.springbootdemo.common.response.Result
     */
    @ResponseBody
    @ExceptionHandler(value = MethodArgumentNotValidException.class)
    public Result errorHandler(MethodArgumentNotValidException exception) {
        BindingResult bindingResult = exception.getBindingResult();
        //获取所有校验异常信息进行拼接返回
        String message = bindingResult.getAllErrors().stream().map(DefaultMessageSourceResolvable::getDefaultMessage).collect(Collectors.joining(","));
        return Result.build(ErrorCodeEnum.ILLEGAL_VALUE.getValue(),message);
    }


    /**
     * description: errorHandler 处理全局异常<br>
     * @version: 1.0
     * @date: 2022/12/27 0027 下午 3:37
     * @author: William
     * @param exception   异常
     * @return java.util.Map<java.lang.String,java.lang.Object>
     */
    @ResponseBody
    @ExceptionHandler(value = Exception.class)
    public Result errorHandler(Exception exception) {
        return Result.build(ErrorCodeEnum.OPERATION_FAILED.getValue(), exception.getMessage());
    }


}
然后我们再次重新启动进行测试

可以看到已经按照我们的期望返回了异常信息。
七、分组校验
在开发中我们还经常会遇到新增和修改用同一个类的。那这种我们应该怎么校验呢?因为新增和修改的字段是不一样的。就比如新增肯定没有ID,但是修改就必须有ID。这个时候就需要用到我们的分组校验。
1.定义新增和修改的接口
新增接口
package com.example.springbootdemo.common.validated;

/**
 * @description: Insert <br>
 * @date: 2023/1/3 0003 上午 11:18 <br>
 * @author: William <br>
 * @version: 1.0 <br>
 */
public interface InsertAction {

}
修改接口
package com.example.springbootdemo.common.validated;

/**
 * @description: UpdateAction <br>
 * @date: 2023/1/3 0003 上午 11:18 <br>
 * @author: William <br>
 * @version: 1.0 <br>
 */
public interface UpdateAction {
}
2.在controller参数校验上新增校验分组
    /**
     * description: insertUser  插入用户信息<br>
     * @version: 1.0
     * @date: 2022/12/28 0028 下午 2:41
     * @author: William
     * @param user   用户信息
     * @return com.example.springbootdemo.common.response.Result
     */
    @ApiOperation(value = "插入用户信息接口")
    @PostMapping
    public Result insertUser(@Validated(InsertAction.class) @RequestBody UserSaveVo user){
        User saveUser = new User();
        BeanUtil.copyProperties(user,saveUser);
        boolean flag = userService.save(saveUser);
        return flag?Result.ok():Result.error(ErrorCodeEnum.OPERATION_FAILED);
    }


    /**
     * description: updateUser 修改用户信息<br>
     * @version: 1.0
     * @date: 2023/1/3 0003 上午 11:42
     * @author: William
     * @param user  用户信息
     * @return com.example.springbootdemo.common.response.Result
     */
    @ApiOperation(value = "修改用户信息接口")
    @PutMapping
    public Result updateUser(@Validated(UpdateAction.class) @RequestBody UserSaveVo user){
        User saveUser = new User();
        BeanUtil.copyProperties(user,saveUser);
        boolean flag = userService.updateById(saveUser);
        return flag?Result.ok():Result.error(ErrorCodeEnum.OPERATION_FAILED);
    }
3.在实体类校验注解上新增检验分组
package com.example.springbootdemo.vo;

import com.example.springbootdemo.common.validated.InsertAction;
import com.example.springbootdemo.common.validated.UpdateAction;
import io.swagger.annotations.ApiModelProperty;
import lombok.Data;

import javax.validation.constraints.*;
import java.io.Serializable;

/**
 * @description: UserSaveVo <br>
 * @date: 2023/1/3 0003 上午 10:24 <br>
 * @author: William <br>
 * @version: 1.0 <br>
 */
@Data
public class UserSaveVo implements Serializable {

    @NotNull(groups = {UpdateAction.class},message = "用户ID不能为空")
    @ApiModelProperty(value = "用户ID")
    private Long id;

    @ApiModelProperty(value = "用户名")
    @NotBlank(groups = {UpdateAction.class, InsertAction.class}, message = "用户名不能为空")
    @Size(groups = {UpdateAction.class, InsertAction.class}, max = 20,message = "用户名长度不能超过20")
    private String userName;

    @ApiModelProperty(value = "密码")
    @NotBlank(groups = {UpdateAction.class, InsertAction.class},message = "密码不能为空")
    @Size(groups = {UpdateAction.class, InsertAction.class},
            min = 6,max = 20,message = "密码长度必须在6到20位之间")
    private String password;


    @ApiModelProperty(value = "性别")
    @NotNull(groups = {UpdateAction.class, InsertAction.class},message = "性别非法")
    @Max(groups = {UpdateAction.class, InsertAction.class},value = 2,message = "性别非法")
    @Min(groups = {UpdateAction.class, InsertAction.class},value = 0,message = "性别非法")
    private Integer sex;


    @ApiModelProperty(value = "手机号")
    @Pattern(groups = {UpdateAction.class, InsertAction.class},
            regexp = "^((13[0-9])|(14[5|7])|(15([0-3]|[5-9]))|(17[013678])|(18[0,5-9]))\\d{8}$",
            message = "手机号码不合法")
    private String phone;
}
好了,到这里我们的分组校验就完成了,可以启动进行测试了。
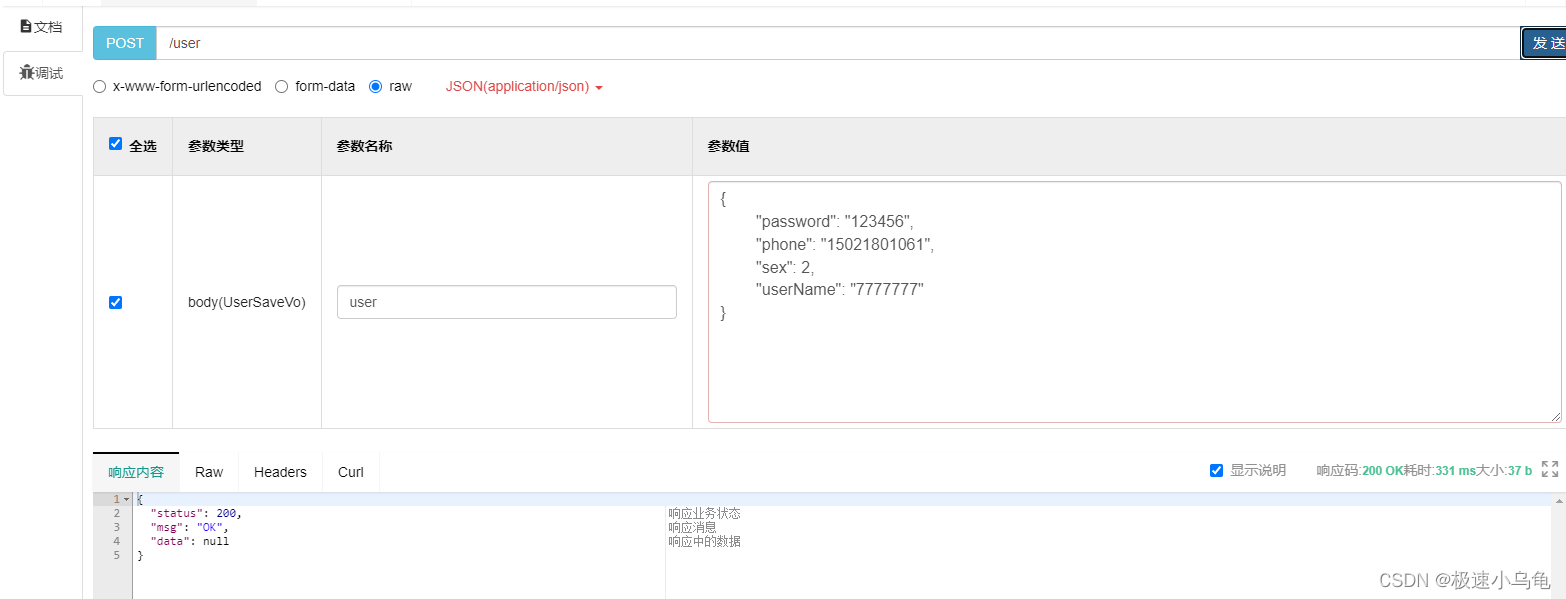
启动后先测试新增

可以看到新增正常,校验都通过了。
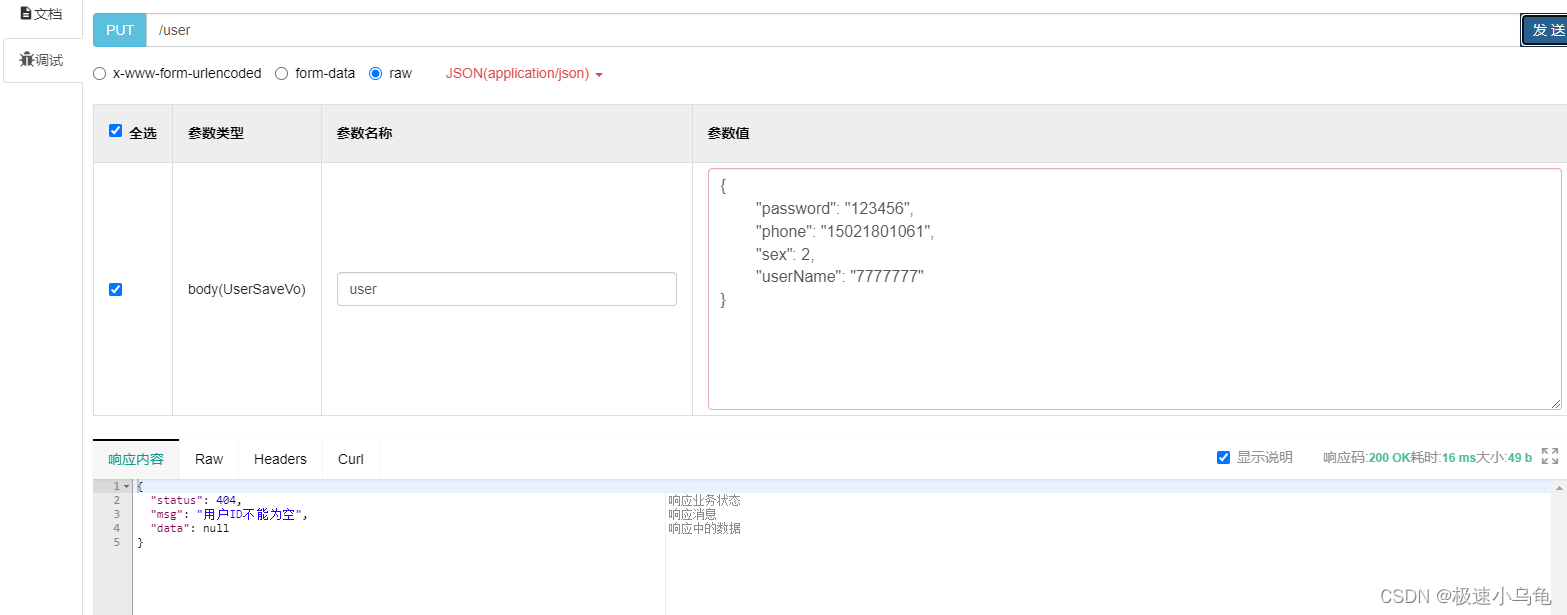
然后测试修改,我们先不加ID,看一下:

测试提示用户id不能为空,说明分组校验生效。然后加上ID进行测试

可以看到校验成功了,修改成功。
好了到这里我们的Validated参数校验就整合成功了。如果文章对你有所帮助可以点赞关注一下~