本文为Varlet组件库源码主题阅读系列第七篇,读完本篇,可以了解到如何通过unplugin-vue-components插件来为你的组件库实现按需引入。
手动引入
前面的文章中我们介绍过Varlet组件库的打包流程,最后会打包成几种格式,其中module和commonjs格式都不会把所有组件的代码打包到同一个文件,而是保留着各个组件的独立,每个组件都导出作为一个Vue插件。
第一种按需使用的方法是我们手动导入某个组件并进行注册:
import {

     createApp } from 'vue'
import {

     Button } from '@varlet/ui'
import '@varlet/ui/es/button/style/index.js'

createApp().use(Button)
Button组件并不是从它的自身目录中引入的,而是从一个统一的入口,@varlet/ui包的package.json中配置了两个导出入口:

按需引入,也可以理解成是tree shaking,它依赖于ES6模块,因为ESM模块语法是静态的,和运行时无关,只能顶层出现,这就可以只分析导入和导出,不运行代码即可知道模块导出的哪些被使用了哪些没有,没有用到的就可以被删除。
所以想要支持按需引入那么必然使用的是module入口,这个字段目前各种构建工具应该都是支持的,module入口它是个统一的入口,这个文件中显然导出了所有组件,那么比如我们只导出Button组件,其他没有用到的组件最终是不是不会被打包进去呢,实际上并没有这么简单,因为有的文件它会存在副作用,比如修改了原型链、设置了全局变量等,所以虽然没有显式的被使用,但是只要引入了该文件,副作用就生效了,所以不能被删除,要解决这个问题需要在package.json中再配置一个sideEffects字段,指明哪些文件是存在副作用的,没有指明的就是没有副作用的,那么构建工具就可以放心的删除了:
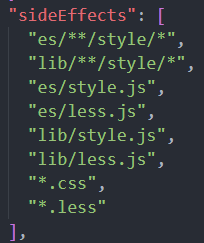
可以看到Varlet告诉了构建工具,这些样式文件是有副作用的,不要给删除了,其他文件中没有用到的模块可以尽情删除。
自动引入
如果你觉得前面的手动引入比较麻烦,Varlet也支持自动引入,这个实现依赖的是unplugin-vue-components插件,这个插件会扫描所有声明在模板中的组件,然后自动引入 组件逻辑 和 样式文件 并 注册组件。
在Vite中的配置方式:
import vue from '@vitejs/plugin-vue'
import components from 'unplugin-vue-components/vite'
import {

     VarletUIResolver } from 'unplugin-vue-components/resolvers'
import {

     defineConfig } from 'vite'

export default defineConfig({


  plugins: [
    vue(),
    components({


      resolvers: [VarletUIResolver()]
    })
  ]
})
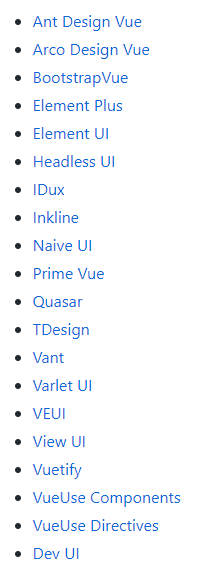
如果想要这个插件支持你的组件库,需要编写一个解析器,也就是类似上面的VarletUIResolver,如果想要给更多人用就需要提个pr,这个插件目前已经支持如下这些流行的组件库:
以VarletUIResolver为例来看一下这个解析器都做了什么:
// unplugin-vue-components/src/core/resolvers/varlet-ui.ts
const varDirectives = ['Ripple', 'Lazy']

export function VarletUIResolver(options: VarletUIResolverOptions = {

    }): ComponentResolver[] {


  return [
    {


      type: 'component',
      resolve: (name: string) => {


        const {

     autoImport = false } = options

        if (autoImport && varFunctions.includes(name))
          return getResolved(name, options)

        if (name.startsWith('Var'))
          return getResolved(name.slice(3), options)
      },
    },
    {


      type: 'directive',
      resolve: (name: string) => {


        const {

     directives = true } = options

        if (!directives)
          return

        if (!varDirectives.includes(name))
          return

        return getResolved(name, options)
      },
    },
  ]
}
执行VarletUIResolver方法会返回一个数组,unplugin-vue-components支持自动导入组件和指令,所以可以看到上面返回了两种解析方法,虽然目前我们没有看到unplugin-vue-components的源码,但是我们可以猜想unplugin-vue-components在模板中扫描到某个组件时会调用type为component的resolve,扫描到指令时会调用type为directive的resolve,如果解析成功,那么就会自动添加导入语句。
当扫描到的组件名以Var开头或扫描到Varlet的指令时,两个解析方法最后都会调用getResolved方法:
// unplugin-vue-components/src/core/resolvers/varlet-ui.ts
export function getResolved(name: string, options: VarletUIResolverOptions): ComponentResolveResult {


    const {


        importStyle = 'css',
        importCss = true,
        importLess,
        autoImport = false,
        version = 'vue3',
    } = options
    // 默认是vue3版本
    const path = version === 'vue2' ? '@varlet-vue2/ui' : '@varlet/ui'
    const sideEffects = []
    // 样式导入文件
    if (importStyle || importCss) {


        if (importStyle === 'less' || importLess)
            sideEffects.push(`${

      path}/es/${

      kebabCase(name)}/style/less.js`)
        else
            sideEffects.push(`${

      path}/es/${

      kebabCase(name)}/style`)
    }
    return {


        from: path,
        name: autoImport ? name : `_${

      name}Component`,
        sideEffects,
    }
}
函数的返回值是一个对象,包含三个属性:组件的导入路径、导入名称、以及一个副作用列表,里面是组件的样式导入文件。
你可能会对组件的导入名称格式_${name}Component有点疑惑,看一下Varlet的导出方式,以Button组件为例,它的导出文件如下:

默认导出了组件之外还通过_ButtonComponent名称又导出了一份,然后看看@varlet/ui整体的导出文件:
import Button, * as ButtonModule from './button'

export const _ButtonComponent = ButtonModule._ButtonComponent || {

    }

function install(app) {


  Button.install && app.use(Button)
}

export {


  install,
  Button,
}

export default {


  install,
  Button,
}
所以_${name}Component格式导出的就是ButtonModule._ButtonComponent,为什么要这么做呢,为什么不直接从:
export {


  install,
  Button,
}
中导入Button呢,按理说应该也是可以的,其实是因为Varlet有些组件默认的导出不是组件本身,比如ActionSheet:
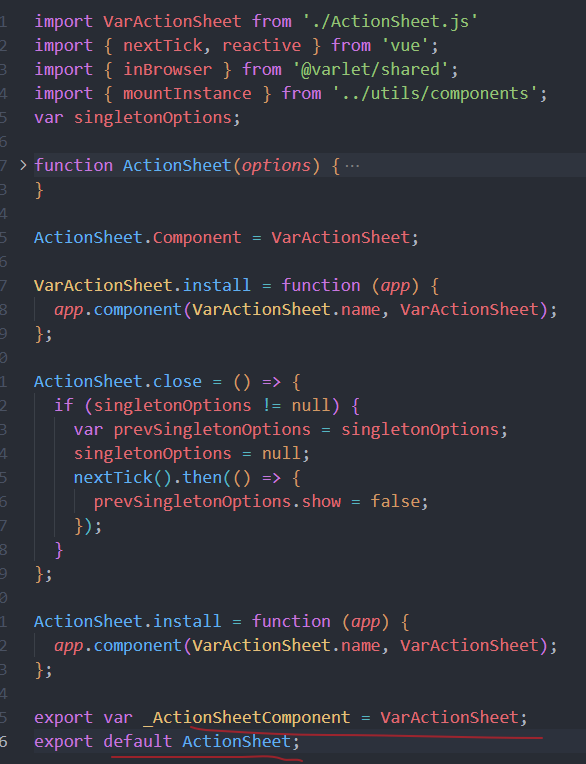
默认导出的是一个函数,根本不是组件本身,那么显然不能直接在模板中使用。
接下来以在Vite中的使用为例来大致看一下unplugin-vue-components的实现原理。
浅析unplugin-vue-components
import components from 'unplugin-vue-components/vite'导入的components是createUnplugin方法执行的返回值:
import {

     createUnplugin } from 'unplugin'

export default createUnplugin<Options>((options = {

    }) => {


    const filter = createFilter(
        options.include || [/\.vue$/, /\.vue\?vue/, /\.vue\?v=/],
        options.exclude || [/[\\/]node_modules[\\/]/, /[\\/]\.git[\\/]/, /[\\/]\.nuxt[\\/]/],
    )
    const ctx: Context = new Context(options)
    const api: PublicPluginAPI = {


        async findComponent(name, filename) {


            return await ctx.findComponent(name, 'component', filename ? [filename] : [])
        },
        stringifyImport(info) {


            return stringifyComponentImport(info, ctx)
        },
    }
    return {


        api,

        transformInclude(id) {


            return filter(id)
        },

        async transform(code, id) {


            if (!shouldTransform(code))
                return null
            try {


                const result = await ctx.transform(code, id)
                ctx.generateDeclaration()
                return result
            }
            catch (e) {


                this.error(e)
            }
        },

        //...s
    }
})
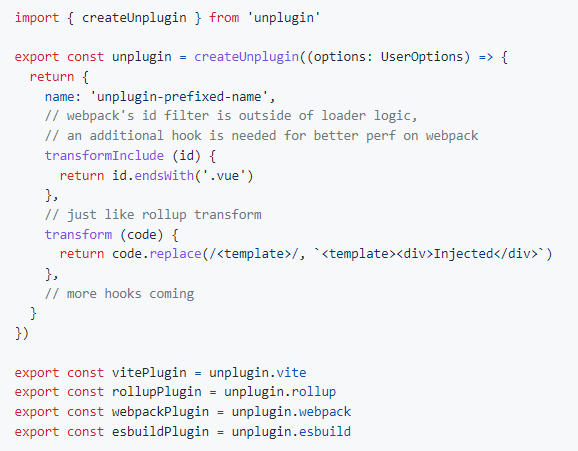
unplugin是一个构建工具的统一插件系统,也就是写一个插件,支持各种构建工具,目前支持以下这些:

createUnplugin方法接收一个函数为参数,最后会返回一个对象,可以从这个对象中获取用于各个构建工具的插件:
传入的函数会返回一个对象,其中transformInclude配置默认只转换.vue文件,transform为转换的核心方法,接收unplugin-vue-components插件之前的其他插件处理过后的Vue文件内容和文件路径作为参数,函数内调用了ctx.transform方法,这个方法又调用了transformer方法:
export default function transformer(ctx: Context, transformer: SupportedTransformer): Transformer {


  return async (code, id, path) => {


    ctx.searchGlob()
    const sfcPath = ctx.normalizePath(path)
    // 用文件内容创建一个魔术字符串
    const s = new MagicString(code)
    // 转换组件
    await transformComponent(code, transformer, s, ctx, sfcPath)
    // 转换指令
    if (ctx.options.directives)
      await transformDirectives(code, transformer, s, ctx, sfcPath)
    // 追加一个注释内容:'/* unplugin-vue-components disabled */'
    s.prepend(DISABLE_COMMENT)
    // 将处理完后的魔术字符串重新转换成普通字符串
    const result: TransformResult = {

     code: s.toString() }
    if (ctx.sourcemap)
      result.map = s.generateMap({

     source: id, includeContent: true })
    return result
  }
}
创建了一个MagicString,然后调用了transformComponent方法:
export default async function transformComponent(code: string, transformer: SupportedTransformer, s: MagicString, ctx: Context, sfcPath: string) {


  const results = transformer === 'vue2' ? resolveVue2(code, s) : resolveVue3(code, s)
  // ...
}
unplugin-vue-components同时支持Vue2和Vue3,我们看一下Vue3的转换,调用的是resolveVue3方法:
const resolveVue3 = (code: string, s: MagicString) => {


  const results: ResolveResult[] = []

  for (const match of code.matchAll(/_resolveComponent[0-9]*\("(.+?)"\)/g)) {


    const matchedName = match[1]
    if (match.index != null && matchedName && !matchedName.startsWith('_')) {


      const start = match.index
      const end = start + match[0].length
      results.push({


        rawName: matchedName,
        replace: resolved => s.overwrite(start, end, resolved),
      })
    }
  }

  return results
}
我们使用Vue3官方的在线playground来看一下Vue单文件的编译结果,如果我们没有导入组件就在模板中引用组件,那么编译结果如下:
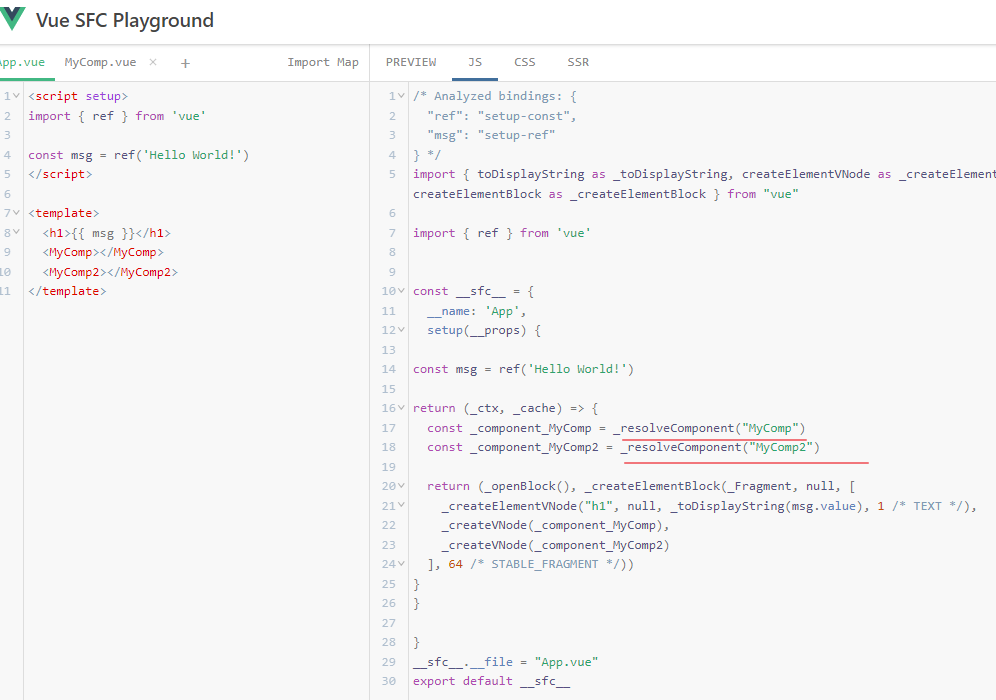
可以看到编译后的setup函数返回的渲染函数中生成了const _component_MyComp = _resolveComponent("MyComp")这行代码用来解析组件,那么前面的resolveVue3方法里的正则/_resolveComponent[0-9]*\("(.+?)"\)/g的含义就很明显了,就是用来匹配这个解析语句,参数就是组件的名称,所以通过这个正则会找出所有引用的组件,并返回一个对应的替换方法,回到transformComponent方法:
export default async function transformComponent(code: string, transformer: SupportedTransformer, s: MagicString, ctx: Context, sfcPath: string) {


  // ...
  for (const {

     rawName, replace } of results) {


    const name = pascalCase(rawName)
    ctx.updateUsageMap(sfcPath, [name])
    const component = await ctx.findComponent(name, 'component', [sfcPath])
    // ...
  }
}
遍历模板引入的所有组件,调用了ctx.findComponent方法:
async findComponent(name: string, type: 'component' | 'directive', excludePaths: string[] = []): Promise<ComponentInfo | undefined> {


    // custom resolvers
    for (const resolver of this.options.resolvers) {


      if (resolver.type !== type)
        continue

      const result = await resolver.resolve(type === 'directive' ? name.slice(DIRECTIVE_IMPORT_PREFIX.length) : name)
      if (!result)
        continue

      if (typeof result === 'string') {


        info = {


          as: name,
          from: result,
        }
      }
      else {


        info = {


          as: name,
          ...normalizeComponetInfo(result),
        }
      }
      if (type === 'component')
        this.addCustomComponents(info)
      else if (type === 'directive')
        this.addCustomDirectives(info)
      return info
    }

    return undefined
  }
这个方法里就会调用组件库自定义的解析器,如果某个组件被成功解析到了,那么会将结果保存起来并返回。
回到transformComponent方法:
export default async function transformComponent(code: string, transformer: SupportedTransformer, s: MagicString, ctx: Context, sfcPath: string) {


  // ...
  let no = 0
  for (const {

     rawName, replace } of results) {


    // ...
    if (component) {


      const varName = `__unplugin_components_${

      no}`
      s.prepend(`${

      stringifyComponentImport({

       ...component, as: varName }, ctx)};\n`)
      no += 1
      replace(varName)
    }
  }
}
组件如果被解析到了,那么会调用stringifyComponentImport方法创建导入语句并追加到文件内容的开头,注意组件的导入名称被命名成了__unplugin_components_${no}格式,为什么不直接使用组件原本的名字呢,笔者也不清楚,可能是为了防止用户自己又导入了组件导致重复吧:
export function stringifyComponentImport({

     as: name, from: path, name: importName, sideEffects }: ComponentInfo, ctx: Context) {


  path = getTransformedPath(path, ctx.options.importPathTransform)

  const imports = [
    stringifyImport({

     as: name, from: path, name: importName }),
  ]

  if (sideEffects)
    toArray(sideEffects).forEach(i => imports.push(stringifyImport(i)))

  return imports.join(';')
}

export function stringifyImport(info: ImportInfo | string) {


  if (typeof info === 'string')
    return `import '${

      info}'`
  if (!info.as)
    return `import '${

      info.from}'`
  else if (info.name)
    return `import { ${

      info.name} as ${

      info.as} } from '${

      info.from}'`
  else
    return `import ${

      info.as} from '${

      info.from}'`
}
这个方法会根据info的类型拼接导入语句,VarletUIResolver解析器最后返回的是from、name、sideEffects三个字段,所以调用stringifyImport方法时会走第三个分支,以前面截图中的为例,结果如下:
import {

     MyComp as __unplugin_components_0 } from 'xxx'
import {

     MyComp2 as __unplugin_components_1 } from 'xxx'
另外也可以看到副作用列表sideEffects也被导入了,实际上就是组件的样式导入文件。
transformComponent方法最后调用replace(varName)方法将/_resolveComponent[0-9]*\("(.+?)"\)/匹配到的内容改成了__unplugin_components_${no},还是前面截图中的为例:
const _component_MyComp = _resolveComponent("MyComp")
const _component_MyComp2 = _resolveComponent("MyComp2")
被改成了:
const _component_MyComp = __unplugin_components_0
const _component_MyComp2 = __unplugin_components_1
到这里Vue3组件的导入语句就添加完成了,也能正常传递到渲染函数中进行使用,Vue2的转换和指令的转换其实也大同小异,有兴趣的可以自行阅读源码。
关于组件库的按需引入笔者之前还单独写过一篇,有兴趣的也可以看一下:浅析组件库实现按需引入的几种方式。