观察登录形式
提交一次登录观察http报文,查看携带的参数,一般登录要么携带cookie,要么携带token。
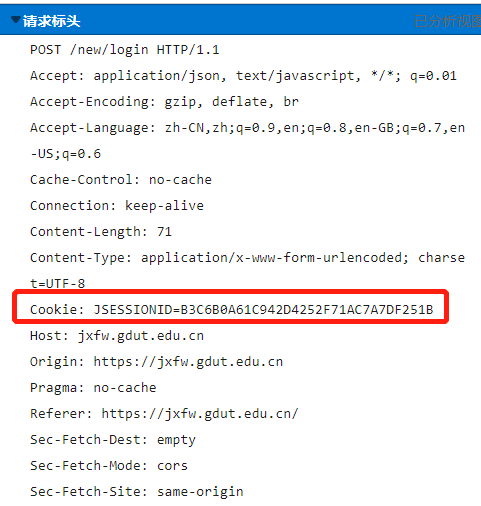
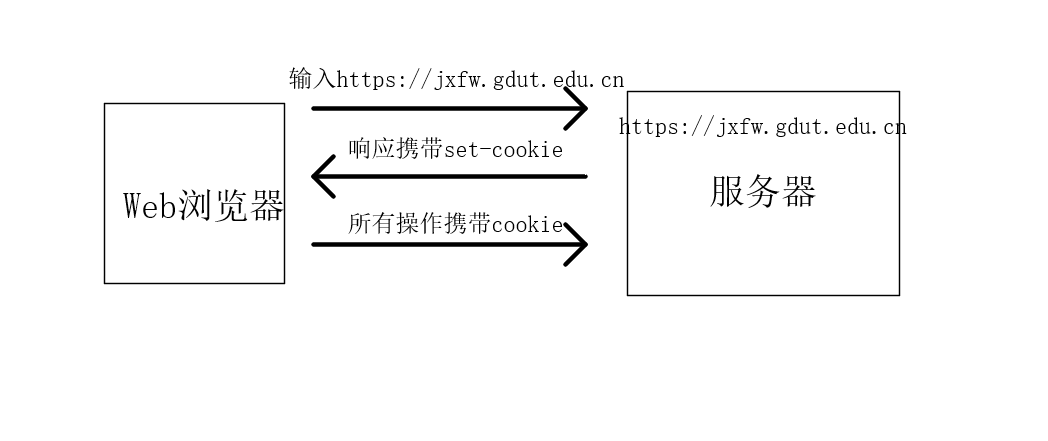
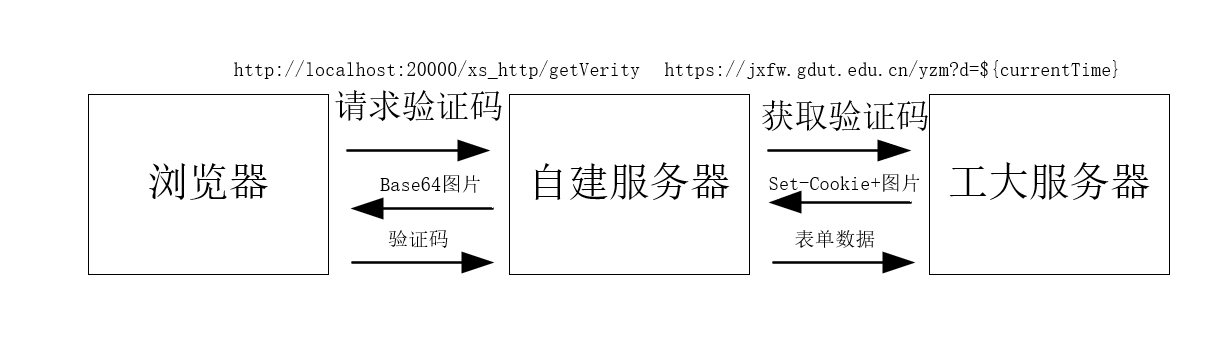
如图所示,肯定是携带cookie作为验证身份的值,提交账号密码和验证码即可登录。可以确定,通信方式如下图所示。
获取cookie的方法
- document.cookie获取
- 拦截响应报文获取set-cookie字段
由于w3c规定浏览器不能拿到响应报文的set-cookie字段所以先打开浏览器的控制台,直接输入document.cookie,发现是空值。
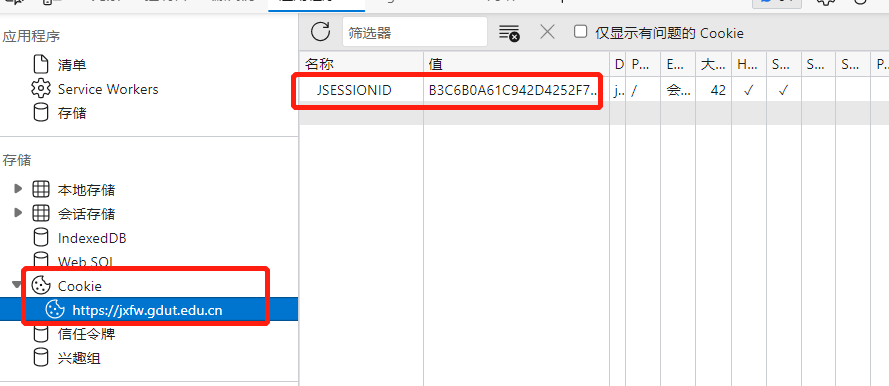
打开应用程序的cookie那里又显示了cookie值,清空cookie然后重新刷新浏览器查看http报文发现

服务器在set-cookie字段设置了secure;httponly,所以无法通过document.cookie获取。显然,直接通过浏览器没办法登录了。
那么考虑第二种,w3c只是不允许浏览器拿到响应报文的set-cookie但是服务器可以。
所以采用的方法,通过服务器与工大服务器进行通信,客户端再与自建服务器进行通信,所有操作通过自建服务器进行操作。解决了跨域和cookie的问题。
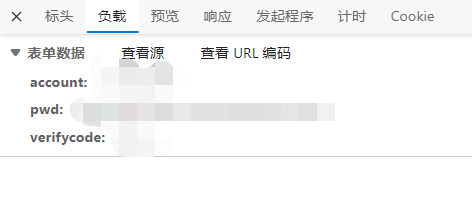
通过上述的http报文得知了登录的形式。
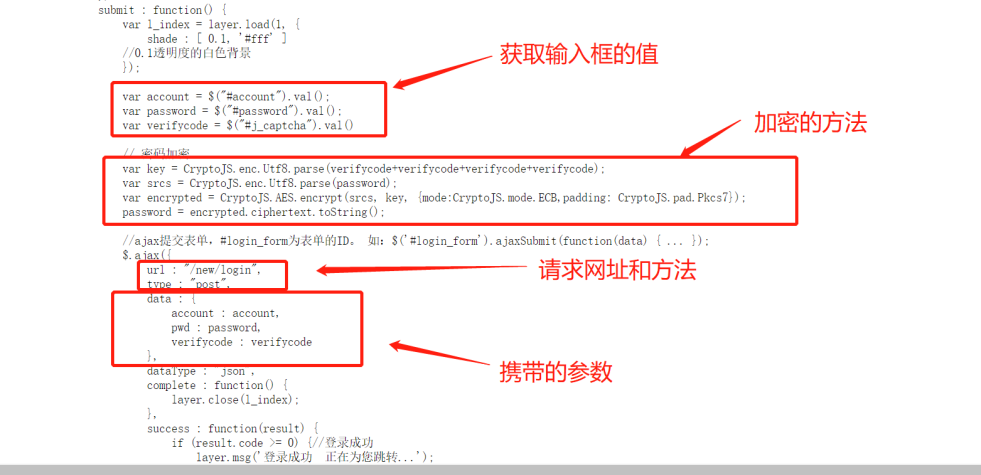
直观上来说就是通过网页可以看到提交的表单就是账号、密码和验证码。但是显然这些不会直接就发送,会进行一定的加密,加密方法可以通过源码进行观察。
开始搭建服务器
大致的方法
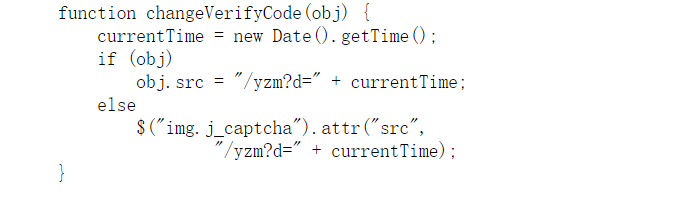
通过源码观察如何获取验证码,可以看到直接通过Date().getTime()作为参数去请求地址。
采用node.js搭建服务器。因为浏览器是要连接自建的服务器,所以要处理接收的http请求,自建服务器又需要请求工大服务器,也就是需要发送http请求。
第三方库介绍
- axios 发送请求
- express 接收请求
- body-parser 处理接收请求格式
- btoa 处理发送请求图片问题
- cors 解决跨域问题
- crypto-js 解决加密问题
- qs 解决发送请求post问题
最终验证

通过node server.js开启服务
const express = require("express"),
cors = require('cors'),
bodyParser = require("body-parser"),

axios = require('axios'),
CryptoJS = require('crypto-js'),
btoa = require('btoa'),
qs = require('qs');
// 使用框架创建web服务器
const app = express();
//解决跨域问题
app.use(cors());
// 解决请求参数格式问题
app.use(bodyParser.json());
app.use(bodyParser.urlencoded({

     extended: false }))

var cookie = ''

// 当客户端以get方式访问/路由时
app.get('/xs_http/getVerity', (req, res) => {


  let currentTime = new Date().getTime();
    axios.get(`https://jxfw.gdut.edu.cn/yzm?d=${

      currentTime}`,{


      responseType: 'arraybuffer'
    },{


      headers: {


        "Accept":"*/*",
        "Accept-Encoding":"gzip, deflate",
        "Connection":"keep-alive",
        "Cache-Control": "no-cache"
      }
    }).then(response=>{


    try{


      cookie = response.headers['set-cookie'][0].split(';')[0];
    } catch{


    };
    let data = btoa(new Uint8Array(response.data).reduce((data, byte) => data + String.fromCharCode(byte), ''));
    res.json({


      base64: data
    });
  })
});

// 当客户端以post方式访问/路由时
app.post('/xs_http/post',(req,res)=>{


  let str = req.body.str
  postVerity(str).then((cookie)=>{


    // console.log(cookie);
    res.send(cookie);
  })
});

// 当客户端以get方式访问/路由时
app.get('/xs_http/gdut_grade', (req, res) => {


  let data = {


    rows: 60,
    sort: 'xnxqdm',
    order: 'asc',
    page: '1',
    jhlxdm: ''
  }
  axios.post(`https://jxfw.gdut.edu.cn/xskccjxx!getDataList.action`,qs.stringify(data),{


    headers: {


      "Accept":"application/json, text/javascript, */*; q=0.01",
      "Accept-Encoding":"gzip, deflate",
      "Connection":"keep-alive",
      "Cookie": cookie,
      "Cache-Control": "no-cache",
      "Content-Type": "application/x-www-form-urlencoded; charset=UTF-8"
    }
  }).then(response=>{


    try{


      cookie = response.headers['set-cookie'][0].split(';')[0];
    } catch{


    };
    res.send(response.data)
  })
});

//启动端口监听
var server = app.listen(20000, function () {


  console.log('服务端已开启')
});


function postVerity(verifycode){


  return new Promise((resolve,reject)=>{


    const keycode = verifycode
    let key = CryptoJS.enc.Utf8.parse(keycode+keycode+keycode+keycode);
    var srcs = CryptoJS.enc.Utf8.parse('你的密码');
    let encryptedData  = CryptoJS.AES.encrypt(srcs, key, {


        mode: CryptoJS.mode.ECB,
        padding: CryptoJS.pad.Pkcs7
    });
    let hexData = encryptedData.ciphertext.toString();
    let data = {


      account: '你的账号',
      pwd: hexData,
      verifycode: keycode
    }
    console.log(data,'\n',cookie);
    axios.post(`https://jxfw.gdut.edu.cn/new/login`,qs.stringify(data),{


      headers: {


        "Accept":"application/json, text/javascript, */*; q=0.01",
        "Accept-Encoding":"gzip, deflate",
        "Connection":"keep-alive",
        "Cookie": cookie,
        "Cache-Control": "no-cache",
        "Content-Type": "application/x-www-form-urlencoded; charset=UTF-8"
      }
    }).then(res=>{


      try{


        cookie = res.headers['set-cookie'][0].split(';')[0];
        console.log('请求cookie变了')
      } catch{


      };
      console.log(res.data);
      resolve(cookie)
    })
  })
}
写html模拟客户端
<!DOCTYPE html>
<html lang="en">
<head>
  <meta charset="UTF-8">
  <meta http-equiv="X-UA-Compatible" content="IE=edge">
  <meta name="viewport" content="width=device-width, initial-scale=1.0">
  <title>Document</title>
</head>
<style>
.button{


  display: inline-block;
  width: 100px;
  height: 25px;
  line-height: 25px;
  text-align: center;
  background-color: #ddd;
  cursor: pointer;
}
</style>
<body>
  <div>
    <div id="request1" class="button">请求</div>
  </div>
  <input id="text" type="text">
  <div id="request2" class="button">发送</div>
  <img id="img" src="">
  <div id="request3" class="button" >获得成绩</div>
</body>
</html>
<script>
document.getElementById('request1').onclick = function(){


  getQR().then((res)=>{


    // document.getElementById('request3').click();
    let obj = JSON.parse(res)
    document.getElementById('img').src = 'data:image/png;base64,' + obj['base64'];
    // let data = JSON.parse(res);
    // document.getElementById('img').src = data.url;
  })
}
document.getElementById('request2').onclick = function(){


  let text = document.getElementById('text').value;
  postQR(text).then(res=>{


    // let obj = JSON.parse(res)
    console.log(res)
    // document.getElementById('img').src = 'data:image/png;base64,' + obj['base64'];
  })
}
document.getElementById('request3').onclick = function(){


  let xhr=new XMLHttpRequest()
		xhr.onreadystatechange=function () {


      if (xhr.readyState == 4) {


        console.log(xhr.response);
      }
		}
		xhr.open('get','http://localhost:20000/xs_http/gdut_grade' ) // 发送数据到后端
		xhr.send()
}
function getQR(){


  return new Promise((resolve,reject)=>{


    let xhr=new XMLHttpRequest()
		// 在xhr的准备状态发生改变的时候,调用该方法
		xhr.onreadystatechange=function () {


			// 判断xhr的准备状态
      if (xhr.readyState == 4) {


        resolve(xhr.response)
      }
		}
    xhr.timeout = 10000;
    xhr.ontimeout = function() {


              alert("网络延迟,请稍后再试");
    }
    xhr.addEventListener('load',function(){


      if(xhr.status>=200&&xhr.status<300||xhr.status===304){


        var data=xhr.responseText;
        // console.log(data)
      }else{


        console.log('error')
      }
    });
		// open方法里面要放置两个参数,
		// 参数1:数据请求方式 get post
		// 参数2:请求的接口,参数在接口后面进行拼接
		xhr.open('get','http://localhost:20000/xs_http/getVerity' ) // 发送数据到后端
		xhr.send()
  })
}
function postQR(str){


  return new Promise((resolve,reject)=>{


    let xhr=new XMLHttpRequest()
		// 在xhr的准备状态发生改变的时候,调用该方法
		xhr.onreadystatechange=function () {


			// 判断xhr的准备状态
      if (xhr.readyState == 4) {


        resolve(xhr.response)
      }
		}
		// open方法里面要放置两个参数,
		// 参数1:数据请求方式 get post
		// 参数2:请求的接口,参数在接口后面进行拼接
		xhr.open('post','http://localhost:20000/xs_http/post') // 发送数据到后端

    xhr.setRequestHeader ('Content-type', 'application/x-www-form-urlencoded');
		xhr.send(`str=${

      str}`)
  })
}
</script>
完整版文件压缩包
链接:https://pan.baidu.com/s/1zRUKg9cuMkSQP9ZL5alPaw
提取码:0000
期间遇到的问题
对浏览器原生xhr请求不熟悉
对axios不熟悉,post请求需要配合qs库
对图片get请求不熟悉,需要配置参数通过buffer来获取res.data
尝试自动识别,考虑了Tesseract.js发现误差太大,弄了好久,放弃了
拓展
这个简单实现了请求成绩的demo
通过抓包,可以分析请求课表等教务系统的所有信息,甚至可以抢课(只需要登录后的cookie就能操作任何事情)