1、文档官网
- SpringBoot:https://spring.io/projects/spring-boot#learn
- SpringCloud:https://spring.io/projects/spring-cloud#learn
- CloudAlibaba:https://spring.io/projects/spring-cloud-alibaba#learn
- SpringCloud配置文件可配项(注意版本):https://docs.spring.io/spring-cloud/docs/2022.0.2-SNAPSHOT/reference/html/configprops.html
2、版本对照
2.1、SpringBoot与SpringCloud对照
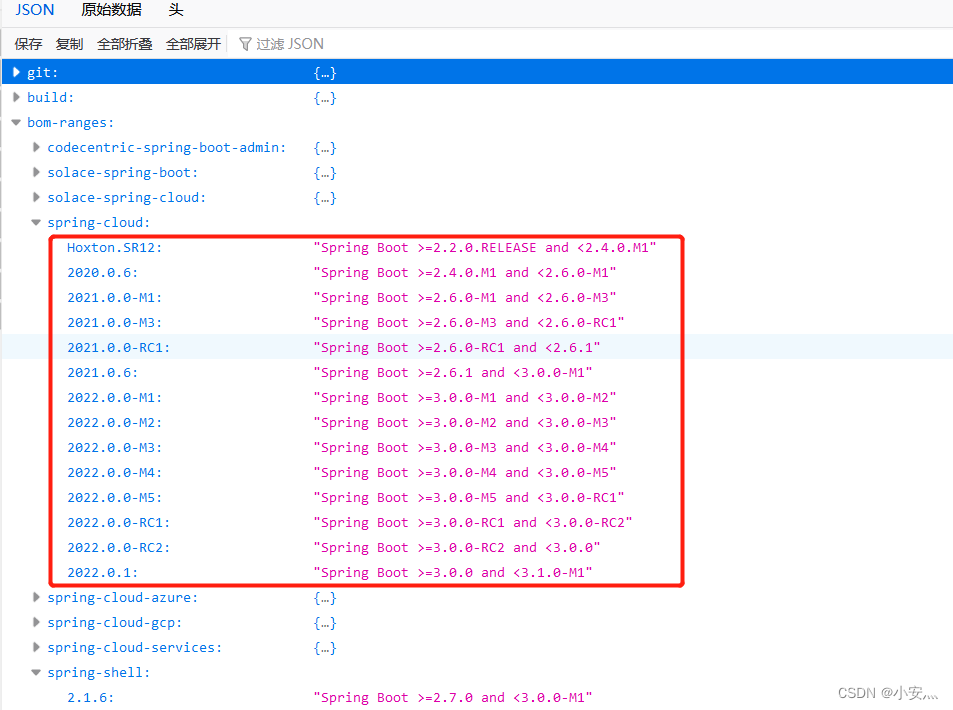
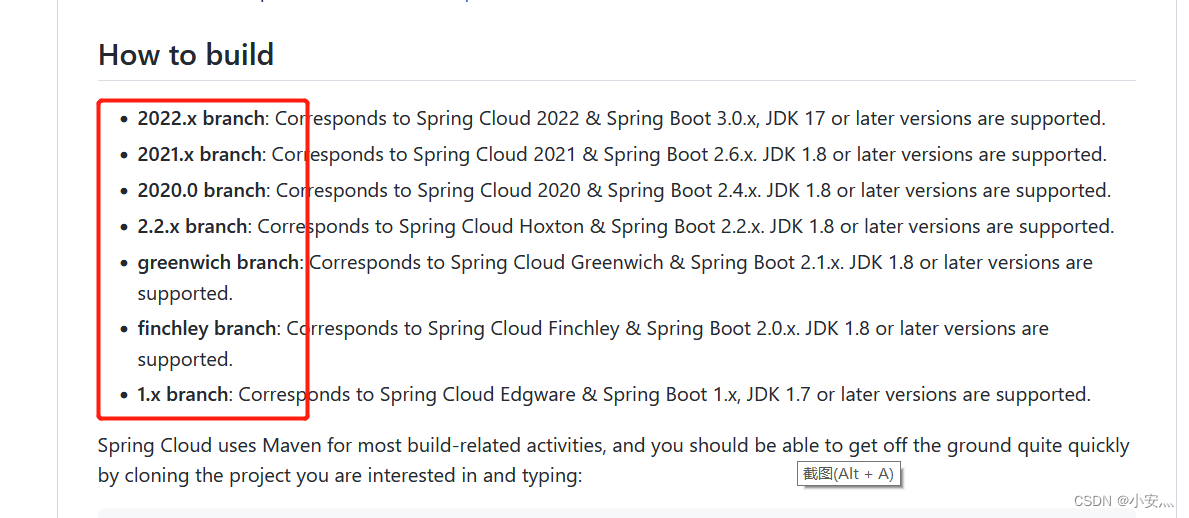
2.2、SpringAlibaba与SpringCloud与SpringBoot版本对照
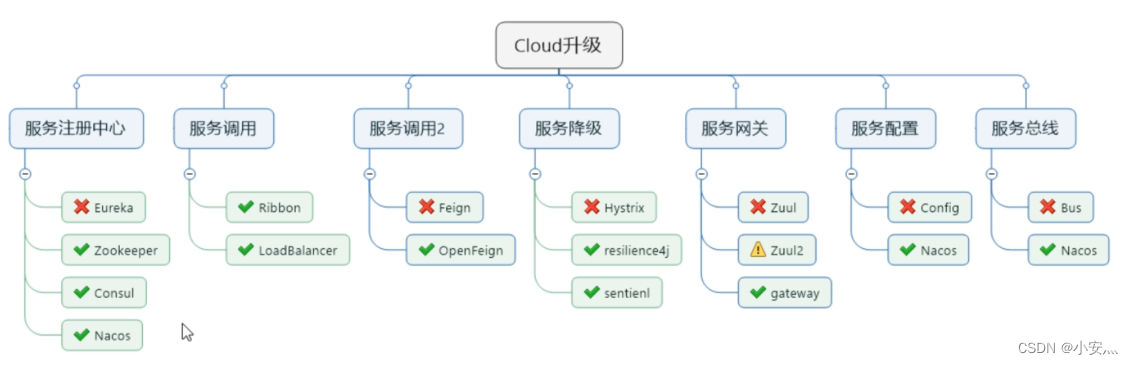
3、Cloud与alibaba停更、升级、替换
4、pom配置
4.1、父pom
  <!-- 统一管理jar包版本 -->
  <properties>
  	<!-- 项目基本配置 -->
    <project.build.sourceEncoding>UTF-8</project.build.sourceEncoding>
    <maven.compiler.source>1.8</maven.compiler.source>
    <maven.compiler.target>1.8</maven.compiler.target>
    <!-- spring相关依赖 -->
    <springboot.version>2.2.2.RELEASE</springboot.version>
    <springcloud.version>Hoxton.SR1</springcloud.version>
    <cloudalibaba.version>2.1.0.RELEASE</cloudalibaba.version>
    <!-- 其它依赖 -->
    <junit.version>4.12</junit.version>
    <log4j.version>1.2.17</log4j.version>
    <lombok.version>1.16.18</lombok.version>
    <mysql.version>5.1.47</mysql.version>
    <druid.version>1.1.16</druid.version>
    <mybatis.spring.boot.version>1.3.0</mybatis.spring.boot.version>
  </properties>

  <!-- 子模块继承之后,提供作用:锁定版本+子modlue不用写groupId和version  -->
  <dependencyManagement>
    <dependencies>
      <dependency>
        <groupId>org.springframework.boot</groupId>
        <artifactId>spring-boot-dependencies</artifactId>
        <version>${springboot.version}</version>
        <type>pom</type>
        <scope>import</scope>
      </dependency>
      <dependency>
        <groupId>org.springframework.cloud</groupId>
        <artifactId>spring-cloud-dependencies</artifactId>
        <version>${springcloud.version}</version>
        <type>pom</type>
        <scope>import</scope>
      </dependency>
      <dependency>
        <groupId>com.alibaba.cloud</groupId>
        <artifactId>spring-cloud-alibaba-dependencies</artifactId>
        <version>${cloudalibaba.version}</version>
        <type>pom</type>
        <scope>import</scope>
      </dependency>

      <dependency>
        <groupId>mysql</groupId>
        <artifactId>mysql-connector-java</artifactId>
        <version>${mysql.version}</version>
      </dependency>
      <dependency>
        <groupId>com.alibaba</groupId>
        <artifactId>druid</artifactId>
        <version>${druid.version}</version>
      </dependency>
      <dependency>
        <groupId>org.mybatis.spring.boot</groupId>
        <artifactId>mybatis-spring-boot-starter</artifactId>
        <version>${mybatis.spring.boot.version}</version>
      </dependency>
      <dependency>
        <groupId>junit</groupId>
        <artifactId>junit</artifactId>
        <version>${junit.version}</version>
      </dependency>
      <dependency>
        <groupId>log4j</groupId>
        <artifactId>log4j</artifactId>
        <version>${log4j.version}</version>
      </dependency>
      <dependency>
        <groupId>org.projectlombok</groupId>
        <artifactId>lombok</artifactId>
        <version>${lombok.version}</version>
        <optional>true</optional>
      </dependency>
    </dependencies>
  </dependencyManagement>

  <build>
    <plugins>
      <plugin>
        <groupId>org.springframework.boot</groupId>
        <artifactId>spring-boot-maven-plugin</artifactId>
        <configuration>
          <fork>true</fork>
          <addResources>true</addResources>
        </configuration>
      </plugin>
    </plugins>
  </build>
4.2、子pom (案例)
<dependencies>
			 <!-- 导入所需的jar包 -->
        <dependency>
            <groupId>com.alibaba.cloud</groupId>
            <artifactId>spring-cloud-starter-alibaba-nacos-discovery</artifactId>
        </dependency>
        <!-- 除网关外,基本都需要配置这俩 -->
        <dependency>
            <groupId>org.springframework.boot</groupId>
            <artifactId>spring-boot-starter-web</artifactId>
        </dependency>
        <dependency>
            <groupId>org.springframework.boot</groupId>
            <artifactId>spring-boot-starter-actuator</artifactId>
        </dependency>
        <!-- devtools热部署 -->
        <dependency>
            <groupId>org.springframework.boot</groupId>
            <artifactId>spring-boot-devtools</artifactId>
            <scope>runtime</scope>
            <optional>true</optional>
        </dependency>
        <!-- 其它jar包 -->
        <dependency>
            <groupId>org.projectlombok</groupId>
            <artifactId>lombok</artifactId>
            <optional>true</optional>
        </dependency>
        <dependency>
            <groupId>org.springframework.boot</groupId>
            <artifactId>spring-boot-starter-test</artifactId>
            <scope>test</scope>
        </dependency>
    </dependencies>
5、技术说明
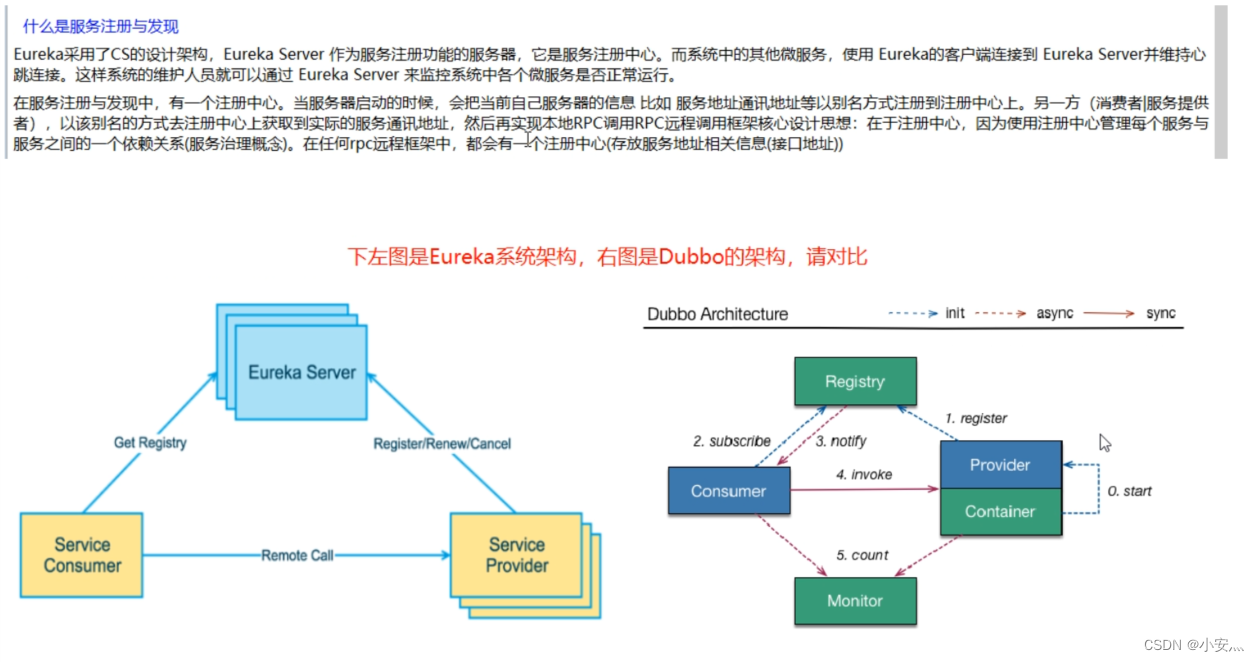
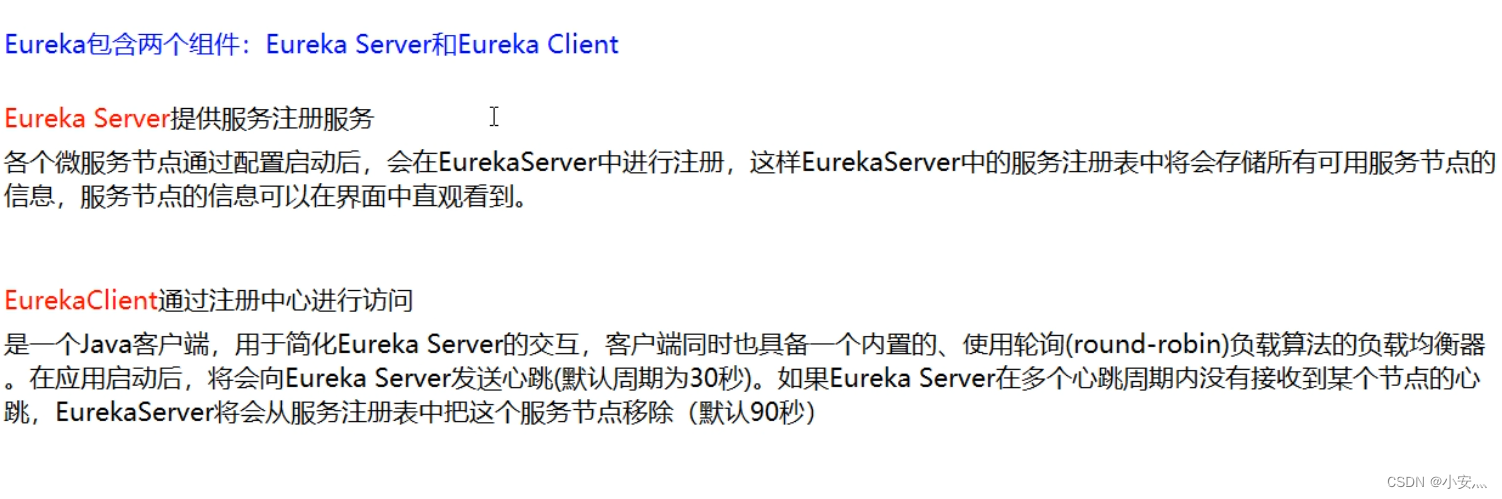
5.1、SpringCloud-Eureka
POM
<!-- Server -->
<dependency>
	     <groupId>org.springframework.cloud</groupId>
	     <artifactId>spring-cloud-starter-netflix-eureka-server</artifactId>
</dependency>

<!-- client -->
<dependency>
	     <groupId>org.springframework.cloud</groupId>
	     <artifactId>spring-cloud-starter-netflix-eureka-client</artifactId>
</dependency>
主启动类
<!-- Server -->
@EnableEurekaServer
// 打开服务发现
@EnableDiscoveryClient

<!-- client -->
@EnableEurekaClient
// 打开服务发现
@EnableDiscoveryClient

<!-- 服务发现 -->
@Resource
private DiscoveryClient discoveryClient;
@GetMapping(value = "/payment/discovery")
public Object discovery(){
    List<String> services = discoveryClient.getServices();
    for (String element : services) {
        log.info("***** element:"+element);
    }
    List<ServiceInstance> instances = discoveryClient.getInstances("CLOUD-PAYMENT-SERVICE");
    for (ServiceInstance instance : instances) {
        log.info(instance.getServiceId()+"\t"+instance.getHost()+"\t"+instance.getPort()+"\t"+instance.getUri());
    }
    return this.discoveryClient;
}
主机名称:服务名称修改、访问信息增加IP、关闭自我保护
自我保护原因:某时刻某一个微服务不可用了,Eureka不会立刻清理,依旧会对该微服务的信息进行保存,属于CAP里面的AP分支。(一般生产环境中不会禁止自我保护)
<!-- client -->
eureka:
  instance:
    # 修改主机名称  将Instance ID设置成IP:端口的形式
    instance-id: ${

    spring.cloud.client.ip-address}:${

    server.port}
    # 显示IP
    prefer-ip-address: true
    # 关闭自我保护
    # eureka客户端向服务端发送心跳的时间间隔
    lease-renewal-interval-in-seconds: 1
    # eureka服务端在收到最后一次心跳后等待时间上限
    lease-expiration-duration-in-seconds: 2

<!-- server-->
eureka:
  server:
    # 关闭自我保护机制
    enable-self-preservation: false
    eviction-interval-timer-in-ms: 2000
多服务访问报错
配置类增加@LoadBalanced
import org.springframework.cloud.client.loadbalancer.LoadBalanced;
import org.springframework.context.annotation.Bean;
import org.springframework.context.annotation.Configuration;
import org.springframework.web.client.RestTemplate;

@Configuration
public class ApplicationContextConfig {


    @Bean
    @LoadBalanced
    public RestTemplate getRestTemplate() {


        return new RestTemplate();
    }

}
5.2、SpringCloud-Ribbon

POM
<!-- 引入eureka或者nacos会自带ribbon,不需要单独引入 -->
<dependency>
     <groupId>org.springframework.cloud</groupId>
     <artifactId>spring-cloud-starter-netflix-ribbon</artifactId>
</dependency>
IRule算法
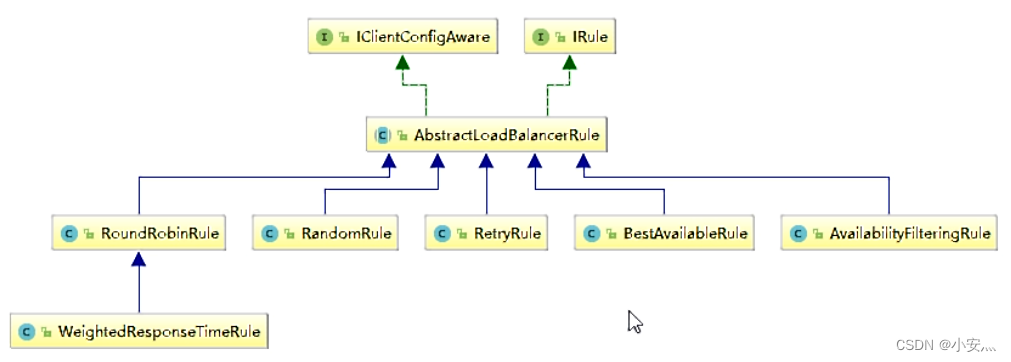
- com.netflix.loadbalancer.RoundRobinRule :轮询
- com.netflix.loadbalancer.RandomRule :随机
- com.netflix.loadbalancer.RetryRule:先按照RoundRobinRule的策略获取服务,如果获取服务失败则在指定时间内会进行重试
- WeightedResponseTimeRule :对RoundRobinRule的扩展,响应速度越快的实例选择权重越大,越容易被选择
- BestAvailableRule :会先过滤掉由于多次访问故障而处于断路器跳闸状态的服务,然后选择一个并发量最小的服务
- AvailabilityFilteringRule :先过滤掉故障实例,再选择并发较小的实例
- ZoneAvoidanceRule:默认规则,复合判断server所在区域的性能和server的可用性选择服务器
替换IRule
类不允许放在主启动类及以下(不允许被spring扫描到)
1、新建规则类:
package com.myrule;

import com.netflix.loadbalancer.IRule;
import com.netflix.loadbalancer.RandomRule;
import org.springframework.context.annotation.Bean;
import org.springframework.context.annotation.Configuration;

@Configuration
public class MySelfRule {


    @Bean
    public IRule myRule(){


        // 定义为随机
        return new RandomRule();
    }
}
2、主启动类增加注解
@RibbonClient(name = "CLOUD-PAYMENT-SERVICE",configuration = MySelfRule.class)
5.3、SpringCloud-OpenFeign
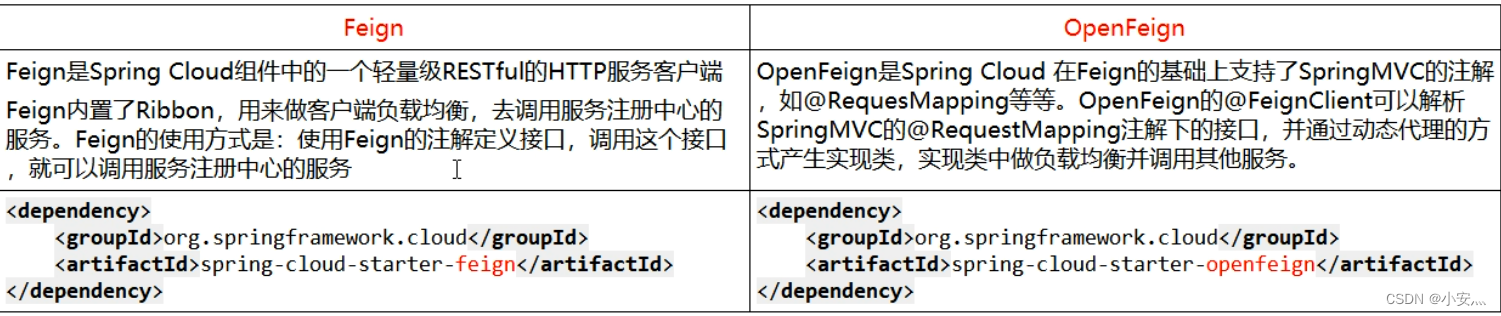
POM
<dependency>
     <groupId>org.springframework.cloud</groupId>
     <artifactId>spring-cloud-starter-openfeign</artifactId>
</dependency>
主启动类
@EnableFeignClients
调用
import com.atguigu.springcloud.entities.CommonResult;
import com.atguigu.springcloud.entities.Payment;
import feign.Param;
import org.springframework.cloud.openfeign.FeignClient;
import org.springframework.stereotype.Component;
import org.springframework.web.bind.annotation.GetMapping;
import org.springframework.web.bind.annotation.PathVariable;

@Component
@FeignClient(value = "CLOUD-PAYMENT-SERVICE")
public interface PaymentFeignService {


    @GetMapping(value = "/payment/get/{id}")
    public CommonResult getPaymentById(@PathVariable("id") Long id);
}
超时配置修改
OpenFeign默认超时时间为一秒钟,超过后报错
ribbon:
  ReadTimeout:  5000
  ConnectTimeout: 5000
日志
1、日志级别
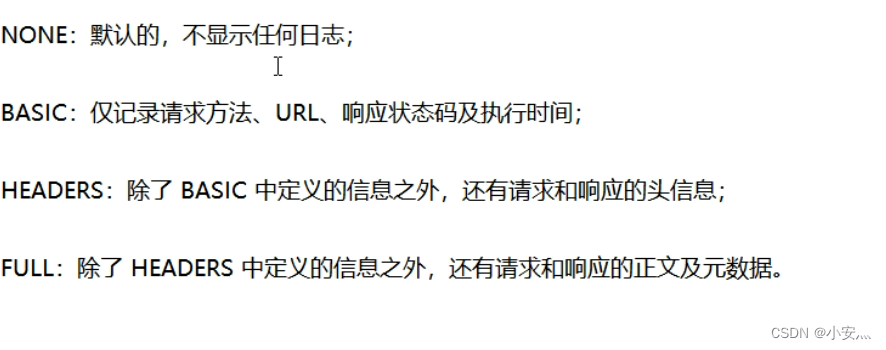
2、修改日志级别
<!-- 新增类 -->
package com.springcloud.config;

import feign.Logger;
import org.springframework.context.annotation.Bean;
import org.springframework.context.annotation.Configuration;

@Configuration
public class FeignConfig {


    @Bean
    Logger.Level feignLoggerLevel(){


        return Logger.Level.FULL;
    }
}

<!-- 修改YML -->
logging:
  level:
    com.springcloud.service.PaymentFeignService: debug
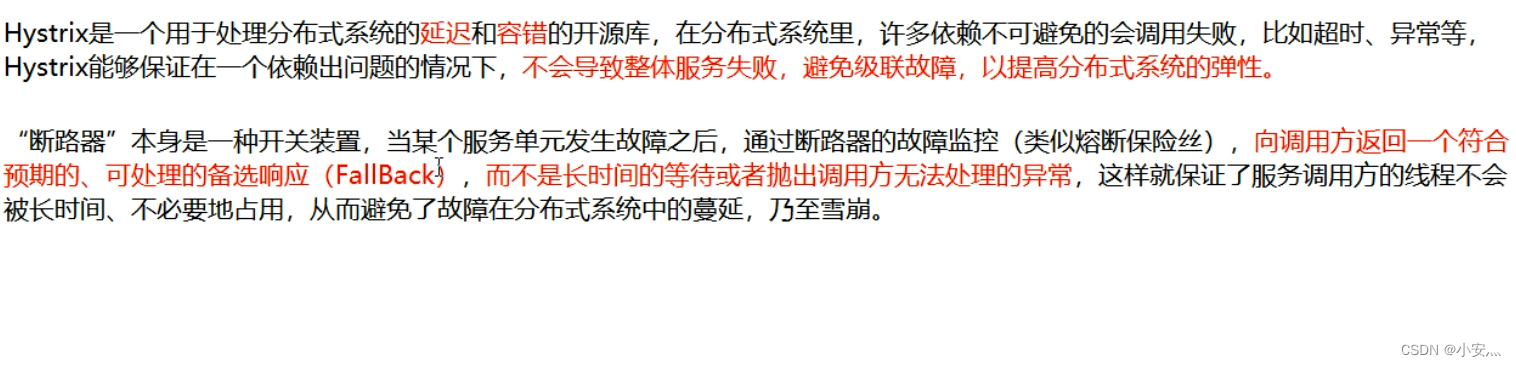
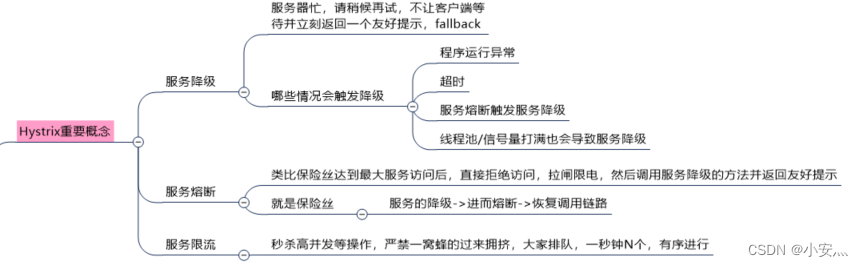
5.4、SpringCloud-Hystrix
POM
<dependency>
      <groupId>org.springframework.cloud</groupId>
      <artifactId>spring-cloud-starter-netflix-hystrix</artifactId>
</dependency>
服务提供者
主启动类
@EnableCircuitBreaker
服务调用者
<!-- 主启动类 -->
@EnableHystrix
<!-- YML -->
feign:
hystrix:
# 如果处理自身的容错就开启。开启方式与生产端不一样。
enabled: true
<!-- 业务类 -->
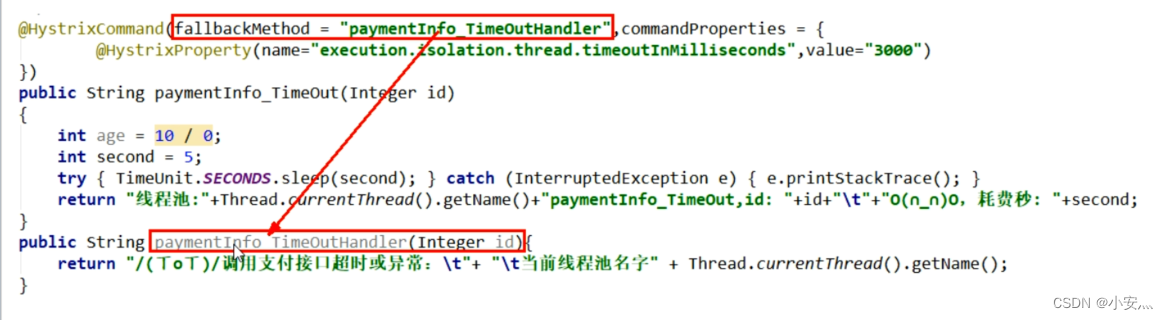
@GetMapping("/consumer/payment/hystrix/timeout/{id}")
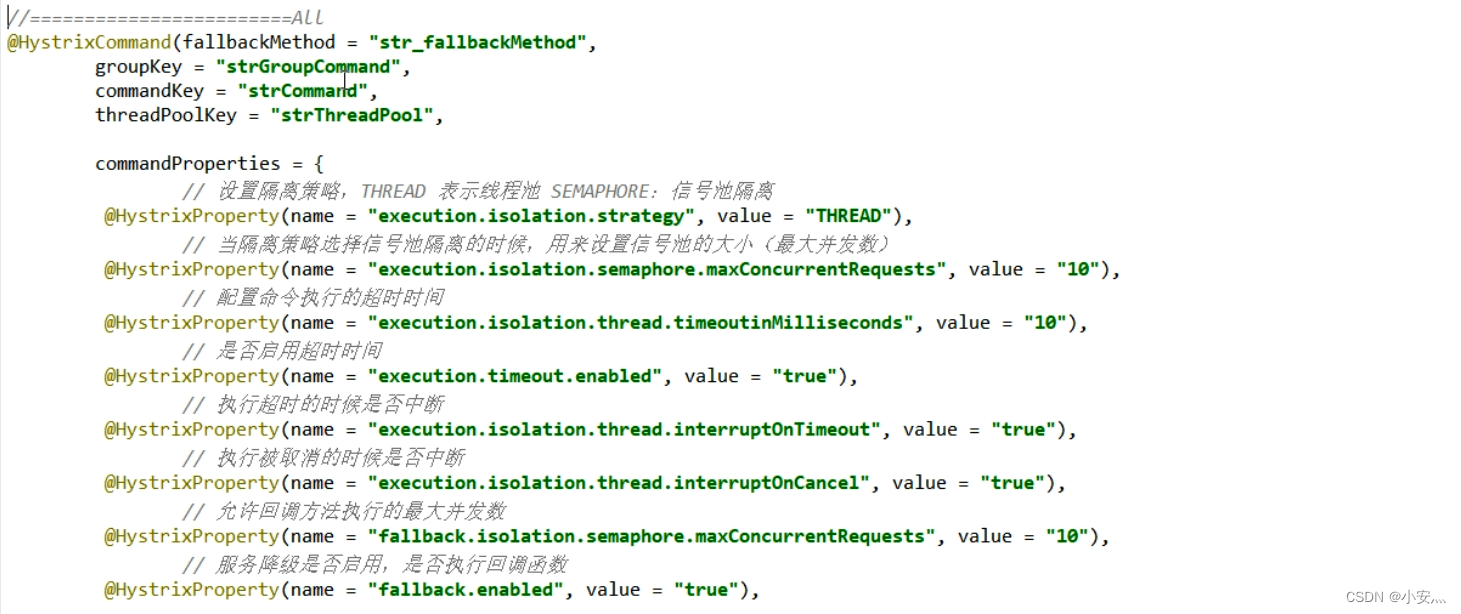
@HystrixCommand(fallbackMethod = "paymentTimeOutFallbackMethod",commandProperties = {
@HystrixProperty(name = "execution.isolation.thread.timeoutInMilliseconds",value = "1500") //3秒钟以内就是正常的业务逻辑
})
public String paymentInfo_TimeOut(@PathVariable("id") Integer id){
String result = paymentHystrixService.paymentInfo_TimeOut(id);
return result;
}
//兜底方法
public String paymentTimeOutFallbackMethod(@PathVariable("id") Integer id){
return "我是消费者80,对付支付系统繁忙请10秒钟后再试或者自己运行出错请检查自己,(┬_┬)";
}
defaultFallback
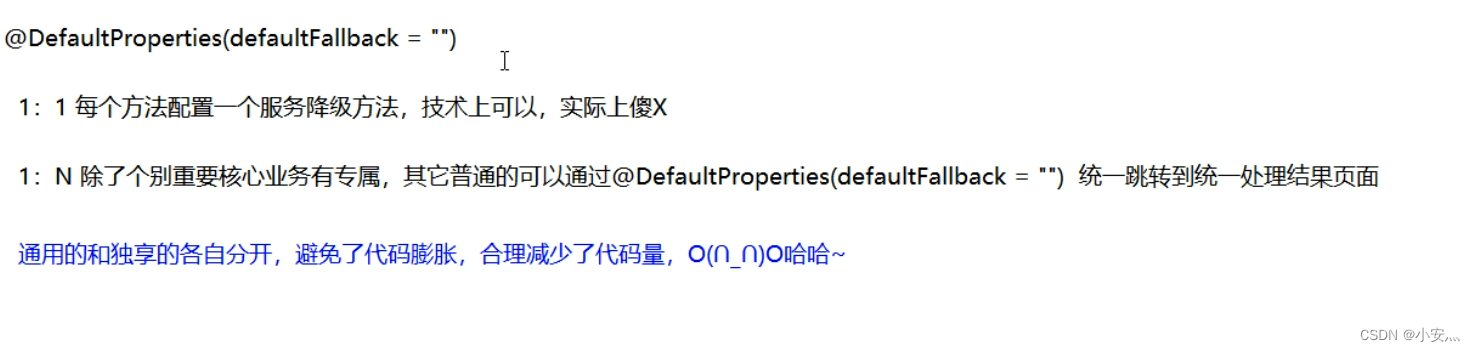
package com.springcloud.controller;

import com.netflix.hystrix.contrib.javanica.annotation.DefaultProperties;
import com.netflix.hystrix.contrib.javanica.annotation.HystrixCommand;
import com.netflix.hystrix.contrib.javanica.annotation.HystrixProperty;
import lombok.extern.slf4j.Slf4j;
import org.springframework.web.bind.annotation.GetMapping;
import org.springframework.web.bind.annotation.PathVariable;
import org.springframework.web.bind.annotation.RestController;

import javax.annotation.Resource;

@RestController
@Slf4j
//全局的
@DefaultProperties(defaultFallback = "global_FallbackMethod")
public class OrderHystrixController {


    @GetMapping("/consumer/payment/hystrix/timeout/{id}")
//    @HystrixCommand(fallbackMethod = "paymentTimeOutFallbackMethod",commandProperties = {


//            @HystrixProperty(name = "execution.isolation.thread.timeoutInMilliseconds",value = "1500")  //1.5秒钟以内就是正常的业务逻辑
//    })
    @HystrixCommand
    public String paymentInfo_TimeOut(@PathVariable("id") Integer id){


        int age = 10/0;
        String result = paymentHystrixService.paymentInfo_TimeOut(id);
        return result;
    }

    //兜底方法
    public String paymentTimeOutFallbackMethod(@PathVariable("id") Integer id){


        return "我是消费者80,对付支付系统繁忙请10秒钟后再试或者自己运行出错请检查自己,(┬_┬)";
    }

    // 下面是全局fallback方法
    public String global_FallbackMethod(){


        return "Global异常处理信息,请稍后再试,(┬_┬)";
    }
}
OpenFeigh调用fallback与业务隔离
1、OpenFeign调用service
package com.springcloud.service;

import org.springframework.cloud.openfeign.FeignClient;
import org.springframework.stereotype.Component;
import org.springframework.web.bind.annotation.GetMapping;
import org.springframework.web.bind.annotation.PathVariable;

@Component
@FeignClient(value = "CLOUD-PROVIDER-HYSTRIX-PAYMENT",fallback = PaymentFallbackService.class)
public interface PaymentHystrixService {


    @GetMapping("/payment/hystrix/ok/{id}")
    public String paymentInfo_OK(@PathVariable("id") Integer id);
    @GetMapping("/payment/hystrix/timeout/{id}")
    public String paymentInfo_TimeOut(@PathVariable("id") Integer id);
}
2、PaymentFallbackService类实现PaymentFeignClientService接口
package com.springcloud.service;

import org.springframework.stereotype.Component;

@Component
public class PaymentFallbackService implements PaymentHystrixService {


    @Override
    public String paymentInfo_OK(Integer id) {


        return "-----PaymentFallbackService fall back-paymentInfo_OK , (┬_┬)";
    }

    @Override
    public String paymentInfo_TimeOut(Integer id) {


        return "-----PaymentFallbackService fall back-paymentInfo_TimeOut , (┬_┬)";
    }
}
服务熔断
参数配置:HystrixCommandProperties
服务监控hystrixDashboard
Unable to connect to Command Metric Stream
@Bean
public ServletRegistrationBean getServlet(){


    HystrixMetricsStreamServlet streamServlet = new HystrixMetricsStreamServlet();
    ServletRegistrationBean registrationBean = new ServletRegistrationBean(streamServlet);
    registrationBean.setLoadOnStartup(1);
    registrationBean.addUrlMappings("/hystrix.stream");
    registrationBean.setName("HystrixMetricsStreamServlet");
    return registrationBean;
}

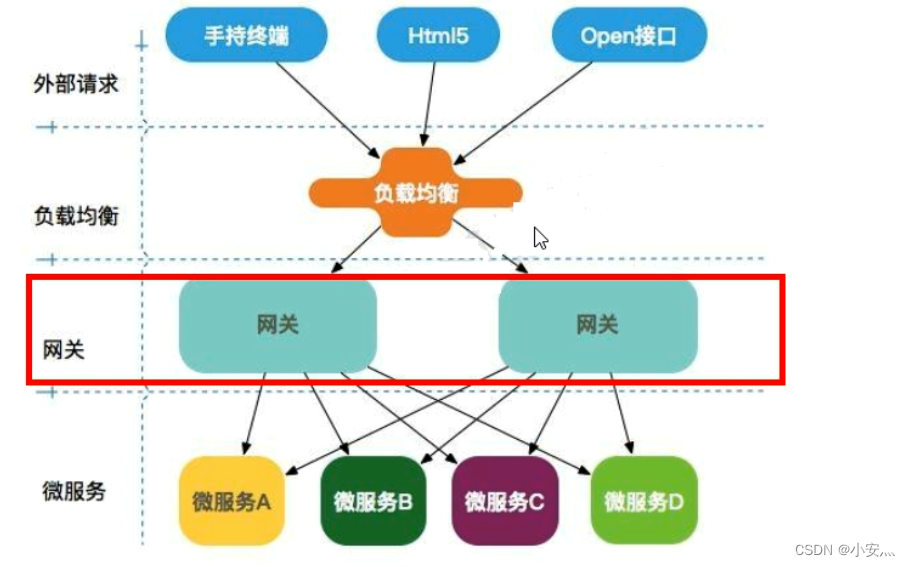
5.5、SpringCloud-GateWay


POM
<dependency>
      <groupId>org.springframework.cloud</groupId>
      <artifactId>spring-cloud-starter-gateway</artifactId>
</dependency>
YML
spring:
  application:
    name: cloud-gateway
  cloud:
    gateway:
      discovery:
        locator:
          enabled: true #开启从注册中心动态创建路由的功能,利用微服务名进行路由
      routes:
        - id: payment_routh #payment_route    #路由的ID,没有固定规则但要求唯一,建议配合服务名
          #uri: http://localhost:8001          #匹配后提供服务的路由地址
          uri: lb://cloud-payment-service #匹配后提供服务的路由地址
          predicates:
            - Path=/payment/get/**         # 断言,路径相匹配的进行路由

        - id: payment_routh2 #payment_route    #路由的ID,没有固定规则但要求唯一,建议配合服务名
          #uri: http://localhost:8001          #匹配后提供服务的路由地址
          uri: lb://cloud-payment-service #匹配后提供服务的路由地址
          predicates:
            - Path=/payment/lb/**         # 断言,路径相匹配的进行路由
            - After=2020-03-08T10:59:34.102+08:00[Asia/Shanghai]
            #            - Before=2020-03-08T10:59:34.102+08:00[Asia/Shanghai]
            #            - Between=2020-03-08T10:59:34.102+08:00[Asia/Shanghai] ,  2020-03-08T10:59:34.102+08:00[Asia/Shanghai]
            #            curl http://localhost:9527/payment/lb --cookie "username=zzyy"
            #            - Cookie=username,zzyy   #Cookie=cookieName,正则表达式
            # 请求头要有X-Request-Id属性并且值为整数的正则表达式 curl http://localhost:9527/payment/lb --cookie "username=zzyy" -H "X-Request-Id:11"
#            - Header=X-Request-Id, \d+
#            - Host=**.atguigu.com  # curl http://localhost:9527/payment/lb -H "Host:afae.atguigu.com"
代码实现路由
package com.springcloud.config;

import org.springframework.cloud.gateway.route.RouteLocator;
import org.springframework.cloud.gateway.route.builder.RouteLocatorBuilder;
import org.springframework.context.annotation.Bean;
import org.springframework.context.annotation.Configuration;

@Configuration
public class GateWayConfig {


    @Bean
    public RouteLocator customRouteLocator(RouteLocatorBuilder routeLocatorBuilder) {


        RouteLocatorBuilder.Builder routes = routeLocatorBuilder.routes();
        //routes.route("payment_routh", r -> r.path("/payment/get/**").uri("lb://cloud-payment-service")).build();
        //routes.route("payment_routh2", r -> r.path("/payment/lb/**").uri("lb://cloud-payment-service")).build();
        //routes.route("payment_routh2", r -> r.path("/payment/lb/**", "/payment/get/**").uri("lb://cloud-payment-service")).build();
        routes.route("path_rote_atguigu", r -> r.path("/guonei").uri("http://news.baidu.com/guonei")).build();
        return routes.build();
    }

}
微服务名实现路由
uri: lb://cloud-payment-service
Predicate
说白了,Predicate就是为了实现一组匹配规则,让请求过来找到对应的Route进行处理
Filter
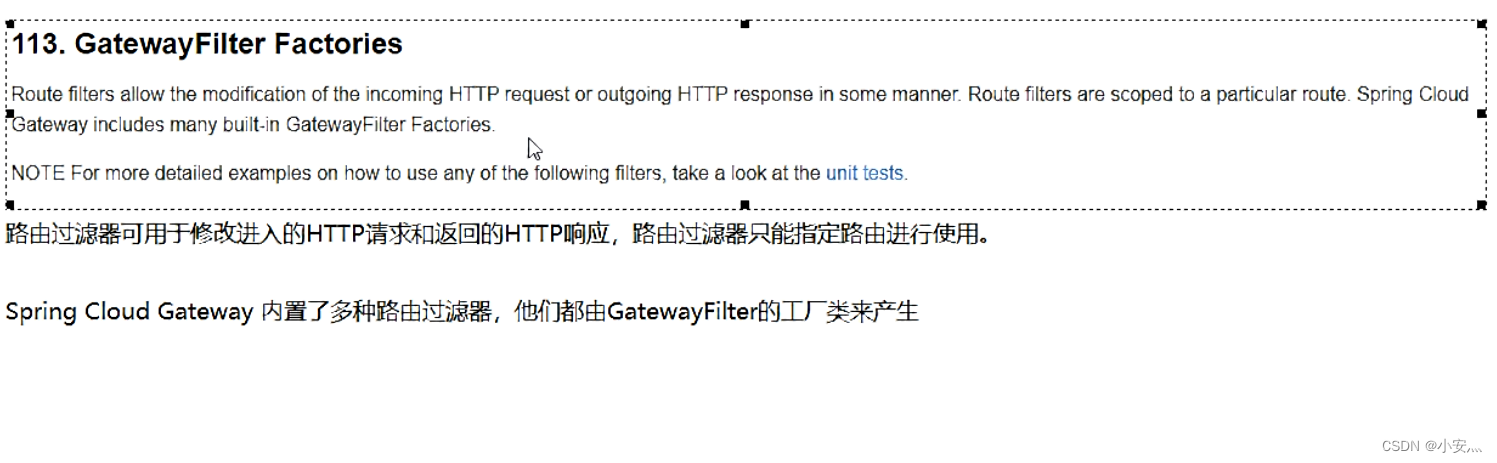
2、全局Filter
https://docs.spring.io/spring-cloud-gateway/docs/4.0.4-SNAPSHOT/reference/html/#global-filters
自定义Filter
package com.springcloud.filter;

import lombok.extern.slf4j.Slf4j;
import org.springframework.cloud.gateway.filter.GatewayFilterChain;
import org.springframework.cloud.gateway.filter.GlobalFilter;
import org.springframework.core.Ordered;
import org.springframework.http.HttpStatus;
import org.springframework.stereotype.Component;
import org.springframework.util.StringUtils;
import org.springframework.web.server.ServerWebExchange;
import reactor.core.publisher.Mono;

import java.util.Date;

@Component
@Slf4j
public class MyLogGateWayFilter implements GlobalFilter,Ordered {


    @Override
    public Mono<Void> filter(ServerWebExchange exchange, GatewayFilterChain chain) {


        log.info("*********come in MyLogGateWayFilter: "+new Date());
        String uname = exchange.getRequest().getQueryParams().getFirst("username");
        if(StringUtils.isEmpty(username)){


            log.info("*****用户名为Null 非法用户,(┬_┬)");
            exchange.getResponse().setStatusCode(HttpStatus.NOT_ACCEPTABLE);//给人家一个回应
            return exchange.getResponse().setComplete();
        }
        return chain.filter(exchange);
    }

    @Override
    public int getOrder() {


        return 0;
    }
}
单点登录
https://blog.csdn.net/qq_67390364/article/details/126481026
5.6、SpringCloud-Config

POM
<!-- server -->
<dependency>
      <groupId>org.springframework.cloud</groupId>
      <artifactId>spring-cloud-config-server</artifactId>
</dependency>

<!-- client -->
<dependency>
      <groupId>org.springframework.cloud</groupId>
      <artifactId>spring-cloud-starter-config</artifactId>
</dependency>
YML
<!-- server -->
spring:
  application:
    name: cloud-config-center #注册进Eureka服务器的微服务名
  cloud:
    config:
      server:
        git:
          uri: https://gitee.com/lixiaogou/sprincloud-config.git #GitHub上面的git仓库名字
          search-paths: #搜索目录
            - springcloud-config
      label: master #读取分支
      #启动成功后访问的路径 http://ip:3344/{label}/{application}-{profile}.yml 能访问的配置文件 就表示成功了

<!-- client - bootstap.yml -->
spring:
  application:
    name: config-client
  cloud:
    # master分支上config-dev.yml的配置文件
    config:
      # 分支名称
      label: master
      # 配置文件名称
      name: config
      # 读取后缀名称
      profile: dev
      uri: http://localhost:3344
主启动类
<!-- server -->
@EnableConfigServer

<!-- client -->
无
@RestController
public class ConfigClientController {


    @Value("${config.info}")
    private String configInfo;
    @GetMapping("/configInfo")
    public String getConfigInfo(){


        return configInfo;
    }
}
动态刷新
1、POM
<!-- client -->
<dependency>
    <groupId>org.springframework.boot</groupId>
    <artifactId>spring-boot-starter-actuator</artifactId>
</dependency>
2、YML
<!-- server && client -->
management:
  endpoints:
    web:
      exposure:
        include: "*"
3、增加@RefreshScope
@RefreshScope
@RestController
public class ConfigClientController {


    @Value("${config.info}")
    private String configInfo;
    @GetMapping("/configInfo")
    public String getConfigInfo(){


        return configInfo;
    }
}
4、手动刷新:需要每台都手动刷新
curl -X POST “http://localhost:3355/actuator/refresh”
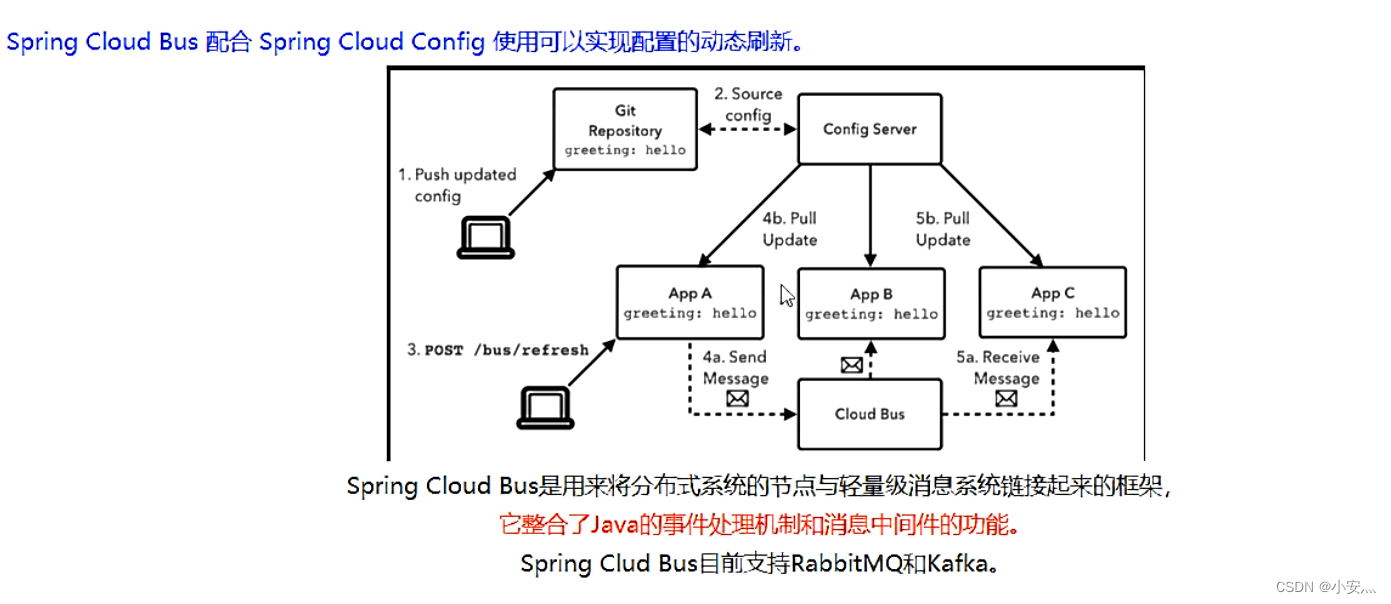
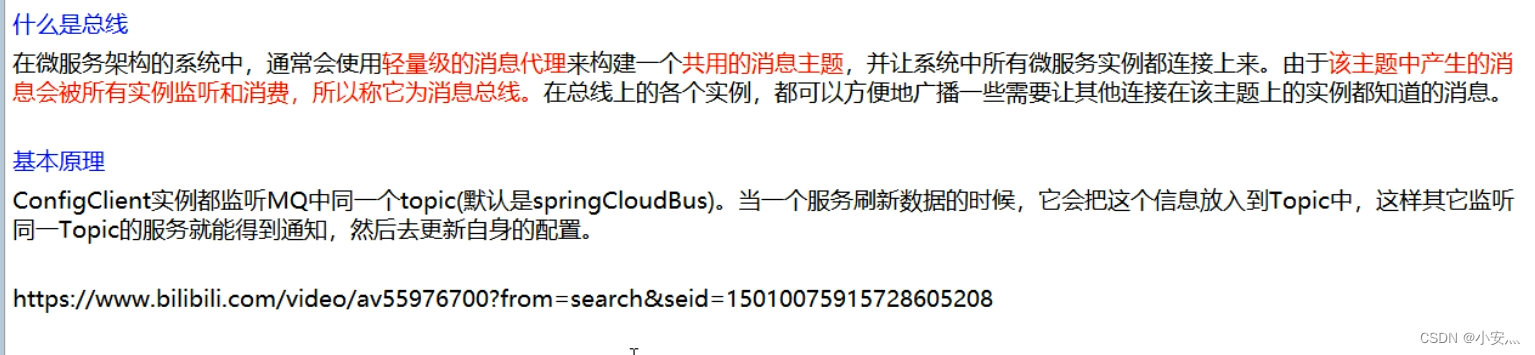
5、自动刷新、全量刷新、指定刷新(SpringCloud Bus)
5.7、SpringCloud-Bus消息总线
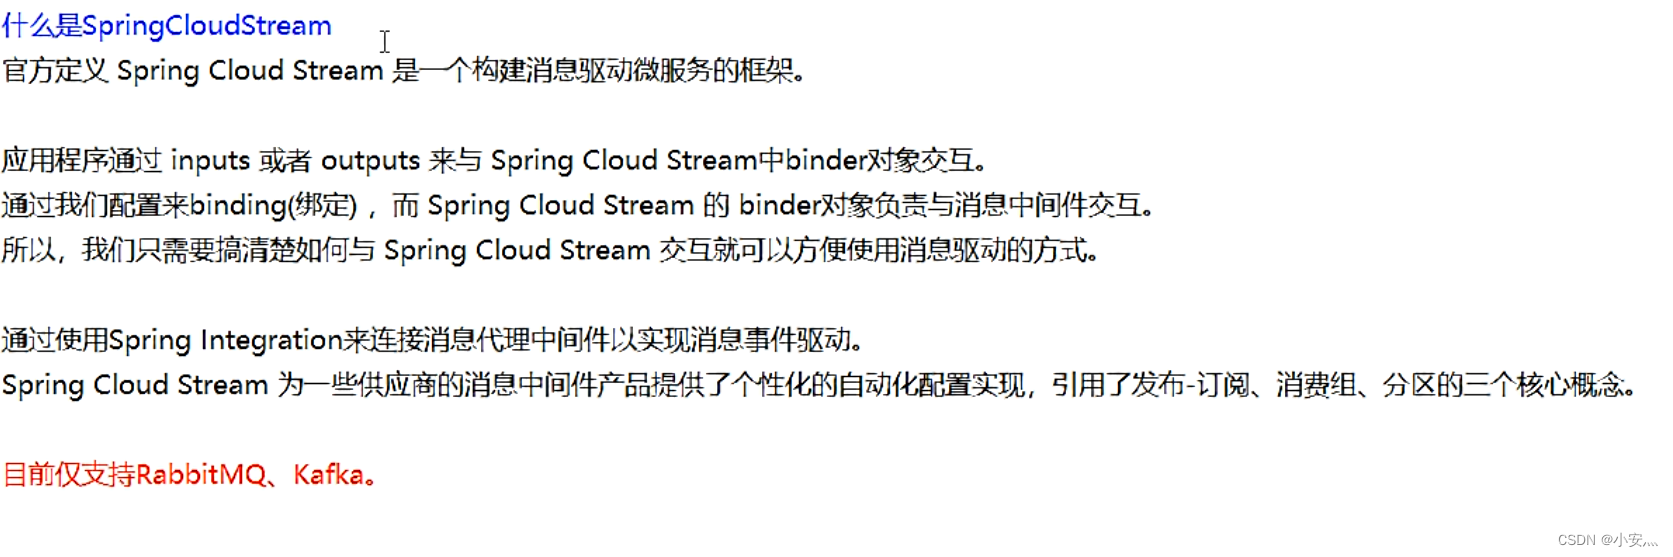
5.8、SpringCloud-Stream消息驱动
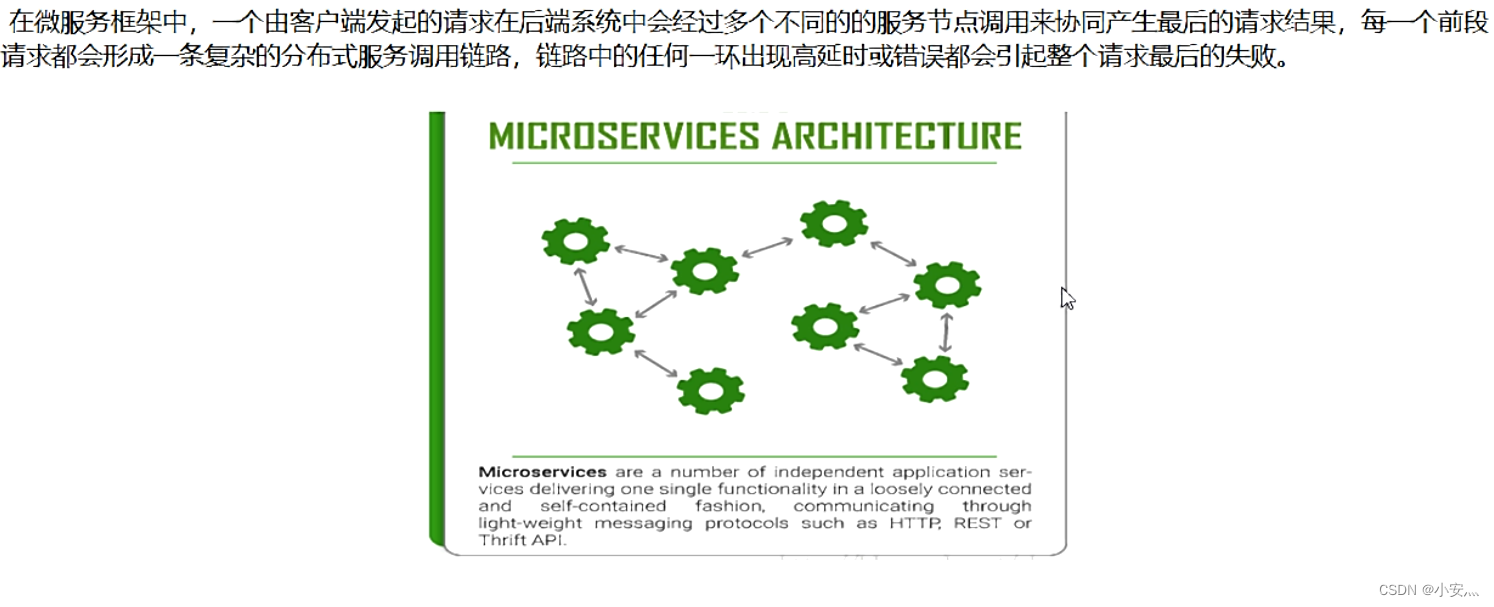
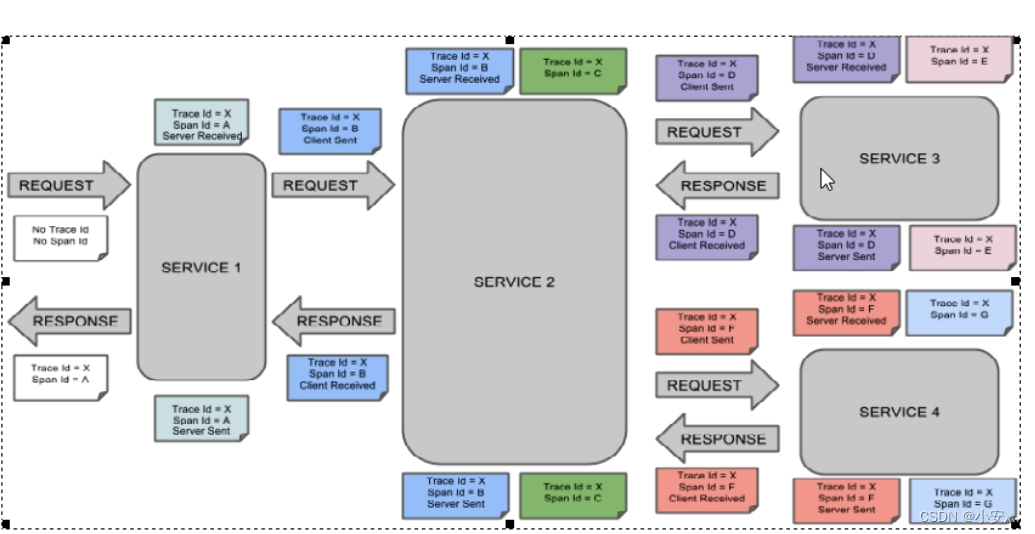
5.9、SpringCloud-Sleuth分布式请求链路追踪
Spring Cloud Sleuth提供了一套完整的服务跟踪的解决方案
在分布式系统中提供追踪解决方案并且兼容支持了zipkin
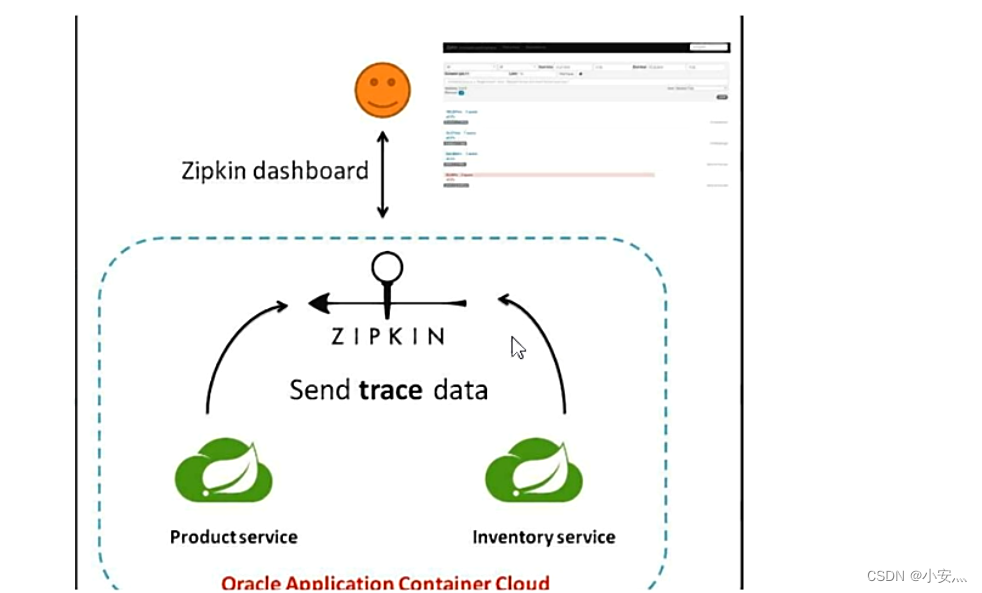
下载安装zipkin
服务改造
1、POM
<!--包含了sleuth+zipkin-->
<dependency>
      <groupId>org.springframework.cloud</groupId>
      <artifactId>spring-cloud-starter-zipkin</artifactId>
</dependency>
2、YML
spring:
  application:
    name: cloud-payment-service
  zipkin:
    base-url: http://localhost:9411
  sleuth:
    sampler:
    probability: 1
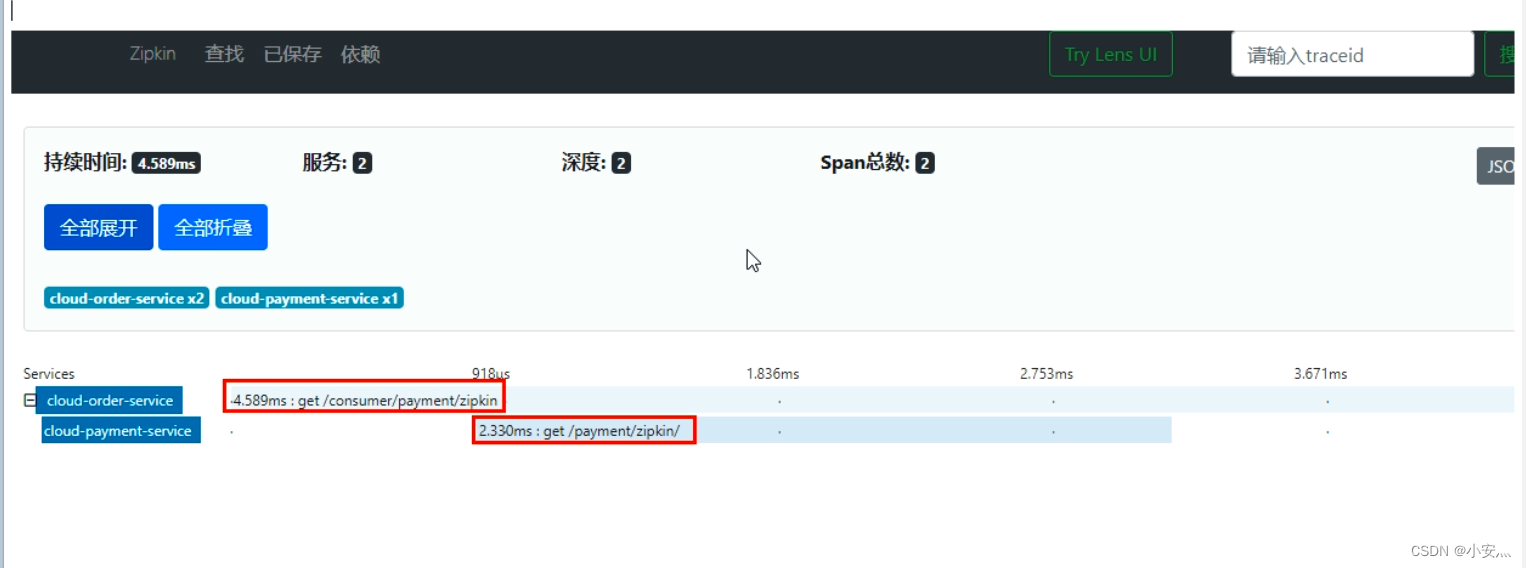
3、访问
http:localhost:9411
原理
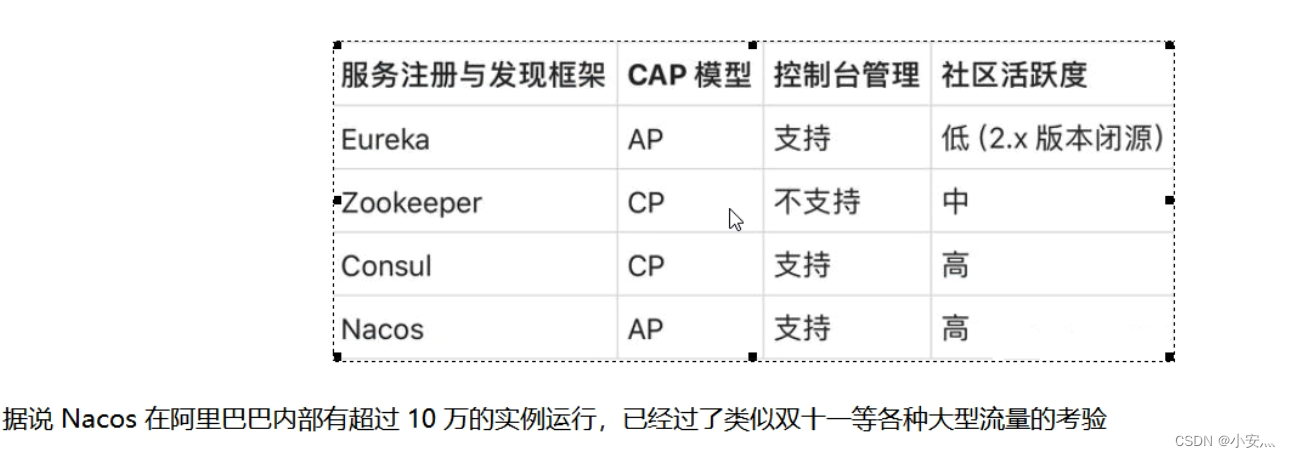
6.0、SpringCloudAlibaba-Nacos
一个更易于构建云原生应用的动态服务发现,配置管理和服务管理中心
因官网文档很好,这里不做说明,仅给出几个文档
nacos-github:https://github.com/alibaba/Nacos
nacos官网:https://nacos.io/zh-cn/docs/quick-start.html
springcloud-nacos文档:https://spring-cloud-alibaba-group.github.io/github-pages/2021/en-us/index.html#_spring_cloud_alibaba_nacos_discovery
nacos-example-github:https://github.com/alibaba/spring-cloud-alibaba/tree/2022.x/spring-cloud-alibaba-examples/nacos-example
6.1、SpringCloudAlibaba-Sentinel
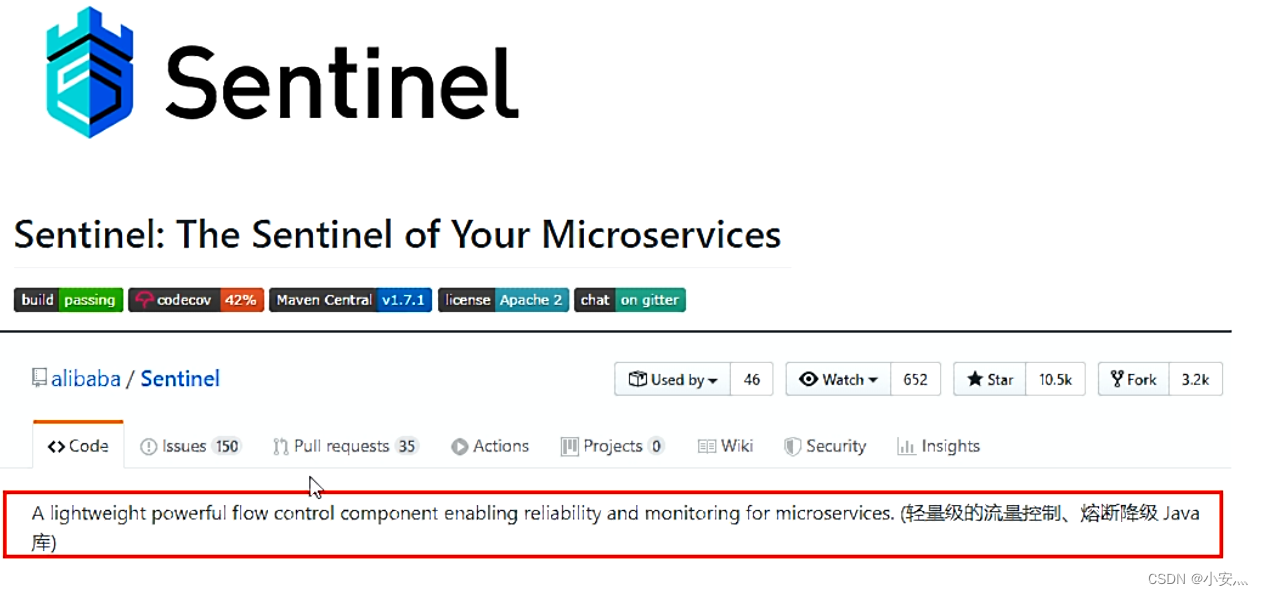
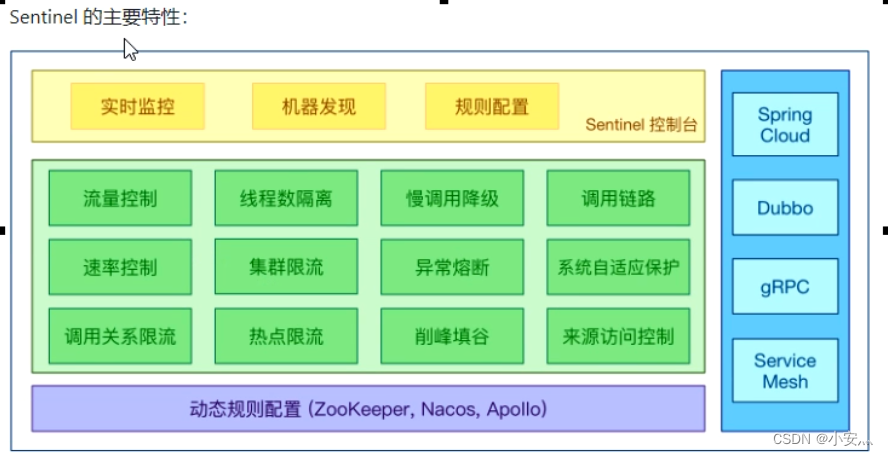
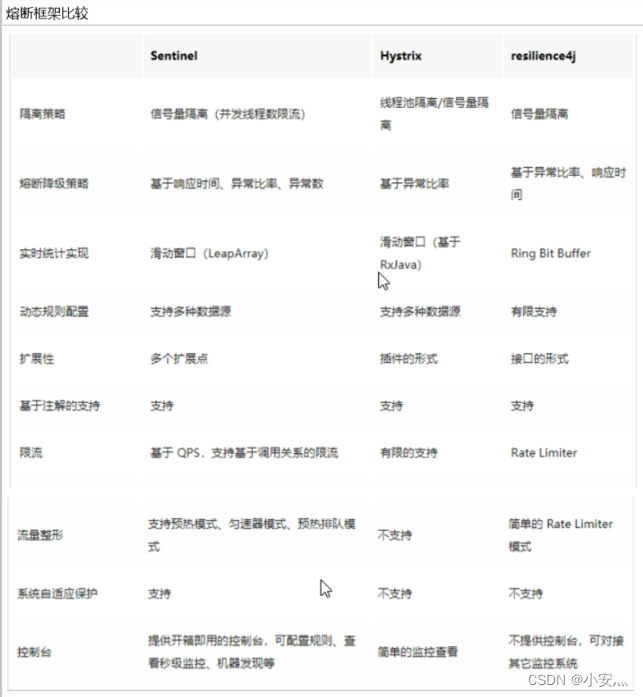
因官网文档很好,这里不做说明,仅给出几个文档
sentinel-文档-中文:https://github.com/alibaba/Sentinel/wiki/%E4%BB%8B%E7%BB%8D
sentinel-github:https://github.com/alibaba/Sentinel
sentinel-example-github:https://github.com/alibaba/spring-cloud-alibaba/tree/2022.x/spring-cloud-alibaba-examples/sentinel-example
自定义限流处理类
1、新建限流处理类
import com.alibaba.csp.sentinel.slots.block.BlockException;
import com.atguigu.springcloud.entitles.CommonResult;

public class CustomerBlockHandler {


    public static CommonResult handleException(BlockException exception) {


        return new CommonResult(2020, "自定义限流处理信息....CustomerBlockHandler");
    }

}
2、使用
    @GetMapping("/rateLimit/customerBlockHandler")
    @SentinelResource(value = "customerBlockHandler",
            blockHandlerClass = CustomerBlockHandler.class,
            blockHandler = "handlerException2")
    public CommonResult customerBlockHandler() {


        return new CommonResult(200, "按客戶自定义", new Payment(2020L, "serial003"));
    }
BolckHandler和FallBack
- FallBack:管运行异常
- blockHandler:管配置违规
- 忽略某个异常:
@SentinelResource(value = “fallback”, exceptionsToIgnore = {IllegalArgumentException.class})
import com.alibaba.csp.sentinel.annotation.SentinelResource;
import com.alibaba.csp.sentinel.slots.block.BlockException;
import lombok.extern.slf4j.Slf4j;
import org.springframework.web.bind.annotation.GetMapping;
import org.springframework.web.bind.annotation.PathVariable;
import org.springframework.web.bind.annotation.RequestMapping;
import org.springframework.web.bind.annotation.RestController;
import org.springframework.web.client.RestTemplate;
import javax.annotation.Resource;


@RestController
@Slf4j
public class CircleBreakerController {


    @RequestMapping("/consumer/fallback/{id}")
    // fallback:只负责业务异常,业务异常执行
    // blockHandler:只负责sentinel控制台配置违规,当sentinl符合规则执行
    @SentinelResource(value = "fallback",fallback = "handlerFallback",blockHandler = "blockHandler",
            exceptionsToIgnore = {

    IllegalArgumentException.class})
    public CommonResult<Payment> fallback(@PathVariable Long id) {


        return result;
    }

    //fallback
    public CommonResult handlerFallback(@PathVariable  Long id,Throwable e) {


        Payment payment = new Payment(id,"null");
        return new CommonResult<>(444,"兜底异常handlerFallback,exception内容  "+e.getMessage(),payment);
    }

    //blockHandler
    public CommonResult blockHandler(@PathVariable  Long id,BlockException blockException) {


        Payment payment = new Payment(id,"null");
        return new CommonResult<>(445,"blockHandler-sentinel限流,无此流水: blockException  "+blockException.getMessage(),payment);
    }
}
持久化:
https://blog.csdn.net/qq_17522211/article/details/129689938?spm=1001.2014.3001.5502
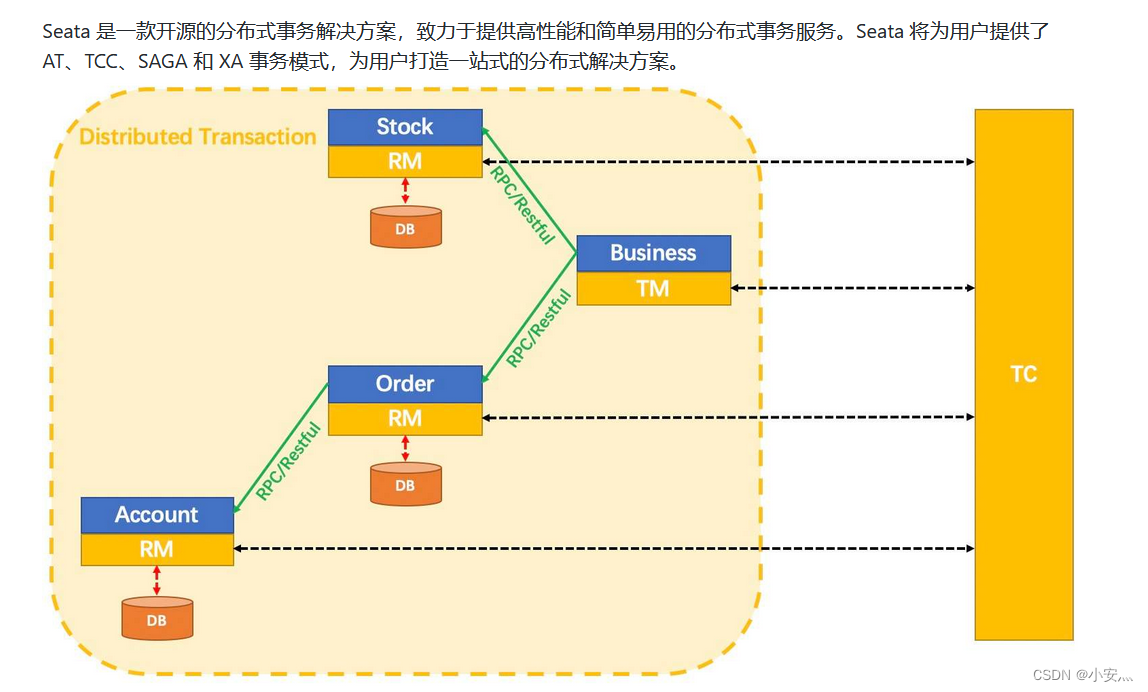
6.2、SpringCloudAlibaba-Seata
一次业务操作需要跨多个数据源或需要跨多个系统进行远程调用,就会产生分布式事务问题
因官网文档很好,这里不做说明,仅给出几个文档
seata-文档:http://seata.io/zh-cn/
6.3、SpringCloudAlibaba-RocketMQ
因官网文档很好,这里不做说明,仅给出几个文档
文档:https://rocketmq.apache.org/
6.4、SpringCloudAlibaba-OSS
因官网文档很好,这里不做说明,仅给出几个文档
文档:https://www.aliyun.com/product/oss
6.5、SpringCloudAlibaba-SMS
因官网文档很好,这里不做说明,仅给出几个文档
文档:https://www.aliyun.com/product/sms
6.6、SpringCloudAlibaba-SchedulerX
因官网文档很好,这里不做说明,仅给出几个文档
文档:https://www.aliyun.com/aliware/schedulerx?spm=5176.10695662.784137.1.4b07363dej23L3
6.7、Alibaba-Seata
官网:http://seata.io/zh-cn/index.html
Seata术语
- TC (Transaction Coordinator) - 事务协调者维护全局和分支事务的状态,驱动全局事务提交或回滚。
- TM (Transaction Manager) - 事务管理器定义全局事务的范围:开始全局事务、提交或回滚全局事务。
- RM (Resource Manager) - 资源管理器管理分支事务处理的资源,与TC交谈以注册分支事务和报告分支事务的状态,并驱动分支事务提交或回滚。
Seata-Server安装配置
1、下载seata-server
http://seata.io/zh-cn/blog/download.html
2、修改conf目录下的file.conf
2.1、service模块
<!-- 自定义 最好以 tx_group结尾-->
vgroup_mapping.my_test_tx_group = "fsp_tx_group"
2.2、store模块
<!-- mode改为db -->
mode = "db"
<!-- 配置db信息 -->
url = "jdbc:mysql://127.0.0.1:3306/seata"
user = "用户名"
password = ""
3、在seata库创建表
建表db_store.sql在\seata-server-XXX\seata\conf目录里面
4、修改\conf目录下的registry.conf
registry {
  <!-- 改为连接nacos -->
  # file 、nacos 、eureka、redis、zk、consul、etcd3、sofa
  type = "nacos"
  <!-- 配置nacos地址 -->
  nacos {
    serverAddr = "localhost:8848"
    namespace = ""
    cluster = "default"
  }
seata-client使用 (项目使用)
1、项目数据库均创建表
conf目录下的db_undo_log.sql
2、sources目录下新建文件file.conf
<!-- 可以使用seat/conf下的file.conf文件,需要修改 service { 下的 -->
<!-- fsp_tx_group 与 seata-server 配置一致 -->
vgroup_mapping.fsp_tx_group = "default"
3、sources目录下新建文件registry.conf
<!-- 可以使用seat/conf下的文件registry.conf文件 -->
4、pom (需要改为seata-server的版本)
<!--seata-->
        <dependency>
            <groupId>com.alibaba.cloud</groupId>
            <artifactId>spring-cloud-starter-alibaba-seata</artifactId>
            <exclusions>
                <exclusion>
                    <artifactId>seata-all</artifactId>
                    <groupId>io.seata</groupId>
                </exclusion>
            </exclusions>
        </dependency>
        <dependency>
            <groupId>io.seata</groupId>
            <artifactId>seata-all</artifactId>
            <!-- 改为seater-server的版本 -->
            <version>0.9.0</version>
        </dependency>
5、YML
spring:
  application:
    name: seata-order-service
  cloud:
    alibaba:
      seata:
        #自定义事务组名称需要与seata-server中的对应
        tx-service-group: fsp_tx_group
6、事务方法增加注解:事务发起方添加即可
// name 与 配置的一致
@GlobalTransactional(name = "fsp-create-order",rollbackFor = Exception.class)
7、流程
