又是一篇万字长文,万字长文让你学会Mybatis
目录
MyBatis介绍:
(1)mybatis是一款优秀的持久层框架,用于简化jdbc开发
(2)mybatis本是Apache的一个开源项目iBatis,2010年这个项目由Apache software founddation 迁移到了Google code,并且改名为MyBatis.2013年11月迁移到Github
Javaee的三层架构:
表现层,业务层,持久层
框架是半成品软件,是可重复,通用,软件的基础代码模型
jdb缺点:
(1)硬编码:
就是在注册驱 动和获取连接时的字符串发生变动时。需要改动代码,还要重新编译,运行。
在写SQL语句时也是硬编码,需要修改
在mybatis中 sql语句与注册驱动等代码会写入配置文件中
(2)操作繁琐:
手动设置参数,手动封锁结果集
mybatis把这些字符串代码写入配置文件,SQL语句同样写入配置文件
设置参数,封装结果集都会自动完成
Mybatis几乎免除了所有jdbc代码,以及设置参数和获取结果集的工作
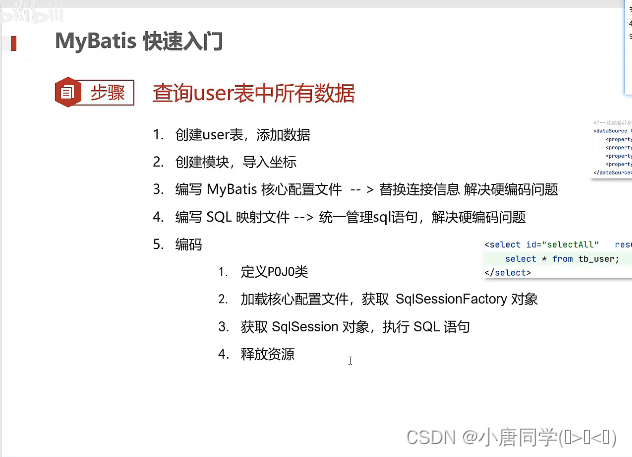
mybatis快速入门:
Mapper代理开发:
引入Mapper代理的目的 1. Mapper代理解决代码中剩余的硬编码问题()
//2.获取 SqlSession对象 来执行sql
SqlSession sqlSession = sqlSessionFactory.openSession();
让后通过获取对象来调用方法执行SQL
List<Object> list = sqlSession.selectList("test.selectAll");
在此硬编码为
UseMapper.xml中的名称空间(test)与id(selectAll)
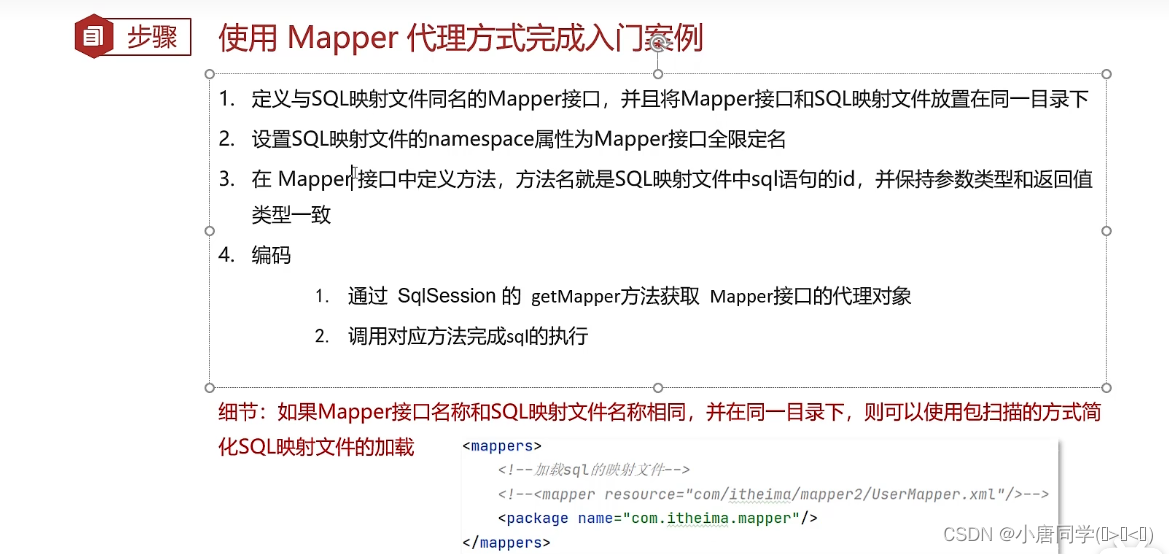
Mapper代理开发的方式:
步骤1.讲解:
同名且要求Mapper接口和sql映射文件放在同一目录下
方式:
在resources包下创建一个包,以(与Mapper接口包名一样 .用/表示 直接把sql映像文件放在resources包下的与Mapper接口包名一样包里)
这样在文件里看Mapper接口文件目录下就有sql映像文件
对整个项目进行编译,框选项目右键选则run maven 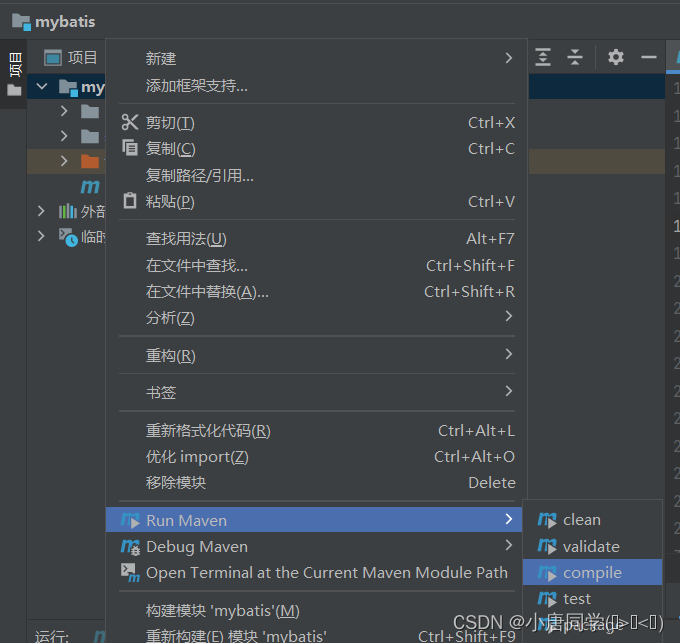
在新版中需要下载插件才有run maven(setings)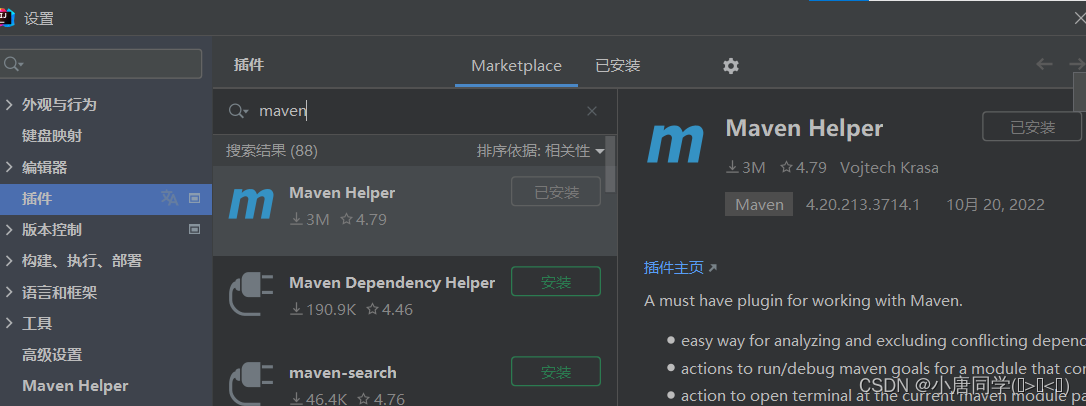
下载后就会出现run maven进行编译
下边就会出现class路径,打开后找到你需要找的目录下,可以看到配置文件在同一目录下

步骤2:
设置sql映射文件的namespace属性(名称空间)为Mapper接口的全限定名

步骤3:
在Mapper接口中定义方法,方法名就是SQL映射文件中SQL语句id,并保持参数类型和返回值类型一致
在接口中代码
package com.itheima.mapper;

import com.itheima.pojo.User;

import java.util.List;

public interface UseMapper {
    List<User> selectAll();
    /*user 返回的是单个对象
    *用List集合返回的是集合
    * */
}
4.编码:
     (1)  获取userMapper接口的代理对象(通过sqlSession获取Mapper接口代理对象)
通过这个生成的对象可以找到UserMapper这个接口接着可以找到同目录下有一个同名的SQL映射文件让后找到SQL语句
UseMapper mapper = sqlSession.getMapper(UseMapper.class);(2)调用方法(对应sql映射文件的id-通过id找到对应的SQL语句)
List<User> users = mapper.selectAll();实际上底层执行的还是sqlSession.selectList方法(因为返回的是List集合)
List<Object> list = sqlSession.selectList("test.selectAll");
包扫描SQL配置文件:
 <!--Mapper代理方式简化-->
        <package name="com/itheima/mapper"/>
定位到Mapper 因为sql映射文件和接口在同一目录下,而且在目录下有多个配置文件时可以都进行加载 Mapper代理代码实现: demo类代码:
package com.itheima.pojo;

import org.apache.ibatis.io.Resources;
import org.apache.ibatis.session.SqlSession;
import org.apache.ibatis.session.SqlSessionFactory;
import org.apache.ibatis.session.SqlSessionFactoryBuilder;

import java.io.IOException;
import java.io.InputStream;
import java.util.List;

public class mybatisdemo {
    public static void main(String[] args) throws IOException {
        //1.加载mybatis的核心配置文件,获取sqlseeionFactory

        String resource = "mybatis-config.xml";
        InputStream inputStream = Resources.getResourceAsStream(resource);
        SqlSessionFactory sqlSessionFactory = new SqlSessionFactoryBuilder().build(inputStream);
    //2.获取 SqlSession对象   来执行sql
        SqlSession sqlSession = sqlSessionFactory.openSession();
        //3.执行SQL
        List<Object> list = sqlSession.selectList("test.selectAll");
        System.out.println(list);
        sqlSession.close();

    }
}
项目运行之后会有错误(警告),但是能够运行

这个是数据库com.mysql.jdbc.Driver(注册驱动已经被弃用,建议你使用新的驱动 com.mysql.cj.jdbc.Driver。
配置mybatis核心文件:
environments:配置数据库连接环境信息,可以配置多个environment,通过default属性(对应environment中的id)来切换不同的environment
mappers:加载SQL映射文件,可以有多个<mapper>也可以用包扫描<package name="包名"/>
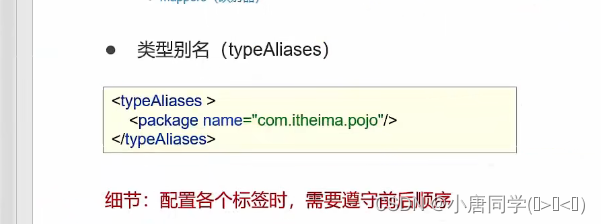
配置别名之后在SQL映射文件中
就可以直接写user(不再区分大小写),别名可有简化配置很多基础类型时自动进行类型别名
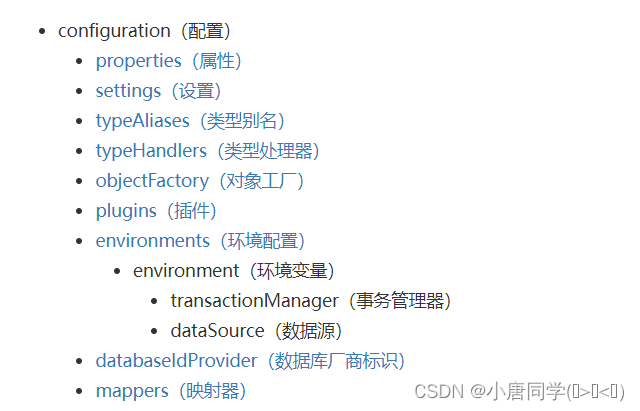
类型别名的放置要按照顺序(官网顺序)
案例1:
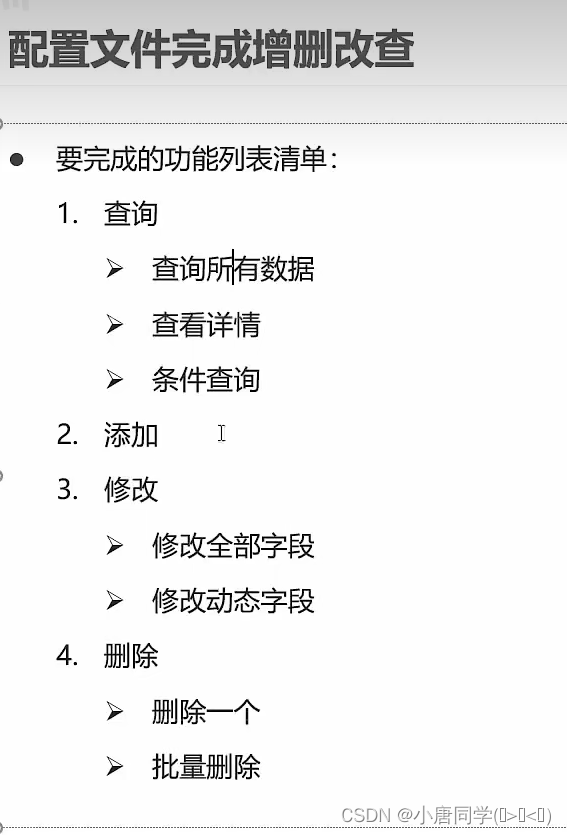
完成品牌数据的增删改查操作
准备阶段:
准备表:
-- 删除tb_brand表
drop table if exists tb_brand;
-- 创建tb_brand表
create table tb_brand
(
    -- id 主键
    id           int primary key auto_increment,
    -- 品牌名称
    brand_name   varchar(20),
    -- 企业名称
    company_name varchar(20),
    -- 排序字段
    ordered      int,
    -- 描述信息
    description  varchar(100),
    -- 状态:0:禁用  1:启用
    status       int
);
-- 添加数据
insert into tb_brand (brand_name, company_name, ordered, description, status)
values ('三只松鼠', '三只松鼠股份有限公司', 5, '好吃不上火', 0),
       ('华为', '华为技术有限公司', 100, '华为致力于把数字世界带入每个人、每个家庭、每个组织,构建万物互联的智能世界', 1),
       ('小米', '小米科技有限公司', 50, 'are you ok', 1);


SELECT * FROM tb_brand;
再pojo下建java实体类
package com.itheima.pojo;

/*
 * 品牌
 *
 * alt + 鼠标左键:整列编辑
 *
 * 在实体类中,基本数据类型建议使用其对应的包装类型
 */

public class Brand {
    // id 主键
    private Integer id;
    // 品牌名称
    private String brandName;
    // 企业名称
    private String companyName;
    // 排序字段
    private Integer ordered;
    // 描述信息
    private String description;
    // 状态:0:禁用  1:启用
    private Integer status;


    public Integer getId() {
        return id;
    }

    public void setId(Integer id) {
        this.id = id;
    }

    public String getBrandName() {
        return brandName;
    }

    public void setBrandName(String brandName) {
        this.brandName = brandName;
    }

    public String getCompanyName() {
        return companyName;
    }

    public void setCompanyName(String companyName) {
        this.companyName = companyName;
    }

    public Integer getOrdered() {
        return ordered;
    }

    public void setOrdered(Integer ordered) {
        this.ordered = ordered;
    }

    public String getDescription() {
        return description;
    }

    public void setDescription(String description) {
        this.description = description;
    }

    public Integer getStatus() {
        return status;
    }

    public void setStatus(Integer status) {
        this.status = status;
    }

    @Override
    public String toString() {
        return "Brand{" +
                "id=" + id +
                ", brandName='" + brandName + '\'' +
                ", companyName='" + companyName + '\'' +
                ", ordered=" + ordered +
                ", description='" + description + '\'' +
                ", status=" + status +
                '}';
    }
}
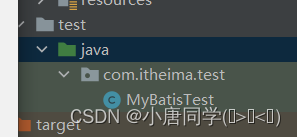
再测试模块中建一个测试类
下载Mybatis插件MybatisX
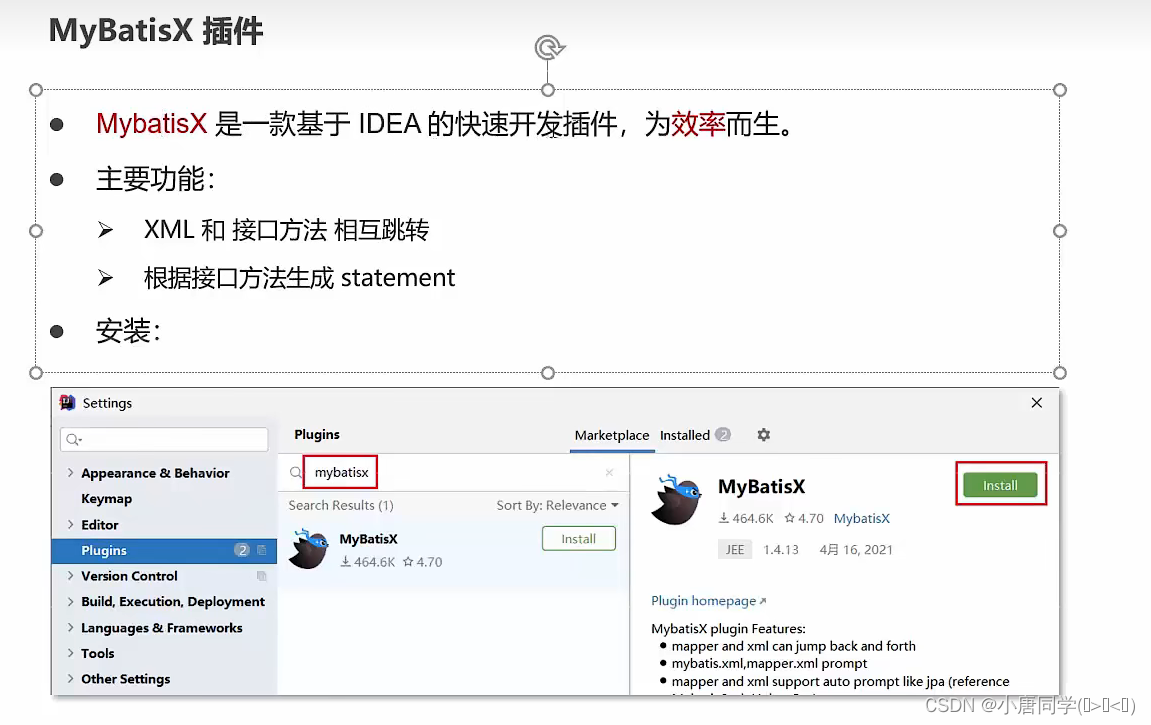
下载之后你的SQL映射文件就会变身变成红色小鸟
你的对应接口就会变成蓝色小鸟
配置文件完成增删改查
(1)查询所有数据
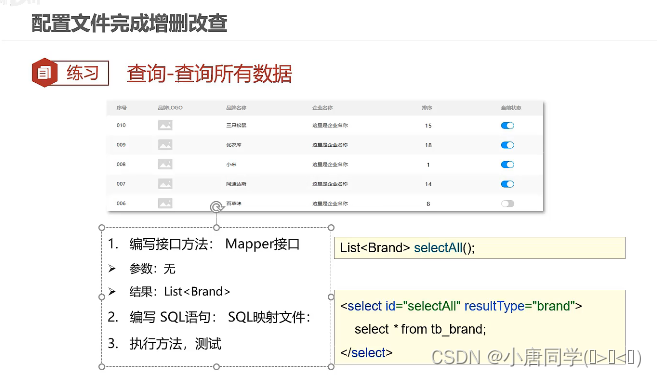
核心点:
1.要根据业务不同写出不同的SQL语句
2.完成业务 有无参数
3.完成业务返回的结果
步骤1:
创建BrandMapper接口
package com.itheima.mapper;

import com.itheima.pojo.Brand;

import java.util.List;

public interface BrandMapper {
    List<Brand> selectAll();
}
在selectAll那里ALT+enter直接跳转生成SQL映射文件
生成后把resultType里的内容改成brand(类型别名)
注意(实体类的定义名称要与数据库中字段名称一致,否则会出现null)
不一样就不会进行自动封装
封装方式:
(1)在SQL映射文件中sql语句中查询列名,给列名起别名,与实体类相同
(2)SQL片段:
在该方法中id可能会爆红,打开setting ----》编辑器---》语言注入--》
找到这个 语言双击,让后删除前面的sql
 <sql id="brand_column">
        id, brand_name as brandname, company_name as companyname, ordered, description, status
    </sql>

    <select id="selectAll" resultType="brand">
        select
        <include refid="brand_column"/>
        from tb_brand;
    </select>
(3)通过<resultMap id="" type="">映射
id是唯一标识
type是映射到那个实体类(支持类型别名)
 <resultMap id="braandResultMap" type="brand">
        <result column="brand_name" property="brandName"/>
        <result column="company_name" property="companyName"/>
        <!--<id></id>  完成主键字段的映射-->
<!--   <result></result>   是映射其他字段-->
    </resultMap>
两个子标签: (看表与实体类那个字段不一样进行选择) <id></id> 完成主键字段的映射 <result></result> 是映射其他字段 子标签的两个属性: column:表的列名 property:实体类的属性名 <resultMap>的使用:
1.定义标签
2.在select标签中使用resultMap属性替换resultType属性
(2)查看详情:
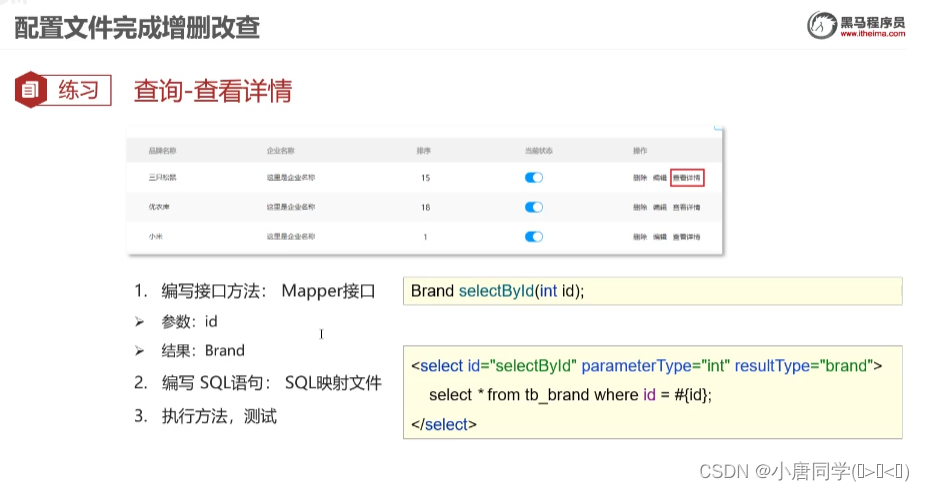
 <select id="selectById" resultMap="braandResultMap">
select * from tb_brand where id=#{id};

/*
  参数占位符
  1.#{}     :将其替换成?占位符  对?设置参数值   为了防止SQL注入
  2.${}     :拼SQL直接带入参数   存在SQL注入问题
  3.参数传递时都用#{}
  4.${}在表名或列名不固定的状态下  可以使用
        */
<!--#{id}相当于写了一个?一样  一个字符串和接口方法里的参数名称保持一致-->
    </select>
参数占位符
1.#{} :将其替换成?占位符 对?设置参数值 为了防止SQL注入
2.${} :拼SQL直接带入参数 存在SQL注入问题
3.参数传递时都用#{}
4.${}在表名或列名不固定的状态下 可以使用
*/
<!--#{id}相当于写了一个?一样 一个字符串和接口方法里的参数名称保持一致-->
参数类型:(可以不写)
我们可以在select标签中添加属性如下:
<select id="selectById" parameterType="int" resultMap="braandResultMap">特殊字符的处理 在xml中 小于号是不符合语法规则xml规则在xml文件开头是< 1.需要转义字符 小于号转移成 < 2.CDATA区
代码实例1:
<select id="selectById" resultMap="braandResultMap">
select * from tb_brand where id < #{id};
</select>代码实例2:
 <select id="selectById" resultMap="brandResultMap">
        select * from tb_brand where id
    <![CDATA[
     <
    ]]> #{id};
    </select>
(3)查询-多条件查询
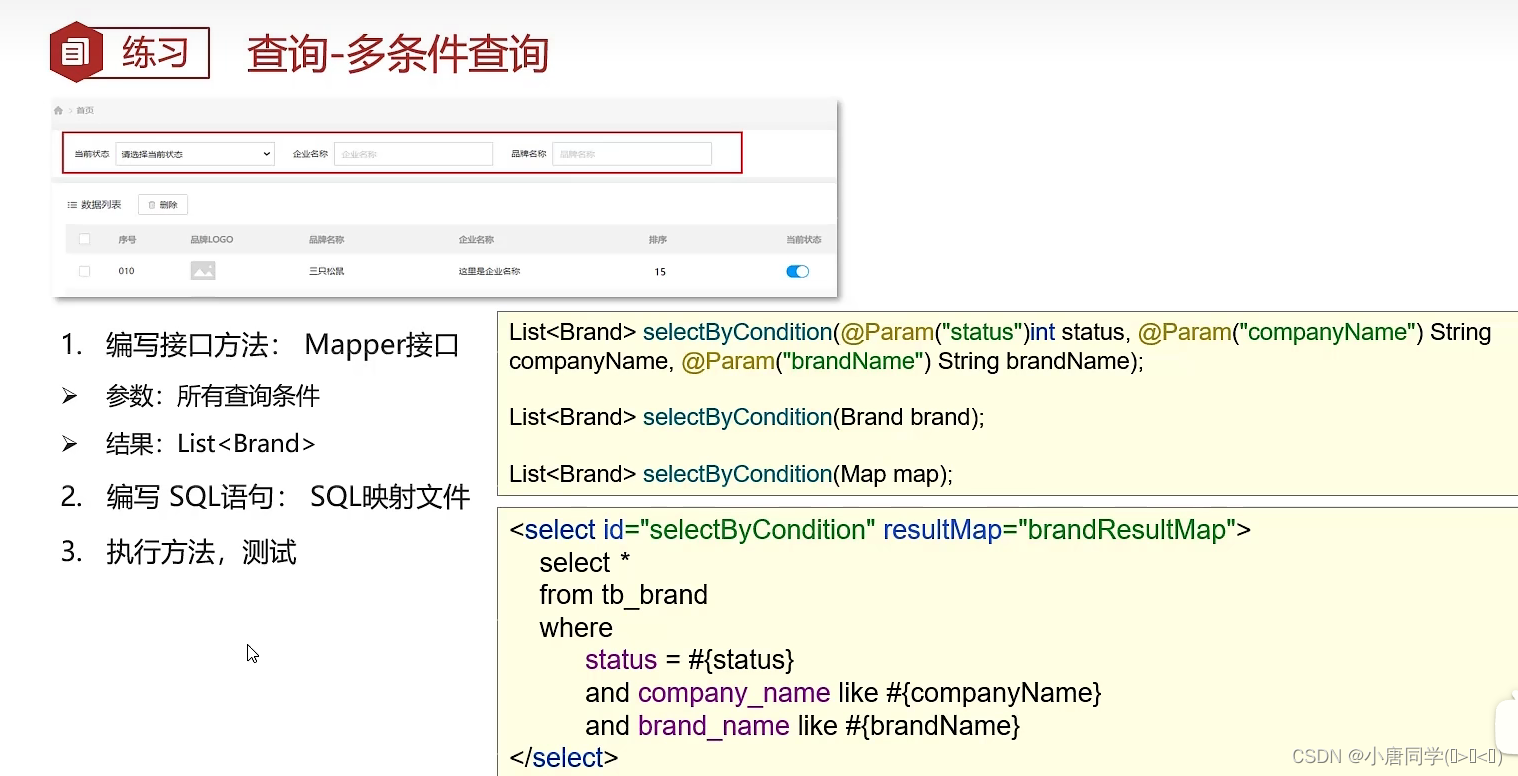
1.
在传参过程中多个参数就需要使用注解
注解作用:传入 status 参数对应SQL语句中的占位符statement
2.
如果传入的参数属于同一个对象 就直接获取对象
在实体类中直接找 getstatement的方法获取值(占位符名称与实体类中属性名称一致)
  int status=1;
        String companyName="华为";
        String brandName="华为";
        //处理参数
        companyName="%"+companyName+"%";
        brandName="%"+brandName+"%";
  Brand brand=new Brand();
        brand.setBrandName(brandName);
brand.setCompanyName(companyName);
brand.setStatus(status);
3.
封装成map集合 map键名称要与占位符名称一致
//获取方法3.map集合
HashMap map=new HashMap();
map.put("status",status);
map.put("companyName",companyName);
map.put("brandName",brandName);
(4)动态SQL查询
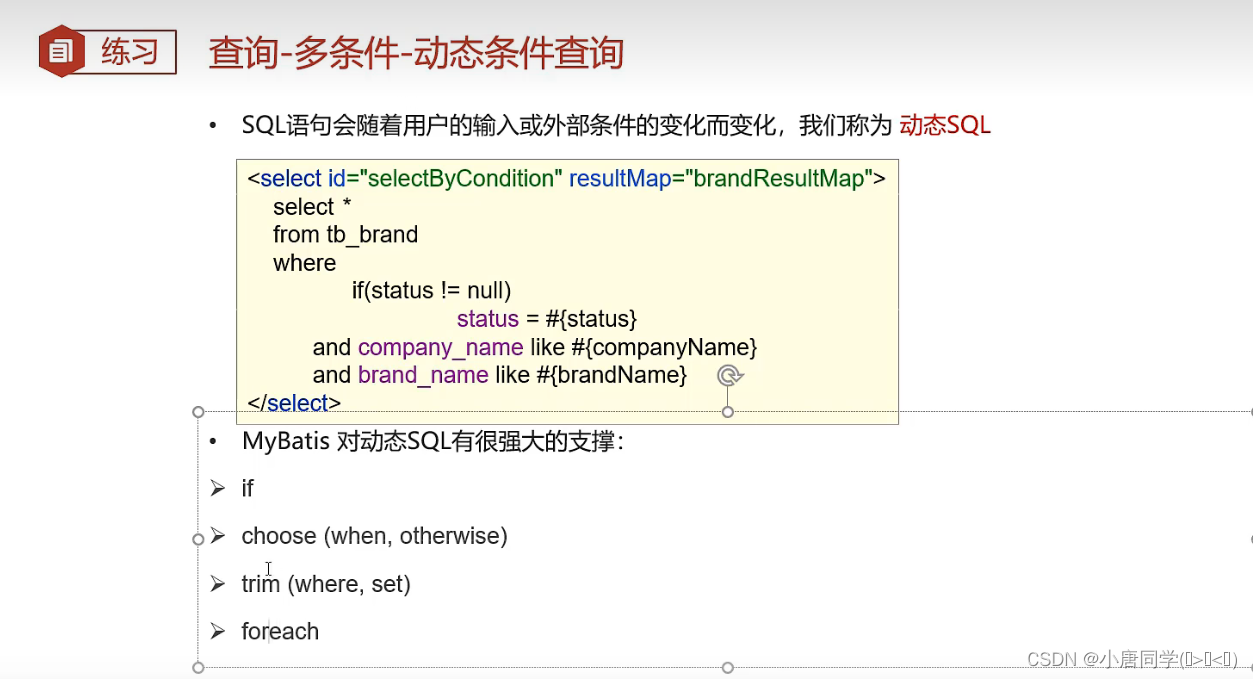
test的值不是sql语句中的列名 而是与实体类一致
动态SQL:
<select id="selectByCondition" resultMap="brandResultMap">
    select * from tb_brand
<where>
    <if test="status !=null">
        and status=#{status}
    </if>
    <if test= "companyName !=null and companyName != '' ">
        and  company_name like #{companyName}
    </if>
    <if test= "brandName !=null and brandName!='' ">
        and brand_Name like #{brandName}
    </if>
</where>

</select>
动态查询中的单条件查询
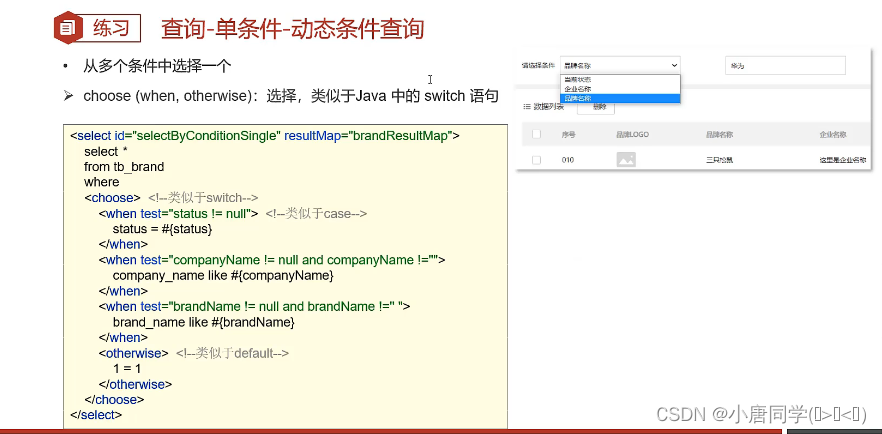
单查询是在多个条件下选择一个
这就要使用动态SQL运用
<choose> 相当于switch
<when> 相当于case
<otherwise> 相当于default(本条件是排除任何都不选的情况1=1)
这种情况也可以是用<where>标签实现动态
来实现,
<select id="selectByConditionSingle" resultMap="brandResultMap">
select * from tb_brand
where <choose><!--switch-->
        <when test="status !=null">
status=#{status}
        </when>  <!--case-->
<when test="companyName !=null and companyName != '' ">
    and  company_name like #{companyName}
</when>
<when test="brandName !=null and brandName!=''">
    and brand_Name like #{brandName}
</when>
<otherwise>
    1=1;
</otherwise>
    </choose>
    </select>
添加功能:
(1)基础添加:
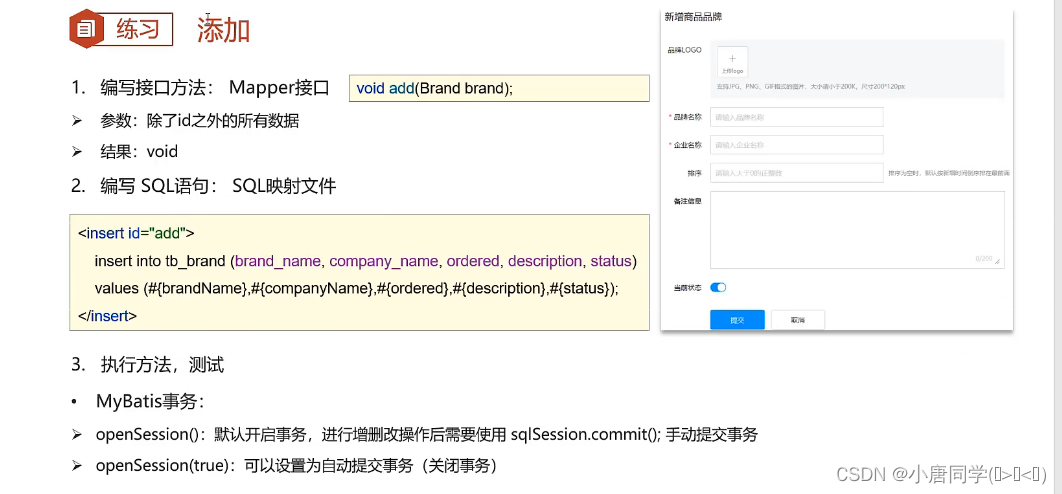
sql映射文件:
<insert id="add">
insert into tb_brand (brand_name, company_name, ordered, description, status)
                 values(#{brandName},#{companyName},#{ordered},#{description},#{status});

    </insert>
在接口中定义
在test测试即可
测试后在数据库并没有添加成功
这是因为事务的开启,需要手动提交事务
调用:
sqlSession.commit();就可以手动提交
如果你不想手动提交:
可以在获取sqlSession对象时设置为自动提交事务
SqlSession sqlSession = sqlSessionFactory.openSession(true);
传入true 则自动提交(关闭事务) false 手动提交
(2)添加--返回主键
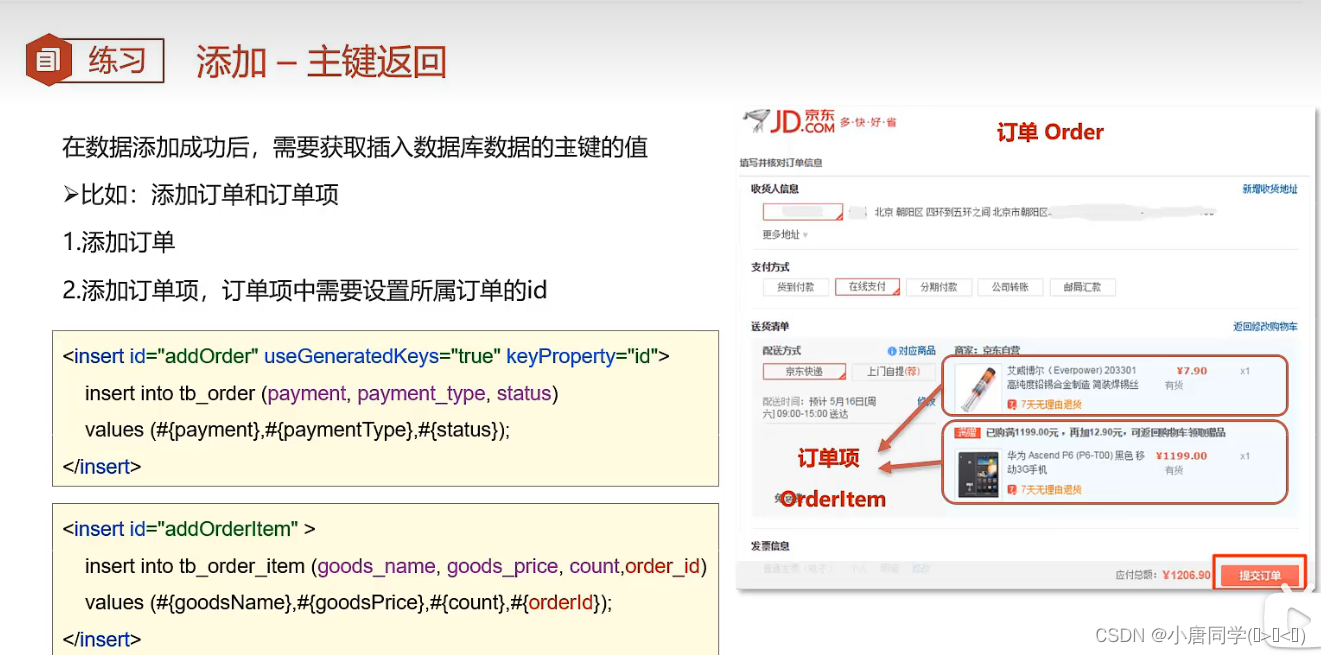
需要在insert标签加两个属性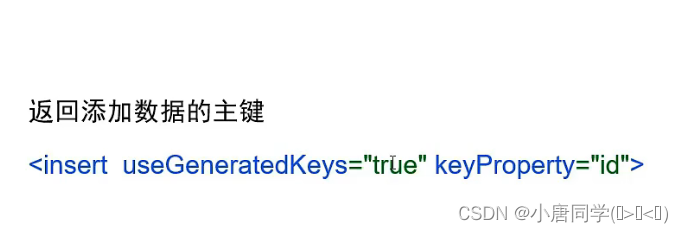
keyProperty是 指向主键
useGeneratedKeys="true" 默认false
修改功能:
修改全部字段:
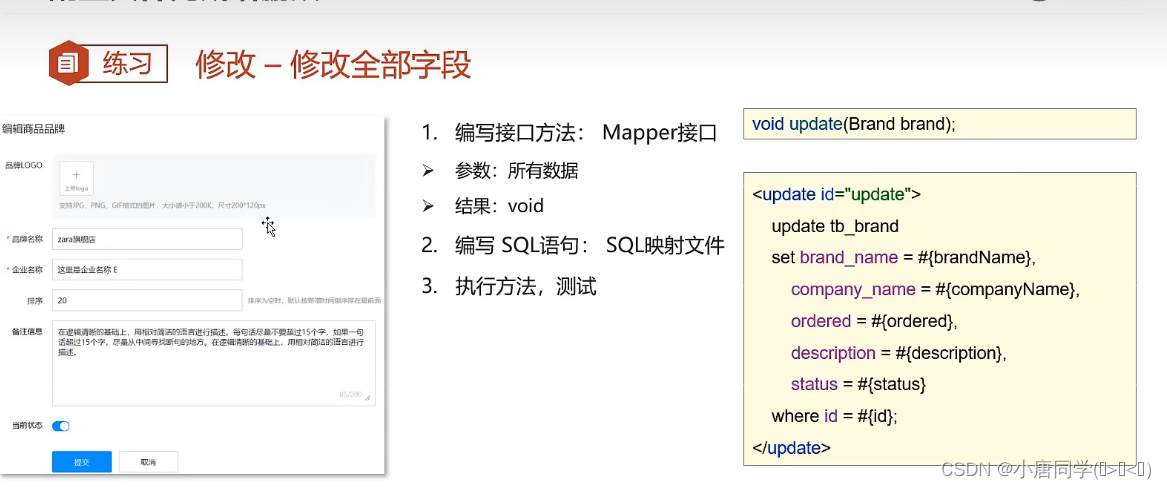
 <update id="update">
update  tb_brand set brand_name=#{brandName}
                     ,company_Name=#{companyName},
                     ordered=#{ordered}
                     ,description=#{description},
                     status=#{status}
where id=#{id};
    </update>
在接口中写上方法在test进行测试
修改动态字段:
体现在动态,我觉得就是判断是否传入值,如果传入值就修改,没有传入就不改(判断用if)
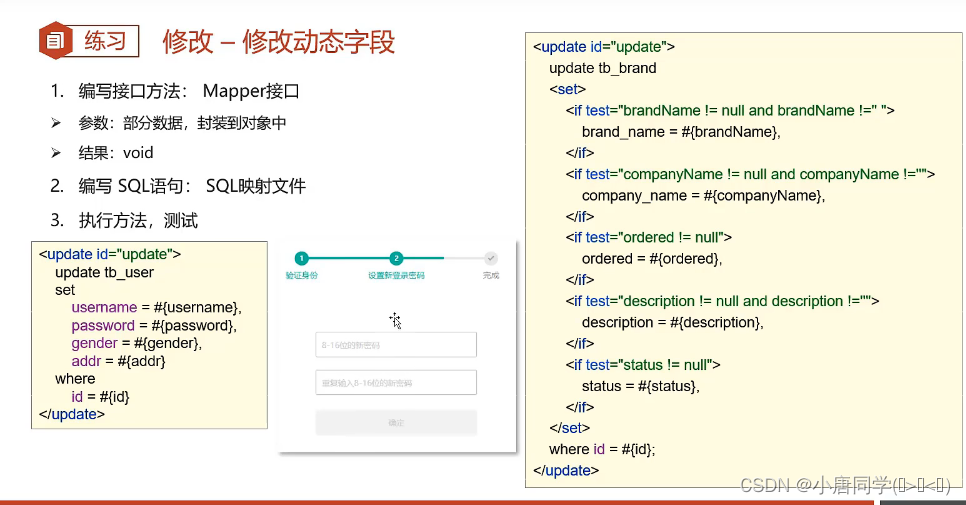
sql映射文件:
<update id="update">
        update  tb_brand <set>


        <if test="brandName !=null and brandName!=''">
            brand_name=#{brandName},
        </if>
        <if test="companyName !=null and companyName!=''">
            company_Name=#{companyName},
        </if>
        <if test="ordered !=null">
            ordered=#{ordered},
        </if>
        <if test="description !=null and description!=''">
            description=#{description},
        </if>
        <if test="status !=null">
            status=#{status}
        </if>
    </set>
        where id=#{id};
    </update>
删除功能:
(1)删除一个:
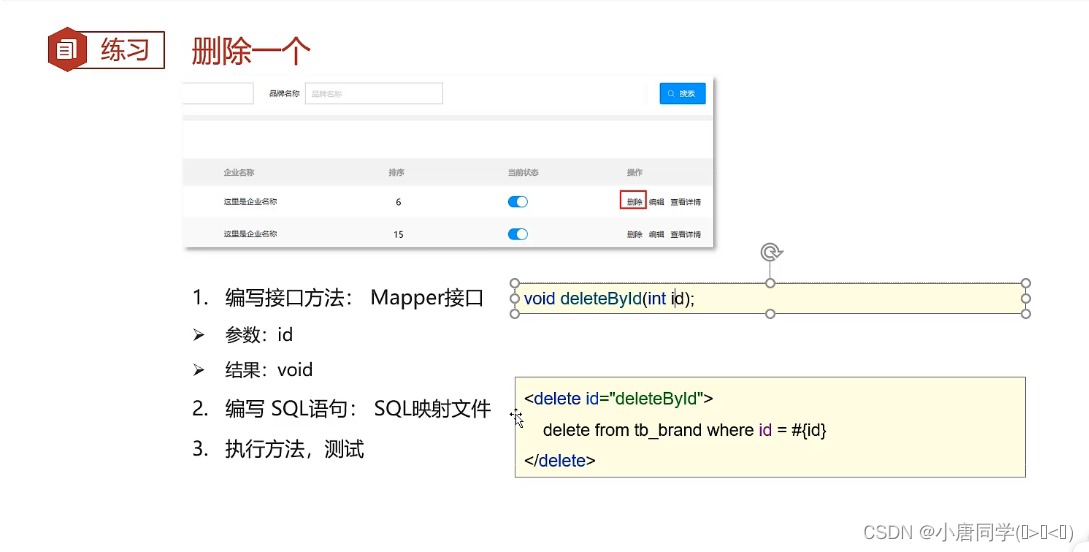
  <delete id="delete">
delete from tb_brand where id=#{id};
    </delete>
(2)批量删除:
把要删除的id的值提交到后台代码,会在提交的时候把id的值封装成id数组一次性接手过来
在便利数组,根据数组中每个id的值来删除对应的品牌
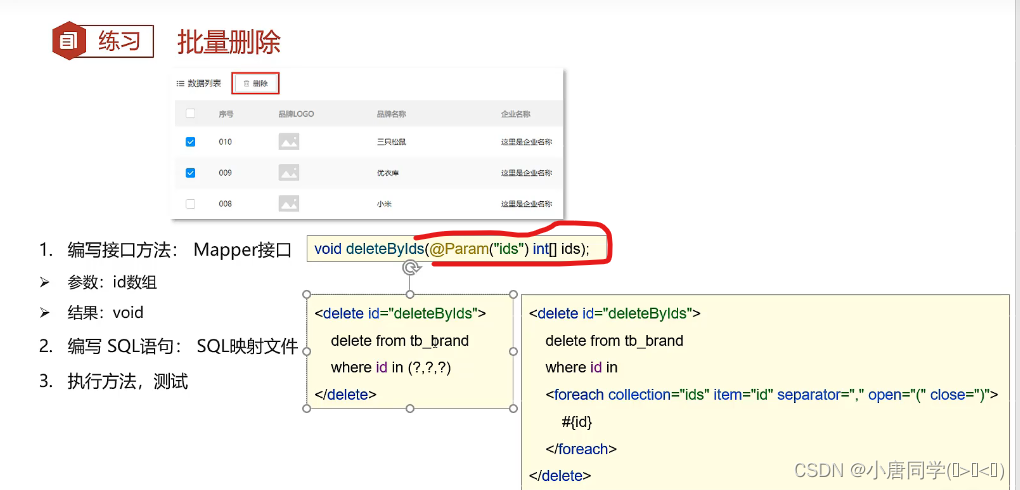
用到标签
    <foreach collection="ids" item="id" separator="." open="(" close=")">
    #{id}
</foreach>
collection="ids"表示你要遍历的集合和数组
item=”id“表示你要遍历的元素
separator=","表示分隔符为,
open="(" 表示开始给你拼什么
close=")" 表示结束拼什么
遍历后加上#{id}占位符 遍历几次有几个占位符
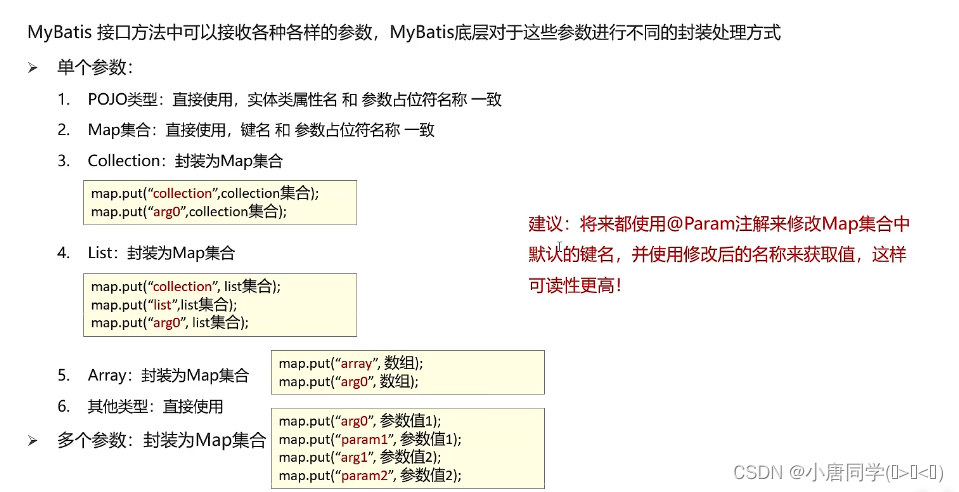
mybatis会将数组参数封装成一个Map集合
*默认arry=数组(键---arry 值--数组) 这种情况 在sql映射文件中collection就不能等于ids(数组名称) 要是arry(默认值)
*使用@Param注解改变map集合的默认key的名称
sql映射文件代码:
   <delete id="deleteById">
delete from tb_brand where id=#{id};
    </delete>
    <delete id="deleteByIds">
        delete from tb_brand where id in
        <foreach collection="ids" item="id" separator="," open="(" close=")">
        #{id}
    </foreach>
            ;
    </delete>
Mybatis参数传递:
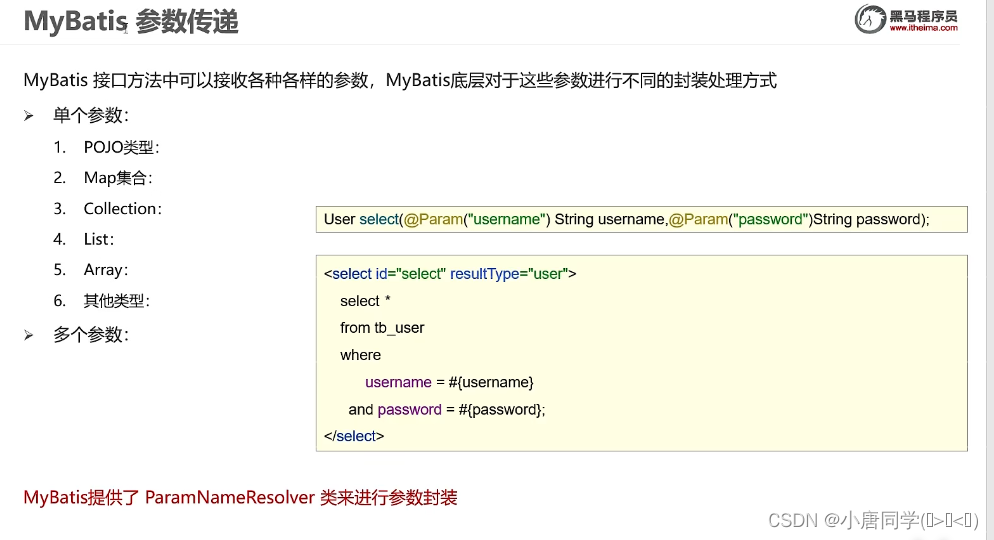
多个参数:
多个参数会用注解@Param
sql映射文件:
<select id="select" resultType="user">
select  * from tb_user
where username=#{username}
and password=#{password}
    </select>
接口类中:
User select(@Param("username") String username,@Param("password")String password);
测试类代码:
package com.itheima.test;

import com.itheima.mapper.BrandMapper;
import com.itheima.mapper.UseMapper;
import com.itheima.pojo.User;
import org.apache.ibatis.io.Resources;
import org.apache.ibatis.session.SqlSession;
import org.apache.ibatis.session.SqlSessionFactory;
import org.apache.ibatis.session.SqlSessionFactoryBuilder;
import org.junit.Test;

import java.io.InputStream;

public class UseuMapperTest {
    @Test
    public void testdeletes() throws Exception {
        //获取 sqlSessionFactory  对象
        String resource = "mybatis-config.xml";
        InputStream inputStream = Resources.getResourceAsStream(resource);
        SqlSessionFactory sqlSessionFactory = new SqlSessionFactoryBuilder().build(inputStream);
//  获取sqlSession对象
        SqlSession sqlSession = sqlSessionFactory.openSession();
        //获取Mapper代理对象
        UseMapper useMapper = sqlSession.getMapper(UseMapper.class);
        String username="zhangsan";
        String password="123";
        User user=useMapper.select(username,password);
        System.out.println(user);
    }
}
多个参数会封装为Map集合,可以使用@Param注解,替换Map集合中默认的键名
默认键名为arg0、arg1、param1、param2
@param注解会封装默认键名
(2)单个参数
注解开发:
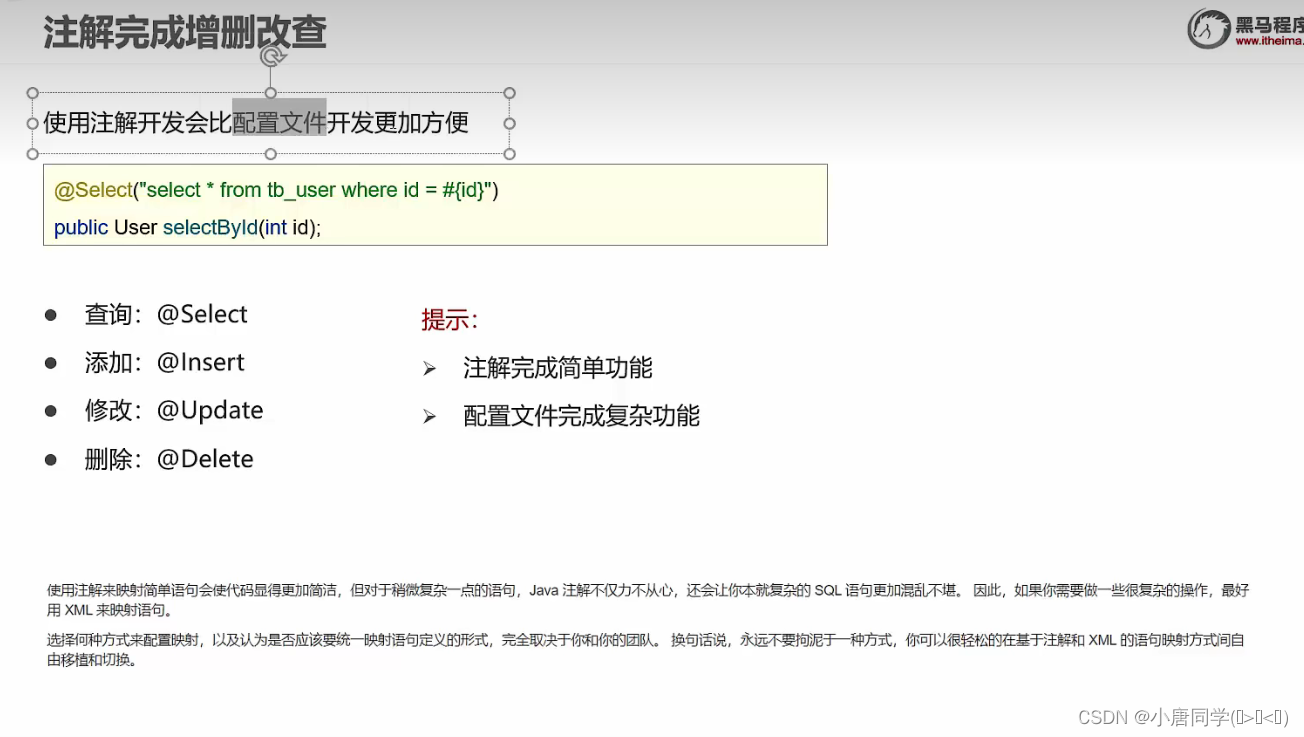
复杂操作还是要xml文件
使用注解开发就不再需要sql映射文件,直接在接口中用注解
@Select("select * from tb_user where id=#{id}")
    User selectById(int id);
测试代码:
@Test
    public void testSelectById() throws IOException {
//        设置id
        int id = 2;
        //获取 sqlSessionFactory  对象
        String resource = "mybatis-config.xml";
        InputStream inputStream = Resources.getResourceAsStream(resource);
        SqlSessionFactory sqlSessionFactory = new SqlSessionFactoryBuilder().build(inputStream);
//  获取sqlSession对象
        SqlSession sqlSession = sqlSessionFactory.openSession();
        //获取Mapper代理对象
       sqlSessionFactory.openSession();
       UseMapper useMapper =sqlSession.getMapper(UseMapper.class);
        User user = useMapper.selectById(1);
        System.out.println(user);
        sqlSession.close();
    }