一、实验目标
1、做一个APP首页,包括顶部图片、顶部菜单栏、中部消息模块、底部Tab按钮。学习 ScrollView, RelativeLayout,以及插件之间的穿插使用。
二、实验步骤
1.页面内容
页面上可以分为四个部分:顶部图片模块、顶部菜单模块、待办消息模块和底部Tab按钮

2.页面设计
为能够比较明显的显示各控件的相对位置,设置最外层父布局背景色为灰色,内层控件背景颜色均为白色
2.1整体父布局
①新建ScrollView,指定长宽
**ScrollView使用场景:**如果一个页面内容很多,需要往下(或者左右)滑动才能显示全内容,可以使用滚动视图ScrollView。
②新建ScrollView 内部父布局LinearLayout,设置长宽,垂直方向为竖直
顶部图片、顶部菜单和代办消息模块都放到内部父布局。在应用场景中,不同于底部tab栏,这三者是属于同一个整体的,需要随着视图滚动而上下移动,而底部tab栏不随视图滚动而上下移动
<?xml version="1.0" encoding="utf-8"?>
<LinearLayout xmlns:android="http://schemas.android.com/apk/res/android"
    android:layout_width="match_parent"
    android:layout_height="match_parent"
    android:orientation="vertical"
    android:background="#F5F5F5">

    <ScrollView
        android:layout_width="match_parent"
        android:layout_height="700dp">

        <LinearLayout
            android:layout_width="match_parent"
            android:layout_height="match_parent"
            android:orientation="vertical">

        </LinearLayout>

    </ScrollView>


</LinearLayout>
效果

2.2创建顶部首页显示栏
创建TextView控件:设置宽高、设置文字“首页”、设置字体样式、设置字体颜色字体、文字居中
<TextView
                android:layout_width="match_parent"
                android:layout_height="50dp"
                android:gravity="center"
                android:text="首页"
                android:textColor="#333"
                android:textSize="18dp"
                android:textStyle="bold" />
效果

2.3创建顶部图片
将素材包的图片移到app/res/mipmap下
创建ImageView控件:设置长宽,增大与左右边界的距离,设置图片路径@mipmap/图片名
 <ImageView
                android:background="#FFFFFF"
                android:layout_width="match_parent"
                android:layout_height="200dp"
                android:layout_marginLeft="10dp"
                android:layout_marginRight="10dp"
                android:src="@mipmap/test_img" />
效果

2.4菜单栏模块
导入图片素材,这里以创建一个菜单选项为例,剩余菜单选项复制此菜单选项控件,修改图标和标签即可
首先创建LinearLayout父布局,设置长宽,垂直方向设置为横向,设置背景色为白色,将整个控件分为四部分weightSum=“4”
<LinearLayout
                android:background="#FFFFFF"
                android:layout_width="match_parent"
                android:layout_height="wrap_content"
                android:layout_marginLeft="10dp"
                android:layout_marginRight="10dp"
                android:orientation="horizontal"
                android:weightSum="4">

            </LinearLayout>
然后添加菜单选项LinearLayout:设置长宽,设置权重为1,则该控件占用整个父控件四分之一空间,设置垂直方向为竖直。
最后在菜单选项LinearLayout内添加图标图片控件ImageView和添加标签文本控件TextView
<LinearLayout
                    android:layout_width="0dp"
                    android:layout_height="100dp"
                    android:layout_weight="1"
                    android:orientation="vertical">

                    <ImageView
                        android:layout_width="50dp"
                        android:layout_height="50dp"
                        android:layout_gravity="center_horizontal"
                        android:layout_marginTop="10dp"
                        android:background="@mipmap/test_icon1" />

                    <TextView
                        android:layout_width="match_parent"
                        android:layout_height="wrap_content"
                        android:layout_marginTop="10dp"
                        android:gravity="center"
                        android:text="验房" />
                </LinearLayout>
效果

2.5消息模块
首先创建一个横向的LinearLayout来作为菜单栏的父布局,垂直方向采用横向
然后创建“待办”Textview和创建“更多”Textview
<LinearLayout
    android:layout_width="match_parent"
    android:layout_height="wrap_content"
    android:layout_marginTop="20dp"
    android:orientation="horizontal">

    <TextView
        android:layout_width="wrap_content"
        android:layout_height="wrap_content"
        android:layout_marginLeft="10dp"
        android:layout_weight="1"
        android:text="待办"
        android:textColor="#333"
        android:textSize="16dp"
        android:textStyle="bold" />

    <TextView
        android:layout_width="wrap_content"
        android:layout_height="wrap_content"
        android:layout_marginLeft="10dp"
        android:layout_marginRight="10dp"
        android:text="更多"
        android:textColor="#666" />
</LinearLayout>
效果

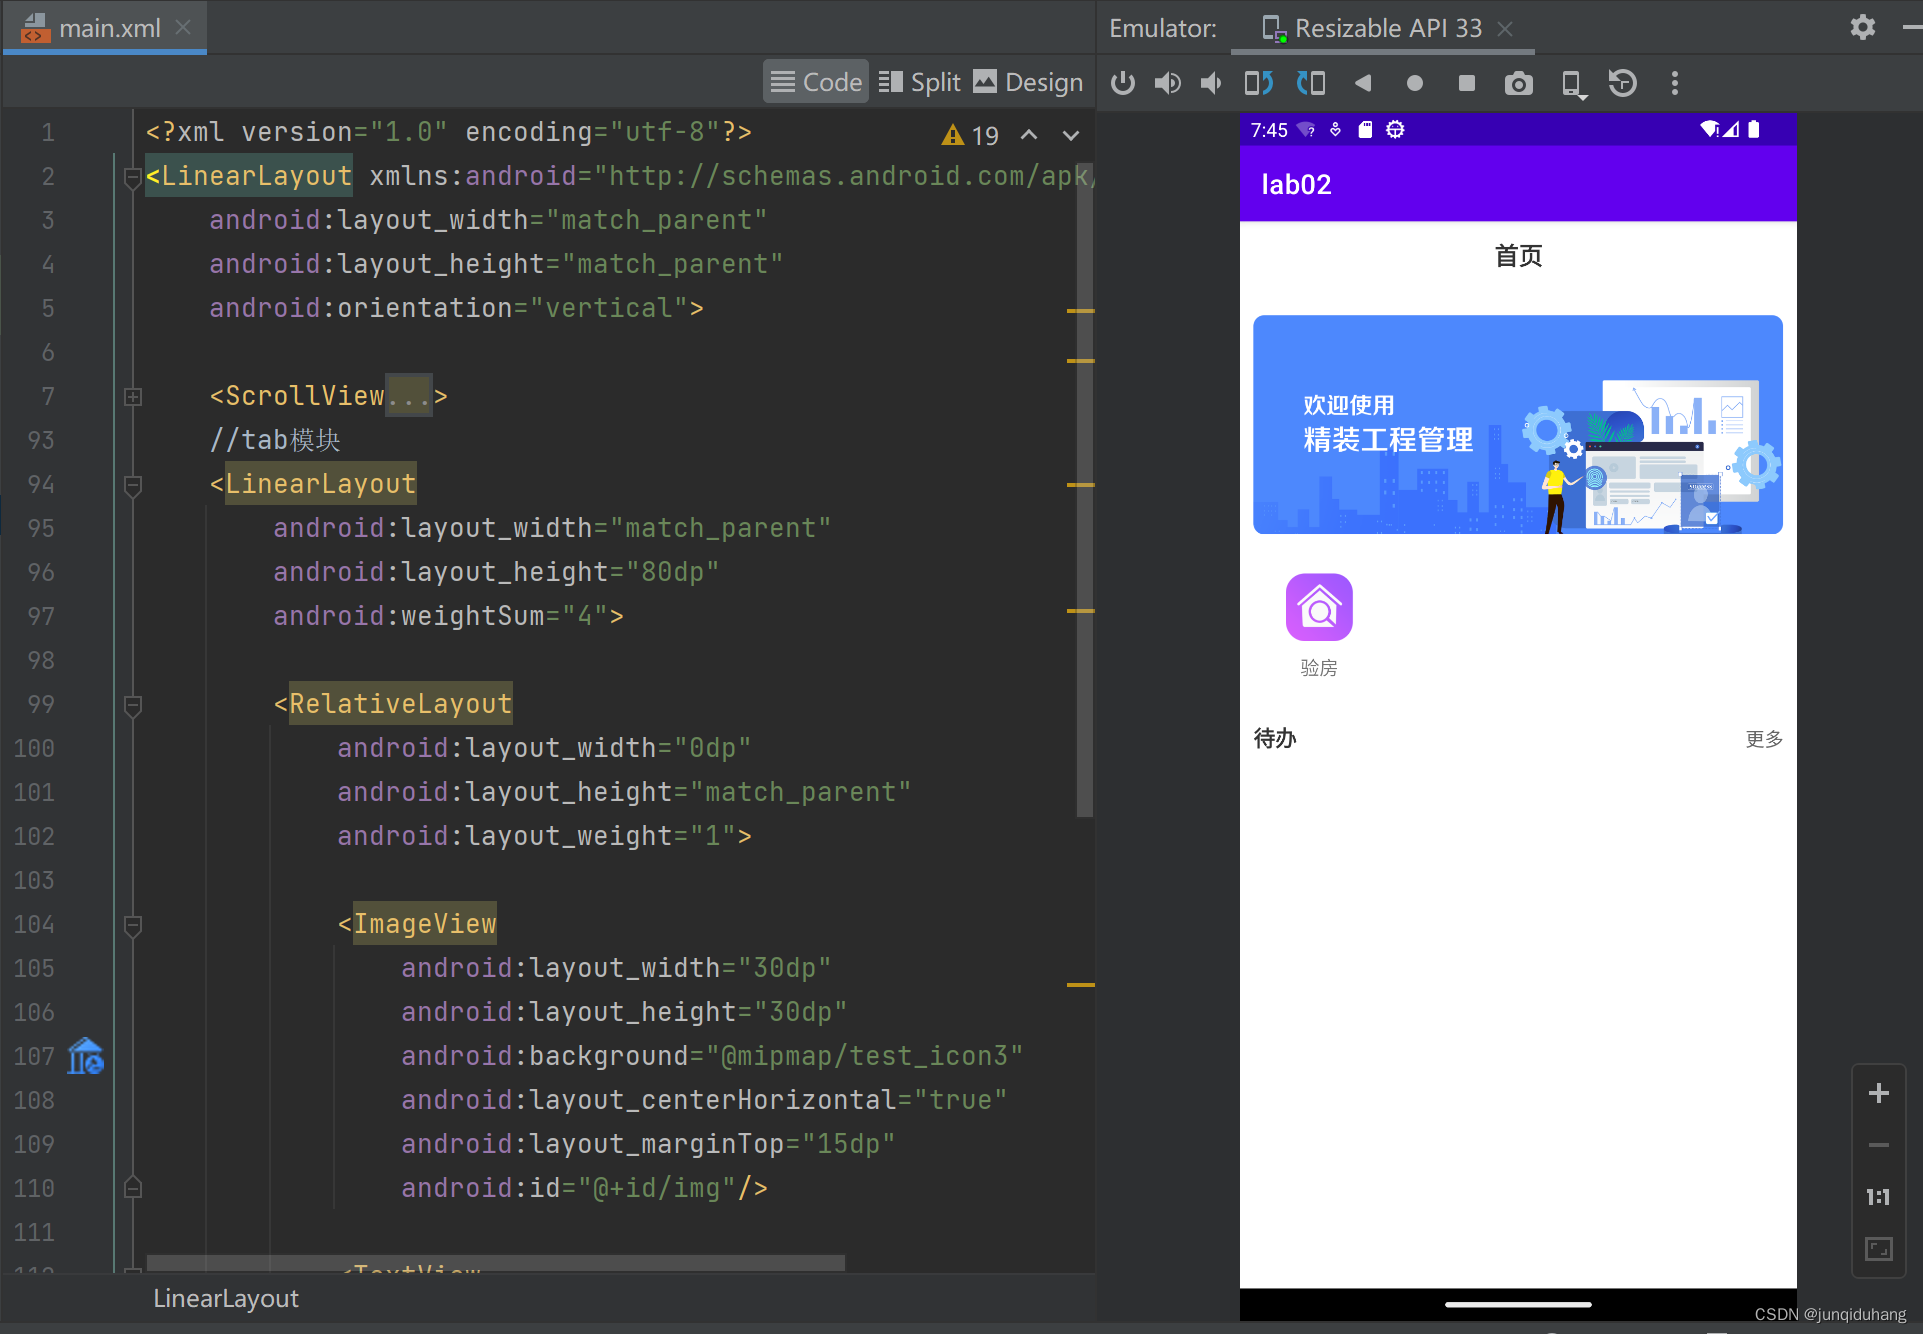
2.6底部Tab模块
首先创建一个横向的LinearLayout来作为菜单栏的父布局,注意此时的LinearLayout与ScrollView组件在同一层
    <LinearLayout
        android:layout_width="match_parent"
        android:layout_height="80dp"
        android:weightSum="4">

    </LinearLayout>
创建一个RelativeLayout作为单个按钮的父布局,创建ImageView显示图标和TextView显示标签(图片底部文字)
解释:id=”@+id/xx”,存在于.xml布局文件中,是为该控件生成一个ID,其名"xx",在后面引用该控件时以“R.id.xx”的形式引用。
 <RelativeLayout
            android:layout_width="0dp"
            android:layout_height="match_parent"
            android:layout_weight="1">

            <ImageView
                android:id="@+id/img1"
                android:layout_width="30dp"
                android:layout_height="30dp"
                android:layout_centerHorizontal="true"
                android:layout_marginTop="15dp"
                android:background="@mipmap/test_icon3" />

            <TextView
                android:layout_width="match_parent"
                android:layout_height="wrap_content"
                android:layout_below="@+id/img1"
                android:layout_centerHorizontal="true"
                android:layout_marginTop="5dp"
                android:gravity="center"
                android:text="首页" />
        </RelativeLayout>
其余三个按钮可以直接复制此按钮代码,替换图标和标签即可。
效果

三、程序运行结果
列出程序的最终运行结果及截图。
代办消息下的一条记录通过LinearLayout控件实现
1、运行结果

四、问题总结与体会
描述实验过程中所遇到的问题,以及是如何解决的。有哪些收获和体会,对于课程的安排有哪些建议。
1、问题:
1)编辑完首页和顶部图片后程序运行崩溃

原因:LinearLayout未将TextView和ImageView包裹起来
        <LinearLayout
            android:layout_width="match_parent"
            android:layout_height="match_parent"
            android:orientation="vertical"/>
        <TextView
            android:layout_width="match_parent"
            android:layout_height="50dp"/>

        <ImageView
            android:layout_width="match_parent"
            android:layout_height="200dp"/>
正确的应该为:
        <LinearLayout
            android:layout_width="match_parent"
            android:layout_height="match_parent"
            android:orientation="vertical">
        <TextView
            android:layout_width="match_parent"
            android:layout_height="50dp"/>

        <ImageView
            android:layout_width="match_parent"
            android:layout_height="200dp"/>
        </LinearLayout>
2)添加Tab模块代码但是运行后不显示Tab模块
原因:使用Design视图可以看到ScrollView组件占用上一层LinearLayout所有剩余空间,导致同一层构造的Tab模块超出屏幕外
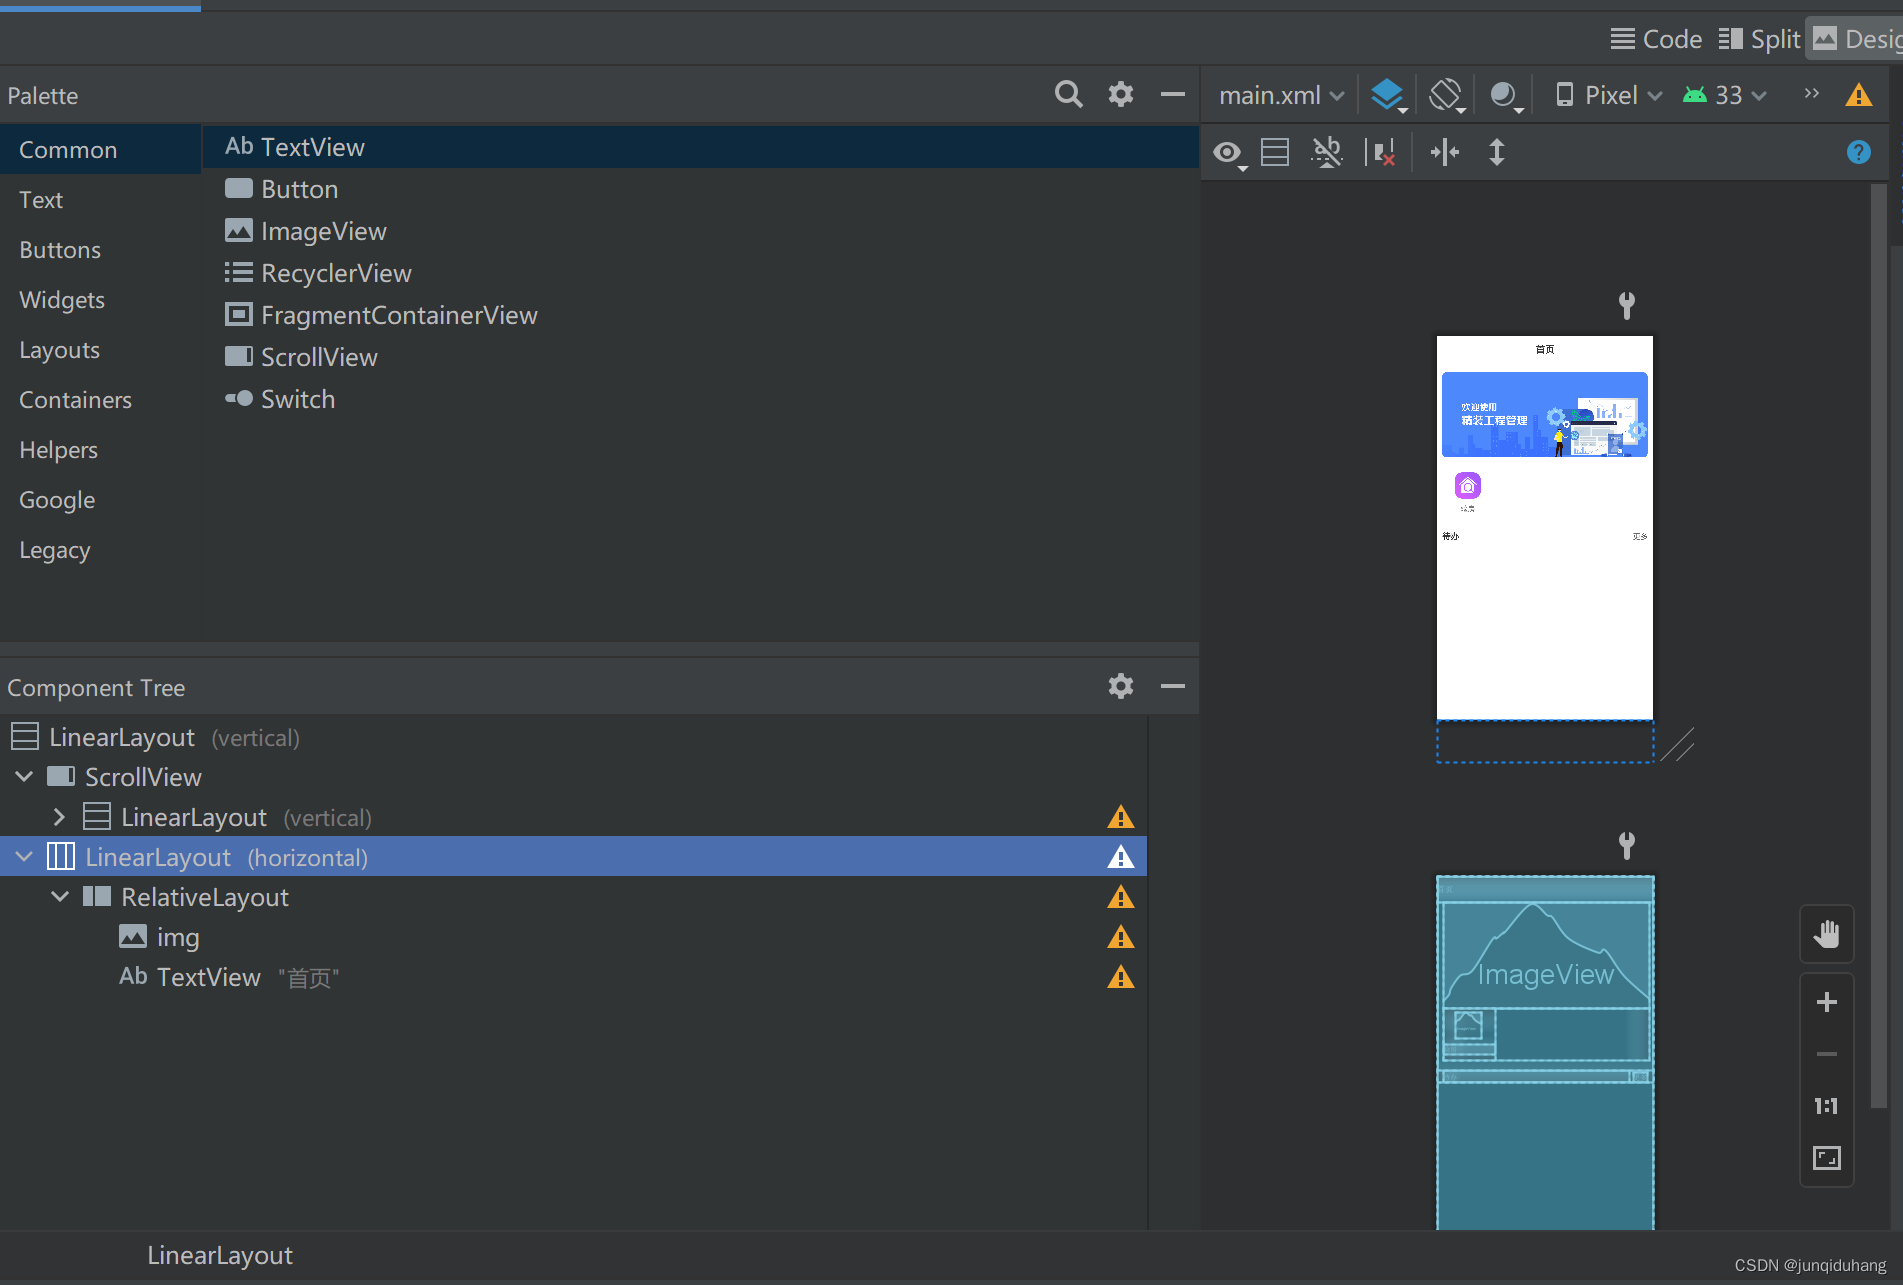
在Design视图将Tab模块拉上来。
2.收获:
1)使用Android Sudio创建页面布局更加熟练;
2)学会使用 ScrollView, RelativeLayout,知道二者的使用场景;
3)加深了对Android Sudio页面布局控件层次结构的认识。