一、自定义PageBean实体类实现分页操作
1、自定义PageBean实体类
package com.ssm.domain;

import java.util.List;

public class PageBean {

	// 前台页面传递的数据
	private Integer pageNum; // 当前页
	private Integer rows; // 每页显示条数

	// 后台查询出来的数据
	private Integer totalCount; // 数据库中总记录条数
	private List list; // 查询出来的指定页数中的数据集合

	// 计算得出的属性
	private Integer totalPage; // 总页数
	private Integer prePage; // 上一页
	private Integer nextPage; // 下一页

	// Oracle数据库分页查询需要的参数
	private Integer startPage; // 分页查询中rownum的起点
	private Integer endPage; // 分页查询汇总rownum的终点

	public PageBean(Integer pageNum, Integer rows, Integer totalCount) {
		this.pageNum = pageNum;
		this.rows = rows;
		this.totalCount = totalCount;

		/**
		 * 计算其余属性的值
		 */
		totalPage = (totalCount % rows == 0) ? (totalCount / rows) : (totalCount / rows + 1);
		prePage = (pageNum - 1) == 0 ? 1 : pageNum - 1;
		nextPage = pageNum == totalPage ? totalPage : pageNum + 1;
		startPage = (pageNum - 1) * rows;
		endPage = pageNum * rows > totalCount ? totalCount : pageNum * rows;
	}
2、Dao查询PageBean
	@Select("select count(1) from product")
	public Integer findCount();

	@Select("select * " +
			"  from (select rownum rn, p.* " +
			"          from (select * from PRODUCT) p " +
			"         where rownum <= #{endPage}) " +
			" where rn >= #{startPage} ")
	public List<Product> findByPage(@Param("startPage") Integer startPage, @Param("endPage") Integer endPage);
3、Service查询PageBean
	/**
	 * 分页查询
	 */
	public PageBean findByPage(Integer pageNum, Integer rows) {
		// 从数据库中查询表中总数量
		Integer totalCount = productDao.findCount();
		// 实例化PageBean,使用带参构造:当前页,每页显示条数,总记录数
		PageBean pageBean = new PageBean(pageNum, rows, totalCount);
		// 查询指定页的数据集合
		List<Product> pageList = productDao.findByPage(pageBean.getStartPage(), pageBean.getEndPage());

		pageBean.setList(pageList);

		return pageBean;
	}
二、使用PageHelper插件进行分页操作
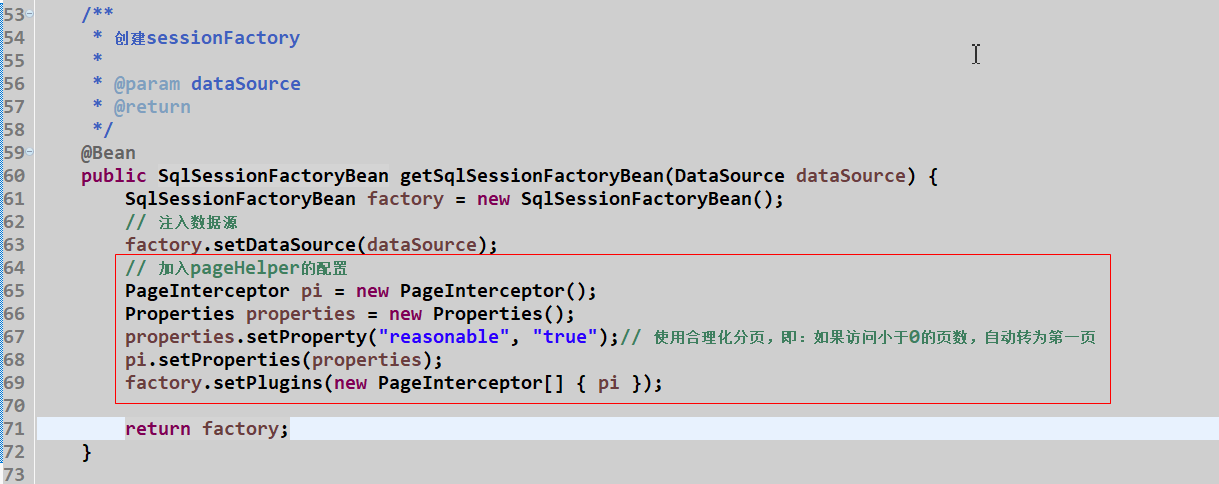
1、加入PageHelper配置
PagerHelper是Mybatis提供的插件,需要注入在sqlSessionFactoryBean中,配置如下:
JdbcConfig.java
2、service、Controller中的方法
OrderServiceImpl.java
	/**
	 * 分页查询的方法
	 */
	public List<Orders> findAllByPage(int page, int rows) {
		//设置分页参数
		PageHelper.startPage(page, rows);
		//返回查询结果
		return orderDao.findAll();
	}
OrderController.java
	@RequestMapping("findAll")
	public String findAllByPage(Model model, @RequestParam(required = true, defaultValue = "1") int page,
			@RequestParam(required = true, defaultValue = "5") int rows) {
		// 查询集合
		List<Orders> list = orderService.findAllByPage(page, rows);
		// 将数据封装到pageHelper的pageBean对象中
		PageInfo<Orders> pageInfo = new PageInfo<Orders>(list);
		model.addAttribute("pageInfo", pageInfo);
		return "order-list";
	}
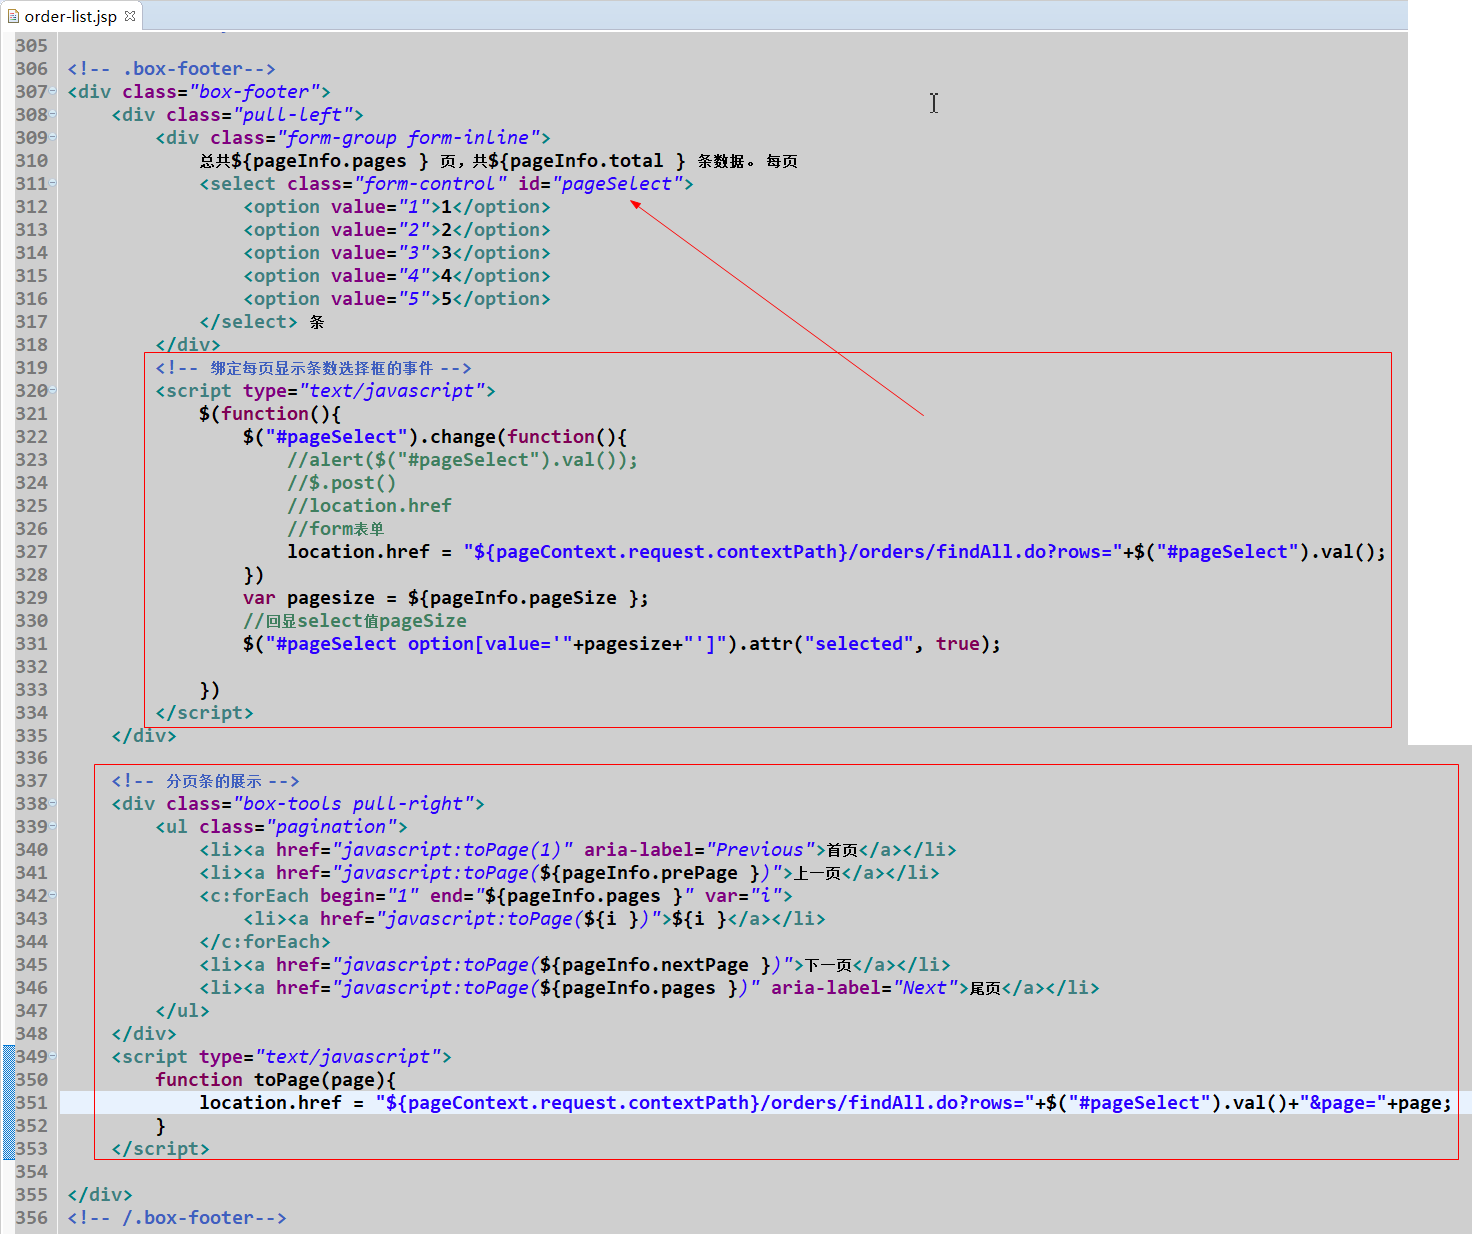
3、页面中分页条以及绑定事件
三、Spring Security
1、spring security小案例
(1)、spring配置文件
<?xml version="1.0" encoding="UTF-8"?>
<beans xmlns:xsi="http://www.w3.org/2001/XMLSchema-instance"
	xmlns="http://www.springframework.org/schema/beans" xmlns:context="http://www.springframework.org/schema/context"
	xmlns:tx="http://www.springframework.org/schema/tx" xmlns:aop="http://www.springframework.org/schema/aop"
	xmlns:mvc="http://www.springframework.org/schema/mvc" xmlns:security="http://www.springframework.org/schema/security"
	xsi:schemaLocation="http://www.springframework.org/schema/beans
	http://www.springframework.org/schema/beans/spring-beans.xsd
	http://www.springframework.org/schema/context
	http://www.springframework.org/schema/context/spring-context.xsd
	http://www.springframework.org/schema/tx
	http://www.springframework.org/schema/tx/spring-tx.xsd
	http://www.springframework.org/schema/aop
	http://www.springframework.org/schema/aop/spring-aop.xsd
	http://www.springframework.org/schema/security
	http://www.springframework.org/schema/security/spring-security.xsd
	http://www.springframework.org/schema/mvc
	http://www.springframework.org/schema/mvc/spring-mvc.xsd ">

	<!-- 放行登录页面,不拦截登录页面 -->
	<security:http security="none" pattern="/login.jsp"></security:http>
	<!-- auto-config="true" : 表示使用spring security默认登录页面 use-expressions="false"
		: 表示不使用spEL表达式 -->
	<security:http auto-config="true" use-expressions="false">
		<!--
			pattern="/**" : 表示拦截所有路径下的请求
			access="ROLE_USER" : 表示访问url时需要的权限
			 如果没有对应的权限,会自动跳转到spring security提供的登录页面,
			 如果有自己的登录页面,需要配置 -->
		<security:intercept-url pattern="/**" access="ROLE_USER" />

		<!-- 配置自己的登录页面
			login-page  :  页面位置
			login-processing-url  :  访问的url
			username-parameter  :  用户名
			password-parameter  :  密码
			default-target-url  :  登录成功要跳转的页面
			authentication-failure-url  :  登录失败要跳转的页面
		 -->
		<security:form-login login-page="/login.jsp"
			login-processing-url="/login" username-parameter="username"
			password-parameter="password" default-target-url="/success.jsp"
			authentication-failure-url="/fail.jsp"/>

		<!-- 关闭csrf验证 -->
		<security:csrf disabled="true"/>
	</security:http>

	<!-- 在内存中临时放置两个用户 -->
	<security:authentication-manager>
		<security:authentication-provider>
			<security:user-service>
				<!-- {noop} : 表示不加密登录 -->
				<security:user name="user" password="{noop}user"
					authorities="ROLE_USER" />
				<security:user name="admin" password="{noop}admin"
					authorities="ROLE_ADMIN" />
			</security:user-service>
		</security:authentication-provider>
	</security:authentication-manager>


</beans>
(2)、web.xml配置文件
<?xml version="1.0" encoding="UTF-8"?>
<web-app xmlns:xsi="http://www.w3.org/2001/XMLSchema-instance"
	xmlns="http://xmlns.jcp.org/xml/ns/javaee"
	xsi:schemaLocation="http://xmlns.jcp.org/xml/ns/javaee http://xmlns.jcp.org/xml/ns/javaee/web-app_3_1.xsd"
	version="3.1">
	<display-name>security_demo</display-name>
	<welcome-file-list>
		<welcome-file>index.html</welcome-file>
		<welcome-file>index.htm</welcome-file>
		<welcome-file>index.jsp</welcome-file>
		<welcome-file>default.html</welcome-file>
		<welcome-file>default.htm</welcome-file>
		<welcome-file>default.jsp</welcome-file>
	</welcome-file-list>

	<!-- 初始化spring容器 -->
	<listener>
		<listener-class>org.springframework.web.context.ContextLoaderListener</listener-class>
	</listener>
	<context-param>
		<param-name>contextConfigLocation</param-name>
		<param-value>classpath:applicationContext-security.xml</param-value>
	</context-param>

	<!-- 配置security过滤器
		DelegatingFilterProxy:该过滤器是用来注册第三方过滤器的过滤器代理对象,
		名字不能随便写,只能是springSecurityFilterChain
		使用spring security需要注册提供的11个过滤器,组成一个过滤器链,这个链的名字就是:springSecurityFilterChain
	-->
	<filter>
		<filter-name>springSecurityFilterChain</filter-name>
		<filter-class>org.springframework.web.filter.DelegatingFilterProxy</filter-class>
	</filter>
	<filter-mapping>
		<filter-name>springSecurityFilterChain</filter-name>
		<url-pattern>/*</url-pattern>
	</filter-mapping>
</web-app>
四、将spring security使用零配置加入项目中
1、创建数据库表
CREATE TABLE sys_user(
id varchar2(32) default sys_guid() primary key,
username VARCHAR2(50) UNIQUE NOT NULL,
email VARCHAR2(50) ,
PASSWORD VARCHAR2(80),
phoneNum VARCHAR2(20),
STATUS number
);
2、创建实体类
public class SysUser {

	private String id;
	private String username;
	private String email;
	private String password;
	private String phoneNum;
	private Integer status;
3、创建Dao、service
SysUserDao.java
package com.ssm.dao;

import org.apache.ibatis.annotations.Select;

import com.ssm.domain.SysUser;

public interface SysUserDao {

	@Select("select * from sys_user where username = #{username}")
	public SysUser findUserByName(String username);
}
SysUserService.java接口
package com.ssm.service;

import org.springframework.security.core.userdetails.UserDetailsService;

/**
 * 接口必须继承spring security需要的Service类型
 * @author wingz
 *
 */
public interface SysUserService extends UserDetailsService {


}
SysUserServiceImpl.java
package com.ssm.service.impl;

import java.util.ArrayList;
import java.util.List;

import org.springframework.beans.factory.annotation.Autowired;
import org.springframework.security.core.authority.SimpleGrantedAuthority;
import org.springframework.security.core.userdetails.User;
import org.springframework.security.core.userdetails.UserDetails;
import org.springframework.security.core.userdetails.UsernameNotFoundException;
import org.springframework.stereotype.Service;
import org.springframework.transaction.annotation.Transactional;

import com.ssm.dao.SysUserDao;
import com.ssm.domain.SysUser;
import com.ssm.service.SysUserService;

@Service
@Transactional
public class SysUserServiceImpl implements SysUserService {

	@Autowired
	private SysUserDao userDao;

	/**
	 * spring security进行用户登录的方法
	 * 如果查询到用户,返回spring security自定义的user对象
	 * 如果没有查询到用户,返回null,spring security就会知道登录失败
	 */
	public UserDetails loadUserByUsername(String username) throws UsernameNotFoundException {
		SysUser sysUser = userDao.findUserByName(username);
		if (sysUser != null) {
			List<SimpleGrantedAuthority> list = new ArrayList<>();
			list.add(new SimpleGrantedAuthority("ROLE_USER"));
			User user = new User(sysUser.getUsername(), "{noop}" + sysUser.getPassword(), list);
			return user;
		}
		return null;
	}

}
4、创建spring security的配置类
SecurityConfig.java : 用来进行spring security的配置,相当于配置文件application-security.xml
package com.ssm.config;

import org.springframework.beans.factory.annotation.Autowired;
import org.springframework.context.annotation.Configuration;
import org.springframework.security.config.annotation.authentication.builders.AuthenticationManagerBuilder;
import org.springframework.security.config.annotation.web.builders.HttpSecurity;
import org.springframework.security.config.annotation.web.configuration.EnableWebSecurity;
import org.springframework.security.config.annotation.web.configuration.WebSecurityConfigurerAdapter;

import com.ssm.service.SysUserService;

/**
 * spring security的配置类 该类用来创建过滤器链对象
 *
 * @author wingz
 *
 */
@Configuration
@EnableWebSecurity // 注册过滤器链
public class SecurityConfig extends WebSecurityConfigurerAdapter {

	@Autowired
	private SysUserService userService;
	/**
	 * 认证方法
	 */
	public void configure(AuthenticationManagerBuilder auth) throws Exception {
		super.configure(auth);//不能删除
		//让spring security使用自定义的service层方法
		auth.userDetailsService(userService);
	}

	@Override
	public void configure(HttpSecurity http) throws Exception {
		http.authorizeRequests()
				//放行的操作
				.antMatchers("/index.jsp", "/login.jsp", "/login.do", "/pages/aside.jsp", "/pages/header.jsp",
						"/css/**", "/img/**", "/plugins/**")
				//配置其他页面以及权限
				.permitAll().anyRequest().authenticated().and().csrf().disable().formLogin().loginPage("/login.jsp")
				.loginProcessingUrl("/login.do").successForwardUrl("/pages/main.jsp").failureForwardUrl("/failer.jsp")
				.permitAll();
	}

}
SecurityWebInit.java : 用来进行注册过滤器链,相当于web.xml中配置过滤器以及加载配置文件
package com.ssm.config;

import org.springframework.security.web.context.AbstractSecurityWebApplicationInitializer;

/**
 * 该类作用是将过滤器链对象添加到web容器中
 *
 * @author wingz
 *
 */
public class SecurityWebInit extends AbstractSecurityWebApplicationInitializer {

}
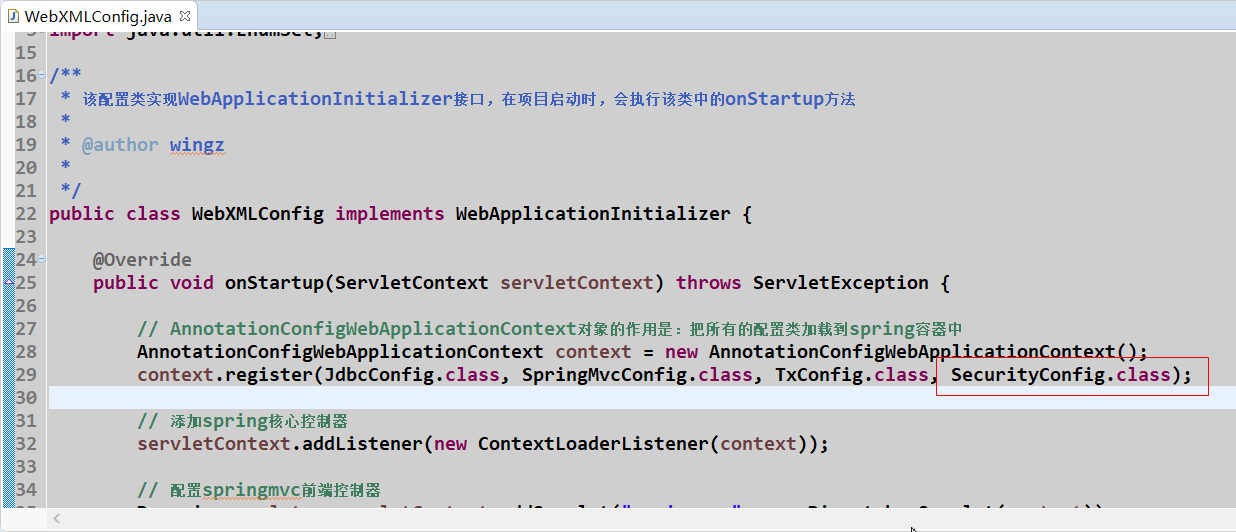
5、将spring security的配置注册到web.xml中
五、基于security的用户登录的认证和授权
1、用户退出的方法
用户登录和退出的方法都在spring security的配置文件中配置,配置如下:
SecurityConfig.java

2、添加其他表结构以及实体类(角色、权限)
---系统角色表
CREATE TABLE sys_role(
id varchar2(32) default sys_guid() primary key,
roleName VARCHAR2(50),
roleDesc VARCHAR2(50)
);
---系统用户角色对应关系表
CREATE TABLE user_role(
userId varchar2(32),
roleId varchar2(32),
PRIMARY KEY (userId,roleId),
FOREIGN KEY (userId) REFERENCES sys_user(id),
FOREIGN KEY (roleId) REFERENCES sys_role(id)
);
---系统权限表
CREATE TABLE sys_permission(
id varchar2(32) default sys_guid() primary key,
permissionName VARCHAR2(50) ,
url VARCHAR2(50)
);
---系统角色权限对应关系表
CREATE TABLE role_permission(
permissionId varchar2(32),
roleId varchar2(32),
PRIMARY KEY (permissionId,roleId),
FOREIGN KEY (permissionId) REFERENCES sys_permission(id),
FOREIGN KEY (roleId) REFERENCES sys_role(id)
);
public class SysRole {

	private String id;
	private String roleName;
	private String roleDesc;
	private List<SysPermission> permissions;
	private List<SysUser> users;
public class SysPermission {

	private Integer id;
	private String permissionName;
	private String url;
	private Integer pid;
	private List<SysRole> roles;
3、用户的添加和列表的展示
4、